Hamilton Beach Roaster Oven User Manual | Recipes and Operating Tips

Content
Introduction of Hamilton Beach Roaster Oven
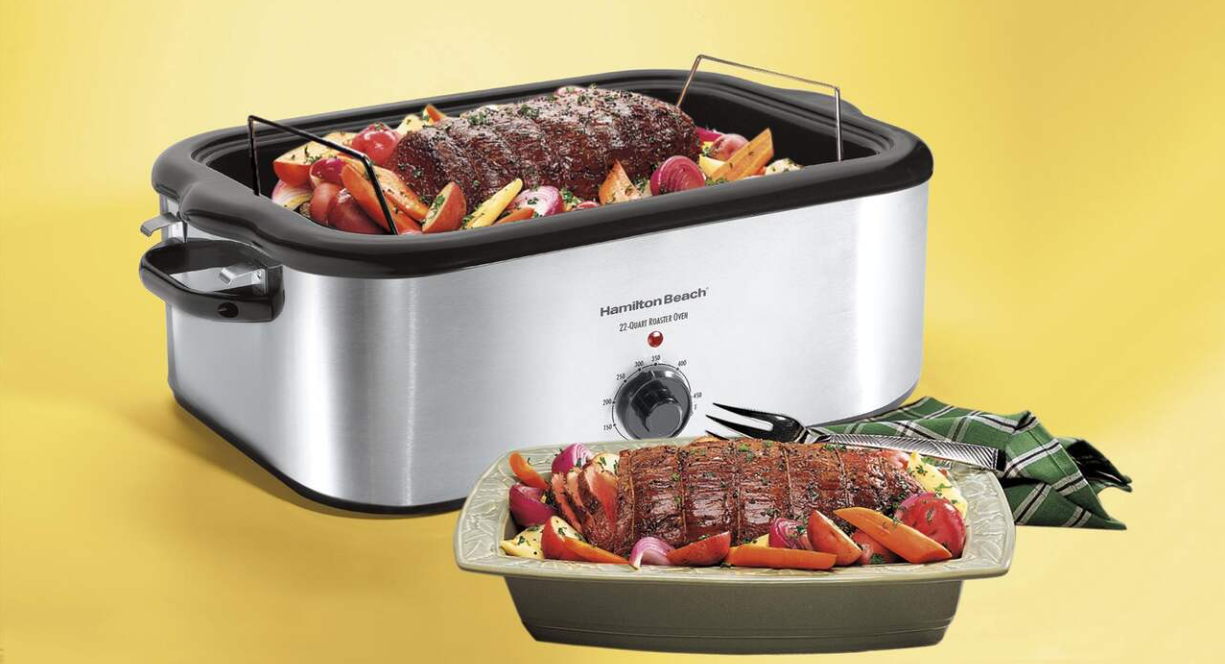
The HamiltonRoaster Oven is a versatile and convenient kitchen appliance that can help you cook and roast your favorite dishes with ease. This countertop oven is perfect for busy families, small kitchens, or anyone who wants to save time and energy in the kitchen. With an estimated price range of $50 to $100 and launching date of 2021, this product is a great investment for any home cook.
Detailed Specifications
The Hamilton Beach Roaster Oven has the following key features:
- 3-quart capacity that can accommodate a 24-pound turkey
- Adjustable temperature control from 150 to 450 degrees Fahrenheit
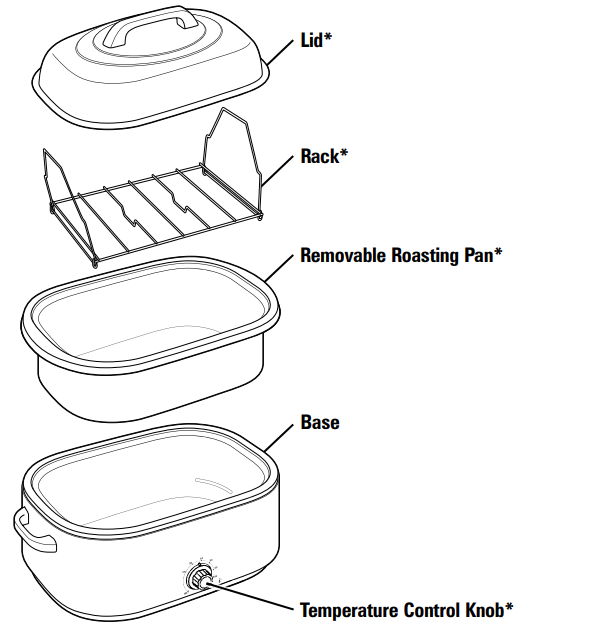
- Removable steel roasting pan and rack for easy cleaning
- Stay-cool handles for safe handling
- Cooks up to 28% faster than a traditional oven
- Lid holder for safe and easy lifting
- Indicator light for when the oven is on
- Dishwasher-safe parts for easy cleanup
- Measures 16.26 x 14.88 x 10.24 inches
- Weighs 12.35 pounds
Description of Hamilton Roaster Oven
The Hamilton Beach Roaster Oven is a compact and efficient alternative to a traditional oven. It has a spacious 3-quart capacity that can fit a 24-pound turkey, making it perfect for holiday meals or family gatherings. The adjustable temperature control allows you to cook a variety of dishes, from roasted vegetables to baked goods. The removable steel roasting pan and rack make cleanup a breeze, and the stay-cool handles ensure safe handling. The lid holder also provides a convenient and safe place to rest the lid while you're checking on your food. With its fast cooking time and energy-saving benefits, the Hamilton Beach Roaster Oven is a must-have for any kitchen.
Parts and Features

*To order parts
- US: 1.800.851.8900
https://hamiltonbeach.com/ - Canada: 1.800.267.2826
- Mexico: 01 800 71 16 100
BEFORE FIRST USE: Wash the roasting pan, rack, and lid in hot, soapy water. Rinse and dry. During the first use of the roaster oven, some smoke and odor may be noticed. The smoke and odor should not occur after this first heating of the oven.
Setup Guide of Hamilton Beach Roaster Oven
Setting up the Roaster Oven is easy. First, make sure you have enough space on your countertop or table. Then, plug in the oven and let it preheat to your desired temperature. Place your food in the removable roasting pan and rack, and then place it in the oven. Make sure the lid is securely in place. Set the timer and wait for your food to cook. When your food is done, use the stay-cool handles to remove the pan and rack. Let the food rest for a few minutes before serving.
Using Your Roaster Oven
WARNING: Burn Hazard. Escaping steam may cause burns. Use hot mitts to protect hands when removing roasting pan, rack, baking pan, or cooked food.
- Make sure temperature control is turned to MIN. Plug cord into outlet.
- Remove rack. Leave roasting pan in roaster oven.
- Set temperature control to desired setting and let preheat 15 minutes with lid on.Place food to be cooked in a pan on the rack (or directly in the roasting pan). Then place rack in oven and replace the lid.
Place food to be cooked in a pan on the rack (or directly in the roasting pan). Then place rack in oven and replace the lid.

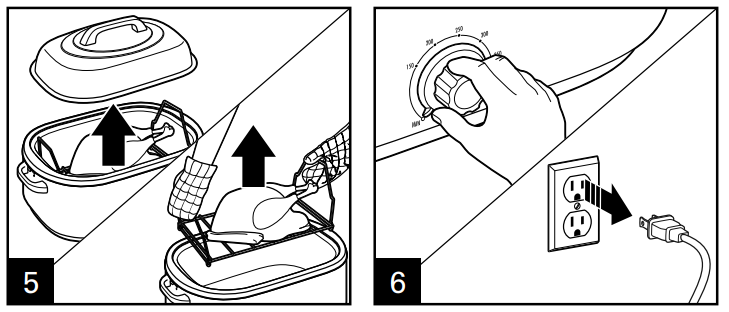
- When finished cooking, remove lid. Wearing oven mitts, remove food by using the rack.
Turn temperature control to MIN and unplug.

NOTE: The roasting pan should always be placed in the roaster base when cooking.
Tips for UsingHamilton Beach Roaster Oven
- Before baking or roasting in the roaster oven, make sure the pan or dish you plan to use will fit by placing it in the roasting pan. Most heat-resistant glass casserole dishes fit in the roaster oven.
- The roasting pan must always be used when cooking in the roaster oven. If cooking large quantities of soups or stews, the roasting pan may be used as the cooking pan in the roaster base. It may also be used as a large roasting pan in the roaster base.
- Do not use the roasting pan as a baking pan or casserole dish for cakes, breads, or casseroles. A separate pan must be placed in the roasting pan when cooking these foods.
- Baking pans and casserole dishes should be placed on the rack for best heat circulation. If necessary, the rack can be removed to fit a large roasting pan or two casseroles in roaster oven.
- Foil oven roasting bags can be used in the roaster oven. We do not recommend using plastic oven roasting bags in the roaster oven.
- Do not remove the lid of the roaster oven unless necessary. Removing the lid allows heat to escape and affects the temperature of the roaster oven.
- Unless otherwise instructed, preheat roaster oven for 15 minutes to the temperature stated in recipes.
- If a recipe calls for the use of a baking pan or dish, take the rack out of the roaster oven. Preheat oven to desired temperature. Then place pan on the rack and then place both into the roaster oven. Bake as instructed in recipe. The rack makes it easier to place or remove pans or dishes in the hot roaster oven.
Following are pan sizes which will fit in the roaster oven
- One 9- x 13-inch (23 x 33 cm) baking or 10- x 14-inch (25 x 36 cm) roasting pan
- Two 9- x 5-inch (23 x 13 cm) or 8- x 4-inch (20 x 10 cm) loaf pans
- One tube or bundt pan
Roasting Meats and Poultry
- We recommend the use of a meat thermometer to ensure perfectly cooked roasts and poultry every time. If using a meat thermometer, the meat or poultry should be removed from the roaster oven when the thermometer reading is 5 to 10 degrees below the desired temperature. The internal temperature will continue to rise after
the meat has been removed from the roaster oven. - Most hams sold today are labeled as “Cook Before Eating” or “Fully Cooked.” Ham labeled “Cook Before Eating” has been smoked or cured but NOT cooked. This ham must be thoroughly cooked to
an internal temperature of 155º to 160°F (68º to 71ºC). The “Fully Cooked” hams have been smoked or cured and already cooked. The ham does not require further cooking, but heating to 140°F (60ºC) improves the flavor. - The roaster oven cooks turkeys in less time than conventional ovens. A 25- to 28-pound (11.3–12.7 kg) unstuffed turkey will cook in approximately 3 1/2 to 4 hours. A turkey cooked in the roaster oven is moist and juicy, but is lighter brown than a conventional oven roasted turkey. To enhance the appearance, use the Turkey Browning Sauce in the “Recipe” section.
- The Roasting Chart lists cooking times for tender cuts of meat that are usually dry-roasted. These roasts are from the rib or sirloin area. To tenderize cuts from the leg (ham) or shoulder/chuck area, cook in liquid for a longer period of time.
- Times indicated are approximate and should be used only as a general guideline. Individual cuts of meat and personal preference may dictate longer or shorter roasting times.
- Food must be hot enough to prevent bacterial growth. Visit foodsafety.gov for more information.
Roasting Chart
FOOD |
WT. LBS WT. KGS |
MEAT THERM. | COOK TIME (18 qt./325°F) (18 L/160ºC) | COOK TIME (22 qt./325°F) (22 L/160ºC) |
Whole Turkey | 14–18 6.4–8.2 | 180°F/82ºC | 2 to 3 hours | 2 to 3 hours |
Whole Turkey | 19–24 8.6–10.9 | 180°F/82ºC | N/A | 2 to 3 hours |
Whole Turkey | 25–28 11.3–12.7 | 180°F/82ºC | N/A | 3 1/2 to 4 hours |
Turkey Breast | 5–7 2.3–3.2 | 180°F/82ºC | 1 1/2 hours | 1 1/2 hours |
Roasting Chicken | 6–8 2.7–3.6 | 180°F/82ºC | 1 to 1 1/2 hours | 1 to 1 1/2 hours |
| Beef Roast | 5–7 2.3–3.2 | 160°F/71ºC (med.) | 2 1/2 hours | 2 1/2 hours |
Fresh Pork Roast | 5–7 2.3–3.2 | 160°F/71ºC (med.) | 2 hours | 2 hours |
Picnic Shoulder Ham (Fully Cooked) | 7–10 3.2–4.5 | 140°F/60ºC | 2 to 3 hours | 2 to 3 hours |
Whole Ham (Fully Cooked) | 15–18 6.8–8.2 | 140°F/60ºC | 2 to 3 hours | 2 to 3 hours |
NOTE: The roasting chart is for reference only. Follow package directions or USDA recommendations. Visit www.foodsafety.org for more information on safe internal cooking temperatures.
Baking
The roaster oven can bake your favorite cakes, pies, breads, or casseroles like a conventional oven. Pans and dishes should be placed on the rack for best heat circulation. Using the rack is also recommended for convenience in removing hot dishes and pans from the roaster oven.
Steaming
Preheat roaster oven to 450ºF (232ºC). To steam in the roaster oven, you will need a metal colander. Place rack in the roasting pan. Place roasting pan in roaster oven. Pour 1 quart (946 ml) boiling water into the roasting pan. Place food to be steamed in the colander and place colander in roasting pan. Cover and steam according to the chart times or until desired doneness.Do not remove the lid of the roaster oven unless necessary. Removing the lid allows heat to escape and affects the temperature of the roaster oven.
ITEM TO STEAM | AMOUNT OF TIME |
2 cauliflower heads,cut up | 10 minutes |
2 bunches of broccoli, cut up | 10 minutes |
2 pounds (907 g) shrimp | 10 minutes |
Warming Rolls and Biscuits
Preheat roaster over to 250ºF (121ºC). You will need two small ovenproof containers to hold water. Emptied and washed food cans are perfect. Fill the cans two-thirds full with hot water and place in opposite corners of the roasting pan.
Quantity Cooking
The roasting pan may be used as a large cooking utensil when cooking or heating large quantities. It may be used to simmer sauces, soups, or stews, or simply to heat or warm large quantities. When cooking or heating soups or stews in the roaster oven, stir occasionally for quicker, even heating.
Stack rolls, biscuits, or pancakes in roasting pan. Do not let them touch sides of pan. Cover and keep warm up to 1 hour.
For example, set the temperature control at 400°F (204ºC) and the roaster oven will warm vegetable beef soup from refrigerated temperature to serving temperature in about 2 hours. To cook soups, stews, or sauces, set the temperature control on 225°F (107ºC) and allow 4 to 8 hours to simmer, depending on recipe.
Cleaning

- Turn temperature control to MIN. Unplug and let cool completely.
- Wash cover, rack, and roasting pan in hot, soapy water. To remove burned-on food, let soak; then scrub with a nylon scouring pad. Rinse in hot water; then dry.
- Wipe the inside of the roaster base with a damp cloth. Wipe the outside of the roaster oven with a damp, soapy cloth; then dry.
- NOTE: The lid may discolor from the cooking process. It is a natural occurrence and does not affect performance.
WARNING: Electrical Shock Hazard. Disconnect power before cleaning. Do not immerse cord, plug, or base in any liquid. Failure to follow these instructions can result in death or electrical shock.
Hamilton Beach Roaster Oven Recipes
Unless otherwise instructed, preheat roaster oven for 15 minutes to the temperature stated in the recipe.
Cooking Recipes
Party Meatballs
- 5- pound (2.3 kg) bag pre-cooked frozen meatballs
- 12-ounce (340 g) jar grape jelly
- 12-ounce (340 g) jar currant jelly
- 12-ounce (340 g) bottle chili sauce
- 12-ounce (340 g) bottle cocktail sauce
- Let meatballs thaw overnight in refrigerator. Place meatballs in roasting pan. In a large mixing bowl, beat together jellies and sauces. Pour over meatballs. Bake at 250ºF (121ºC) for 2 hours or until heated through.
If a recipe calls for the use of a baking pan or dish, take the rack out of the oven. Preheat oven to desired temperature. Then place pan on the rack and then place both into the roaster oven. Bake as instructed in the recipe. The rack makes it easier to place or remove pans or dishes in the hot roaster oven.
Chili
- 2 tablespoons (30 ml) oil
- 2 pounds (907 g) beef chuck, cut into small pieces
- 1 pound (454 g) hot Italian sausage, removed from casings
- 1 pound (454 g) sweet Italian sausage, removed from casings
- 2 large onions, chopped
- 1 large green pepper, seeded and chopped
- 1 tablespoon (15 ml) minced garlic
- 4 tablespoons (59 ml) canned, sliced jalapeno peppers (half of
- 4-ounce [113 g] can)
- 4 tablespoons (59 ml) chili powder
- 2 tablespoons (30 ml) ground cumin
- 1 teaspoon (5 ml) black pepper
- 2 (16-ounce [454 g]) can kidney beans
- 28- ounce (794 g) can diced tomatoes, undrained
- 12-ounce (340 g) can tomato paste
- 2 (15-ounce [425 g]) cans chicken broth
Set temperature dial to 400ºF (204ºC). In roasting pan, heat the oil. Add the beef and sausage and cook about 20 minutes. Add the onions, pepper, garlic and jalapeno and cook 5 minutes. Stir in remaining ingredients. Reduce temperature to 275ºF (135ºC). Cover and bake for 2 hours, stirring halfway though. Makes 5 quarts (4.7 L).
Hamilton Beach Roaster Oven Warranty
This product is warranted to be free from defects in material and workmanship for a period of five (5) years from the date of original purchase in Canada and one (1) year from the date of original purchase in the U.S. During this period, your exclusive remedy is repair or replacement of this product or any component found to be defective, at our option; however, you are responsible for all costs associated with returning the product to us and our returning a product or component under this warranty to you. If the product or component is no longer available, we will replace with a similar one of equal or greater value.
Troubleshooting
Here are some common problems and solutions for the Roaster Oven
- If the oven is not heating up, make sure it is plugged in and the temperature control is set to the desired temperature. If the problem persists, contact Hamilton Beach customer service.
- If the food is cooking unevenly, make sure the oven is preheated to the correct temperature and the food is placed in the center of the roasting pan. If the problem persists, rotate the pan halfway through cooking.
- If the oven is smoking, make sure there is no food debris on the heating element or the bottom of the oven. If the problem persists, contact Hamilton Beach customer service.
- Always use oven mitts or pot holders when handling the oven, as the exterior can become hot during use.
Pros & Cons of Hamilton Beach Roaster Oven
Pros
- Cooks up to 28% faster than a traditional oven
- Saves energy and counterspace
- Removable parts for easy cleanup
- Spacious capacity for large meals
- Adjustable temperature control
Cons
- May take some time to preheat
- Can be heavy to move around
- May not cook some dishes as evenly as a traditional oven
Customer Reviews about Hamilton Beach Roaster Oven
Customers love the Roaster Oven for its convenience, versatility, and fast cooking time. They appreciate the spacious capacity and easy cleanup. However, some customers have noted that the oven can take some time to preheat and may not cook some dishes as evenly as a traditional oven. Overall, the Hamilton Beach Roaster Oven is a great investment for any home cook.
Faqs
How does a Hamilton Beach Roaster Oven operate and what is it?
For the first time, how should I operate the Hamilton Beach Roaster Oven?
Is it possible to bake in my Hamilton Beach Roaster Oven?
How should my Hamilton Beach Roaster Oven be cleaned?
I can't get my Hamilton Beach Roaster Oven to heat up. How should I proceed?
How do I keep the food in my roasting oven from drying out?
Can food in a Hamilton Beach Roaster Oven be overdone?
What are some pointers for using my Hamilton Beach Roaster Oven to its full potential?
If damaged, can the cooking pan and rack be replaced?
What guarantee is included with the roaster oven from Hamilton Beach?
Leave a Comment
