How to Connect & Operate: Hauppauge HD PVR Rocket Instruction Manual
Content
Introduction of Hauppauge HD PVR Rocket
The HD PVR Rocket is a portable video capture device designed for gamers and content creators. This device allows you to record high-definition video from game consoles, such as Xbox, PlayStation, and Wii U, as well as other HDMI and component video sources. The HD PVR Rocket is compact, easy to use, and comes with powerful software for video editing and sharing. With an estimated price of $160 USD and a launch date of 2014, the HD PVR Rocket is a popular choice for those looking to share their gaming experiences and create high-quality video content.
Detailed Specifications of HD PVR Rocket
Here are the detailed specifications of the Hauppauge HD PVR Rocket
- Interface: USB 2.0
- Video Input: HDMI, Component
- Audio Input: Stereo
- Video Output: HDMI
- Maximum Video Resolution: 1080p
- Dimensions: 4.6 x 3.5 x 1.1 inches
- Weight: 9.6 ounces
- System Requirements: Windows XP/Vista/7/8/10, Mac OS X 10.5 or higher
- Included Software: ArcSoft ShowBiz, Hauppauge Capture
Description of Hauppauge PVR Rocket
The PVR Rocket is a powerful and portable video capture device, perfect for gamers and content creators. With its compact size and USB 2.0 interface, the HD PVR Rocket can be taken anywhere and used to record high-definition video from a variety of sources, including game consoles, set-top boxes, and camcorders. The HD PVR Rocket supports HDMI and component video inputs, and features stereo audio input for the highest quality sound. The device is capable of recording video at resolutions up to 1080p, and comes with powerful software for video editing and sharing.
Setup Guide of Hauppauge HD PVR Rocket
Setting up the Hauppauge HD PVR Rocket is easy and straightforward. Simply connect the device to your computer using the included USB cable, and then connect your video source to the HD PVR Rocket using an HDMI or component video cable. Next, install the included software, which includes ArcSoft ShowBiz and Hauppauge Capture, and follow the on-screen instructions to configure the device. Once the HD PVR Rocket is configured, you can begin recording high-definition video and audio from your video source.
Overview of Hauppauge PVR Rocket
- The Hauppauge HD PVR Rocket records video in HD from an HDMI video camera, PC or video game console or cable or satellite set top box. There are two modes of operating with the Rocket: stand-alone and PC-connected.
- In the ‘stand-alone’ mode, recordings are made directly to a USB thumb drive plugged into the front of the Rocket. You can plug in a microphone to the front of the Rocket and add commentary to your recordings.
- In the ‘PC connected’ mode, the Rocket can be plugged into a USB port on a Windows PC and recordings are made directly to the PC’s hard drive. Hauppauge Capture is supplied with the Rocket and was designed to record videos, trim them and upload to YouTube. Hauppauge Capture includes StreamEez to stream on Twitch and YouTube.
- You can plug in a microphone to the front of the Rocket and add commentary to your Hauppauge Capture recordings, or you can plug in any PC microphone (USB or any other PC microphone) to add commentary into your recordings.
- HD PVR Rocket recordings are made in a compressed H.264 format. It can record from HDMI or Component Video (also called YPrPb). You can also record S-Video or composite video using and optional A/V cable (you can purchase this on the Hauppauge Webstore). It will record at 1080p30, 720p or 480p at datarates from 1Mbit/sec up to 13.5Mbits/sec.
Note: if you are recording from a cable or satellite box, it is recommended that
you use Component Video. Many cable and satellite set top boxes (though not all) do not allow recording from the HDMI port.
Audio can be supplied to the HD PVR Rocket from HDMI or stereo audio connectors on the Hauppauge AV cable. Recorded audio is two channel stereo audio.
There are two types of HD PVR Rocket record formats
- TS: This is a native H.264 format. TS files are often used to burn Blu-ray discs. The TS files recorded with the HD PVR Rocket can be edited with most video editors.
- MP4: this is the video recording format when the Rocket is used stand-alone. MP4 is also encoded with H.264
Operating HD PVR Rocket in Stand Alone mode
HD PVR Rocket can be operated without being connected to a computer. To do this
- Plug the Type-B black end of the supplied ”Y” cable into the back of the Rocket.
- Plug the Type-A black end of the supplied ”Y” cable into a USB 2.0/3.0 port on a PC or a 5V .8 amp minimum power adapter (the same type of power adapter used to charge phones and tablets). If you plug the supplied ”Y” cable into a PC, we recommend that you plug in both the red and black Type-A connectors into two USB ports.
- Plug a USB thumb drive formatted as NTFS or FAT32 into the USB slot on the front of the HD PVR Rocket. We have also tested USB-connected SSD drives up to 1TB.
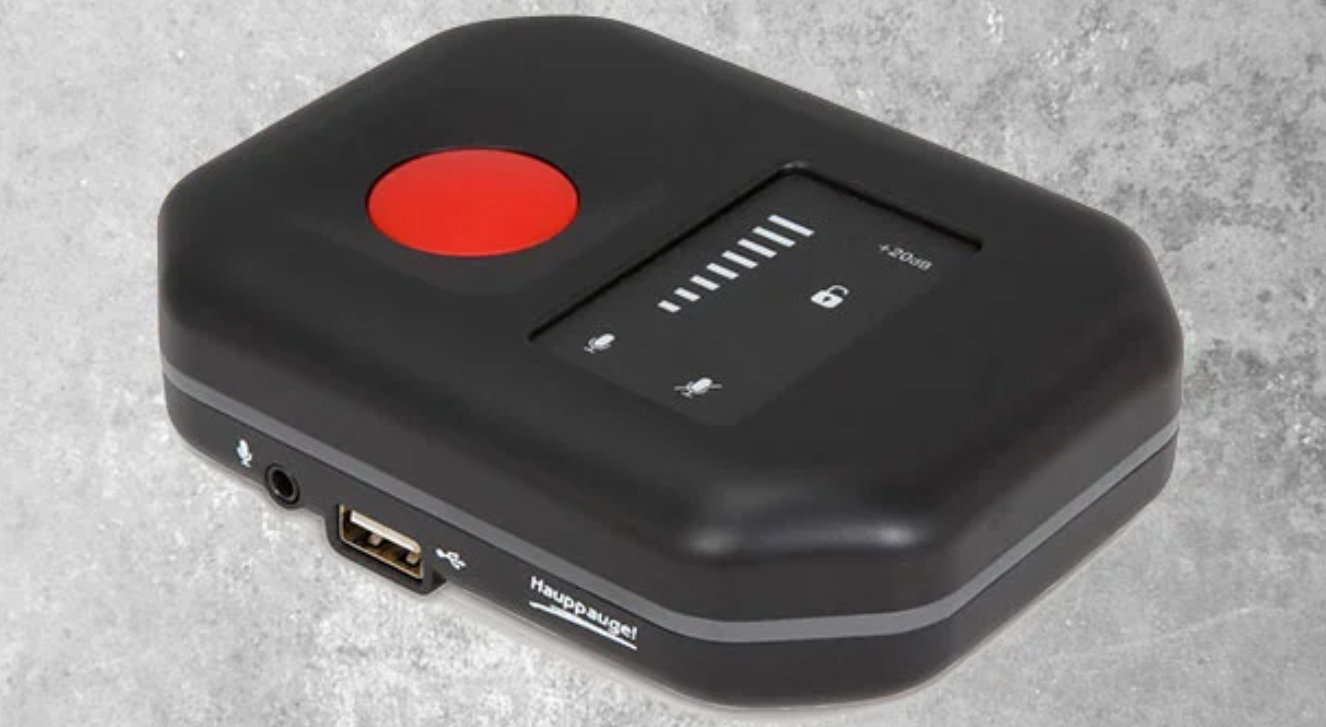
- Optional: connect your microphone into the Microphone input jack on the front of the Rocket. You can adjust the microphone volume with the mixer on top of the Rocket. Make sure you unmute the microphone and unlock the control panel when making changes.
- Hit the record button to start recording, and once again to stop recording.
- After recording, do not remove the USB thumb drive until the blinking green light becomes solid green. This indicates that the recording is complete.
You can change the bit rate of your stand alone recordings in Hauppauge Capture. When you make changes in Hauppauge Capture (bit rate, microphone and game audio levels), they are saved to the Rocket when you close the Hauppauge Capture application.
Operating HD PVR Rocket in the PC-connected mode
- Connect the HD PVR Rocket to your PC
Plug the Type-B black end of the supplied ”Y” cable into the back of the Rocket. Plug the Type-A black end of the supplied ”Y” cable into a USB 2.0/3.0 port on a PC. - Connect HD PVR Rocket to your video source
You can use either HDMI, Component video or Composite video. When using HDMI, connect our video source to the HDMI In port on the Rocket. - Connect HD PVR Rocket to your TV monitor
Connect the HD PVR Rocket HDMI Out port to your TV monitor. - Install Hauppauge Capture
You can find the Hauppauge Capture download plus how-to videos and user guides at: www.hauppauge.com/capture
The Hauppauge Capture installer is downloaded to your Downloads directory. It will be called hauppaugecapture_1_1_zzzzz.exe where zzzzz is the version number.
Run this file to start the installation. - Use Hauppauge Capture to record and trim your videos
After installing Hauppauge Capture, you will see the Hauppauge Capture icon on your Windows desktop. Click this icon to start Hauppauge Capture.
Using Hauppauge Capture
After restarting your PC, you will see the Hauppauge Capture icon on your Windows desktop. Click this icon to start Hauppauge Capture.
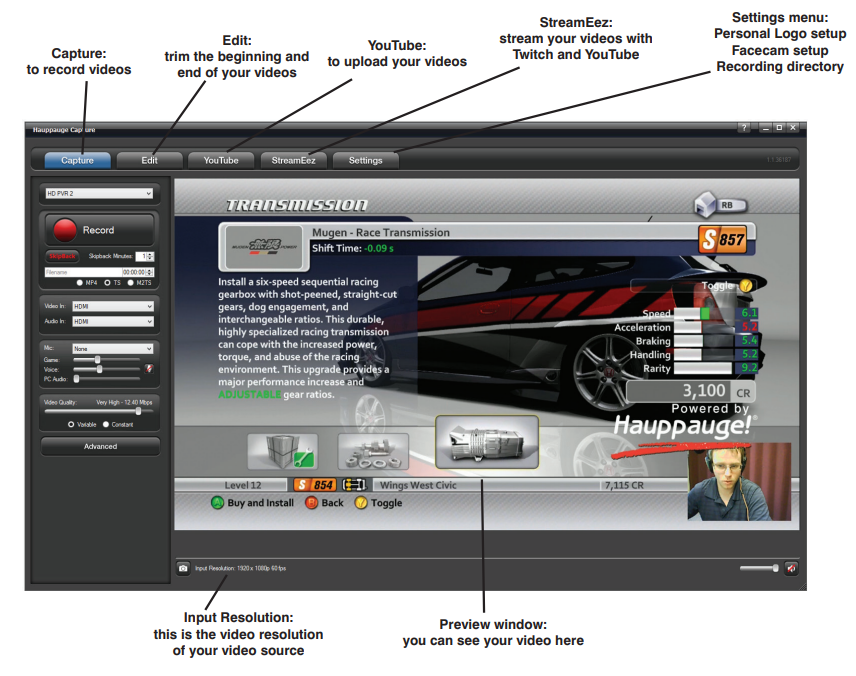
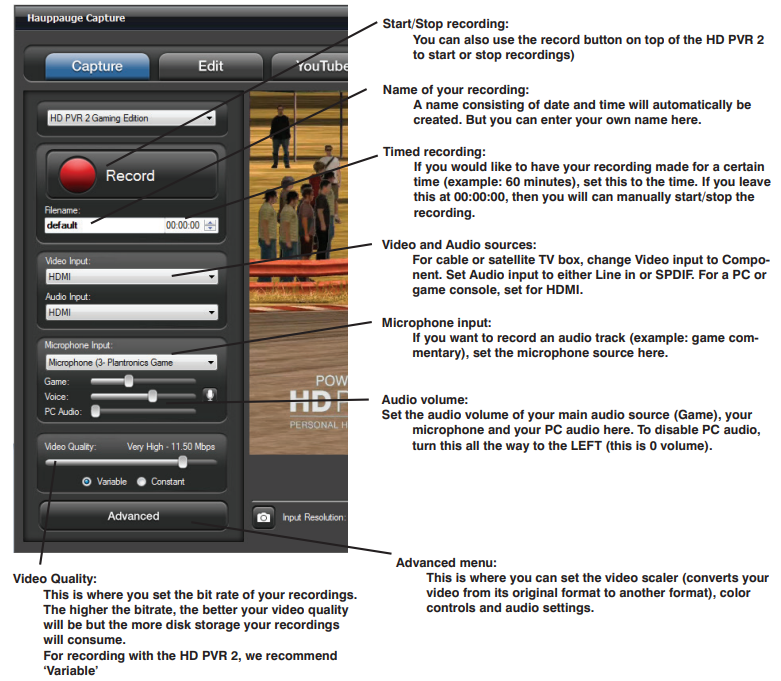
Capture tab of Hauppauge HD PVR Rocket
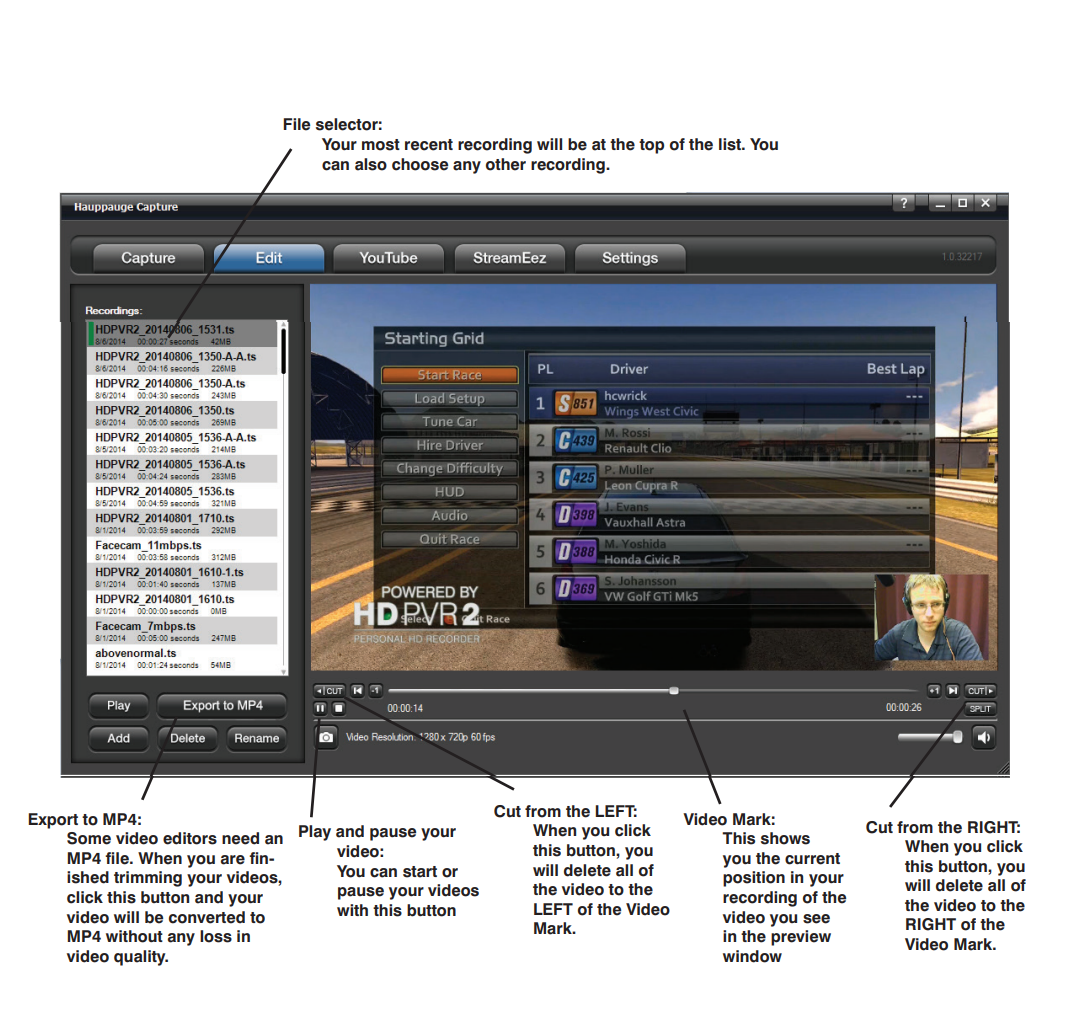
Edit tab of Hauppauge HD PVR Rocket
The Edit tab uses a fast cut and trim, which is very fast and preserves the video quality of your recording
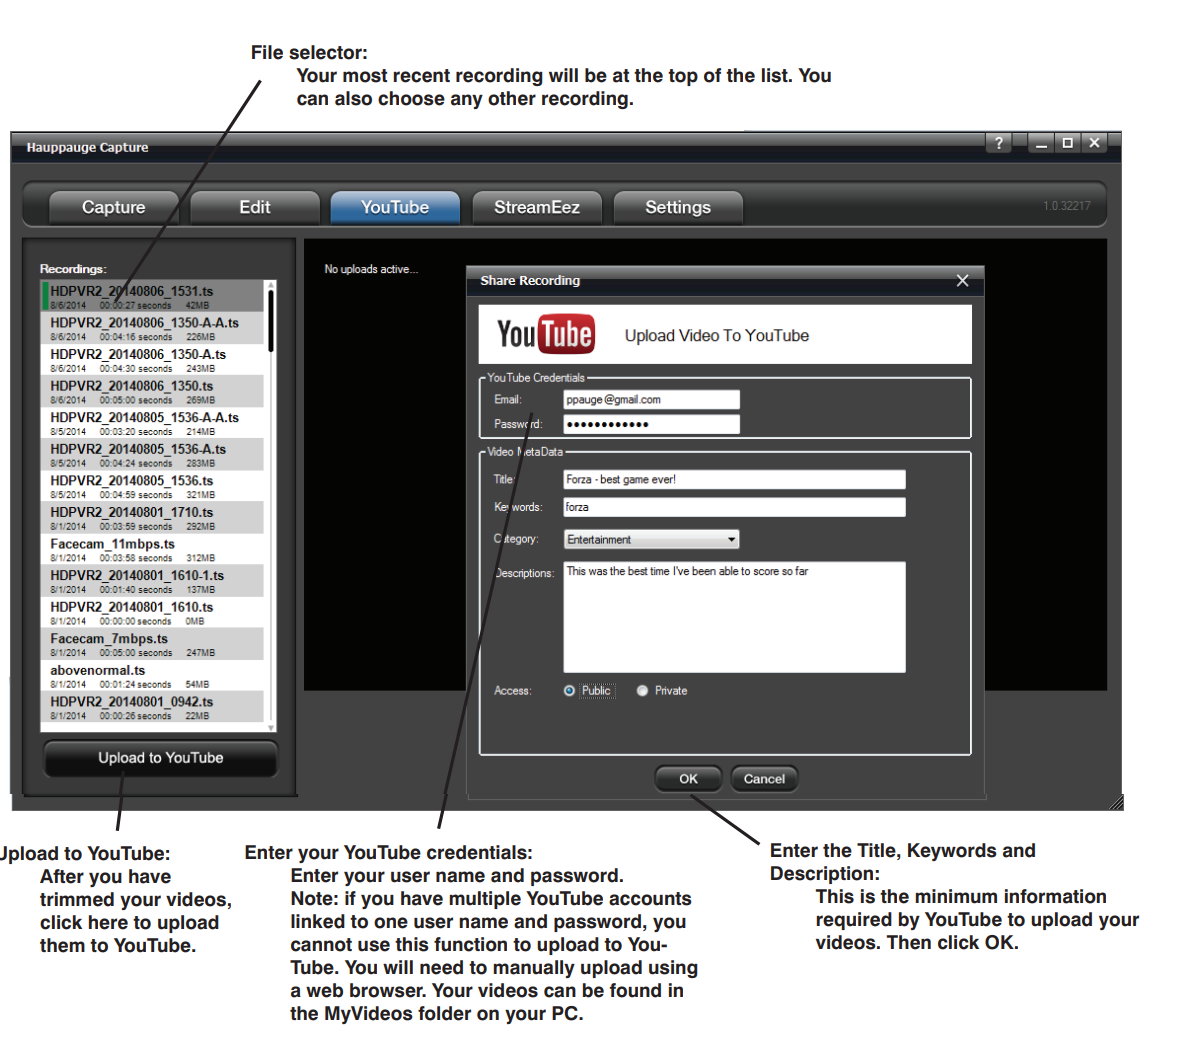
YouTube tab of HD PVR Rocket
The YouTube allows you to enter your YouTube credentials and quickly upload your video recordings to your YouTube channel.
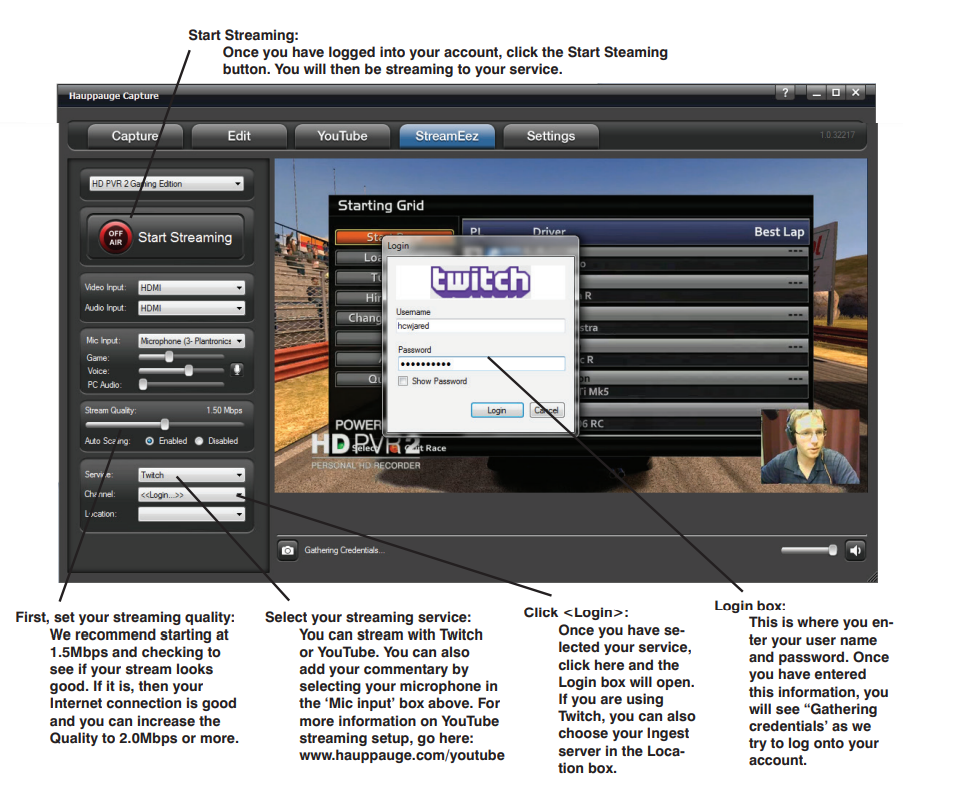
StreamEez tab of Hauppauge
Live stream with your logos and microphone commentary on Twitch and YouTube.
Troubleshooting
What do the lights on front of HD PVR Rocket mean?
- Greenlight: In PC-connected mode, when HD PVR Rocket is powered on and the Windows driver is running, the green light is on. It is ready to record or stream.
- Red record ring: indicates that HD PVR Rocket is recording or streaming video.
- Blinking red: In stand-alone mode, blinking red means the Rocket isn’t seeing a USB thumb drive or your thumb drive is not properly formatted (see below).
- Blinking blue: Blinking blue means the Rocket isn’t seeing video or your video is out of range.
There are some things you can do to fix this
First, when PC is connected, make sure you have plugged BOTH the red and black USB Type-A connectors into two USB ports.
Next, check your video connections. If you are recording from HDMI, unplug the HDMI cable and replug it. Make sure that your video source does not have HDCP copy protection. If you are using Composite video, check to make sure the Yellow composite video connection is going to the Blue Component video connector. If you are recording from a PC, make sure the HDMI output is enabled (normally you have to hit the F4 key to turn on the HDMI port.
Next, if you are using Yellow composite video, update your Rocket to the latest firmware since not all Rocket firmware supports Composite video (but the latest firmware added this support). In all cases, flashing the firmware can sometimes correct video issues as well.
Are you getting low audio volume in your Rocket recordings?
If you find that the audio is too low after recording in standalone mode, download and install the Hauppauge Capture application. After installation, open Hauppauge Capture. Make sure the Rocket is listed as the source (you should see HD PVR Rocket listed). Then increase the Game audio volume in Hauppauge Capture with the slider. Now close Hauppauge Capture to save the new audio volume setting and you’re record-ings will have increased audio volume.
Does your Rocket keep blinking red even though you have a USB thumb drive plugged in?
If the Rocket keeps blinking red even though you have a USB thumb drive (flash drive) plugged in, your thumb drive might not be formatted as NTFS. Try reformatting the thumb drive on a PC: inserting the thumb drive into a USB port on your PC and then when the drive is assigned a drive letter, right-click on the drive and choose Format (choose NTFS or FAT32).
The red light will also blink if your USB thumb drive is corrupt. Most times this can be easily fixed by plugging your thumb drive into a Windows PC and running Error Check. To do this: insert the thumb drive into a USB port on your PC and then open File Manager. Select your thumb drive. Right-click on the thumb drive and select Properties > Tools > Error check and click Check. When the scan is complete, your USB thumb drive will be ‘clean’ and should work in the Rocket.
No video in the Hauppauge Capture preview window
- Make sure HD PVR Rocket is listed in the Capture tab. If not, then please check your USB cables and make sure the blue light is on on the front of HD PVR Rocket. If you cannot see HD PVR Rocket listed, reinstall Hauppauge Capture. Power cycle the Rocket and reboot your PC after reinstalling the drivers.
- Check the video mode of your console. It must be set at either 1080p60 or 720p. If you are using a PC game system, check our website at:https://www.hauppauge.com/pages/support/support_hdpvr2.html#pcrecording
- Check your cables. Remove each cable and make sure it’s firmly reseated into each device you are using. If using HDMI cables, try swapping the HDMI cables.
- Check the Video input setting. If the Video input setting is wrong, you will get a black preview window. Set Video input to Component video for a cable or satellite box and HDMI for all other devices. Is the yellow light on on the front of HD PVR Rocket? If the yellow light is not on, then either you have the wrong Video input source set or your game console is not turned on.
- If using HDMI, verify your source device does not use HDCP copy protection. If your video source has HDCP copy protection, you will see a black screen.
If capture fails, it is likely something is wrong with the video input to HD PVR Rocket. This could be a broken or loose video cable or you plugged the cables into the wrong connection.
Pass through video problems
- No video on my TV set
Open Hauppauge Capture and verify the correct Video input is selected. Video and audio input must be set initially for passthrough to work (if you power cycle the HD PVR 2, it may revert to its default setting and will need to be set again). Also, check the video mode on your PS3 or Xbox 360. The video mode should be 1080p or 720p. - No video on my TV set but I can see video in the Capture tab
Check that the HDMI cable from the HD PVR 2 (HDMI out) is connected to your TV monitor and the TV is set to the correct HDMI port if multiple are available on your TV. Try changing the output resolution from your game console. Some TV monitors may not support all HDMI output resolutions. - Wrong colors with Component Video
Check the Component video cable: unplug and replug the Red, Green and Blue video cables. Make sure the Red audio cable is not plugged into the Red video cable.
Pros & Cons of Hauppauge HD PVR Rocket
Pros
- Compact and portable design
- High-definition video recording at up to 1080p
- Supports HDMI and component video inputs
- Powerful software for video editing and sharing
- Affordable price
Cons
- No built-in battery, requires external power
- Limited compatibility with some game consoles
- USB 2.0 interface may be slow for large video files
- No included HDMI or component video cables
Customer Reviews about HD PVR Rocket
Customers have praised the HD PVR Rocket for its compact and portable design, high-definition video recording capabilities, and powerful software for video editing and sharing. However, some have criticized the device for its lack of a built-in battery, limited compatibility with certain game consoles, and slow USB 2.0 interface. The most common complaints about the HD PVR Rocket include issues with audio syncing and difficulty setting up the device with certain video sources.
Faqs
Is it possible for the Hauppauge HD PVR Rocket to record and stream simultaneously?
Which resolutions can be recorded with the Hauppauge HD PVR Rocket?
How long is the gaming recording duration on the Hauppauge HD PVR Rocket?
Is an external power supply required for the Hauppauge HD PVR Rocket?
Can I edit videos that the Hauppauge HD PVR Rocket has captured?
What kind of USB disks is the Hauppauge HD PVR Rocket compatible with?
What should I do if my PC is unable to recognize my HD PVR Rocket?
Can I use the Hauppauge HD PVR Rocket to record party chat?
Where can I purchase the HD PVR Rocket from Hauppauge?
What kind of warranty does the Hauppauge HD PVR Rocket come with?
Leave a Comment