How to Operate: Hellobaby Digital Video Baby Monitor HB65 User Manual
Content
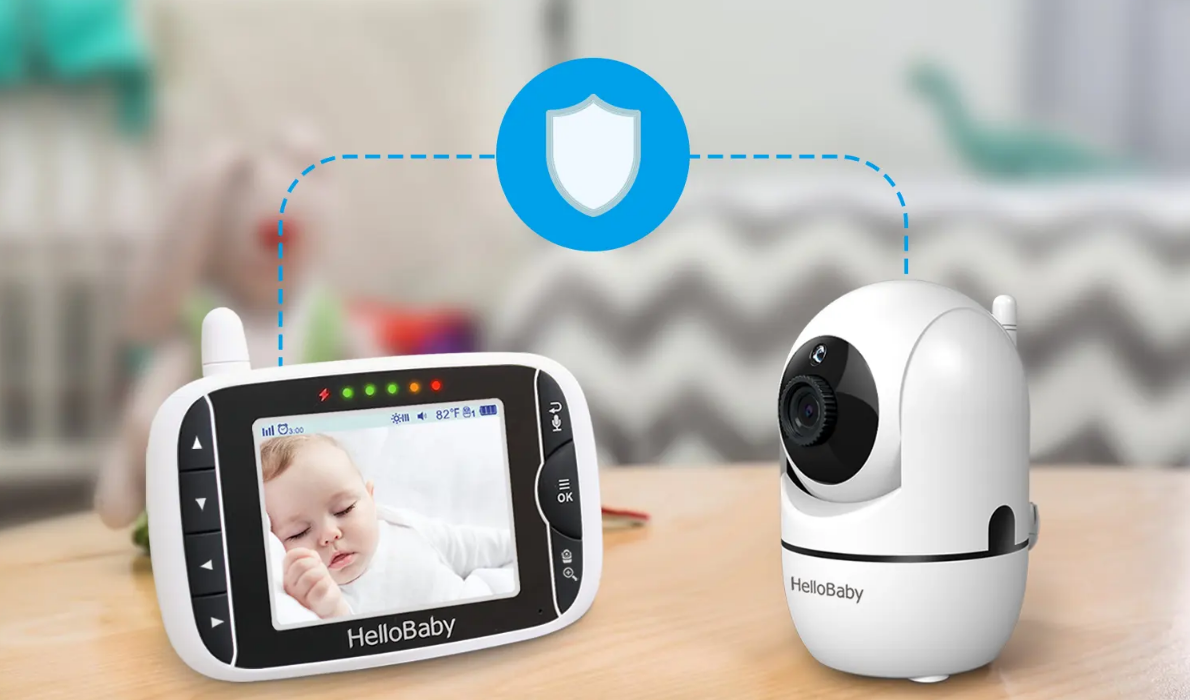
Introducing the HelloBaby Digital Video Baby Monitor HB65
The HelloBaby Digital Video Baby Monitor is a high-quality, reliable, and feature-rich baby monitor designed to help parents keep a close eye on their little ones. This monitor boasts a 3.2-inch LCD screen with a high-resolution display, ensuring crisp and clear video feedback. It operates on a 2.4GHz wireless connection, providing a stable and secure connection with no interference from other devices. The estimated price of the HelloBaby Digital Video Baby Monitor is around $79.99, making it an affordable yet advanced baby monitoring solution.
Detailed Specifications
Key features of the HelloBaby Digital Video Baby Monitor include
- 3.2-inch LCD screen with high-resolution display
- 2.4GHz wireless connection providing a stable and secure connection
- Infrared night vision up to 15 feet
- Two-way audio communication
- Room temperature monitoring
- Up to 960 feet of transmission range (open field)
- Lullabies and white noise options
- Rechargeable battery with low battery alert
- Expandable up to four cameras
- Sound-activated LED lights
Product Description
The HelloBaby HB65 offers exceptional video and audio quality, allowing parents to view their babies with clarity and peace of mind. With infrared night vision, two-way audio communication, and temperature monitoring, you can ensure your baby's comfort and safety 24/7. Lullabies and white noise options help create a soothing environment for your baby, and up to 960 feet of transmission range provides flexibility in placement. Additionally, this monitor supports up to four cameras, making it an ideal choice for families with multiple children.
Please make sure you have the following in your package
- Parent unit x 1
- Camera unit x 1
- Power Adapter x 2
- User manual x 1
- Wall-mounting kit x 1
PRODUCT OVERVIEW
ICONS OVERVIEW
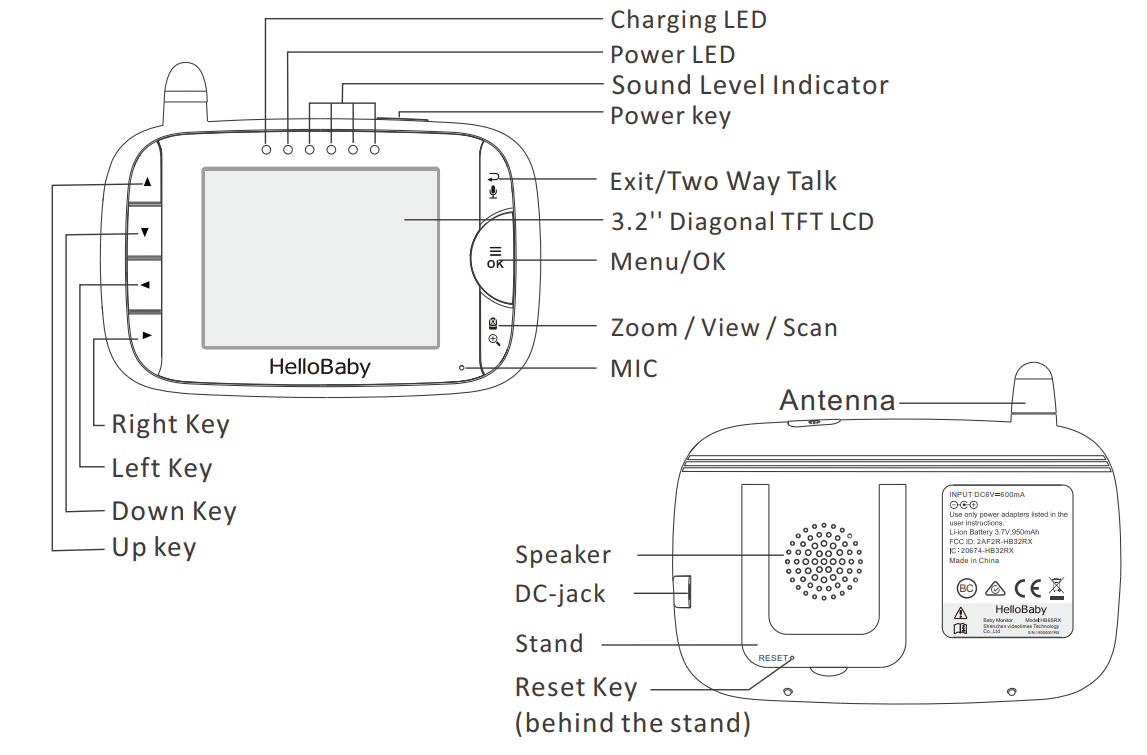
PARENT UNIT OVERVIEW
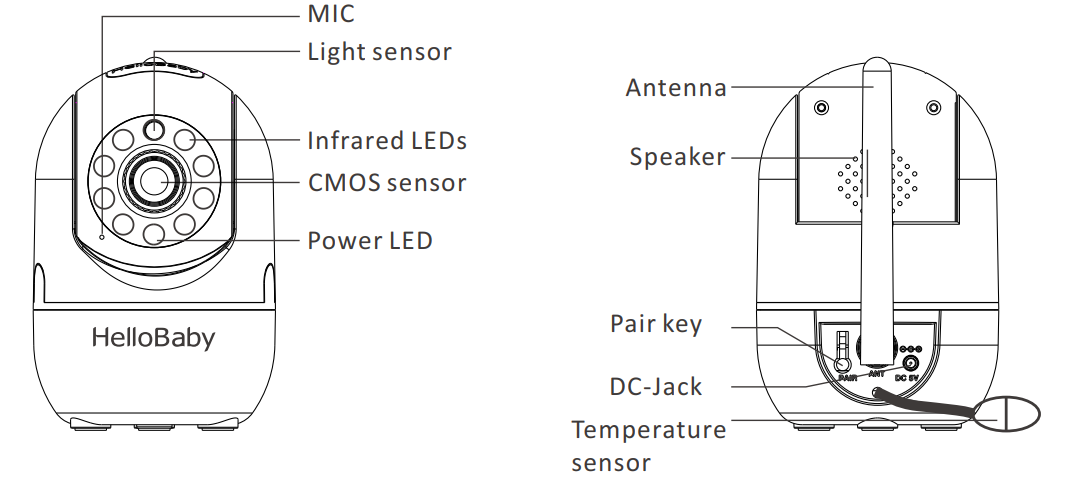
BABY UNIT OVERVIEW
Setup Guide
To set up the Digital Video Baby Monitor HB65, follow these steps
- Insert the rechargeable battery into the parent unit.
- Power on both the parent and baby units.
- Press the "MENU" button on the parent unit and select "PAIR."
- Press the "PAIR" button on the baby unit to sync the devices.
- Adjust the antenna on both units for optimal signal strength.
- Place the baby unit in your baby's room, ensuring it is within range and has a clear line of sight to the parent unit.
INSTALLATION
- To use your parent unit and camera unit together, you must be able to establish a radio link between them, and the range will be affected by environmental conditions.
- Any large metal object, like a refrigerator, a mirror, a filling cabinet, metallic doors or reinforced concrete between the baby and parent unit may block the radio signal.
- The signal strength may also be reduced by other solid structures, like walls, or by radio or electrical equipment, such as TV, computers, cordless or mobile phones, fluorescent lights or dimmer switches.
- Use of other 2.4GHz product, such as wireless networks (Wi-Fi routers), Bluetooth systems, or microwave ovens, may cause interference with this product, so keep the baby monitor away at least 5ft (1.5m) from these types of products, or turn them off if they appear to be causing interference.
PLACEMENT OF THE CAMERA UNIT
The camera can be placed at wall mount and desktop modes. Place the baby monitor away from heat sources such as radiators, chimneys, cookers and direct sunlight; place the baby unit away from TV sets, microwave oven and to ensure optimal reception.
Getting Started
TURN ON THE CAMERA UNIT
Only use the A/C adapter included in this package (5V, 1A);
- Insert the plug of the Camera Unit power adaptor into the DC socket in the back of the Camera unit.
- Insert the other end of the power adaptor into a suitable electrical outlet.
- Once the adapter is connected, the power LED will light up.
TURN ON THE PARENT UNIT
- Only use the A/C adapter included in this package (6V, 600mA);
- The parent unit is supplied with a built-in rechargeable Li-ion battery (3.7V 950mAh).
Charge the battery in the Parent Unit at least 12 hours before using for the first time or when the Parent Unit indicates that the battery is low.
- Insert the round plug of the Parent Unit's power adaptor (Output 6V 600mA) into the DC socket of the Parent Unit.
- Insert the other end of the power adaptor into a suitable electrical outlet.
- Press and hold the power key on the top of the parent unit. The battery status indicator will light up indicates that the Parent Unit is connected to the electrical outlet.
INFRARED NIGHT VISION (AUTOMATIC)
The infrared night vision function allows the camera to pick up images in dark or low light conditions. In this mode, only black and white images will be displayed on the monitor, the optimum image is 6ft (2m) distance between baby unit and object. When the camera is in night vision mode, the icon  will be displayed on the top of the screen.
Key OPERATION
- POWER SAVE/ SCREEN OFF
Short press the power key to turn on / off the screen.
 - UP ▲ KEY
Press once to tilt the camera up by one step. Press and hold to tilt continuously. - DOWN ▼ KEY
Press once to tilt the camera down by one step. Press and hold to tilt continuously. - LEFT ◀ KEY
Press once to pan the camera left by one step. Press and hold to pan continuously. - RIGHT ▶ KEY
Press once to pan the camera right by one step. Press and hold to pan continuously. - CAMERA VIEW/SCAN

Press scan key to view/scan camera; during scan mode, the scan icon
  will be displayed on the top of screen. and each camera is video will be stay on the LCD around 10 seconds then change to next camera;
 - DIGITAL ZOOM
Press and hold the key for around 2 seconds to operate zoom in/ out; - Two Way Talk

Press and hold key to enter two way talk mode. A microphone icon will be displayed on the top of the LCD screen. Release the key to stop.
Note: When you are in the two-way talk mode, the parent unit speaker is muted.
MENU OPERATION
PAIRING THE CAMERA AND PARENT UNITS
The baby unit is pre-registered to your parent unit. You do not need to register it again unless the baby unit loses its link with the parent unit. To re-register your baby unit, or register a new baby unit, follow the procedure below
- ADD CAMERA
- Press the MENU
 key then the menu will pop up;
 - Press the ◀ key or ▶ key until the camera icon is highlighted , then press ▲ key or ▼ key to select your desired camera;
- Press OK key to enter into sub-menu;
- Press ▲ key or ▼ key to select ADD CAM then press OK key;
- While the
 appears on the LCD screen, unplug the camera power plug first, then press and hold the PAIR button at the camera unit and re-plug the power plug at the same time until the camera's power indicator flashes.
 - Once paired, “
 appears”on the LCD screen. If fails, repeat the above steps.
- Press the MENU
- DELETE CAMERA
- Press the MENU key and the menu will pop up;
- Press the ◀ key or ▶ key until the camera icon is highlighted , then press ▲ key or ▼ key to select your desired camera;
- Press OK key, to enter into sub-menu;
- Press ▲ key or ▼ key to select DEL CAM
 then press OK key;
 - Press ▼ key to select key to delete the camera;
- Press OK key to confirm the option.
- VOLUME
- Press the button and the menu bar will pop up.
- Press the ◀ button or ▶ button until
 is highlighted.
 - Press the ▲ button or ▼ button to select the desired volume level from level 1 ~ 5. (The default volume level setting is level 2 and level 0 is OFF.)
- Press the button
- VOLUME
TEMPERATURE UNIT SETTING
- Press the MENU/OK key and the menu will pop up;
- Press the ◀ key or ▶ key until the temperature icon
 is highlighted;
 - Press ▲ key or ▼ key to select between ℉ or ℃ ;
- Press OK key to confirm;
- Press
 the key to Exit.
Note: The detection range is 0~50 ℃ .
TEMPERATURE ALARM SETTING
- Press ▲ / ▼ key to select then for alert setting.
- Press ▲ / ▼ to select
 then followed by for confirming alarm on or then followed by for switching off
 alarm function.
 - SET TEMPERATURE HI/LO ALERT LIMITS
- When is highlighted at Alarm
 setting then press to enter Hi/Lo limits settings.
 - Press ▲ / ▼ keys to adjust the Hi limit then press to confirm.
- Then the cursor will jump to Lo limit setting.
- Press ▲ / ▼ keys to adjust the Lo limit then press to confirm
- When
To skip the setting edit, press![]() key to exit to last menu level.
key to exit to last menu level.
Note:The High temperature alarm range is 20-40 ℃, and the Low temperature alarm range is 0-19 ℃. The high temperature alarm default setting is 36 ℃, and the low temperature alarm default setting is 8 ℃. When the temperature goes above or below the settings, the temperature icon turns red. It will flash to alert user by audio beeps. Press any key on the parent unit to stop beeping and flashing
LULLABY SETTING
You can soothe the baby to sleep by playing a gentle lullaby from the Camera unit.
- Press the MENU key and the menu will pop up;
- Press the ◀ key or ▶ key until the lullaby icon
 is highlighted;
 - Press ▲ key or ▼ key to select one of the 8 available lullabies, you can pick single playback, loop (all 8 lullabies) playback
 or stop ;
 - Press OK key to confirm.
Note : The lullaby default setting is OFF.
ALARM SETTING
You can use the Parent Unit to set an alarm as a reminder for you to take care of your baby. If an alarm time is selected, the Parent Unit will beep at the end of the selected hour period from 30min to 6hrs with 30min step interval. The alarm will sound for about 1 minute when the time is reached, or can be stopped by pressing any button.
- Press the MENU key and the menu will pop up.
- Press the◀ / ▶ keys to select
 is highlighted.
 - Press the▲ / ▼ keys to select the expected timers.
- Press OK key to confirm.
Note : The alarm default setting is OFF. When the alarm is ringing, press any key on the parent unit to stop.
DISPLAY BRIGHTNESS
- Press the button and the menu bar will pop up.
- Press the ◀ or ▶ keys until
 is highlighted.
 - Press the ▲ or ▼ keys to select the desired brightness level from level 1 ~ 5. (The default brightness level setting is level 3.)
VOX SETTING
This mode allows you to control the sound activation of your baby unit. If there is no sound around the baby unit within 30 seconds, it will stop audio transmission and turn off the screen of the parent unit. When the baby unit detects any sounds louder than the sensitivity level, it will start transmitting the signal to the parent unit again and turn on the screen of the parent unit. To change the VOX level, please follow the below instructions.
- Press key and the menu bar will pop up.
- Press ◀ / ▶ key until the vox is
 highlighted
 - Press ▲ / ▼ key to select the VOX sensitivity level.
- Press or key to confirm the setting.
Note: Sensitivity levels and indications
- Hear everything from your baby. The speaker of the parent unit is continuously on.
 Hear all sounds from soft babbling. If your baby does not make any sound, the speaker of the parent unit is off.
 The speaker of the parent unit only goes on if the baby makes loud sounds (e.g. crying)
SAFETY INSTRUCTIONS
- CAUTION: Keep the device away from children.
- Strangulation Hazard: Children have STRANGLED in cords. Keep this cord out of the reach of children (more than 3ft (1m) away). Never use extension cords with AC Adapters. Only use the AC Adapters provided.
- Choking Hazard: This product contains small parts, so exercise care when unpacking and assembling the product.
- Read and keep to instructions: All the safety and operating in structions should be read before the video baby monitor is operated. This product cannot replace responsible adult supervision.
- Water and moisture: This product is designed for indoor use only. The unit should not be exposed to rain, moisture, dripping or splashing. No objects filled with liquid should be placed on top of, or beside the product, such as a glass or vase. This item should not be used near water.
- DO NOT: Use the appliance if the cord or plug is damaged. If your baby monitor is not operating properly or has suffered any damage, contact “HelloBaby” service center to request inspection and repair of the appliance in order to avoid any possible risk.
- DO NOT: Attempt to repair or adjust any of the electrical or mechanical functions of the unit, if you do, the guarantee will be made void.
- Ventilation: This baby monitor should not be used on a bed, sofa, rug or similar surface that may block the ventilation openings, or be placed in an enclosed area such as a bookcase or drawer that may impede air flow.
- Keep away from sources of heat: This unit should not be exposed to direct heat sources such as a candle, radiator, heat register, stove or other appliance that emits heat. The unit should not be left in direct sunlight.
- Power source: This unit should only be used with the AC power adapters included in this package (rated 6V 600mA/ rated 5V 1000mA).
- Damage requiring service: This unit should be serviced by qualified personnel only when
- Objects have fallen or liquid has been spilled into the product;
- The units have been exposed to rain;
- The units do not appear to operate normally or exhibit a distinct change in performance; The units have been dropped or the enclosure damaged
MAINTENANCE
- Clean your baby monitor with a slightly damp or anti-static cloth.
- Never use cleaning agents or solvents.
TECHNICAL DATA
| Specification | Detail |
|---|---|
| Frequency | 2403.5MHz~2475.5MHz |
| Power Adaptor | Parent Unit: Input: 100-240VAC 50/60Hz, Output: 6V DC 600mA |
| Camera Unit: Input: 100-240VAC 50/60Hz, Output: 5V DC 1A | |
| Operating Range | Up to 1000ft (300m) outdoor (line of sight) |
| Up to 165ft (50m) indoor | |
| Display | 3.2" Diagonal TFT LCD |
| Battery (Parent Unit) | Li-ion 3.7V 950mAh (3.515Wh) |
| Battery Life | Up to 6 hours |
| Maximum Power | <19dBm |
| Operation Environment | Operation Temperature: +32°F~+104°F (0°C~+40°C) |
| Battery Charging Temperature: +50°F~+104°F (10°C~+40°C) | |
| Relative Humidity: 15%~85% |
TROUBLESHOOTING
| Problem | Possible Causes | Solutions |
|---|---|---|
| No reception on the monitor | * The power adapters may not be properly connected. | * Confirm that the camera and monitor are ON. |
| * Camera may be far away from the monitor. | * Move the monitor close to the camera. | |
| * Camera and monitor may not be properly paired; follow PAIRING instructions. | ||
| Interference or poor reception | * The camera or monitor may be placed too close to many metal objects. | * Other electronic devices may be interfering with the signal. |
| * The battery power may be too low. | ||
| Audio feedback (high pitched noise) | * The camera and monitor may be placed too close. | * The volume on the monitor may be set too high. |
| Frozen Picture on Screen | * Repower the baby unit (plug out the adapter, then plug it into the socket again). | * Press the RESET key at the back of the parent unit. |
WARRANTY
We offer a one-year warranty from the original purchase date against defects in workmanship and materials. If you have warranty or support issues, please contact our after sales service via email.
Note : Camera icon with "*" means it is well registered. You should select and pair with the camera icon without "*" sign.
Pros & Cons OF Digital Video Baby Monitor HB65
Pros
- High-resolution 3.2-inch LCD screen
- Secure and interference-free 2.4GHz wireless connection
- Infrared night vision and temperature monitoring
- Expandable up to four cameras
- Affordable price point
Cons
- May experience some delay in video feed
- Limited battery life on the parent unit
Customer Reviews About HelloBaby Digital Video Baby Monitor HB65
Parents love the Digital Video Baby Monitor HB65 for its high-quality video and audio, expandability, and affordable pricing. The most common compliments include its ease of use, excellent night vision, and reliable wireless connection. However, some users have reported issues with battery life and minor video delays.
Faqs
How should my HelloBaby HB65 be originally configured?
Is it possible to link many cameras to the main unit?
How can I resolve the issue of the baby monitor not charging?
What should I do if the audio transmission is delayed?
Is there a way to change the HB65's lullaby volume?
How many cameras can I attach to an HB65 parent unit at a time?
What is the ideal camera angle to capture my baby's face?
What actions should I take in the event that the HB65 monitor's video feed is lost?
How can I use the HB65 to respond to my infant?
What is covered by and how long is the HelloBaby HB65 warranty?
Leave a Comment