Hitachi Window Type Room Air Conditioner RA-13LDF User Guide

Content
Introduction
The Hitachi Window Type Room Air Conditioner RA-13LDF is designed to provide efficient and reliable cooling for medium-sized rooms. With a cooling capacity of 13,000 BTU, it effectively maintains a comfortable indoor environment even during hot weather. This air conditioner features multiple cooling modes, adjustable fan speeds, and a convenient remote control for easy operation. Its sleek design ensures it fits seamlessly into any room decor. The RA-13LDF is priced at approximately $499.00.
Specifications
- Cooling Capacity: 13,000 BTU
- Energy Efficiency Rating: 10.6 EER
- Dehumidification Capacity: Up to 60 pints per day
- Operating Voltage: 115V, 60Hz
- Air Flow: 220 CFM
- Noise Level: 38 dB (low) to 46 dB (high)
- Dimensions: 20.3 x 14.5 x 21.5 inches
- Weight: Approximately 70 lbs
- Washable Filter: Yes
- Remote Control: Included
NAMES AND FUNCTIONS OF REMOTE CONTROLLER
REMOTE CONTROLLER
This controls the operation of the air conditioner. The signal range to reach air conditioner is about 7 meters. If an inverter lamp is used, the range of control may be shorter. It can be fixed on a wall using the fi xture provided. Before fixing it, make sure the air conditioner can be controlled from the remote controller.
MODEL: RA-08LDF, RA-10LDF and RA-13LDF
- Transmission sign
The transmission sign blinks when a signal is sent. - Display
This indicates the room temperature setting, timer status, operation mode and fan speed setting. - CIRCULATION button
Press this button to set air circulation in the room or start the operation. - DEHUMIDIFYING button
Press this button to dehumidify the room or start the operation. - COOLING button
Press this button to set cooling mode in the room or start the operation. - RESET button
- STOP button
Press this button to stop the operation. - SLEEP TIMER button
Press this button to set the sleep timer. - FAN SPEED button
Press this button to change the fan speed. Every time you press this button, the intensity of circulation will change from (AUTO) to (HI) to (MED) to (LOW). - AUTO SWING button
Press this button to set auto swing or stop angle of the vertical air defl ector. - TEMPERATURE button
Press this button to raise or lower the temperature setting. (Keep pressed, and the value will change more quickly.) - ON-TIMER button
Press this button to setting the turn on time.
Precautions
- Do not put the remote controller in the following places.
- In direct sunlight.
- Near a heat source.
- Handle the remote controller carefully. Do not drop it on the fl oor, and away from water.
- Once the air conditioner stops, it will not restart for about 3 minutes (unless you turn the power switch off and on or unplug the power cord and plug it in again).
- This is to protect the device and does not indicate a failure.
Description
The Hitachi Window Type Room Air Conditioner RA-13LDF boasts a robust design with a sturdy build, ensuring durability and long-lasting performance. The unit features a powerful cooling system that can efficiently cool rooms up to 550 square feet. It includes multiple fan speeds and a dehumidifying mode, allowing you to customize the air flow and humidity levels to your comfort.
The RA-13LDF also comes with an Eco Mode that helps reduce energy consumption without compromising on cooling performance. The air conditioner is equipped with an auto-restart feature, which automatically turns the unit back on to the last setting after a power outage. This model is also known for its quiet operation, making it suitable for use in bedrooms or home offices.
Operations
COOLING OPERATION
Use the device for cooling when the outdoor temperature is 21 ~ 43°C.
If indoor humidity is very high (over 80%), some dew may form on the air outlet grille and defl ectors of the unit.
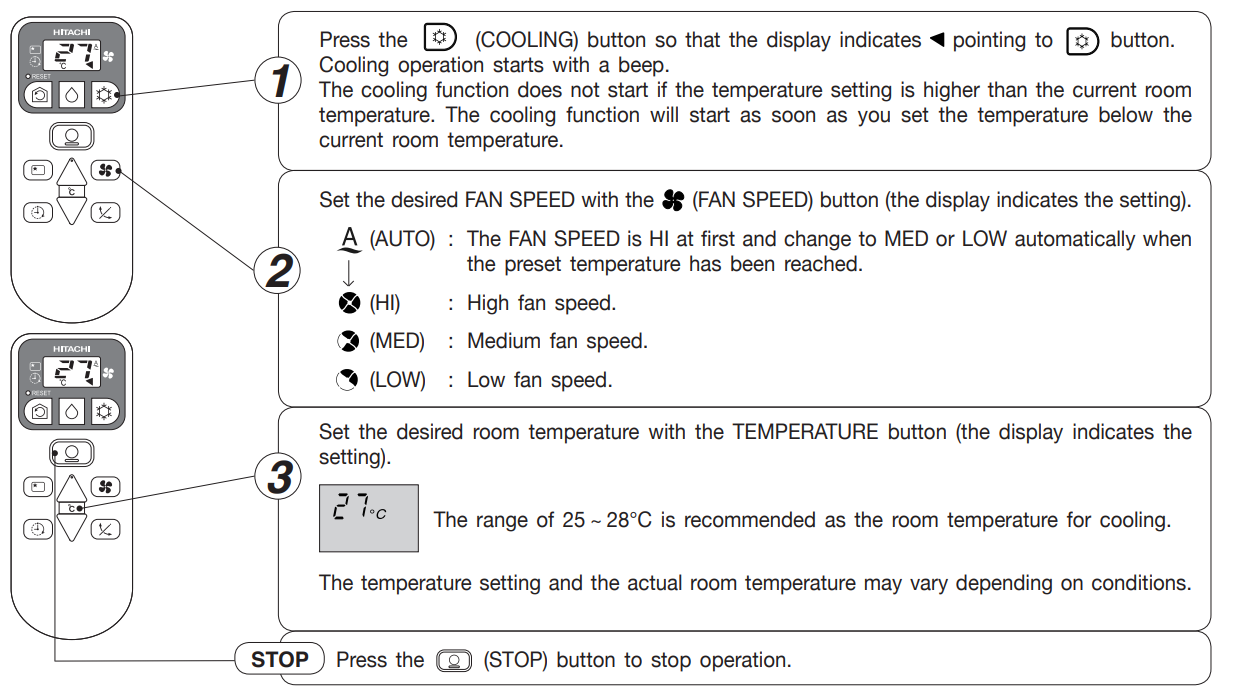
As the settings are stored in memory in the remote controller, you only have to press the (COOLING)![]() button next time.
button next time.
DEHUMIDIFYING OPERATION
Use the device for dehumidifying when the room temperature is over 16°C. When it is under 15°C, the dehumidifying function will not work.
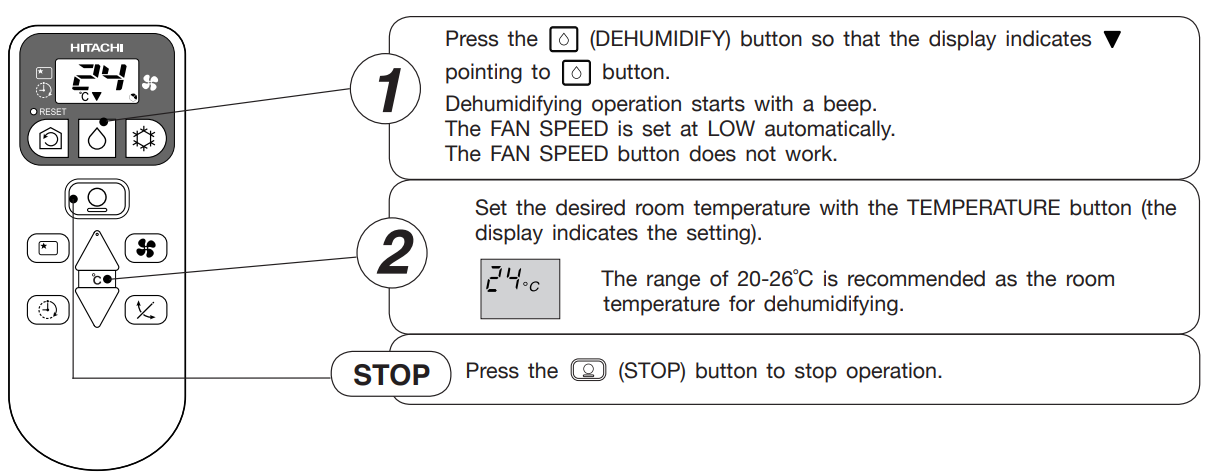
As the settings are stored in memory in the remote controller, you only have to press the (DEHUMIDIFYING)![]() button next time.
button next time.
Dehumidifying Function
- When the room temperature is higher than the temperature setting: The device will start to dehumidify and lower the room temperature to the preset level.
- When the room temperature is lower than the temperature setting: Dehumidifying will be performed at the temperature setting slightly lower than the current room temperature, regardless of the temperature setting. The function will stop (the fan will stop emitting air) as soon as the room temperature becomes lower than the setting temperature. You might feel a bit colder in dehumidifying operation.
CIRCULATION OPERATION

As the settings are stored in memory in the remote controller, you only have to press the (CIRCULATION)  button next time.
Circulation Function
- During circulation operation, compressor will not run and there is no cooling operation with only fan running.
- When the setting temperature is higher than room temperature, fan will stop running.
HOW TO SET THE SLEEP TIMER
Press the ![]() (SLEEP TIMER) button, and the display changes as shown below.
(SLEEP TIMER) button, and the display changes as shown below.
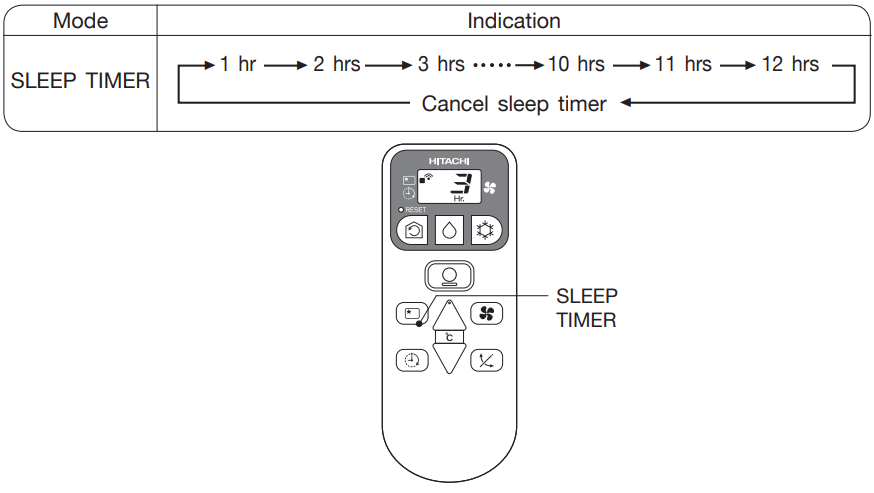
SLEEP TIMER: The device will continue working for the designated number of hours and then turn off.
Point the signal window of the remote controller toward the indoor unit, and press the SLEEP TIMER button.
The timer information will be displayed on the remote controller. The TIMER lamp lights with a beep from the indoor unit.
NOTE
- After sleep timer time is up and when press sleep timer button again, the timer will be set as last setting.
- Sleep timer effective only once.
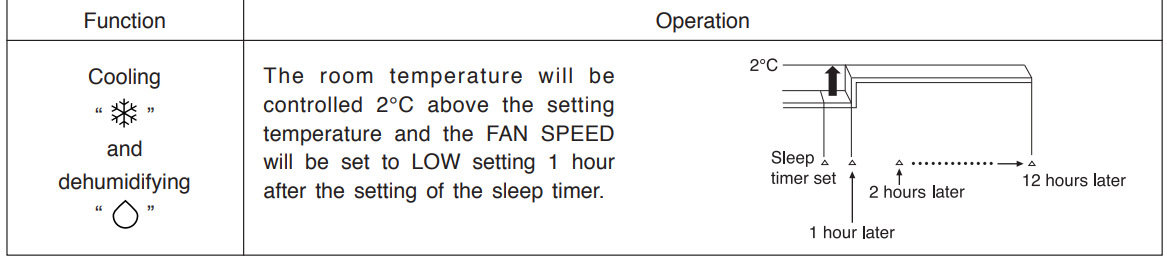
Explanation of the sleep timer
- The device will control the FAN SPEED and room temperature automatically so as to be quiet and good for people’s health.
- You can set the sleep timer to turn off after 1 to 12 hours. The FAN SPEED and room temperature will be controlled as shown below.
Operations with the Sleep Timer
HOW TO SET THE ON TIMER
Press the ![]() (ON TIMER) button, and the display changes as shown below.
(ON TIMER) button, and the display changes as shown below.

The operation will start for setting the temperature at the setting time (The starting time may different depend on the room temperature and set temperature).
HOW TO REPLACE THE BATTERIES IN THE REMOTE CONTROLLER
When using the remote controller, if there is no response from the air conditioner or the remote controller display is dim, please try to replace the batteries.
- Remove the cover as shown in the fi gure and take out the old batteries.
Install the new batteries.
The terminal of the batteries should match the marks in the case.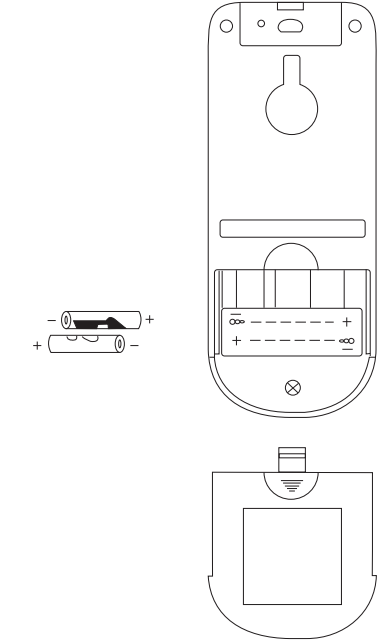
CAUTION
- Do not use new and old batteries, or different kinds of batteries together.
- Take out the batteries when you do not use the remote controller for 2 months or longer.
- Use high quality and high performance AAA batteries to avoid short operating life and electrolyte leakages
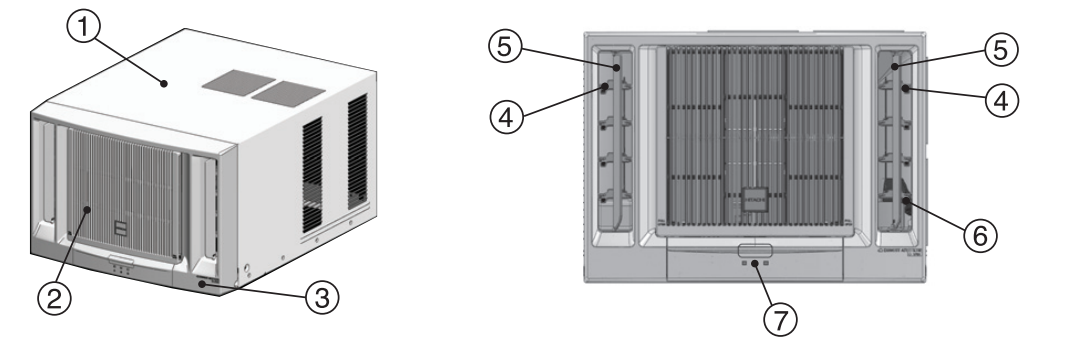
PARTS IDENTIFICATION AND OPERATIONS
Model | Width | Height | Depth |
RA-08LDF RA-10LDF | 18 1⁄2”, 470mm | 13 1⁄2”, 345mm | 25 3⁄16”, 640mm |
RA-13LDF | 22 3⁄64”, 560mm | 14 3⁄4”, 375mm | 27 29⁄32”, 709mm |
- Cabinet
- Suction Grille
- Front Cover
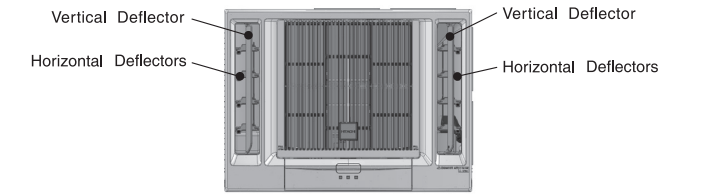
- Horizontal Defl ectors
- Vertical Defl ector
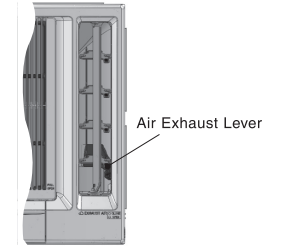
- Air Exhaust Lever
- Switch Panel Cover
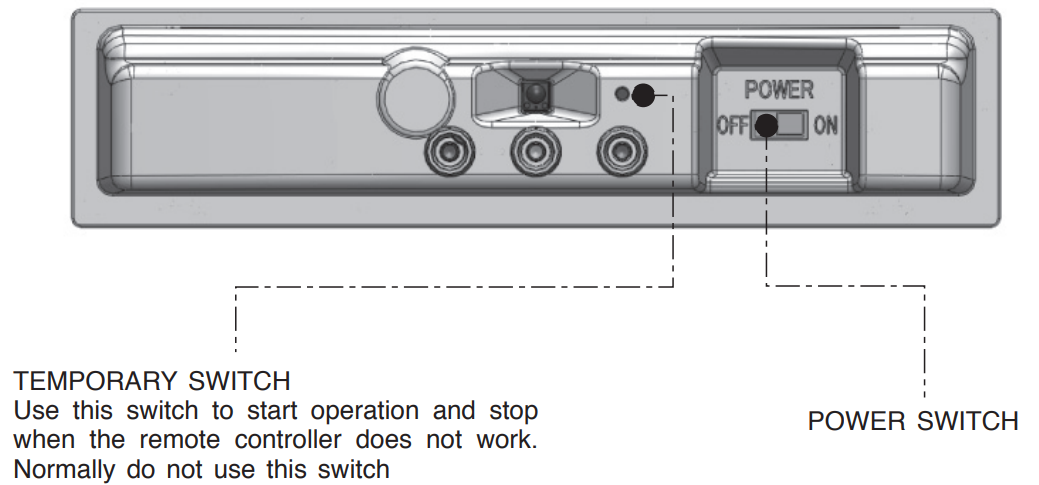
CONTROL PANEL
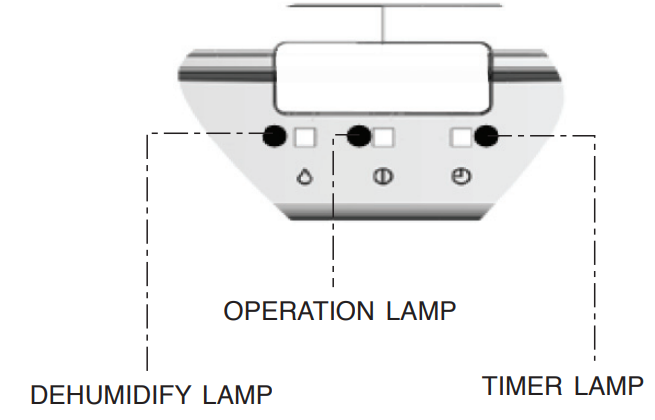
INDICATION LAMP
TEMPORARY SWITCH
- Use the temporary switch for start or stop operation when operation cannot be done with the remote controller.
- By pressing the temporary switch, [use non-conductor stick (for example: toothpick),] the operation will follow previous operation mode.
- When the operation is done using the temporary switch, after the power source is turned off and is turned on again, the operation is done in automatic mode.
AIR DEFLECTORS
VERTICAL DEFLECTORS
Vertical defl ectors at both sides of outlets can be set to either auto-swing or static position to direct discharge air rightward, leftward or forward direction.
HORIZONTAL DEFLECTORS
Horizontal defl ectors at both sides of the outlets can be set to direct discharge air upward, downward or forward direction.
CAUTIONS
To avoid dew forming on the defl ectors which eventually may drip to the fl oor, please do not adjust horizontal defl ectors extremely downward position or vertical defl ectors extremely leftward or rightward position during cool operation for a long time.
Also, do not adjust the vertical defl ectors position by hand or any other object.
AIR EXHAUST LEVER
Set the air exhaust lever to the down ( OPEN) position for air ventilation in the room. The air exhaust lever should normally be kept in up ( CLOSE) position during cooling operation and in the case of typhoon.
WASABI AIR PURIFYING FILTER
Always stop the operation before installing the wasabi air purifying filter.
- Pull and remove the suction grille
- Remove the pre-filter
- Install the wasabi air purifying filter in the frame
Install back the pre-filter and close the suction grille
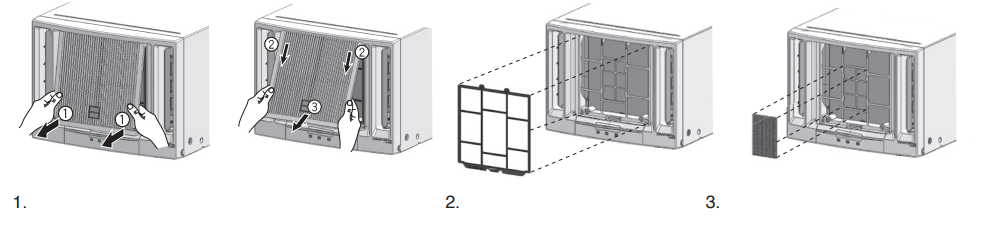
Wasabi air purifying fi lter are not washable. It is recommended to use vacuum to clean it. It can be used use for 1 year time. Type number for this wasabi air purifying fi lter is <SPX-CFH9W>. Please use this number for ordering when you want to renew it.
Setup Guide
To set up the Hitachi Window Type Room Air Conditioner RA-13LDF, start by carefully unpacking the unit and ensuring all parts are included. Follow these steps:
- Measure your window to ensure the air conditioner fits properly.
- Install the window bracket according to the instructions provided.
- Place the air conditioner into the bracket and secure it.
- Connect the power cord to a nearby electrical outlet.
- Turn on the air conditioner using the remote control or the control panel on the unit.
- Adjust settings such as fan speed, temperature, and mode as needed.
MAINTENANCE
CAUTION
Always turn off and unplug the unit before any cleaning or maintenance to ensure safety
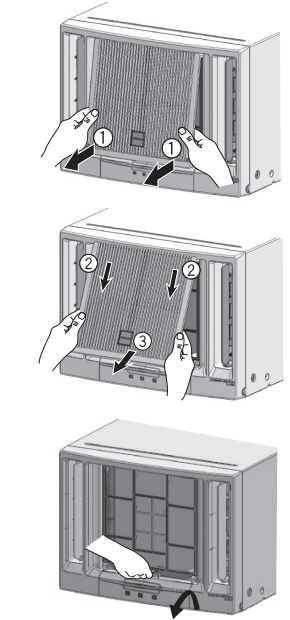
PRE-FILTER
If the pre-fi lter is clogged with dust, the air fl ow volume will be decreased and resulting in poor cooling performance, and increased operating noise. Be sure to clean the fi lter about every 20 days.
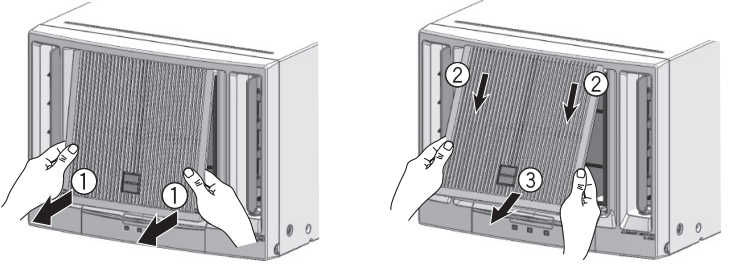
- Remove the suction grille by pulling the bottom corner and slightly lift up the suction grille.
- Pull downward to unhook the suction grille and remove the suction grille.
- Lift and unhook the bottom of the pre-fi lter and remove it.
- Remove dust from the pre-fi lter by using a vacuum cleaner. If the pre-fi lter is very dirty, wash it with detergent and rinse properly with water. Dry the pre-fi lter with soft cloth and do not expose it to heat or under direct sunlight.
- Install the pre-fi lter by fi tting the top hooks and then hook the bottom of the pre-fi lter.
Attach the suction grille back to its place by hooking at the top side to the front cover, then gently push at bottom corner.
CAUTION
- Do not use hot water above 40°C for cleaning the pre-fi lter.
- Do not operate the air conditioner without the pre-fi lter.
FRONT COVER AND SUCTION GRILLE
Clean the front cover and suction grille with a soft dry cloth. When it is excessively dirty, wipe it with a soft cloth dampened with mild soap, then wipe it again thoroughly with a soft dry cloth. The suction grille can also be removed and be washed with water and mild soap. Remove the suction grille in the following manner.
- Remove the suction grille by pulling the bottom corner and slightly lift up the suction grille .
- Pull downward to unhook the suction grille and remove the suction grille.
CAUTIONS
Never use hot water above 50°C, erosive chemicals or brush to clean the front cover and suction grille because they will damage the plastic surface.
Check the following items before asking for service. If the malfunction persists, please contact service centre.
CAUTION: If the power supply cord is damaged, it must be replaced by the manufacturer, its service agent or similiarly qualifi ed persons in order to avoid a hazard.
INSTALLATION INSTRUCTIONS
Remove all the shipping parts before installation and consult an authorised dealer concerning installation requirements, otherwise may damage the air conditioner.
LOCATION
- Select a location that can support the weight of the air conditioner and will not cause increased operating noise and vibration.
- Select a location to avoid direct sunlight on the air conditioner.
- Select a good location for effi cient air circulation.
- Select a location where there is no obstacles near the air inlet and outlet.
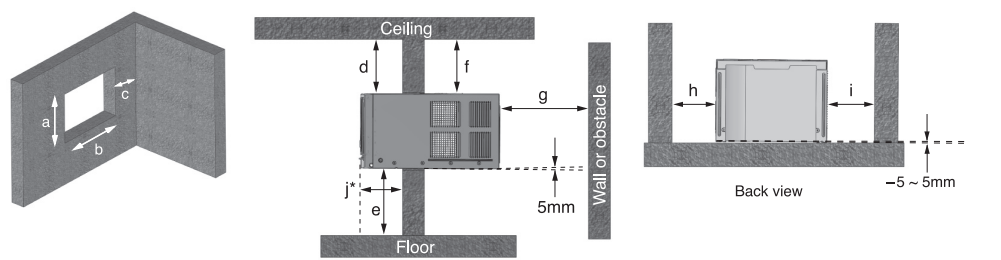
* Recommended dimension for performance testing purpose only.
CAUTIONS
- The installation material must be corrosion proof, especially the air conditioner is installed near the sea or hot spring.
- Do not install air conditioner in the places where there is a possibility of infl ammable gas leaks.
- Secure tightly the cabinet with screws to the frame. Otherwise there may be danger of the air conditioner dropping.
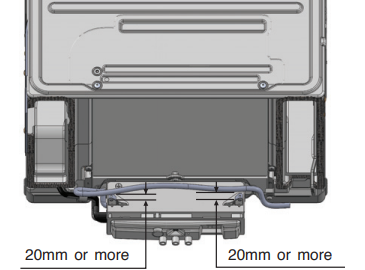
- Please keep the recommended installation dimensions. Otherwise waterdrops or malfunction may occur.
POWER SOURCE
- Check the capacity of wiring and power outlet. The power outlet should be used exclusively for the air conditioner. Do not use it with other appliances. Any wiring must follow the national wiring regulation.
- Ground the air conditioner to prevent danger of electric shock.
- Connect the air conditioner with power source securely.
Use a fuse as below:
RA-13LDF: 15A time delay fuse
Voltage rating | 50Hz 220V |
Operatable Voltage range | 50Hz 198-242V |
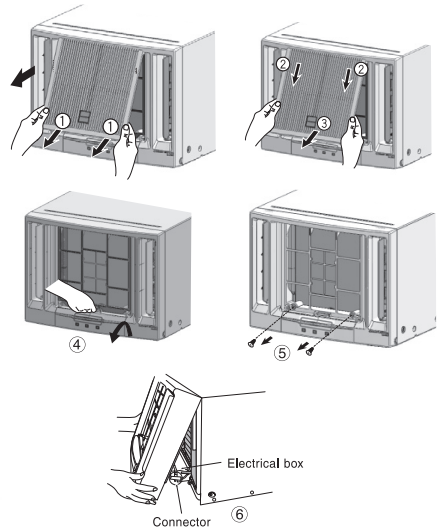
REMOVE THE FRONT COVER
Remove the front cover in the following manner.
- Remove the suction grille by pulling the bottom corner and slightly lift up the suction grille.
- Pull downward to unhook the suction grille and remove the suction grille.
- Lift and unhook the bottom of the pre-fi lter and remove it.
- Remove two screws which secure the front cover.
Remove the front cover from lower side. Disconnect the timing motor connector at right side of the electrical box.
SLIDE OUT OF UNIT
- Remove the four screws which fasten the base pan to the cabinet at the side and back.
- Remove the stopper at front left side of base. (RA-13LDF)
Slide out the unit by pulling the handles.
After slide in the unit, please install a sealer between the base pan and cabinet to prevent from entering rain water in case of typhoon. Fasten the unit to cabinet at the side with the screw, then refi t the front cover.
POWER CORD ARRANGEMENT
If power cord is withdrawn from left side of unit, please arrange the power cord as in fi gure after installing the front cover.
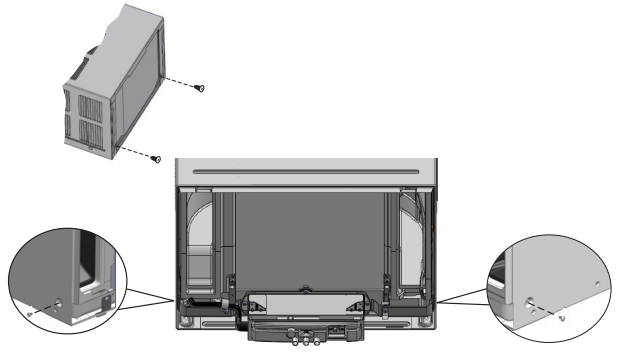
DRAIN PAN
CONDENSED WATER DRAINAGE
This air conditioner use a “turbo fan splashing ring” which is designed to splash the condensated water on the condenser surface for maximum cooling effi ciency, thus producing a splashing sound.
If you are uncomfortable with the sound, you can install an outside drainage by using the following procedure which may, reduce the cooling operation performance.
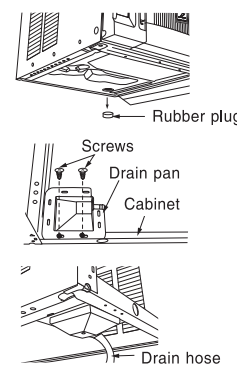
- Remove the rubber plug from the base pan.
- Install the drain pan by using 2 pieces of screws (provided) at the cabinet.
- Connect the drain pan with the drain hose to drain point. (Drain hose or tubing can be purchase locally. Drain hose inner diameter should be around ø13mm or 1/2 inch.)
- Pour 2 glasses of water into the drain pan to ensure the drainage is functioning normal.
Slide the air conditioner unit back into the cabinet.
The Drain Pan can be used in any positions as below and be secured by 2 screws to avoid water dropping problem:

CAUTIONS: Drain Pan edge shall not exceed the cabinet roller.
CAUTION
When using the operation of auto swing function, Please manually turn the vertical defl ector to the utmost right angle before switching on the auto swing function.
An abnormal sound will occur when adjusting the vertical defl ector before switching on the auto swing. This abnormality does not affect the operation.
It there is any abnormalities in the vertical movement during the auto swing operation, please do the above setting again. When raining, rain water will enter the outdoor side. An abnormal sound will occur during operation of unit in raining conditions and approximately 10 minutes after rain stop. This will not affect the performance or liability of the room air conditioner.
Hitachi Window Type Room Air Conditioner RA-13LDF Troubleshooting
BEFORE ASKING FOR SERVICE
Symptom | Check |
Does not operate at all | 1 Isthe power cord loosened or unplugged? 2 Isthe fuse blownout or the circuit breakertripped? 3 Isthe voltage normal? 4 Isthe main switchset to “OFF”position? |
Poor cooling performance | 1 Is the pre-filter covered with heavy dust? Clean pre-filter and replace it. 2 Isthe temperature setting correctly? 3 Isthe sunlight fall directly in the air conditioner? 4 Isthe air flowon the rearside (outdoor) blocked? Leave a space of 900 mm (3 feet)behind the rear side of air conditioner. 5 The doorsor windows may be openedwidely or thereare other sourcesof heat in the room. 6 Isthe ventilation damperopened? |
Pros & Cons
Pros:
- Energy Efficient: High EER rating ensures lower energy bills.
- Quiet Operation: Suitable for bedrooms and home offices.
- Compact Design: Easy to install in any window.
- Multiple Fan Speeds: Customizable air flow for comfort.
- Dehumidifying Mode: Effective in humid climates.
Cons:
- Limited Room Size: Effective for rooms up to 550 square feet.
- No Wi-Fi Connectivity: No smart features or remote app control.
- Heavy Unit: Requires careful handling during installation.
- Noise During High Fan Speed: Can be slightly noisy on high settings.
Customer Reviews
Customers have generally praised the Hitachi Window Type Room Air Conditioner RA-13LDF for its efficient cooling and quiet operation. Many reviewers have noted its ease of installation and the effectiveness of its dehumidifying mode. However, some users have mentioned that it can be somewhat heavy and that high fan speeds can be noisy.
Common complaints include the lack of smart features and Wi-Fi connectivity, but overall, the product has received positive feedback for its performance and value.
Faqs
What is the cooling capacity of the Hitachi?
Is the air filter washable?
How do I reset my Hitachi Window Type Room Air Conditioner after a power outage?
Can I use the Hitachi Window in a room larger than 550 square feet?
Does the Hitachi Window Type Room Air Conditioner RA-13LDF come with a remote control?
How do I ensure proper airflow for my Hitachi Window Type Room Air Conditioner RA-13LDF?
What is the energy efficiency rating of the Hitachi?
Can I install the Hitachi RA-13LDF by myself?
How often should I clean the air filter of my Hitachi Window Type Room Air Conditioner RA-13LDF?
Does the Window Type Room have a dehumidifying mode?
Leave a Comment