How to Start: Holy Stone HS110D FPV RC Drone Instruction Guide
Content
Introduction
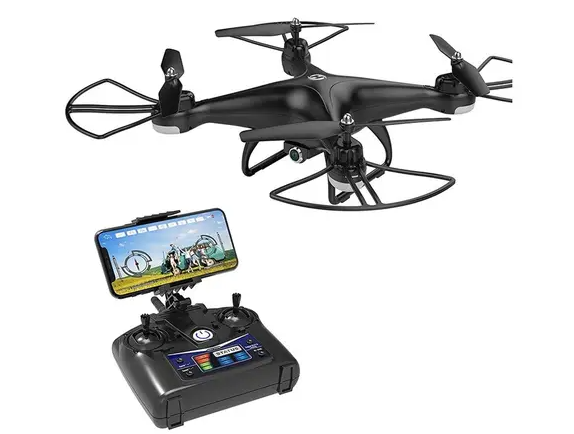
The Holy Stone HS110D FPV RC Drone is an affordable and feature-rich drone that offers a first-person-view (FPV) experience for capturing stunning aerial footage. With a 1080P HD camera and real-time video transmission, this drone is perfect for hobbyists, beginners, and experienced pilots alike. The estimated price of the Holy Stone HS110D FPV RC Drone is around $160, and it was launched in 2019.
PARTS NAME
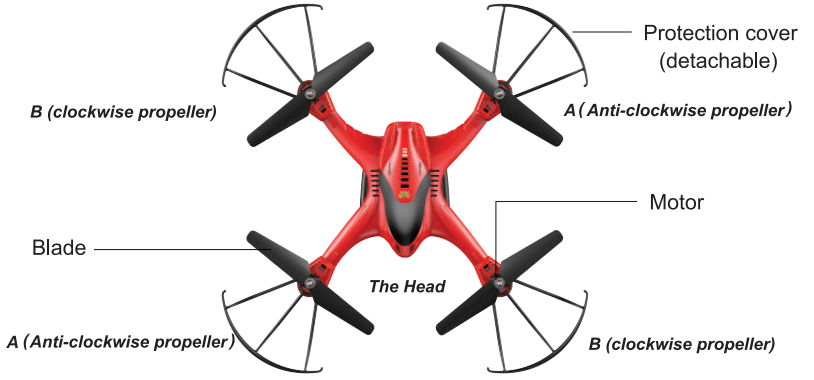
Please note that all the propellers must be installed in the right orientation.(counterclockwise/clockwise adjacent, pay attention to the letter printed on each blade)
REMOTE CONTROL & FUNCTIONS
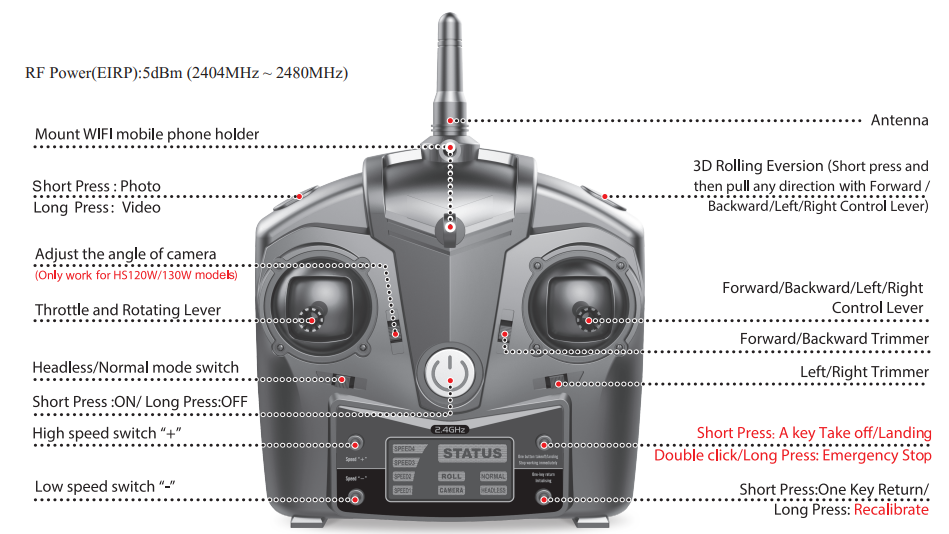
RF Power(EIRP):5dBm (2404MHz ~ 2480MHz)
Detailed Specifications
- Dimensions: 12.6 x 12.6 x 4.7 inches
- Weight: 145g
- Camera: 1080P HD with 120° FOV and 75° adjustable angle
- Flight Time: 10-12 minutes
- Charging Time: 90-120 minutes
- Control Distance: 90-120 meters
- Video Transmission Distance: 50-100 meters
- FPV Real-time Transmission
- Altitude Hold Function
- Headless Mode
- One-Key Return
- 4 Speed Modes
ASSEMBLE THE REMOTE CONTROL
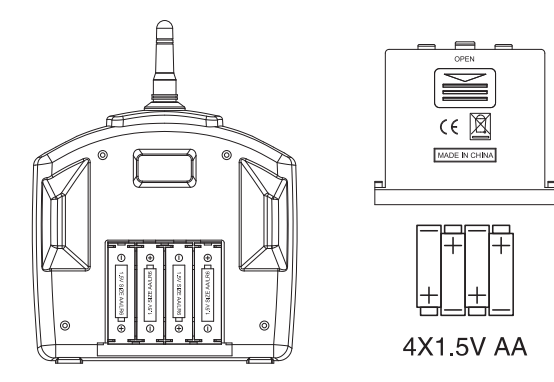
Take out the battery cover from the back of remote control, and install 4 batteries(size AA) into the battery case correctly (Refer to the picture), then shut the battery cover.
Tips
- When installing the battery, follow the electrode instructions, and do not load the batteries reversely.
- Don't mix new battery with old.
- Don't use different types of batteries.
CHARGING THE LITHIUM BATTERY
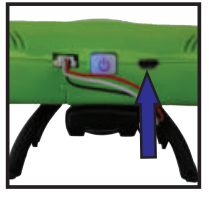
- Balanced charging: Switch off the power of the transmitter, please insert the USB port of the charger into the USB port of the computer, and then connect another end of the charger with the charging port of the drone. (see the picture below) When charging, the indicator of the drone is shown as red light. When it is fully charged, the indicator will be OFF and the charging process is finished.
- You can use the mobile charger or car-loaded power to charge it.
- It takes around 100 minutes to fully charge the battery. The flight time for a fully charged battery is around 8 minutes.
CAUTIONS FOR CHARGING
- When charging, please put this product on a dried or ventilated area and keep it far away from heat source or explosive product.
- After flying, please do not charge the battery if it is still hot.
- If the battery has been used for a long time, please replace them.
- Please make sure that you use the original USB charger cable provided. When the battery has been used for a long time, or appears to be swollen, please replace them.
- If a battery is not used for a long time, it would lose the power by itself. Charging or discharging too often may reduce the lifetime of the battery.
PREPARATION BEFORE TAKE OFF
- Fly the quadcopter in a spacious indoors area, or an outdoors area free of obstacles, rain, snow, animals, and people. When flying outdoors, make sure there isn't too much wind.
- Make sure all propellers are installed in the right orientation, otherwise, the drone would not be able to take off from the ground.
- Make sure the remote control is assembled with brand new or fully charged AA batteries.
- Make sure the lithium battery in the drone is also fully charged.
TAKING OFF
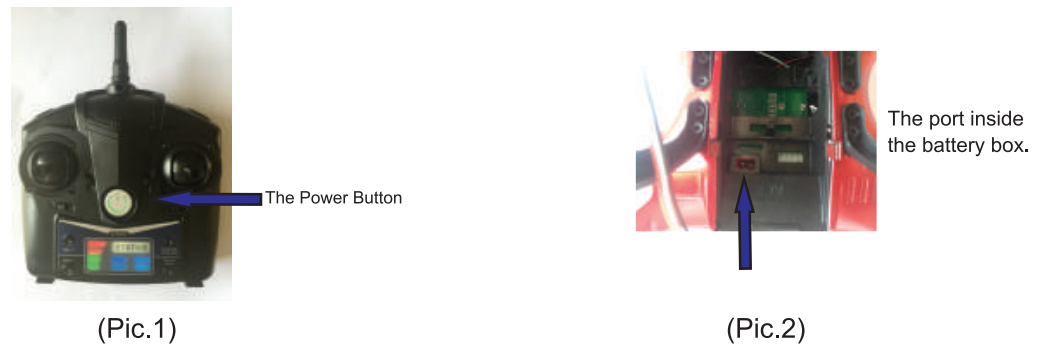
- Turn on the remote control (short press the power button). It will beep once and the “STATUS” light will flash. (pic1)
Check the lithium battery(3.7V 650mAh), make sure it is inserted into the port inside the battery box of the drone(Pic.2).
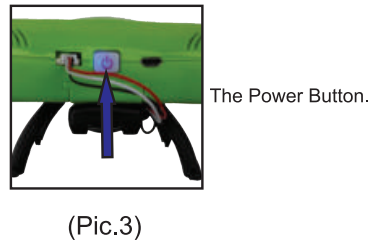
Place the drone on a flat, level surface, then press down the power button of the drone to turn on the power(Pic.3). The lights on the drone begin blinking.
Push the throttle stick (left stick) up then down. If done correctly, the transmitter sound will beep(Pic.4), and the LED lights "STATUS", "SPEED2", "SPEED1", "ROLL", "NORMAL" on the remote control will turn on(Pic.5). And the LED lights on the drone keep flashing slowly(Pic.6).

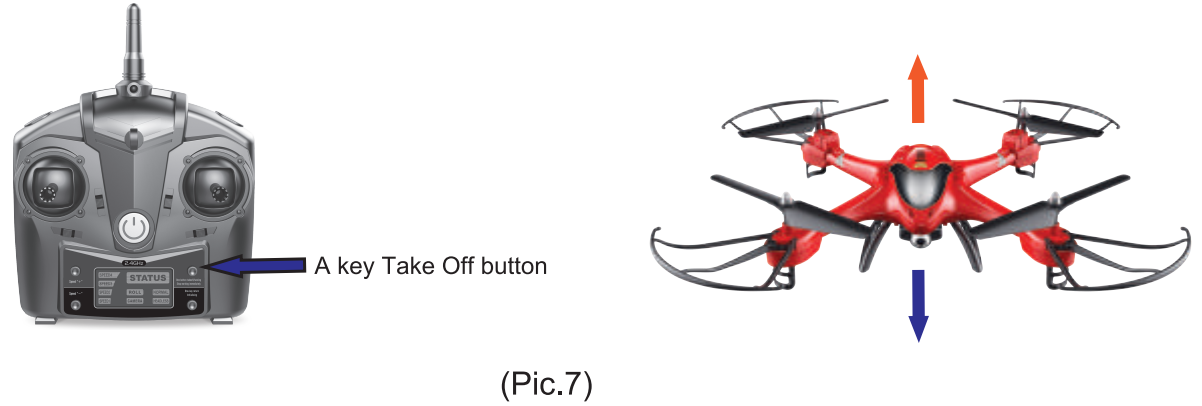
- The drone is now connected to the remote control and ready to take off. Press down the A Key Take Off button, and the drone would take off automatically(Pic.7).
Tips- Once the drone takes off, you could use the throttle stick and forward/backward stick to control the flight.
- To avoid injuries or accidents, we suggest that the beginners read through the Instruction Manual before using the A Key Take Off function.
- If the pilot would like to stop the flight after taking off, simply press down the A Key Take Off/Landing button again, the drone would land back on the ground automatically, until the propellers stop rotating.
LED LIGHTS DISPLAY

ALTITUDE HOLD MODE
- Throwed is designed with Altitude Hold Mode by default. The drone will be kept at the same alitude
- Throttle up the left stick, the drone will be ascending.
- Move the left throttle stick downward, the drone will be descending.
- When the throttle stick returns back to the neutral position, the drone will be kept at the same height.
Operations
- Hover up and down: Push the throttle up or down, the quadcopter flies upward or downward.
Forward and backward: Push the direction lever up or down, the quadcopter flies forward or backward.

Turn left and right: Pull the throttle left or right, the quadcopter turns to left or right.
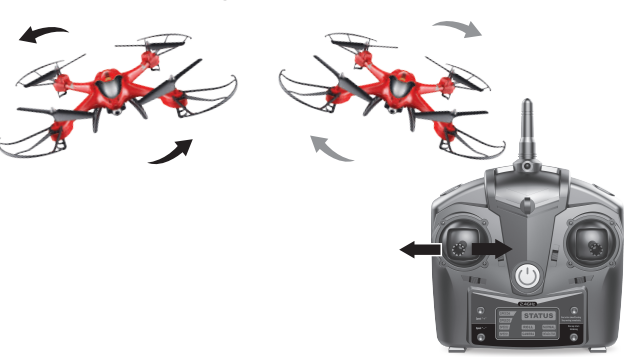
Sideward fly: Pull the direction lever left or right, the quadcopter flies to left side or right side.
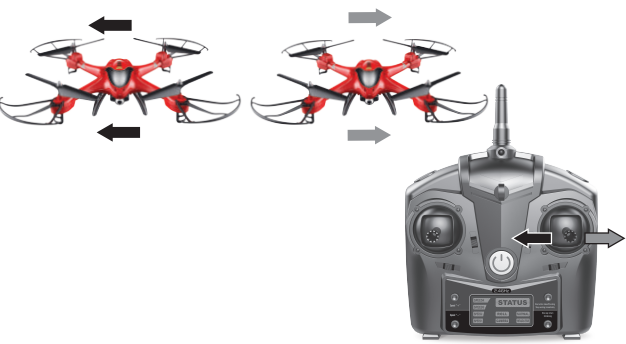
- Sideward fly fine-tuning: When the quadcopter keeps drifting to left/right side, you can correct it by sliding the left/right fine tuning button.
- Forward and backward fly fine-tuning: When the quadcopter keeps drifting forward/back, correct it by sliding the forward/back trimmer button.

HEADLESS MODE
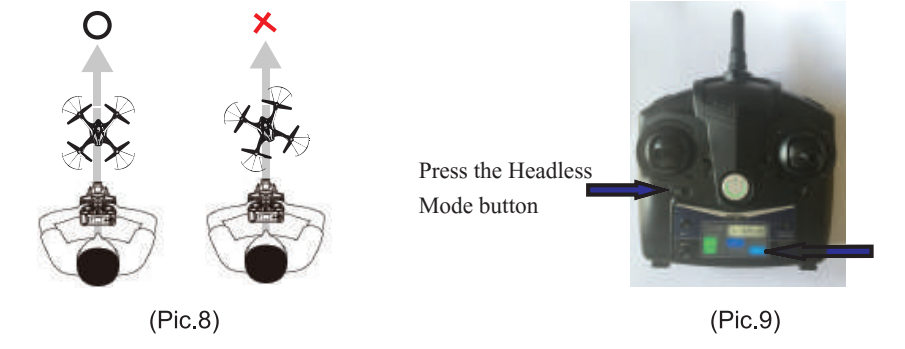
- Place the drone in front of the pilot, before the pilot pairs the drone. Make sure the head of the drone faces in the same direction as the pilot, and the tail faces towards the pilot (Pic 8). Before the drone takes off, press the Headless Mode button on the transmitter to enter Headless Mode. The LED light for "NORMAL" turns off, and the light for "HEADLESS" turns on(Pic 9).
- In Headless Mode, The forward direction is always away from the pilot regardless of which way the drone is facing. It is very important for the pilot to not move or change positions after pairing the drone and controller and initiating Headless Mode to ensure accurate control of the drone.
- Press the Headless Mode button again to exit the Headless mode, the LED light for “HEADLESS” turns off on the transmitter, the LED light for" NORMAL" turns on.
Tips: (Important!)
- Make sure that the head of the drone faces forward and the tail faces towards the pilot when being paired.
- When flying in Headless Mode/One Key Return, the pilot should not move around. This is because the drone will fly relative to the point where it was paired to the transmitter, not relative to the transmitter is.
- When using Headless Mode, it is important to stay stationary and facing the same direction as you were when the drone and transmitter were paired.
ONE KEY RETURN
The Model is designed with a One Key Return function. The function makes the drone fly itself back towards the pilot automatically by simply pressing the One Key Return button. It will continue to fly in this direction until One Key Return mode is canceled or the pilot moves one of the control sticks to resume control of the drone.

- In Normal Mode(The LED light "NORMAL" turns on): Press the One Key Return button, the drone would fly back to the direction where the tail of the drone pointed when the drone was paired (Pic10).
- In Headless Mode (The LED light "HEADLESS MODE" is lit) Press the One Key Return button, the drone will fly back towards the direction where the tail of the drone pointed when the drone entered Headless Mode. Please use the Headless Mode and One Key Return function after you totally comprehend the function. Otherwise, it may cause loss of control or damage.
3D TUMBLING FUNCTION
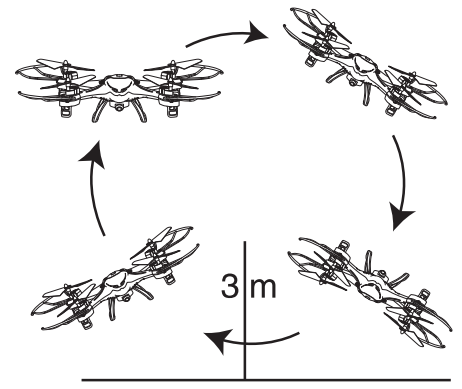
When you are family with all the basic actions, you can try this amazing Flip Mode When you fly the drone at least 3 meters high, press the Flip Mode button at the * upper right shoulder, then push the Right Control Lever to forward Backward/Left/Right until it reaches the farthest position. The drone will then flip in the direction the right Right Control Lever Under was pushed. Under the Headless Mode, it can not make flip action.
Caution: The Flip Mode works best on a fully charged battery.
ASSEMBLE THE CAMERA
The camera is installed onto the drone out from the box. Check if the wires of the camera are well connected with the drone.
Tips
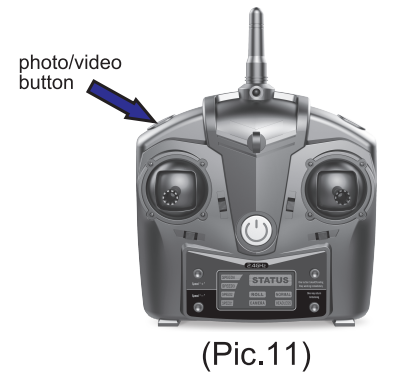
- Short press down the button on the top left of the remote control to take photo(Pic. 11)
- Long press down the button on the top left of the remote control to take video, short press down the button again to end the recording. When the drone is taking a video, the remote control sounds constant beeps, until the recording is ended.
- All the images and videos would be reserved in the TF card which is inserted into the camera.
ASSEMBLE THE PHONE HOLDER
A phone holder is included in the box for the FPV function, the assembling is shown as below.
- Insert the phone holder stick into the hole at the middle top of the remote control(Pic. 12).
- Rotate the phone holder to bite the plastic tag on the remote control (Pic. 13, Pic. 14).
- Fix the phone holder on the remote control by clockwise locking the black plastic screw(Pic. 14)

Description
The Holy Stone HS110D FPV RC Drone is a high-quality drone that offers an immersive first-person-view (FPV) experience. The 1080P HD camera delivers clear and vivid aerial footage, and the real-time video transmission allows you to see what the drone sees in real-time. The drone also features an altitude hold function, which allows you to maintain a stable altitude for capturing smooth footage, and a headless mode, which simplifies controls for beginners.
With a flight time of 10-12 minutes and a control distance of 90-120 meters, the Holy Stone HS110D FPV RC Drone offers plenty of flight time and range for capturing stunning aerial footage. The drone also features a one-key return function, which simplifies the landing process, and four speed modes, which allow you to adjust the drone's speed to suit your skill level.
Pros & Cons
Pros
- Affordable price point
- 1080P HD camera with real-time video transmission
- Altitude hold function for capturing smooth footage
- Headless mode for beginners
- One-key return function
- Four speed modes
Cons
- Flight time could be longer
- Control distance could be further
- Camera quality could be better
- No obstacle avoidance feature
- Battery life indicator could be more accurate
Trouble Shooting

Customer Reviews
Customers have praised the Holy Stone HS110D FPV RC Drone for its affordability, ease of use, and real-time video transmission. Many reviewers have commented on the drone's stability and smooth footage, and have noted that the drone is a great value for the price. However, some reviewers have noted that the flight time could be longer and that the battery life indicator could be more accurate.
Faqs
What is the build quality of the Holy Stone HS110D?
What does the camera on the HS110D offer?
What is the battery life and charging time of the HS110D?
How does the drone perform in flight?
What is the price of the Holy Stone HS110D?
How does the HS110D's controller perform?
What are the limitations of the HS110D's camera?
What should I be aware of when flying the HS110D?
Is Holy Stone considered a good brand for drones?
Do I need to register the HS110D with the FAA?
Leave a Comment
