Honeywell Programmable Thermostat RET95E Owner Manual | Installation

Content
Introduction of Honeywell Programmable Thermostat RET95E
The Honeywell Programmable Thermostat RET95E is a top-of-the-line thermostat designed to provide homeowners with ultimate control over their home's temperature. With an estimated price range of $100 to $150 and a launch date of January 2021, this thermostat is an investment that will pay off in the long run. Its programmable features allow for energy savings and increased comfort, making it a popular choice among homeowners.
Detailed Specifications
The Honeywell Programmable Thermostat RET95E boasts several key features, including:
- 7-day programmability with 4 periods per day
- Touchscreen display with easy-to-use interface
- Smart response technology for optimal temperature control
- Energy Star certified for energy efficiency
- Compatible with most heating and cooling systems
- 5-year warranty
Thermostat controls

Display screen


Honeywell Programmable Thermostat RET95E Instructions
Turn Off Power to Heating/Cooling System

Remove Old Thermostat
Remove old thermostat but leave wallplate with wires attached.

Label Wires with Tags
Label the wires using the supplied wire labels as you disconnect them.


Separate Wallplate from New Thermostat
Remove wallplate from the new thermostat and mount onto wall.

Wallplate
Mount Wall plate
Mount the new wall plate using the included screws and anchors.

Drill 3/16-in. holes for drywall
Drill 3/32-in. holes for plaster
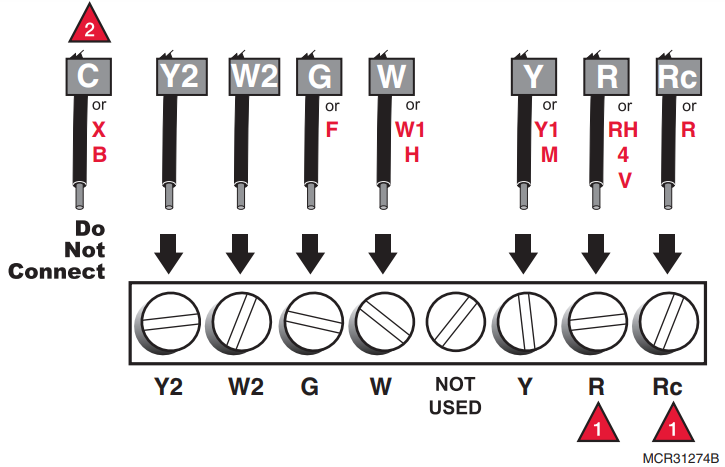
Connect Wires
Simply match wire labels. If labels do not match letters on the thermostat, check Alternate Wiring on page 6 and connect to terminal as shown (see notes, below).

We are here to help. Call 1-800-468-1502 for wiring assistance.
Alternate Wiring (Conventional Systems)
If labels do not match terminals, connect wires as shown here (see notes, below).

- If wires will be connected to both R and Rc terminals, remove metal jumper.
- Do not use C, X or B. Wrap bare end of wire with electrical tape.
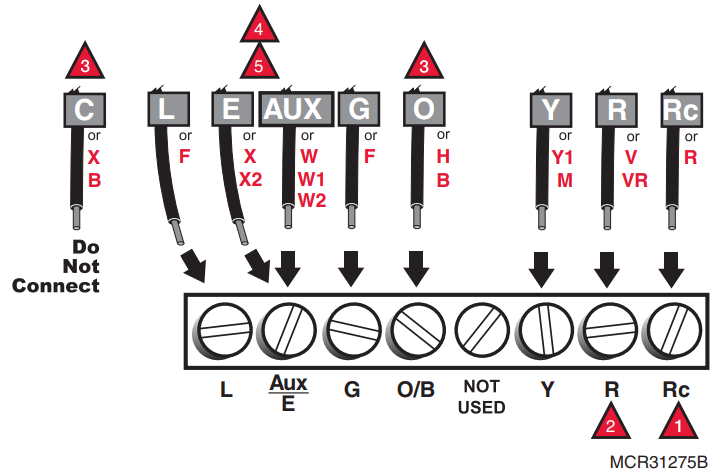
Wiring Heat Pump
If E and Aux do not each have a wire connected, use a small piece of wire to connect them to each other.

Alternate Wiring (Heat Pump Only)
If labels do not match letters on the thermostat, check the chart below and connect to terminal as shown here (see notes, below).

- Leave metal jumper in place, connecting R and Rc terminals.
- If your old thermostat had both V and VR wires, stop now and contact a qualified contractor for help.
- If your old thermostat had separate O and B wires, wrap the B wire in electrical tape and do not connect.
- If your old thermostat had Y1, W1 and W2 wires, stop now and contact a qualified contractor for help.
- If there were seperate wires on E and Aux, place both wires in the Aux/E terminal.
Install Batteries

Install Thermostat onto Wallplate
Install thermostat onto the wall plate on the wall.

Turn Power Back On
Turn the power back on to the heating/cooling system.

If your system type is
Single Stage Heat and Cool
Congratulations, you’re done!
If your system type is
Multistage Heat and Cool
Heat Pump* without Backup Heat
Heat Pump* with Backup Heat
Heat Only
Cool Only
Continue with Advanced Installation to match your thermostat to your system type.
*Heat Pumpan air conditioner that provides cooling in the summer, and also runs in reverse in the winter to provide heating. If you are not sure of your system type or if you have other questions, call us toll-free at 1-800-468-1502. This thermostat works on 24 volt or 750 mV systems. It will NOT work on 120/240 Volt systems.
Advanced Installation of Honeywell Programmable Thermostat RET95E
Enter System Setup
To enter system setup, press and hold both the ▲ and FAN buttons until the display changes (approximately 5 seconds).

| Function | Description | Setting |
|---|---|---|
| 1 | Press the ▲ or ▼ button to select the type of system you have in your home | Heating & cooling: Gas, oil or electric heating with central air conditioning. Heat pump: Outside compressor provides both heating and cooling without backup or auxiliary heat. Heating only: Gas, oil or electric heating without central air conditioning. Heating only with fan: Gas, oil or electric heating without central air conditioning. (Use this setting if you could turn the fan on and off with a fan switch on your old thermostat.) Cool only: Central air conditioning only. Cool pump: Outside compressor provides both heating and heating with backup or auxiliary heating. |
| 2 | select whether your changeover valve is used in heating or cooling | Cooling changeover valve: Use this setting if you connected a wire labeled "O" to the O/B/W wire terminal. Heating changeover valve: Use the setting if you connected a wire labeled "B" to the O/B/W wire terminal. |
| 3 | select your heating system and fan operation | Gas or oil heat: Use this setting if you have a gas or oil heating system (system controls fan operation). Electric heat: Use this setting if you have an electric heating system (thermostat controls fan operation). |
| 5 | select your Stage 1 heating system and optimize its operation | Gas or oil furnace: Use this setting if you have a standard gas or oil furnace that is less than 90% efficient. Electric furnace: Use this setting if you have any type of electric furnace. Heat pump, hot water or high-efficiency furnace: Use this setting if you have a hot water system or a gas furnace of greater than 90% efficiency. Gas/oil steam or gravity system: Use this setting if you have a steam or gravity heat system. |
| 6 | select your Stage 2 heating system and optimize its operation | Gas or oil furnace: Use this setting if you have a standard gas or oil furnace that is less than 90% efficient. Electric furnace: Use this setting if you have any type of electric furnace. Heat pump, hot water or high-efficiency furnace: Use this setting if you have a hot water system or a gas furnace of greater than 90% efficiency. Gas/oil steam or gravity system: Use this setting if you have a steam or gravity heat system. |
| 8 | Emergency Heat Cycle Rate (heat pumps only) | Electric furnace: Electric heating systems. |
| 12 | select Manual or Auto Changeover | Manual Changeover: (Heat/Off/Cool) Automatic Changeover: (Heat/Off/Cool/Auto) Automatically turns on heat or cool based on room temperature. |
| 13 | select Smart Response Technology | Smart Response Technology OFF 1 Smart Response Technology ON |
| 14 | select Fahrenheit or Celsius temperature display | Fahrenheit temperature display (°F) 1 Celsius temperature display (°C) |
Troubleshooting
If you have difficulty with your thermostat, please try the following suggestions. Most problems can be corrected quickly and easily.
Display is blank: Make sure fresh AA alkaline batteries are correctly installed
Temperature settings do not change: Make sure heating and cooling temperatures are set to acceptable ranges:
Heat: 40° to 90°F (4.5° to 32°C).
Cool: 50° to 99°F (10° to 37°C).Cannot change system setting to Cool
Check Function 1: System Type to make sure it is set to match your heating and cooling equipmentFan does not turn on when heat is required
Check Function 3: Heating Fan Control to make sure it is set to match your heating equipmentHeating or cooling system does not respond
Press SYSTEM button to set system to Heat. Make sure the temperature is set higher than the Inside temperature.
Press SYSTEM button to set system to Cool. Make sure the temperature is set lower than the Inside temperature
Check circuit breaker and reset if necessary.
Make sure power switch at heating & cooling system is on
Make sure furnace door is closed securely.
Wait 5 minutes for the system to respond.
“Cool On” or “Heat On” is flashing
Compressor protection feature is engaged. Wait 5 minutes for the system to restart safely, without damage to the compressorHeat pump issues cool air in heat mode, or warm air in cool mode
Check Function 2: Heat Pump Changeover Valve to make sure it is properly configured for your system.Heating and cooling equipment running at the same time (or heat does not turn off)
Check Function 1: System Type to make sure it is set to match your heating and cooling equipment.
Grasp and pull thermostat away from wallplate. Check to make sure bare wires are not touching each other.Heating system is running in cool mode
Check Function 1: System Type to make sure it is set to match your heating and cooling equipment
Honeywell Programmable Thermostat RET95E Description
The Honeywell Programmable Thermostat RET95E is a high-quality thermostat that offers homeowners precise temperature control and energy savings. Its 7-day programmability allows for customized scheduling, while the smart response technology ensures that the desired temperature is reached at the set time. The touchscreen display is user-friendly, making it easy to navigate and adjust settings. Additionally, this thermostat is Energy Star certified, ensuring that it meets strict energy efficiency guidelines.
Changing Settings
Press the ▲ or ▼ button to change the setting.
Press NEXT to advance to the next function.
Press DONE to exit and save settings.
About your new thermostat
Your new Honeywell thermostat has been designed to give you many years of reliable service and easy-to-use, push-button climate control.
Easy-to-follow menu programming.
One-touch temp control overrides program schedule at any time.
Large, clear, backlit display is easy to read — even in the dark.
Displays both room temperature and temperature setting.
Removable battery holder for fast, easy replacement.
Built-in compressor protection.
Set the time and day

Press SET CLOCK/DAY/SCHEDULE, then press ▲ or ▼ to set the clock time.
Press the SET DAY button, then press ▲ or ▼ to select the day of the week.
Press DONE to save & exit.
NOTE: If the SET CLOCK/DAY/SCHEDULE option is not displayed, press DONE or RUN SCHEDULE.
NOTE: If the display flashes Set Clock, the thermostat will follow your settings for the weekday “Wake” time period until you reset the time and day.
Program Schedule
You can program four time periods each day, with different settings for weekdays and weekends. We recommend the pre-set settings (shown in the table below), since they can reduce your heating/ cooling expenses.

Wake: Set to the time you awaken and the temperature you want during the morning, until you leave for the day.
Leave: Set to the time you leave home and the temperature you want while you are away (usually an energy-saving level).
Return: Set to the time you return home and the temperature you want during the evening, until bedtime.
Sleep: Set to the time you go to bed and the temperature you want overnight (usually an energy-saving level).
NOTE: Leave and Return periods can be canceled on weekends
To adjust program schedules
(RTH6350 and RET93E only)

Press SET CLOCK/DAY/SCHEDULE, then SET SCHEDULE.
Press ▲ or ▼ to set your weekday Wake time (Mo-Fr), then press NEXT.
Press ▲ or ▼ to set the temperature for this time period, then press NEXT.
Set time and temperature for the next time period (Leave). Repeat steps 2 and 3 for each weekday time period.
Press NEXT to set weekend time periods (Sa & Su), then press DONE to save & exit.
NOTE: Make sure the thermostat is set to the system you want to program (Heat or Cool).
NOTE: You can press CANCEL PERIOD to eliminate unwanted time periods (except Wake).
To adjust program schedules
(RTH6450 and RET95E only)

Press SET CLOCK/DAY/SCHEDULE, then SET SCHEDULE.
Press ▲ or ▼ to set your weekday Wake time (Mo-Fr), then press NEXT.
Press ▲ or ▼ to set the temperature for this time period, then press NEXT.
Set time and temperature for the next time period (Leave). Repeat steps 2 and 3 for each weekday time period.
Press NEXT to set Saturday time periods.
Press NEXT to set Sunday time periods, then press DONE to save & exit.
NOTE: Make sure the thermostat is set to the system you want to program (Heat or Cool).
NOTE: You can press CANCEL PERIOD to eliminate unwanted time periods (except Wake).
Program schedule override
(Temporary)

Press ▲ or ▼ to immediately adjust the temperature. This will temporarily override the temperature setting for the current time period.
“Temporary” will appear on the display and the current program period will flash.
The new temperature will be maintained only until the next programmed time period begins (see page 13).
To cancel the temporary setting at any time, press RUN SCHEDULE.
NOTE: Make sure the thermostat is set to the system you want to control (heat or cool).
Program schedule override
(Permanent)

Press HOLD to permanently adjust the temperature. This will override the temperature settings for all time periods.
The “Hold” feature turns off the program schedule and allows you to adjust the thermostat manually, as needed.
Whatever temperature you set will be maintained 24 hours a day, until you manually change it, or press RUN SCHEDULE to cancel “Hold” and resume the program schedule.
NOTE: Make sure the thermostat is set to the system you want to control (heat or cool).
Auto Changeover
(RTH6450 and RET95E only)
Use this feature in climates where both air conditioning and heating are used on the same day. When the system mode is in Auto, the thermostat automatically selects heating or cooling depending on the indoor temperature.
While in the Auto mode, if a schedule override takes place (temporarily or permanently) the thermostat will automatically adjust the cooling and heating settings to maintain a 3-degree separation between the cool and heat settings.
For example, if the heat temperature is raised to where it gets within 3-degrees of the cool setting, the display will show an up arrow next to “cool” to show the thermostat is raising the cool setting up to maintain a 3-degree separation.Press the Select Heat/Cool button to select between the heat and cool to view/adjust either mode.

NOTICE: To avoid possible compressor damage, do not use Auto Changeover if the outside temperature drops below 50ºF (10ºC).
Honeywell Programmable Thermostat RET95E Smart Response Technology
This feature allows the thermostat to “learn” how long the furnace and air conditioner take to reach programmed temperature settings, so the temperature is reached at the time you set. For example: Set the Wake time to 6 am, and the temperature to 70°. The heat will come on before 6 am, so the temperature is 70° by the time you wake at 6. The message “In Recovery” is displayed when the system is activated before a scheduled time period.

Built-in compressor protection
This feature helps prevent damage to the compressor in your air conditioning or heat pump system.
Damage can occur if the compressor is restarted too soon after shutdown. This feature forces the compressor to wait a few minutes before restarting.
During the wait time, the display will flash the message Cool On (or Heat On if you have a heat pump). When the safe wait time has elapsed, the message stops flashing and the compressor turns on.

Battery replacement
Install fresh batteries immediately when REPLACE BATTERY begins flashing. The warning flashes about two months before the batteries are depleted.
Replace batteries once a year, or when you will be away for more than a month.
If batteries are inserted within two minutes, the time and day will not have to be reset. All other settings are permanently stored in memory and do not require battery power.


Troubleshooting
Here are some common problems and solutions for the Honeywell Programmable Thermostat RET95E:
- Problem: Thermostat is not responding to touch.
Solution: Make sure the thermostat is powered on and the display is lit. If not, check the batteries and replace them if necessary. - Problem: Temperature is not changing as expected.
Solution: Check the thermostat's settings and make sure they are correctly programmed. Also, ensure that the thermostat is properly connected to the heating and cooling system.
Warning: Do not attempt to repair the thermostat yourself if it is still under warranty. Contact Honeywell for repair or replacement.
Warranty
Honeywell warrants this product, excluding battery, to be free from defects in the workmanship or materials, under normal use and service, for a period of one (1) year from the date of purchase by the consumer. If at any time during the warranty period the product is determined to be defective or ma functions, Honeywell shall repair or replace it (at Honeywell’s option).
Pros & Cons about Honeywell Programmable Thermostat RET95E
Pros
- 7-day programmability with 4 periods per day
- Smart response technology for optimal temperature control
- Energy Star certified for energy efficiency
- User-friendly touchscreen display
Cons
- May be more expensive than some other programmable thermostats
- Some users may find the setup process complicated
Faqs
How do I program my Honeywell Programmable Thermostat RET95E for daily heating and cooling schedules?
How do I initially set up my Honeywell Programmable Thermostat RET95E?
What is the correct way to program the heating and cooling schedule on the Honeywell Programmable Thermostat RET95E?
How can I temporarily override the programmed temperature on my Honeywell Programmable Thermostat RET95E?
Is it possible to set different schedules for weekdays and weekends on the Honeywell Programmable Thermostat RET95E?
How does the Honeywell Programmable Thermostat RET95E Auto Changeover function work?
What batteries does the Honeywell Programmable Thermostat RET95E require and how often should they be replaced?
How do I reset my Honeywell Programmable Thermostat RET95E thermostat to factory settings?
Can the Honeywell Programmable Thermostat RET95E be connected to a smart home system?
Why is my Honeywell Programmable Thermostat RET95E system running continuously without shutting off?
Leave a Comment
