Hp LaserJet Ultra Printer M106 User Guide
Content
Introduction
A monochrome printer that is tiny and effective enough for home and small business use. The M106 provides dependable performance, excellent print quality, and wireless connectivity in addition to quick printing rates and automatic duplex printing. It is the perfect option for anyone looking for convenience and productivity in a stylish packaging because of its energy-efficient design and user-friendly features.
Printer Overview
HP's all-inclusive help for the printer includes the following information:
- Install and configure
- Learn and use
- Solve problems
- Download software and firmware updates
- Join support forums
- Find warranty and regulatory information
Printer views
Printer front view
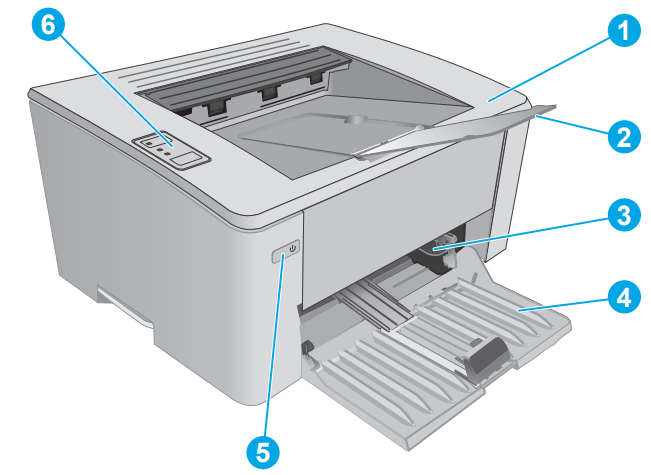
- Top cover (toner cartridge access) and output bin
- Output bin extension
- Priority input tray (M102w, M104w, M106w models only)
- Input tray
- Power button
- Control panel
Printer back view
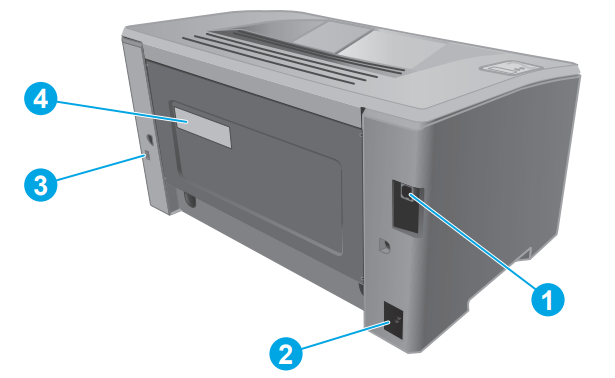
- USB interface port
- Power connection
- Slot for cable-type security lock
- Serial number and printer number label
Control-panel view
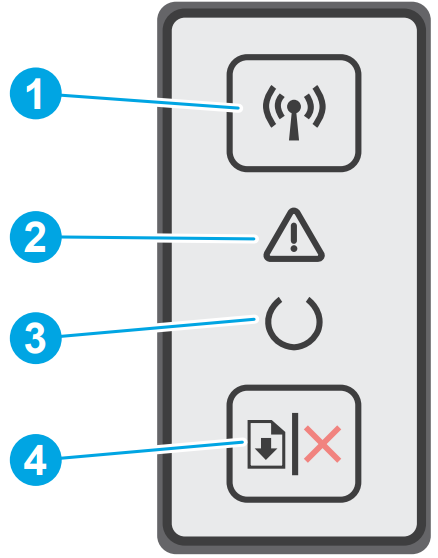
- Wireless button and LED (wireless models only)
- Press this button to turn the wireless feature on or off, or to configure a WiFi Direct connection.
- Press and hold this button to configure a WPS connection.
- If the wireless LED light is on, there is a stable wireless connection. If it is blinking, there is either a WPS or WiFi Direct configuration process in progress. If it is blinking rapidly, there is an issue with the wireless connection.
- Attention LED
The Attention light blinks when the printer requires user attention, such as when the printer runs out of paper or a toner cartridge needs to be changed. If the light is on without blinking, the printer has experienced an error. - Ready LED
The Ready light is on when the printer is ready to print. It blinks when the printer is receiving print data or canceling a print job. - Resume/Cancel button
_control_hp_laserjet_ultra_printer_m106.png)
Press this button for the following actions:- If the printer is currently processing a job, with the Attention LED off and Ready LED blinking, press the button to cancel the print job.
- If the printer is in an error or prompt state, with the Ready LED off and the Attention LED blinking, press the button to clear the error and resume printing.
- In manual duplex mode, press this button to print the second side of the page.
Printer specifications
IMPORTANT: The following specifications are correct at the time of publication, but they are subject to change. For current information, see https://www.hp.com/support/ljM101
Technical specifications
See https://www.hp.com/support/ljM101 for current information.
Supported operating systems
The following information applies to the printer-specific Windows PCLmS and OS X print drivers.
Windows: The HP Software Installer installs the PCLm.S, PCLmS, or PCLm-S driver depending on the Windows operating system along with optional software when using the full software installer. See the software installation notes for more information
OS X: Mac computers are supported with this printer. Download HP Easy Start either from the printer installation CD or from 123.hp.com, and then use HP Easy Start to install the HP print driver and utility. See the software installation notes for more information.
- Go to 123.hp.com.
- Follow the steps provided to download the printer software.
Linux: For information and print drivers for Linux, go to hplipopensource.com/hplip-web/index.html.
| Operating System | Print Driver Installed | Notes |
|---|---|---|
| Windows® XP SP3 or later, 32-bit | The HP PCLm.S printer-specific print driver is installed for this operating system as part of the basic software installation. The basic installer installs the driver only. | Microsoft retired mainstream support for Windows XP in April 2009. HP will continue to provide best-effort support for the discontinued XP operating system. |
| Windows Vista®, 32-bit | The HP PCLm.S printer-specific print driver is installed for this operating system as part of the basic software installation. The basic installer installs the driver only. | |
| Windows Server 2003, SP2 or later, 32-bit | The HP PCLm.S printer-specific print driver is installed for this operating system as part of the basic software installation. The basic installer installs the driver only. | Microsoft retired mainstream support for Windows Server 2003 in July 2010. HP will continue to provide best-effort support for the discontinued Server 2003 operating system. |
| Windows Server 2003, R2, 32-bit | The HP PCLm.S printer-specific print driver is installed for this operating system as part of the basic software installation. The basic installer installs the driver only. | Microsoft retired mainstream support for Windows Server 2003 in July 2010. HP will continue to provide best-effort support for the discontinued Server 2003 operating system. |
| Windows 7, 32-bit and 64-bit | The HP PCLmS printer-specific print driver is installed for this operating system as part of the full software installation. | |
| Windows 8, 32-bit and 64-bit | The HP PCLmS printer-specific print driver is installed for this operating system as part of the basic software installation. | Windows 8 RT support is provided through Microsoft IN OS Version 4, 32-bit driver. |
| Windows 8.1, 32-bit and 64-bit | The HP PCLm-S printer-specific print driver is installed for this operating system as part of the basic software installation. | Windows 8.1 RT support is provided through Microsoft IN OS Version 4, 32-bit driver. |
| Windows 10, 32-bit and 64-bit | The HP PCLm-S printer-specific print driver is installed for this operating system as part of the basic software installation. | |
| Windows Server 2008, 32-bit and 64-bit | The HP PCLm.S printer-specific print driver is installed for this operating system as part of the basic software installation. | |
| Windows Server 2008, R2, 64-bit | The HP PCLmS printer-specific print driver is installed for this operating system as part of the basic software installation. | |
| Windows Server 2012, 64-bit | The HP PCLmS printer-specific print driver is installed for this operating system as part of the basic software installation. | |
| Windows Server 2012 R2, 64-bit | The HP PCLm-S printer-specific print driver is installed for this operating system as part of the basic software installation. | |
| OS X 10.9 Mavericks, OS X 10.10 Yosemite, and OS X 10.11 El Capitan | The OS X print driver and print utility are available for download from either the installation CD or 123.hp.com. | Download HP Easy Start either from the printer installation CD or from 123.hp.com, and then use HP Easy Start to install the HP print driver and utility. 1. Go to 123.hp.com. 2. Follow the steps provided to download the printer software. |
NOTE: For a current list of supported operating systems, go to https://www.hp.com/support/ljM101 for HP's all-inclusive help for the printer.
Mobile printing solutions
HP offers multiple mobile and ePrint solutions to enable easy printing to an HP printer from a laptop, tablet, smartphone, or other mobile device. To see the full list and to determine the best choice, go to https://www.hp.com/go/LaserJetMobilePrinting
NOTE: Update the printer firmware to ensure all mobile printing and ePrint capabilities are supported.
- Wi-Fi Direct (wireless models only)
- HP ePrint via email (Requires HP Web Services to be enabled and the printer to be registered with HP Connected)
- HP ePrint software
- Android Printing
- AirPrint
Printer dimensions
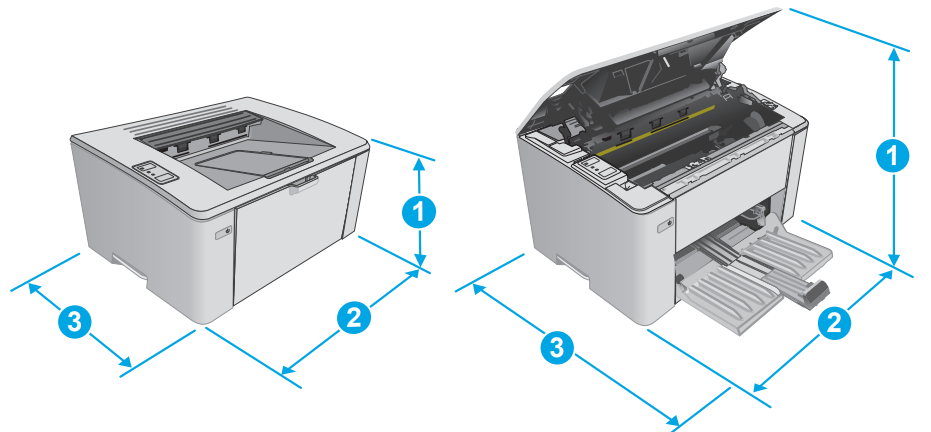
| Printer State | Height | Width | Depth | Weight (with cartridges) |
|---|---|---|---|---|
| Fully Closed | 190.7 mm (7.5 in) | 364.7 mm (14.4 in) | 247.8 mm (9.7 in) | |
| Fully Open | 332.4 mm (13.1 in) | 364.7 mm (14.4 in) | 467 mm (18.4 in) | |
| With CF217A/CF218A Cartridge | 5.1 kg (11.24 lb) | |||
| With CF233A Cartridge | 5.26 kg (11.6 lb) |
Power consumption, electrical specifications, and acoustic emissions
CAUTION: Power requirements are based on the country/region where the printer is sold. Do not convert operating voltages. This will damage the printer and void the printer warranty.
Operating-environment range
| Environment | Recommended | Allowed |
|---|---|---|
| Temperature | 15° to 27°C (59° to 80.6°F) | 15° to 30°C (59° to 86°F) |
| Relative humidity | 20% to 70% relative humidity (RH), noncondensing | 10% to 80% (RH), non-condensing |
| Altitude | Not applicable | 0 to 3048 m (0 to 10,000 ft) |
Printer hardware setup and software installation
For basic setup instructions, see the Setup Poster and Getting Started Guide that came with the printer. For additional instructions, go to HP support on the Web.
Find the following support:
- Install and configure
- Learn and use
- Solve problems
- Download software and firmware updates
- Join support forums
- Find warranty and regulatory information
Description
Perfect for any workplace setting, the HP LaserJet Ultra Printer M106 is a beautiful and portable printer. It is an adaptable and dependable option for any organization, providing quick printing times, excellent picture quality, and a multitude of connectivity choices. Additionally, the printer has HP's Instant On technology, which guarantees that it is constantly prepared to print—even after extended periods of inactivity. Furthermore, the HP LaserJet Ultra Printer M106 has sophisticated security features like HP Jet Advantage Security Manager and HP Sure Start that guard your network and data from danger.
Interpret control-panel light patterns
If the printer requires attention, an error code appears on the control-panel display.
Table 6-1 Status-light legend
 Symbol for “light off”
 Symbol for “light on”
 Symbol for "light blinking"
Table 6-2 Control-panel light patterns
| Light Status | State of the Printer | Action |
|---|---|---|
| The Attention light is blinking. | The printer is in manual-feed mode. | Load the correct paper type and size into the input tray. Press the Resume/Cancel button to continue. |
 | The printer is processing a manual duplex job. | Load the pages into the input tray to print the second sides. Press the Resume/Cancel button to continue. |
| The input tray is empty. | Load the tray. | |
| A door is open. | Verify that the toner-cartridge door is fully closed. | |
| The printer has failed to pick up a sheet of paper to process a print job. | Verify that paper is correctly loaded, and then press the Resume/Cancel button to continue. | |
| Paper is jammed in the printer. | Check for jams in the input tray, the output bin, and the toner cartridge area. Clear the jam. Press the Resume/Cancel button to continue. | |
| The toner cartridge or imaging drum is missing or incorrectly installed. | Verify that all supplies are in place and installed correctly. | |
| The toner cartridge or imaging drum is very low. | Replace the toner cartridge or imaging drum. | |
| Multiple supplies are very low. | Replace the supplies. | |
| The toner cartridge or imaging drum is incompatible with the printer, possibly due to a missing or damaged memory chip. | Replace the toner cartridge or imaging drum. | |
| Multiple supplies are incompatible with the printer, possibly due to a missing or damaged memory chip. | Replace the supplies. | |
| The toner cartridge or imaging drum has been protected on another printer. | Replace the toner cartridge or imaging drum. | |
| Multiple supplies have been protected on another printer. | Replace the supplies. | |
| The printer has detected an unauthorized toner cartridge or imaging drum. | The printer has detected an unauthorized toner cartridge or imaging drum. | Replace the toner cartridge or imaging drum. |
| The printer has detected multiple unauthorized supplies. | The printer has detected multiple unauthorized supplies. | Replace the supplies. |
| The cartridge sensor has experienced an error. | The cartridge sensor has experienced an error. | Replace the toner cartridge. |
| The loaded paper is not the size needed for the print job. | The loaded paper is not the size needed for the print job. | Replace the paper, or press the Resume/Cancel button to continue with the size currently loaded. |
| The printer has experienced a general engine error. | The printer has experienced a general engine error. | Press the Resume/Cancel button to continue. If the error repeats, turn off the printer. Wait 30 seconds, and then turn on the printer. |
| Incorrect firmware has been loaded. | Incorrect firmware has been loaded. | Press the Resume/Cancel button to continue. Load the correct firmware. |
| The printer has experienced a bad code signature. | The printer has experienced a bad code signature. | Press the Resume/Cancel button to accept the signature. |
| The printer has experienced an engine cable error. | The printer has experienced an engine cable error. | Press the Resume/Cancel button to continue. If the error persists, contact HP customer support. |
| The printer has experienced a control panel cable error. | The printer has experienced a control panel cable error. | Press the Resume/Cancel button to continue. If the error persists, contact HP customer support. |
The Attention and Ready lights are on. 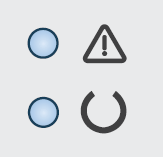 | The printer has experienced a fatal error from which it cannot recover. | 1. Turn off the printer or disconnect the power cord from the printer. 2. Wait 30 seconds, and then turn on the printer or reconnect the power cord to the printer. 3. Wait for the printer to initialize. If the error persists, contact HP customer support. |
Restore the factory-set defaults
Restoring the factory-set defaults returns all of the printer and network settings to the factory defaults. It will not reset the page count, tray size, or language. To restore the printer to the factory-default settings, follow these steps.
CAUTION: Restoring the factory-set defaults returns all of the settings to the factory defaults, and it also deletes any pages that are stored in the memory.
- Open the HP Embedded Web Server (EWS):
Direct-connected printers- Open the HP Printer Assistant.
- Windows 8.1: Click the down arrow in lower left corner of the Start screen, and then select the printer name.
- Windows 8: Right-click an empty area on the Start screen, click All Apps on the app bar, and then select the printer name.
- xWindows 7, Windows Vista, and Windows XP: From the computer desktop, click Start, select All Programs, click HP, click the folder for the printer, select the icon with the printer's name, and then open HP Printer Assistant.
- In the HP Printer Assistant, select Print, and then select HP Device Toolbox.
Network-connected printers- Print a configuration page to determine the IP address or host name.
- Press and hold the Resume/Cancel button until the Ready light
 begins blinking.
 - Release the Resume/Cancel button.
- Press and hold the Resume/Cancel button
Open a web browser, and in the address line, type the IP address or host name exactly as it displays on the printer configuration page. Press the Enter key on the computer keyboard. The EWS opens.

- Print a configuration page to determine the IP address or host name.
- Open the HP Printer Assistant.
NOTE: If the web browser displays a message indicating that accessing the website might not be safe, select the option to continue to the website. Accessing this website will not harm the computer.
A “Cartridge is low” or “Cartridge is very low” message displays on the HP EWS
- Cartridge is low: The printer EWS indicates when a cartridge level is low. Actual cartridge life remaining may vary. Consider having a replacement available to install when print quality is no longer acceptable. The cartridge does not need to be replaced now.
- Cartridge is very low: The printer EWS indicates when the cartridge level is very low. Actual cartridge life remaining may vary. Consider having a replacement available to install when print quality is no longer acceptable. The cartridge does not need to be replaced now unless the print quality is no longer acceptable.
Once an HP cartridge has reached Very Low, HP’s Premium Protection Warranty on that cartridge has ended.
NOTE: The cartridge must be replaced when the printer indicates that the cartridge is very low for HP 33A Black Original LaserJet Toner Cartridge and HP 34A Original LaserJet Imaging Drum.
Change the “Very Low” settings
You can change the way the printer reacts when supplies reach the Very Low state. You do not have to reestablish these settings when you install a new cartridge.
NOTE: The "Very Low" setting cannot be changed for HP 33A Black Original LaserJet Toner Cartridge and HP 34A Original LaserJet Imaging Drum.
Open the HP Embedded Web Server (EWS):
Direct-connected printers- Open the HP Printer Assistant.
- Windows 8.1: Click the down arrow in lower left corner of the Start screen, and then select the printer name.
- Windows 8: Right-click an empty area on the Start screen, click All Apps on the app bar, and then select the printer name.
- Windows 7, Windows Vista, and Windows XP: From the computer desktop, click Start, select All Programs, click HP, click the folder for the printer, select the icon with the printer's name, and then open HP Printer Assistant.
- In the HP Printer Assistant, select Print, and then select HP Device Toolbox.
Network-connected printers
- Print a configuration page to determine the IP address or host name.
- Press and hold the Resume/Cancel button until the Ready light begins blinking.
- Release the Resume/Cancel button.
- Press and hold the Resume/Cancel button
- Open a web browser, and in the address line, type the IP address or host name exactly as it displays on the printer configuration page. Press the Enter key on the computer keyboard. The EWS opens.
NOTE: If the web browser displays a message indicating that accessing the website might not be safe, select the option to continue to the website. Accessing this website will not harm the computer.
- Open the HP Printer Assistant.
- Select the System tab, and then select Supply Settings.
- Select one of the following options:
- Select the Continue option to set the printer to alert you that the toner cartridge is very low, but to continue printing.
- Select the Stop option to set the printer to stop printing until you replace the cartridge.
- Select the Prompt option to set the printer to stop printing and prompt you to replace the cartridge. You can acknowledge the prompt and continue printing. A customer configurable option on this printer is “Prompt to Remind Me in 100 pages, 200 pages, 300 pages, 400 pages, or never.” This option is provided as a customer convenience and is not an indication these pages will have acceptable print quality.
Order supplies
| Order Method | Details |
|---|---|
| Order supplies and paper | http://www.hp.com/go/suresupply |
| Order through service or support providers | Contact an HP-authorized service or support provider. |
| Order using the HP Embedded Web Server (EWS) | To access, in a supported web browser on your computer, enter the printer IP address or host name in the address/URL field. The EWS contains a link to the HP SureSupply website, which provides options for purchasing Original HP supplies. |
Solve paper feed or jam problems
- If the printer has recurring problems with paper feeding or with jams, use the following information to reduce the number of occurrences.
The printer does not pick up paper
If the printer does not pick up paper from the tray, try these solutions.
- Open the printer and remove any jammed sheets of paper.
- Load the tray with the correct size of paper for your job.
- Make sure the paper size and type are set correctly on the printer control panel.
- Make sure the paper guides in the tray are adjusted correctly for the size of paper. Adjust the guides to the appropriate indentation in the tray.
- Check the printer control panel to see if the printer is waiting for you to acknowledge a prompt to feed the paper manually. Load paper, and continue.
- The pickup roller and separation pad might be contaminated.
The printer picks up multiple sheets of paper
If the printer picks up multiple sheets of paper from the tray, try these solutions.
- Remove the stack of paper from the tray and flex it, rotate it 180 degrees, and flip it over. Do not fan the paper. Return the stack of paper to the tray.
- Use only paper that meets HP specifications for this printer.
- Use paper that is not wrinkled, folded, or damaged. If necessary, use paper from a different package.
- Make sure the tray is not overfilled. If it is, remove the entire stack of paper from the tray, straighten the stack, and then return some of the paper to the tray.
- Make sure the paper guides in the tray are adjusted correctly for the size of paper. Adjust the guides to the appropriate indentation in the tray.
- Make sure the printing environment is within recommended specifications.
Frequent or recurring paper jams
Follow these steps to solve problems with frequent paper jams. If the first step does not resolve the problem continue with the next step until you have resolved the problem.
- If paper has jammed in the printer, clear the jam and then print a configuration page to test the printer.
- Check that the tray is configured for the correct paper size and type on the printer control panel. Adjust paper settings if necessary.
- Turn the printer off, wait 30 seconds, and then turn it on again.
- Print a cleaning page to remove excess toner from inside the printer.
- Open the HP Printer Assistant.
- Windows 8.1: Click the down arrow in lower left corner of the Start screen, and then select the printer name.
- Windows 8: Right-click an empty area on the Start screen, click All Apps on the app bar, and then select the printer name.
- Windows 7, Windows Vista, and Windows XP: From the computer desktop, click Start, select All Programs, click HP, click the folder for the printer, select the icon with the printer's name, and then open HP Printer Assistant.
- In the HP Printer Assistant, select Print, and then select HP Device Toolbox.
- On the Systems tab, click Service.
- In the Cleaning Mode area, click Start to begin the cleaning process.
- Open the HP Printer Assistant.
- Print a configuration page to test the printer.
- Press and hold the Resume/Cancel button until the Ready light begins blinking.
- Release the Resume/Cancel button.
If none of these steps resolves the problem, the printer might need service. Contact HP customer support.
- Press and hold the Resume/Cancel button
Prevent paper jams
To reduce the number of paper jams, try these solutions.
- Use only paper that meets HP specifications for this printer.
- Use paper that is not wrinkled, folded, or damaged. If necessary, use paper from a different package.
- Use paper that has not previously been printed or copied on.
- Make sure the tray is not overfilled. If it is, remove the entire stack of paper from the tray, straighten the stack, and then return some of the paper to the tray.
- Make sure the paper guides in the tray are adjusted correctly for the size of paper. Adjust the guides so they are touching the paper stack without bending it.
- If you are printing on heavy, embossed, or perforated paper, use the manual feed feature and feed sheets one at a time.
- Verify that the tray is configured correctly for the paper type and size.
- Make sure the printing environment is within recommended specifications.
Clear paper jams
Introduction
The following information includes instructions for clearing paper jams from the product.
Paper jam locations

- Output bin
- Toner cartridge area
- Main input tray or priority input tray (wireless models only)
Experiencing frequent or recurring paper jams?
Follow these steps to solve problems with frequent paper jams. If the first step does not resolve the problem continue with the next step until you have resolved the problem.
- If paper has jammed in the printer, clear the jam and then print a configuration page to test the printer.
- Check that the tray is configured for the correct paper size and type in the HP Embedded Web Server (EWS). Adjust paper settings if necessary.
Open the HP Embedded Web Server (EWS):
Direct-connected printers- Open the HP Printer Assistant.
- Windows 8.1: Click the down arrow in lower left corner of the Start screen, and then select the printer name.
- Windows 8: Right-click an empty area on the Start screen, click All Apps on the app bar, and then select the printer name.
- Windows 7, Windows Vista, and Windows XP: From the computer desktop, click Start, select All Programs, click HP, click the folder for the printer, select the icon with the printer's name, and then open HP Printer Assistant.
- In the HP Printer Assistant, select Print, and then select HP Device Toolbox.
Network-connected printers
- Print a configuration page to determine the IP address or host name.
- Press and hold the Resume/Cancel button until the Ready light begins blinking.
- Release the Resume/Cancel button.
- Open a web browser, and in the address line, type the IP address or host name exactly as it displays on the printer configuration page. Press the Enter key on the computer keyboard. The EWS opens.
- Open the HP Printer Assistant.
- Click the System tab, and then click the Paper Setup page.
- Select the type of paper that is in the tray.
- Select the size of paper that is in the tray.
- Turn the printer off, wait 30 seconds, and then turn it on again.
- Print a cleaning page to remove excess toner from inside the printer.
- Open the HP Printer Assistant.
Windows 8.1: Click the down arrow in lower left corner of the Start screen, and then select the printer name
Windows 8: Right-click an empty area on the Start screen, click All Apps on the app bar, and then select the printer name.
From the computer desktop, click Start, select All Programs, click HP, click the folder for the printer, select the icon with the printer's name, and then open HP Printer Assistant - In the HP Printer Assistant, select Print, and then select HP Device Toolbox.
- On the Systems tab, click Service.
- In the Cleaning Mode area, click Start to begin the cleaning process.
- Open the HP Printer Assistant.
- Print a configuration page to test the printer.
- Press and hold the Resume/Cancel button until the Ready light begins blinking.
- Release the Resume/Cancel button.
If none of these steps resolves the problem, the printer might need service. Contact HP customer support.
Setup Guide
Setting up the HP LaserJet Ultra Printer M106 is easy.
- First, remove the packaging materials and plug in the printer.
- Turn it on using the power button and wait for it to initialize.
- Then, connect the printer to your network using Wi-Fi Direct, USB, or Ethernet.
- Once connected, you can install the printer software on your computer or mobile device and start printing.
- It is important to follow the manufacturer's instructions carefully to ensure that the printer is set up correctly and that it is functioning properly.
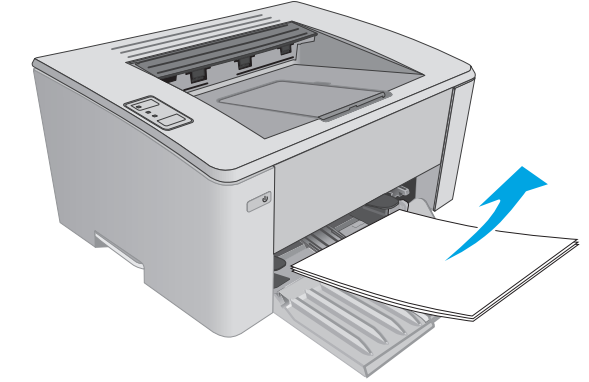
Clear paper jams in the input tray
When a jam occurs, the Attention light blinks repeatedly on the printer control panel.
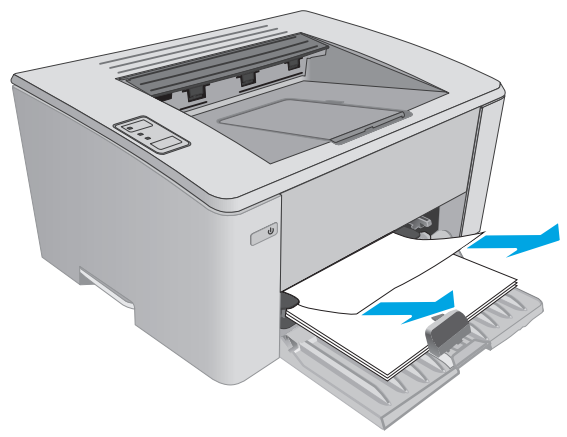
Remove any loose paper from the input tray.
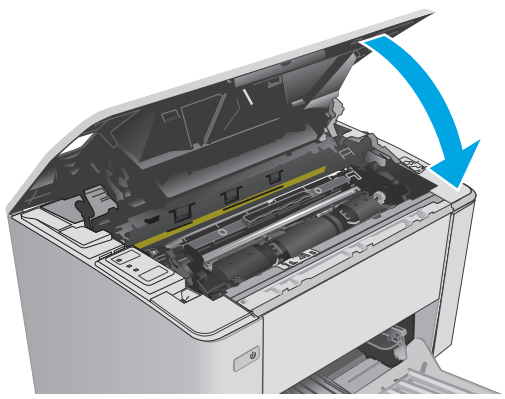
Open the top cover.
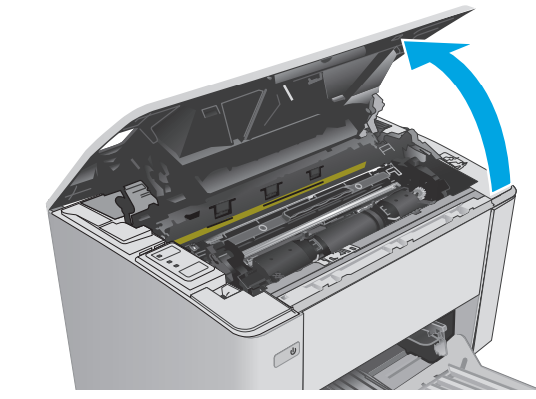
Remove the toner cartridge and imaging drum.
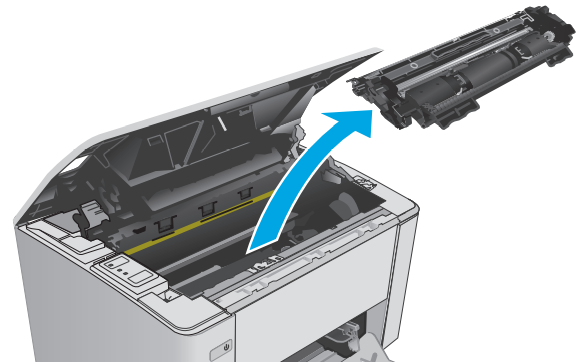
- M101-M105 models: Remove the toner cartridge first, and then remove the imaging drum.
- M106 models: Remove the toner cartridge and imaging drum as one unit.
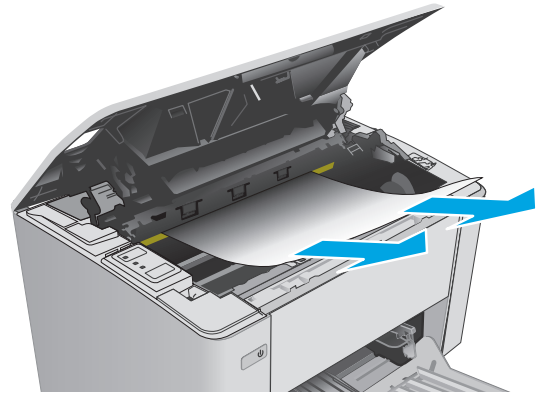
Remove any visible jammed paper in the input tray area. Use both hands to remove jammed paper to avoid tearing the paper.
Remove any jammed paper from the toner- cartridge area. Use both hands to remove jammed paper to avoid tearing the paper.
Reinsert the imaging drum and toner cartridge.
M101-M105 models: Install the imaging drum first, and then install the toner cartridge .
M106 models: Install the toner cartridge and imaging drum as one unit.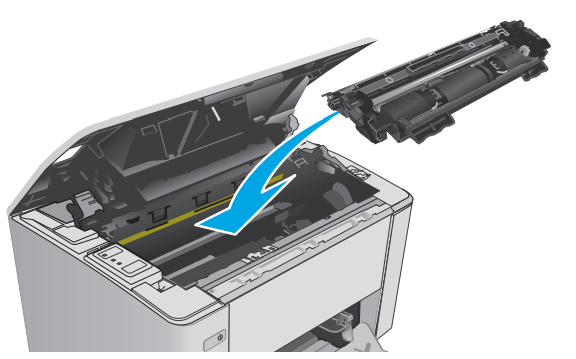
Close the top cover.
Troubleshooting
Solve wireless network problems
Wireless connectivity checklist
- Verify that the network cable is not connected.
- Verify that the printer and the wireless router are turned on and have power. Also make sure that the wireless radio in the printer is turned on.
- Verify that the service set identifier (SSID) is correct. Print a configuration page to determine the SSID. If you are not sure the SSID is correct, run the wireless setup again.
- With secured networks, verify that the security information is correct. If the security information is incorrect, run the wireless setup again.
- If the wireless network is working correctly, try accessing other computers on the wireless network. If the network has Internet access, try connecting to the Internet over a wireless connection.
- Verify that the encryption method (AES or TKIP) is the same for the printer as it is for the wireless access point (on networks using WPA security).
- Verify that the printer is within the range of the wireless network. For most networks, the printer must be within 30 m (100 ft) of the wireless access point (wireless router).
- Verify that obstacles do not block the wireless signal. Remove any large metal objects between the access point and the printer. Make sure poles, walls, or support columns containing metal or concrete do not separate the printer and wireless access point.
- Verify that the printer is located away from electronic devices that might interfere with the wireless signal. Many devices can interfere with the wireless signal including motors, cordless phones, security system cameras, other wireless networks, and some Bluetooth devices.
- Verify that the print driver is installed on the computer.
- Verify that you have selected the correct printer port.
- Verify that the computer and printer connect to the same wireless network.
- For OS X, verify that the wireless router supports Bonjour.
The printer does not print after the wireless configuration completes
- Make sure that the printer is turned on and in the ready state.
- Turn off any third-party firewalls on your computer.
- Make sure that the wireless network is working correctly.
- Make sure that your computer is working correctly. If necessary, restart the computer.
- Verify that you can open the printer HP Embedded Web Server from a computer on the network.
The printer does not print, and the computer has a third-party firewall installed
- Update the firewall with the most recent update available from the manufacturer.
- If programs request firewall access when you install the printer or try to print, make sure you allow the programs to run.
- Temporarily turn off the firewall, and then install the wireless printer on the computer. Enable the firewall when you have completed the wireless installation.
The wireless connection does not work after moving the wireless router or printer
- Make sure that the router or printer connects to the same network that your computer connects to.
- Print a configuration page.
- Compare the service set identifier (SSID) on the configuration page to the SSID in the printer configuration for the computer.
- If the numbers are not the same, the devices are not connecting to the same network. Reconfigure the wireless setup for the printer.
Cannot connect more computers to the wireless printer
- Make sure that the other computers are within the wireless range and that no obstacles block the signal. For most networks, the wireless range is within 30 m (100 ft) of the wireless access point.
- Make sure that the printer is turned on and in the ready state.
- Make sure there are not more than 5 concurrent Wi-Fi Direct users
- Turn off any third-party firewalls on your computer.
- Make sure that the wireless network is working correctly.
- Make sure that your computer is working correctly. If necessary, restart the computer.
The wireless printer loses communication when connected to a VPN
Typically, you cannot connect to a VPN and other networks at the same time.
The network does not appear in the wireless networks list
- Make sure the wireless router is turned on and has power.
- The network might be hidden. However, you can still connect to a hidden network.
The wireless network is not functioning
- Make sure that the network cable is not connected.
- To verify if the network has lost communication, try connecting other devices to the network.
- Test network communication by pinging the network.
- Open a command-line prompt on your computer.
- For Windows, click Start, click Run, type cmd, and then press Enter.
- For OS X, go to Applications, then Utilities, and open Terminal.
- Type ping followed by the router IP address.
- If the window displays round-trip times, the network is working.
- Open a command-line prompt on your computer.
- Make sure that the router or printer connects to the same network that the computer connects to.
- Print a configuration page.
- Compare the service set identifier (SSID) on the configuration report to the SSID in the printer configuration for the computer.
- If the numbers are not the same, the devices are not connecting to the same network. Reconfigure the wireless setup for the printer.
Perform a wireless network diagnostic test
From the printer control panel, you can run a diagnostic test that provides information about the wireless network settings.
- Open the HP Embedded Web Server (EWS):
- Print a configuration page to determine the IP address or host name.
- Press and hold the Resume/Cancel button until the Ready light begins blinking.
- Release the Resume/Cancel button.
- Open a web browser, and in the address line, type the IP address or host name exactly as it displays on the printer configuration page. Press the Enter key on the computer keyboard. The EWS opens.
NOTE: If the web browser displays a message indicating that accessing the website might not be safe, select the option to continue to the website. Accessing this website will not harm the computer.
- Print a configuration page to determine the IP address or host name.
- Select the Networking tab.
- On the Wireless Configuration page, verify that the On option is selected.
- Click the Print Test Report button to print a test page that shows test results.
Reduce interference on a wireless network
The following tips can reduce interference in a wireless network:
- Keep the wireless devices away from large metal objects, such as filing cabinets, and other electromagnetic devices, such as microwaves and cordless telephones. These objects can disrupt radio signals.
- Keep the wireless devices away from large masonry structures and other building structures. These objects can absorb radio waves and lower signal strength.
- Position the wireless router in a central location in line of sight with the wireless printers on the network.
HP LaserJet Ultra Printer M106 Pros & Cons
Pros:
- Fast printing speeds of up to 30 ppm
- High-quality images and text
- Wide range of connectivity options
- Compact and stylish design
- Advanced security features
Cons:
- No automatic duplex printing feature
- Higher upfront cost compared to some other printers in its class
Customer Reviews
Customers have praised the HP LaserJet Ultra Printer M106 for its fast printing speeds, high-quality images, and easy setup. However, some have criticized it for its lack of automatic duplex printing and higher upfront cost. Overall, the HP LaserJet Ultra Printer M106 is a reliable and high-performance printer that is well-suited for small to medium-sized businesses.
Most Common Complaints
The most common complaints about the HP LaserJet Ultra Printer M106 are its lack of automatic duplex printing and higher upfront cost compared to some other printers in its class. Some customers have also reported issues with the printer's connectivity and software.
Faqs
What is the initial setup procedure for the HP LaserJet Ultra M106?
Which kind of toner is compatible with the HP LaserJet?
How can I join a wireless network with the HP LaserJet Ultra Printer?
How can I use the HP M106 to print a document from my mobile device?
How should I proceed if an error message appears on the printer?
Can I use toner cartridges from a different manufacturer with the M106?
Leave a Comment