Htc Vive Headset and link box 2.0 User Guide | Settings
Content
Introduction
The Htc Vive Headset and Link Box 2.0 is a high-end virtual reality headset that delivers an immersive gaming experience. The VIVE Link Box (2.0) is an essential accessory that connects the headset to your computer, enabling seamless VR gameplay. The Link Box is compatible with the VIVE Pro series when paired with the VIVE Headset Cable 2.0. $76.41
Unboxing
What's inside the box?
Your VIVE comes with the following items, which you'll use to experience immersive VR environments:
Main component | Accessories |
| VIVE headset |
|
Link box |
|
VIVE controllers (2) |
|
Base stations (2) |
|
What are the system requirements?
To use VIVE, your computer must meet the following system requirements. To find out if your computer is ready for VR, download and run the Vive Quick Compatibility Check.wall anchors
| Component | Recommended system requirements | Minimum system requirements |
| Processor | Intel Core i5-4590/AMDFX™ 8350 equivalent or better | Intel Core i5-4590/AMD FX 8350 equivalentor better |
GPU | NVIDIA GeForce GTX 1060,AMD Radeon™ RX 480equivalent or better | NVIDIA GeForceGTX 970, AMD Radeon R9 290 equivalent or better |
| Memory | 4 GB RAM or more | 4 GB RAM or more |
| Video output | HDMI 1.4,DisplayPort™ 1.2 or newer | HDMI 1.4, DisplayPort 1.2 or newer |
| USB port | 1x USB 2.0 or newer | 1x USB 2.0 or newer |
| Operating system | Windows 7 SP1, Windows 8.1 or later, Windows 10 | Windows 7 SP1, Windows8.1 or later, Windows 10 |
Detailed Specifications
The Htc Vive Headset and Link Box 2.0 features a 2448 x 2448 pixels per eye resolution, providing crisp and clear visuals. The refresh rate is 90 Hz, ensuring smooth and seamless motion. The headset also has integrated headphones with 3D spatial audio, providing an immersive audio experience. The Link Box 2.0 supports DisplayPort 1.4 and HDMI 2.0, allowing for a more extensive range of connectivity options. The headset weighs approximately 550 grams, making it lightweight and comfortable to wear for extended periods.
Headset and link box
Headset
About the VIVE headset
- The headset is your window to the VR environment.
- The headset has sensors that are tracked by the base stations.
NOTE: The sensors on the headset are sensitive. Do not cover or scratch the sensor lenses, including the proximity sensor.
Front and side
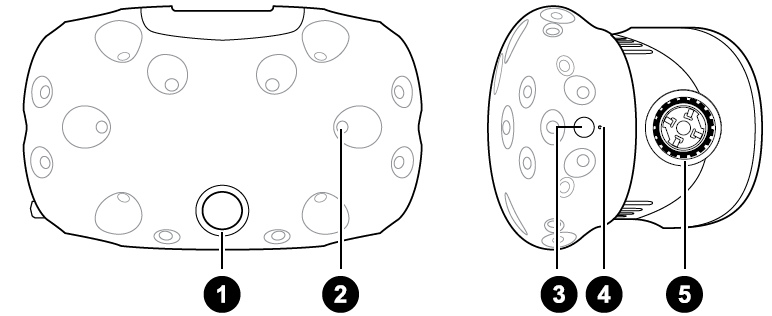
| 1 | Camera lens |
| 2 | Tracking sensor |
| 3 | Headset button |
| 4 | Status light |
| 5 | Lens distance knob |
Back
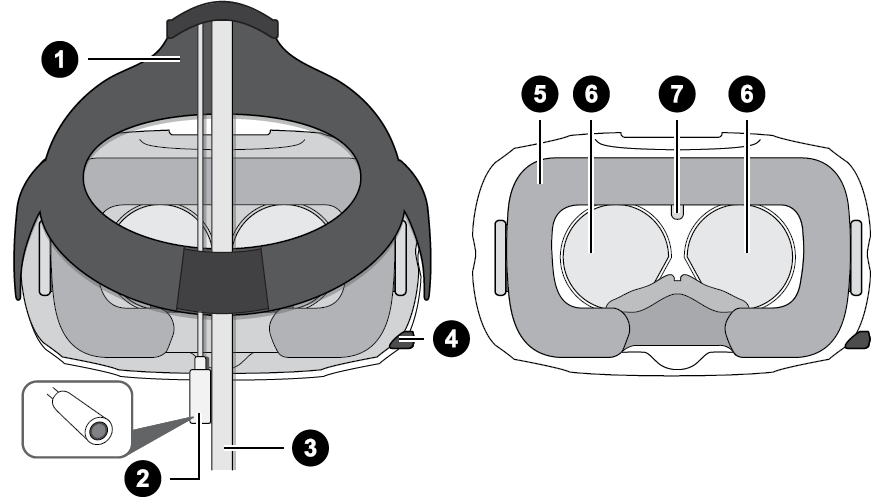
| 1 | Standard strap |
| 2 | Audio cable |
| 3 | 3-in-1 cable |
| 4 | IPD (interpupillary distance) knob |
| 5 | Face cushion |
| 6 | Lenses |
| 7 | Proximity sensor |
Bottom
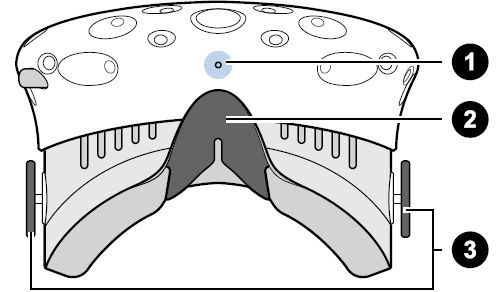
| 1 Microphone |
2 Nose rest |
3 Lens distance knobs |
Putting the headset on
TIP: Before putting the headset on, make sure that you've peeled off the protective film from the lenses.
- Pull the headset down over your eyes.
- Slide the standard strap around the back of your head, and adjust them so that the headset fits snugly and comfortably.
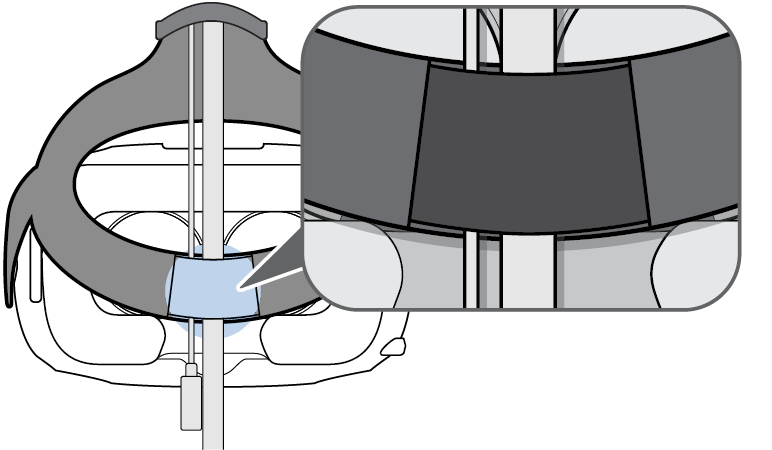
- Make sure that the cables pass through the sleeve at the back of the headset, and are positioned straight down your back.
Using the IPD knob on the headset
Interpupillary distance (IPD) is the distance between the center of the pupils in your eyes. A quick way to get an estimate is by facing a mirror and holding a millimeter ruler against your brow. Use this measurement as a guide to adjust the distance between the lenses of the headset so that you'll have a better viewing experience.
To change the distance between the lenses, rotate the IPD knob.
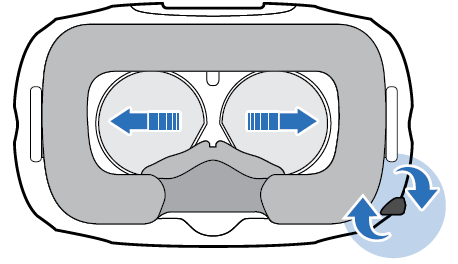
As you adjust the IPD, you'll see information displayed in the headset that indicates the current distance between the centers of the lenses.
Can I wear my prescription glasses while using VIVE?
Most glasses fit inside the headset. If you wear large prescription glasses, adjust the lens distance knobs to increase the space in the headset.
NOTE: Make sure that no part of your glasses scratch the headset lenses.
Adjusting the lens distance on the headset
If you wear large prescription glasses or have long eyelashes, you may need to increase the lens distance further from your face. Only increase this distance as necessary, as the closer the lenses are to your eyes, the better your field of view will be while wearing the headset.
NOTE: Make sure that no part of your glasses scratch the headset lenses.
Pull out each lens distance knob to unlock it.

Rotate both lens distance knobs to adjust the lens further or closer to your face.

After you're done adjusting, push each knob to lock it back in.

Description
The Htc Vive Headset and Link Box 2.0 offer an unparalleled VR experience, with its superior resolution and audio capabilities. The headset is designed with comfort in mind, featuring a halo headband that evenly distributes weight and a soft facial cushion. The Link Box 2.0 allows for easy setup and connectivity, with multiple ports for HDMI, DisplayPort, and USB. With its 90 Hz refresh rate, the HTC Vive Headset and Link Box 2.0 provide a smooth and responsive VR experience, free of motion sickness.
Controllers
About the VIVE controllers
Use the controllers to interact with objects in the VR world. The controllers have sensors that are tracked by the base stations.
NOTE: The sensors on the controllers are sensitive. Do not cover or scratch the sensor lenses.
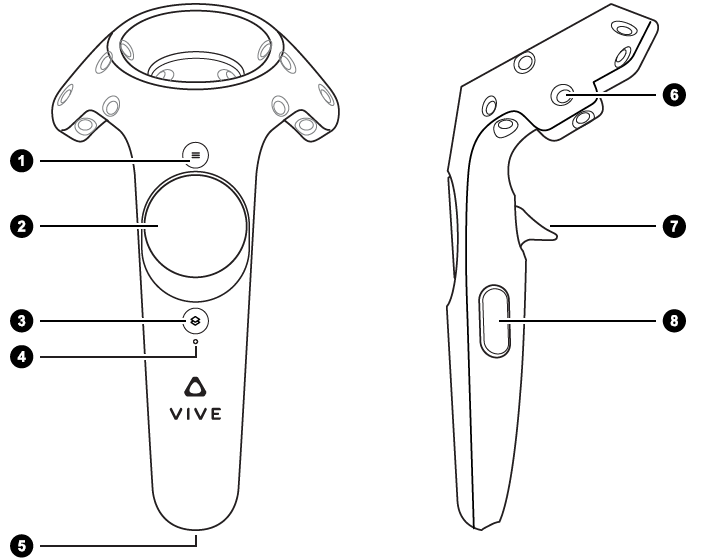
| 1 | Menu button |
2 | Trackpad |
3 | System button |
4 | Status light |
5 | Micro-USB port |
6 | Tracking sensor |
7 | Trigger |
8 | Grip button |
Charging the controllers
- You can check the battery level of the controllers when no apps are running, or when the System Dashboard is up. When the battery is low, the indicator will show a single red dot
 .
. - Charge each controller using the provided power adapters and USB cables.
- When the controller is plugged in and fully charged, its status light shows green if the controller is on or white if the controller is off.
Turning the controllers on or off
- To turn the controller on, press the System button until you hear a beeping sound.
- To turn the controller off, press and hold the System button until you hear a beeping sound.
When you quit the SteamVR app, the controllers will automatically turn off. The controllers will also automatically turn off after being idle for a period of time.
Pairing the controllers with the headset
- Once the controllers are turned on for the first time, they will automatically pair with the headset.
- The status light shows as blinking blue while the pairing is in progress. The status light turns solid green when the controllers are paired with the headset.
- To manually pair the controllers, launch the SteamVR app, tap
 , and then select Devices Pair Controller. Follow the on-screen instructions to complete the process.
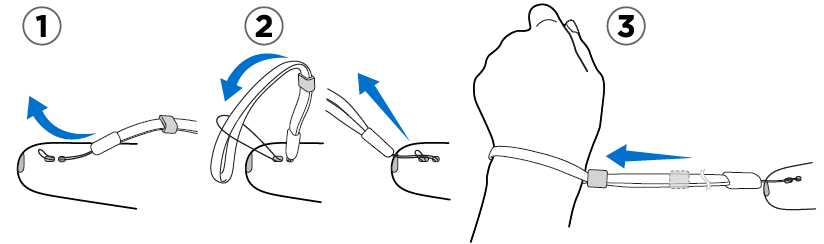
Attaching the lanyards to the controllers
Using the lanyards may help prevent the controllers from accidentally being dropped; however, please do not fling or violently throw the controller because the lanyard may break.
- While holding the controller, insert the lanyard’s thread from the top to the bottom hole.
- Loop the lanyard through the thread, and then tug the lanyard to fasten it in place.
- Place the lanyard on your wrist, and then adjust the lock to tighten the lanyard comfortably around your wrist.
Updating controller firmware
- From your computer, open the SteamVR app.
- If you see the icon
 , mouse over it to check if the firmware is out of date. If so, click Update controller firmware.
 - Using a micro-USB cable, connect the controllers to one of your computer's USB ports one at a time.
Once the controller is detected by the SteamVR app, the firmware update will start automatically.
TIP: Do not unplug the micro-USB cable any time before the firmware update is complete. Doing so could result in a firmware error.. - When the update is complete, click Done.
What does the status light on the controllers mean?
The status light shows:
- Green when the controller is in normal mode
- Blinking red when battery is low
- Blinking blue when the controller is pairing with the headset
- Blue when the controller is connecting with the headset
- Orange when charging
What should I do if any of the controllers is not tracked?
Try the following methods to troubleshoot the issue:
- Make sure that the controller is placed inside the play area.
- Turn the controller off and on again to reactivate the tracking.
- Restart the SteamVR app. If you still get an error, reboot your computer and reopen the SteamVR app.
How do I know which of the controllers is not being tracked?
If one of your controllers is not being tracked and you want to find out which one, follow these steps.
- On your computer, open the SteamVR app.
- Hover your cursor on the icon of the controller that's not tracked.
- Click Identify controller.
The status light on the controller rapidly flashes white.
What can I do if the controller's trackpad is oversensitive?
Check if there's a firmware update available for the controllers. After which, re-calibrate the controller by doing these steps:
- From your computer, open the SteamVR app.
- Right-click on the icon, and then click Calibrate controller.
- Follow the onscreen prompts to complete the calibration process.
What should I do if my controller won't turn on?
Try these troubleshooting suggestions:
- Press and hold the System button for at least 5 seconds and see if the controller turns on.
- Charge the controller using the other cable and adapter, and plug the adapter to a different power outlet.
- On the SteamVR dashboard, check if the controllers are detected. If controllers are detected but the LED light is off, it may indicate an issue with the LED.
- Check if you have a firmware update that failed. To recover from this error, see My controller won't turn on after I accidentally unplugged it during firmware update. What should I do? on page 57.
The controller automatically turns off. What should I do?
Do the following steps to troubleshoot the issue:
- Make sure that the controller is charged.
- Check that the status light on the controller shows as green, which means that it is paired with the headset.
- Plug the USB cable from the link box into another USB 3.0 port on the computer.
- Manually update the USB driver on your computer. You can also download and install official driver updates from the website of your motherboard or USB port manufacturer.
My controller won't turn on after I accidentally unplugged it during firmware update. What should I do?
Do the following steps to recover your controller from bootloader mode.
- Using a micro-USB cable, connect the controller to one of your computer's USB ports.
- From your computer, open the SteamVR app.
- Once the controller is detected by the SteamVR app, follow the onscreen prompts to complete the firmware update.
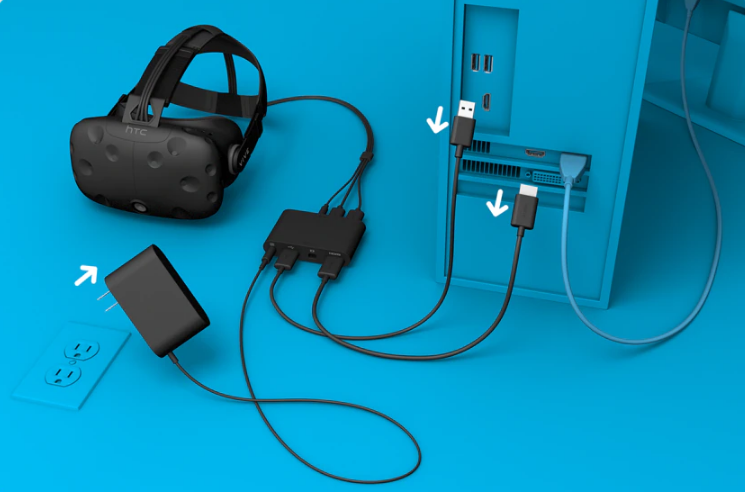
Setup Guide
To set up the HTC Vive Headset and Link Box 2.0, follow these steps:
- Connect the Link Box 2.0 to your computer using the DisplayPort, HDMI, and USB cables provided in the box.
- Turn on the headset by pressing and holding the power button.
- Put on the headset and follow the on-screen instructions to complete the setup process.
- Adjust the headset to fit your head securely and comfortably.
- Run the SteamVR software to ensure that the headset is connected and functioning properly.
HTC Vive Headset and Link Box 2.0 Settings
Vive app settings
Changing the VIVE system language
Once you change the language on the Vive app, the language used in the VIVE VR system will also be changed.
- From your computer, open the Vive app.
- Click the Settings tab.
- On the Language drop-down list, select the language that you want to use.
TIP: Changing the VIVE system language doesn’t change the language for specific VR content you've downloaded, which is decided by the content developer/publisher.
Setting the Vive app to automatically launch at startup
You can automatically launch the Vive app when you turn your computer on.
- From your computer, open the Vive app.
- Click the Settings tab.
- Select Open at startup.
System Dashboard settings
System Dashboard
The System Dashboard serves as your central point of entry in VR. While in the dashboard, some of the things you can do are:
- Launch or close a VR app
- Control sound volume and mic access
- Change settings, such as style of the collision bounds in Chaperone or the in-headset background
- Turn the VIVE system off
To bring up the dashboard, press the System button on either controller.
Changing the Chaperone settings
The Chaperone shows a grid whenever you're close to the bounds of your play area. You can change how the grid looks.
- From the System Dashboard, select
 .
. - Select Chaperone.
- Choose the style of the collision bounds that you prefer.
- Drag the sliders to change the color and opacity.
- To show a constant visual reference of your floor while in VR, select Floor bounds always on.
Changing the default background display
When you turn on the VIVE system, the first you'll see is a default background display. It's the same background that shows when you select Room view in System Dashboard.
- From the System Dashboard, select .
- Select In-Headset.
- Under Background style, select Image.
- Choose which image you want from the options. If want to use an image from your computer, select Open image folder.
- Exit the current app to apply the changes.
Phone notifications
Downloading and installing the VIVE phone app

NOTE: Before downloading the VIVE app, please make sure that your phone meets the minimum system requirements indicated on the VIVE app's download page.
- On your phone, open the Play Store or App Store apps.
- Search for Vive.
- Download and install the VIVE app.
Pairing your phone with VIVE
Pair your phone with the VIVE system to start receiving notifications while you're on VR.
- On your computer's VIVE app, go to the Settings tab, and then click Set up a Phone.
- On your phone, open the VIVE app. The first time that you open the VIVE app, review the prompts and tap Allow.
- On both your computer and phone, click Get started. Make sure that Bluetooth is turned on and that your phone is discoverable.
- From the list of discovered devices on your computer, select your phone, and then click Next.
- When prompted, accept the pairing request or enter the pairing code on your phone.
- Once pairing is complete, click OK and Done on your computer and phone respectively.
Choosing which notifications to receive on VR
Manage which notifications you get while using VIVE.
- On your phone, open the Vive app.
- Do one of the following:
- Android users: Tap
 Settings.
 - iOS users: Switch to the Settings tab.
- Android users: Tap
- Choose which types of notifications you'd like to receive.
Receiving notifications while in VR
Don't worry about missing important notifications. While you're in any VR app, you'll see a notification when you have an incoming call, message, or upcoming calendar event.
NOTE: To receive notifications while in VR, you need to pair your phone with VIVE first.
- To receive or open the notification, press the System button.
- If you choose to ignore the incoming notification, you can always check it later on the VIVE tab.
Checking your notifications
Conveniently review notifications from your phone without leaving VR.
From the VIVE tab's Notifications panel, you can:
- View a missed call or text message
- View an upcoming calendar event
- Call back a contact
- Reply with a text message (Android users only)
Editing or adding message replies (Android users)
If you're using an Android phone, customize the messages that you can quickly send to your contacts.
- On your phone, open the Vive app.
- Tap Settings.
- Tap Quick replies.
- Select a predefined message to edit or tap
 to add a custom message.
Unpairing your phone with VIVE
You can only use one phone at a time with your VIVE. Unpair your current phone first if you need to use another phone with VIVE.
- On your phone, open the Vive app.
- Do one of the following:
- Android users: Tap Settings, and then tap Unpair.
- iOS users: Switch to the Settings tab, and then tap Forget this device.
- Android users: Tap
TIP: You can also unpair your phone through your computer's Vive app. Under Phone on the Settings tab, click Unpair.
What types of phone notifications can I receive on VIVE?
While in VR, you may receive phone calls, text messages, and calendar reminders. To do so, you need to install the Vive app on your phone and complete the pairing process with the VIVE system. You can choose which notifications you want to get on your phone's Vive app settings.
Can I receive notifications from more than one phone on VIVE?
Currently, only one phone is supported if you want to receive notifications while in VR. If you want to use another phone with your VIVE, unpair the previous phone first.
What features of the Vive phone app are not supported in the iOS version?
Currently, editing or adding personalized replies for calls or messages are not supported in the app's iOS version.
SteamVR
Activating the front-facing camera
You need to enable the settings for the front-facing camera before you can use it in VR, such as for showing your actual room.
- From your computer, open the SteamVR app.
- Click , and then select Settings Camera.
- Click Enable Camera.
- Close and reopen the SteamVR app.
- Click , and then select Settings Camera.
- Select Allow Camera in the Dashboard.
Checking for firmware updates
Firmware updates include improved features and bug fixes.
- From your computer, do one of the following:
- On the SteamVR status window, mouse over on any of the hardware icons to check if the firmware is out of date, and then select to update the firmware.
- On the SteamVR app, click , and then click Devices Update firmware.
- Follow the prompts on the screen.
If the update is for the controllers or base stations, you'll be asked to connect them to your computer using a micro-USB cable.
IMPORTANT: While firmware updates are in progress, do not unplug the micro-USB or power cables that connect your hardware to your computer. Doing so could result in a firmware error.
How can I capture screenshots in VR?
While in VR, press the System button and the trigger at the same time. You'll see a notification when the screenshot is saved.
To find the screenshot in your computer, navigate to the following path: \Steam\userdata\[Steam user number]\760\remote\250820\screenshots
What can I do if I'm having issues with the SteamVR app?
The problem could be due to missing or corrupt files in the SteamVR app. Make sure that your installation is intact.
- From your computer, close the SteamVR app.
- Open the Steam app, and then click Library Tools.
- Right-click SteamVR, and then and select Properties.
- Click the Local Files tab, and then select Verify integrity of tool cache.
How do I resolve SteamVR Error 208?
If you encounter the SteamVR Error 208 (Monitor not Found) issue, check if the troubleshooting details on What can I do to troubleshoot the headset?
If you're using Windows 8 or later, the issue might be caused by enhancements in power management settings. Do these steps as a workaround:
- On your computer, go to Control Panel System and Security System.
- Click Device Manager, and then click to expand the list under Universal Serial Bus controllers.
- Right-click Generic USB Hub (there may be more than one with the same label), and then select Properties.
- Click the Power Management tab, and then de-select Allow the computer to turn off this device to save power.
- Unplug and re-plug the power cable on the link box.
- Restart the SteamVR app.
How can I opt-in to SteamVR Beta?
- From your computer, open the Steam app.
- Under Library, right-click SteamVR, and then click Properties.
- Select the Betas tab.
- Under Select the beta you would like to opt into drop-down list, select beta - SteamVR Beta Update.
TIP: If you'd like to opt out in the future, select None – Opt out of all beta programs. - Close the window, and then wait for SteamVR to finish updating.
Troubleshooting
What can I do to troubleshoot the headset?
Try these troubleshooting suggestions.
Option Description |
Check the ■ If the LED is not lit, try connecting the link box to a different poweroutlet. headset’s LED ■ If the LED is dim green,the headset is on standby mode. Activate it by status moving the headsetor starting a VR app.
|
Reboot the 1. From your computer, open the SteamVR app. headset 2. Click is enabled.
|
Checkthe cable ■ Make surethat your cableconnections are securely attached on both connections ends.
|
| Restart the link box |
What can I do when the status light on the headset indicates an error?
If you see that the status light is red, try these methods to resolve the issue:
- Disconnect and reconnect the headset 3-in-1 cable on the link box.
- Check that the cables between the link box and your computer are properly connected. Disconnect and reconnect the cables as needed.
- Unplug and replug the power adapter into an electrical outlet to restart the link box.
What should I do if the headset is not tracked?
Try the following methods to troubleshoot the issue:
- Make sure that the headset is placed insie the play area.
- If power on the headset was disconnected and reconnected, you need to also restart the SteamVR app.
- Try to disconnect and reconnect the HDMI cable to the HDMI port on your computer's graphic card.
- Restart the SteamVR app. If you still get an error, reboot your computer and reopen the SteamVR app.
My headset display is blurry. What should I do?
Try these troubleshooting suggestions:
- Make sure that you've removed the protective film on the headset lenses.
- Check that the lenses are clean. Use the cleaning cloth provided in the box to wipe the lenses.
- Make sure that you're wearing the headset properly.
The headset's bottom edge should rest on your cheekbones, while the standard strap should cup the back of your head. You should feel comfortable bending down without the headset slipping off.
If the headset is too low on your face, your display will appear blurry.
What can I do to resolve the "headset not found" error?
Do the following steps to troubleshoot the issue:
- Close all Steam apps on your computer, including the SteamVR app.
- Unplug the link box cables (HDMI and USB) from your computer, as well as its power cable from an electric outlet.
- Wait for a few seconds, and then plug the cables back in. On your computer, you might see a notification that drivers are being installed. Wait for the installation to finish.
- Restart the SteamVR app.
If you still get a similar error, repeat the steps again. You can also check if you're encountering a USB-related issue. For more details, see My headset can't be detected due to a USB port issue. What should I do? on page 42.
My headset can't be detected due to a USB port issue. What should I do?
Do the following steps to troubleshoot the issue:
Plug the USB cable into a different USB port to confirm if the error is due to a USB port-related issue.
Option Description
If you have a USB Plug the USBcable into theUSB 2.0 port.
2.0 port...
If you don'thave a 1. Plug the USB cableinto a genericUSB 3.0 port.
USB 2.0 port... 2. Open the SteamVR app,and then tap
Create system report.3. Make surethat VIVE devices connect via a USB xHCI port rather than to a port froma specific manufacturer, which might havea compatibility issue with VIVE.
If the error is not resolved, your issue may not be due to USB port compatibility.
- Manually update the USB driver on your computer. You can also download and install official driver updates from the website of your motherboard or USB port manufacturer. If updating your USB driver doesn't solve the error, purchase and use another PCI-Express USB card (with Intel chipset). Based on our tests, this USB card works well with VIVE: Inateck 2-Port USB3.0 PCI-Express Card (Serial: KTU3FR-2O2I)
After upgrading to Windows 10, VIVE shows as the computer's main monitor. What should I do?
Try the following steps to troubleshoot the issue:
- Disconnect the headset 3-in-1 cable on the link box.
- Restart your computer.
- Reconnect the headset 3-in-1 cable on the link box.
I'm experiencing skipped frames. What could I do?
If you've installed software in your computer that automatically adjusts the display (such as for night mode), it may be causing the conflict.
To resolve the issue, disable the software that may cause the conflict (such as f.lux or Prismatik) when using VIVE.
I'm seeing drifting motion or floating objects in VR. What could I do?
Try these troubleshooting suggestions.
- Make sure that there are no reflective surfaces (such as mirrors) within your play area.
- If there are Bluetooth devices in the room, turn them off so that they don't interfere with hardware pairing.
- Check if you're having CPU performance issues. On the SteamVR app, click Settings Performance Display Frame Timing. If there are spikes in the graph, it means that the issue is with your CPU.
What should I do if I don't hear a sound while using the audio cable?
Make sure that the headset is on normal mode and not on standby, and that the SteamVR app is running on your computer.
If it doesn't solve your problem, do the following:
| Option Description |
Make sure that 1. From your computer, open the SteamVRapp. SteamVR is sending 2. Click audio to VIVE 3. On the Set playback device to drop-down list, choose HTC-VIVE or select Speakers (USB-Audio Device). |
Make sure that 1. On your computer, right-click the Volume icon on the task tray. Windows is sending 2. Click Playback devices, and thenselect HTC-VIVE. audio to VIVE 3. Right click HTC-VIVE, and then selectSet as default device. You may also need to right-click on any detected audio device, and select Show disabled devices and Show disconnected devices. |
Check the volumeof On your computer, right-click the Volume icon on the task tray. Do the HTC-VIVE audio following: device and current ■ Find the volume sliderfor HTC-VIVE, and then set it to 50%. program
|
Is there a way to also hear from the computer what's in VR?
You can duplicate the audio from VIVE to your computer. You may use another pair of headphones or speakers.
- From your computer, open the SteamVR app.
- Click , and then select Settings Audio.
- On the Mirror audio-to-device drop-down list, choose the audio device where you want to send the additional audio.
Pros & Cons
Pros
- Superior resolution and audio capabilities
- Lightweight and comfortable to wear
- Easy setup and connectivity
- Smooth and responsive VR experience
Cons
- Expensive
- Requires a powerful computer to run
Customer Reviews
The HTC Vive Headset and Link Box 2.0 has received positive reviews from customers, praising its superior visuals and audio. However, some customers have criticized its high price point. The most common complaints include issues with connectivity and setup.
Faqs
What is the HMD and Link Box 2.0 for HTC Vive?
Does the HTC Vive Headset work with all PCs?
How do I get the HTC Vive Headset and Link Box 2.0 ready to use?
How many dots does the HTC Vive Headset have?
Does the HTC Vive Headset allow for wifi connection?
What kinds of material can I get for my HTC Vive headset?
How do I clean and take care of my HTC Vive headset?
What do I need to perform if the HTC Vive Headset and Link Box 2.0 isn't working right?
Leave a Comment