Instant Pot Multi-Use Pressure Cooker Air Fryer 8-quart User Guide

Content
Instant Pot Multi-Use Pressure Cooker Air Fryer 8-quart
Simplify your cooking with the 8-quart Instant Pot Multi-Use Pressure Cooker Air Fryer. Offering enough of space for big families or meal preparation, this 8-quart model combines the features of a pressure cooker, air fryer, slow cooker, steamer, sauté pan, and more. Its cutting edge technology makes cooking fast and easy, and the air fryer lid offers a healthy substitute for conventional frying that uses little to no oil. The Instant Pot Multi-Use Pressure Cooker Air Fryer is a necessary equipment for easily preparing tasty and nourishing meals because of its several cooking programs and safety features.
Product, Parts and Accessories
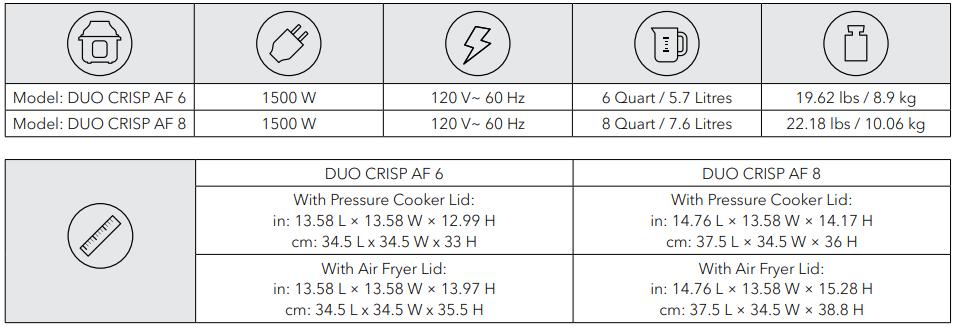
Duo Crisp + Air Fryer 6 & 8 Quart
Before using the Instant Pot Duo Crisp, verify that all parts are accounted for.
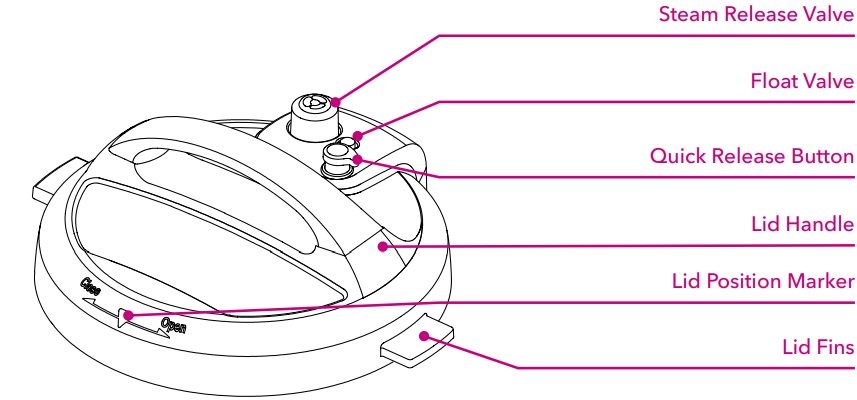
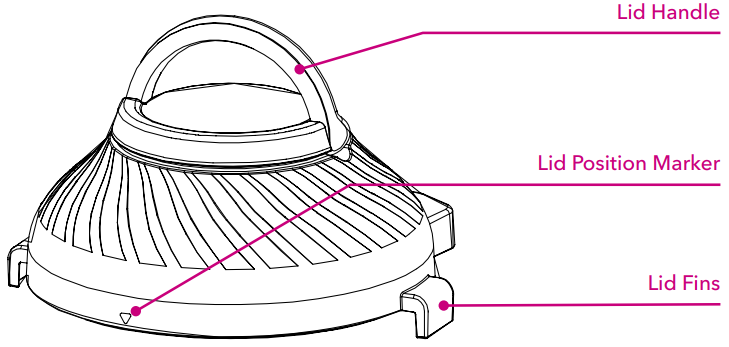
Pressure Cooking Lid
Use the following programs with the pressure cooking lid: Pressure Cook, Sauté, Slow Cook, Steam, Sous Vide, Delay Start and Keep Warm. These programs do not air fry.
Top
Interior
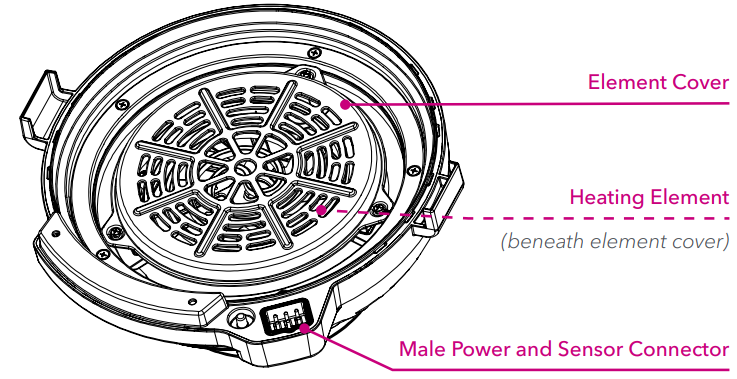
Air Fryer Lid: Use the following Smart Programs with the air fryer lid: Air Fry, Roast, Bake, Broil and Dehydrate.
Front
Back
Interior
Inner Pot
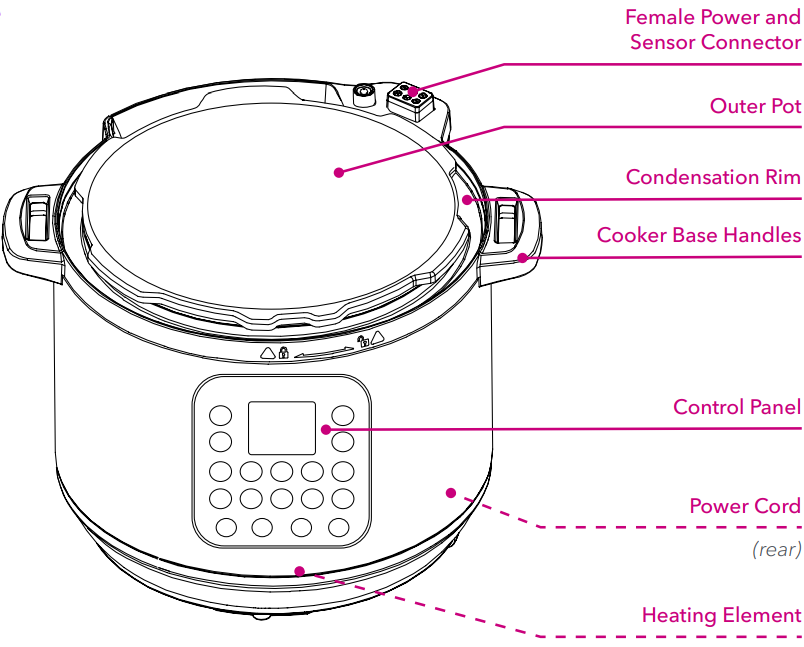
Cooker Base
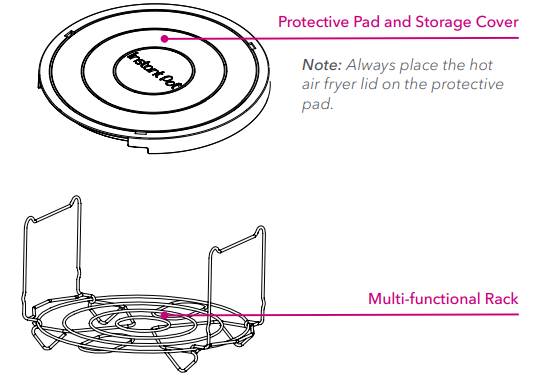
Accessories

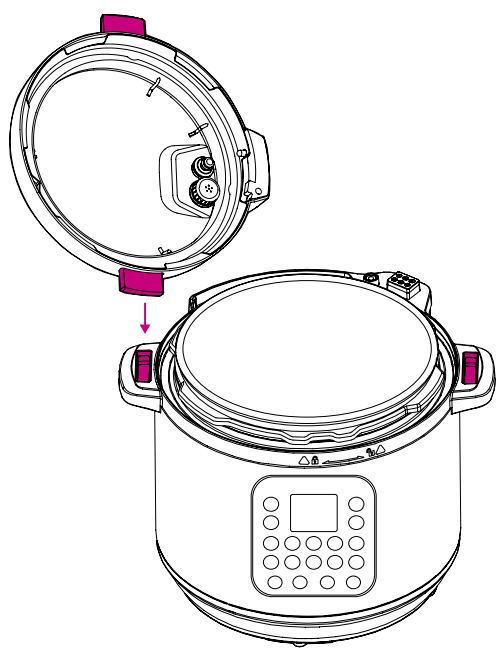
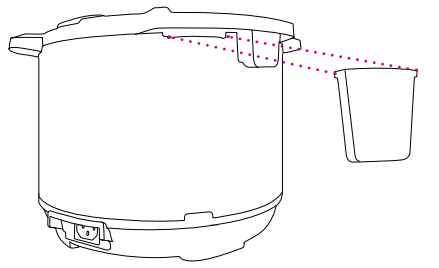
Lid Standing Position
Did you notice that the cooker base handles have a rectangular slot in them? Keep your counters dry after lifting the pressure cooking lid by inserting the left or right lid fin into the corresponding slot on the cooker base. Once the lid is safely in the standing position, it’s easy to remove the inner pot.
Product Specifications
Control Panel
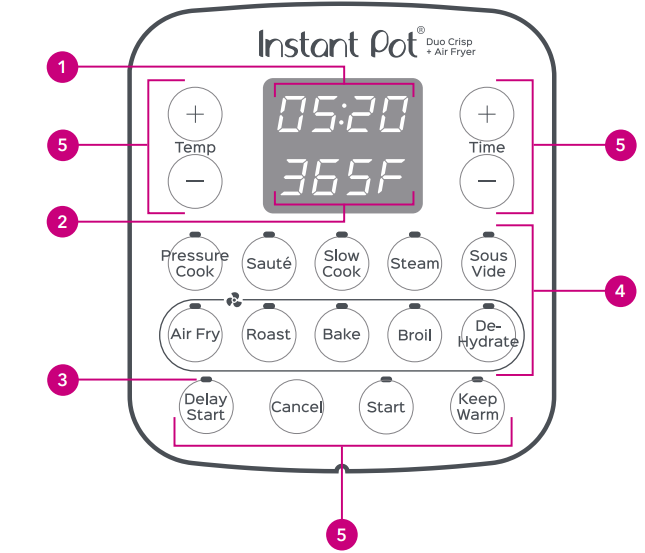
- Time Display: The countdown timer indicates cooking and Delay Start time in hour format (05:20 is 5 hours, 20 minutes). The timer counts up while in Keep Warm.
- Temperature / Pressure Display
- Pressure Cooking Lid: Display indicates Lo (Low) or Hi (High) pressure or temperature level.
- Air Fryer Lid: Display indicates temperature in ºF (Fahrenheit) or ºC (Celsius).
- LED Indicators: Illuminate to indicate the active Smart Program and settings selected.
- Smart Programs
- Pressure Cooking Lid: Pressure Cook, Sauté, Slow Cook, Steam, Sous Vide
- Air Fryer Lid: Air Fry, Roast, Bake, Broil, Dehydrate
- Smart Program Settings
- + / – Temp
- + / – Time
- Delay Start
- Keep Warm
- Cancel
- Start
Smart Program Settings
- Cancel and Standby Mode: Press Cancel to stop a Smart Program at any time. The display returns to Standby mode and indicates OFF.
- Turn Sound On/Off: When in Standby mode, press and hold + over Time until the display indicates S On (sound on) or SOFF (sound off). Note: Error alerts cannot be silenced.
- Adjust Temperature Scale: ºF or ºC: When in Standby mode, press and hold + above Temp until the display indicates ºF (Fahrenheit) or ºC (Celsius). The temperature is displayed in the unit indicated.
- Set a Delay Start Timer: Delay Start may be applied to the Pressure Cook, Slow Cook and Steam Smart Programs.
- Select a Smart Program and adjust the settings as you desire, then press Delay Start.
- When the timer flashes, use the + / − Time buttons to adjust the delay time.
- Press Delay Start again to toggle to the minutes field and follow the same process as the previous step.
- Press Start to begin.
- Automatically Keep Food Warm After Cooking: Keep Warm is on by default on the Pressure Cook, Slow Cook and Steam Smart Programs. To turn automatic warming off, select an applicable Smart Program then press Keep Warm. The LED indicator dims to indicate that the setting is off.
- Reheat Food or Keep Warm for Long Periods: Keep Warm may be set from a minimum of 10 minutes to a maximum of 24 hours.
- When in Standby, select Keep Warm.
- Press Keep Warm again to cycle through Lo (Low) and Hi (High) temperature levels.
- Use the − / + Time buttons to set a warming timer.
- Press Start to begin.
- When Keep Warm completes, the display indicates End.
- Adjust and Save Custom Temperatures: Applicable to Sous Vide, Air Fry, Roast, Bake, Broil and Dehydrate Smart Programs.
- Select an applicable Smart Program.
- Use the − / + Temp buttons to adjust the temperature in ºF or ºC.
- Press Start to start the program and save the temperature.
- Reset Smart Programs to Factory Default Settings
- Reset Individual Smart Program: With the cooker in Standby mode, press and hold one Smart Program button until the cooker returns to Standby, it will beep and display OFF. The Smart Program’s pressure level, cooking time and temperature are restored to the factory default setting.
- Reset All Smart Programs: With the cooker in Standby mode, press and hold Cancel until the cooker beeps. All Smart Program pressure levels, cooking times and temperatures are restored to the factory default setting.
Instant Pot Multi-Use Pressure Cooker Air Fryer 8-quart Accessories
Wash the accessories with hot water and dish soap before using them for the first time, and then after each use. Rinse with warm, clear water and use a soft cloth to dry the accessories.
To assemble the multi-level air fryer basket:
- Place the multi-level air fryer basket base on a stable surface.
- Position the air fryer basket over the base and press down firmly. The teeth on the base should pop into the groove on the outside of the basket.
- To easily lift and position the broil/dehydrating tray, hold the large holes in the middle of the tray with 2 fingers.
Insert the broil/dehydrating tray into the multi-level air fryer basket, ensuring that the raised rim is facing down.
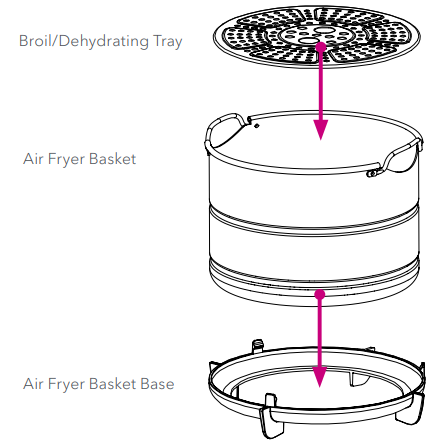
Note: The air fryer basket must be used with the stainless steel inner pot.
Overview of Pressure Control Features
Pressure Cooking Lid: The stainless steel lid included is necessary for most cooking processes, and is essential for pressure cooking. Always ensure to only use the Duo Crisp pressure cooking lid with the Duo Crisp cooker base. When plugged in, the cooker plays a jingle when the lid is opened and closed.
Open and Remove the Lid: Grip the lid handle and turn it counter-clockwise to align the symbol
.png) on the lid with the symbol
on the lid with the symbol .png) on the rim of the cooker base, then lift the lid up and off the cooker base.
on the rim of the cooker base, then lift the lid up and off the cooker base.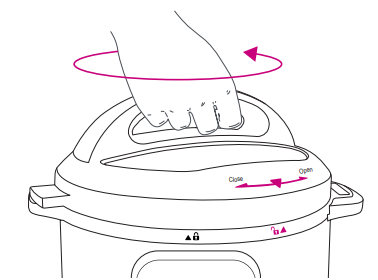
Close the Lid: Align the symbol
on the lid with the symbol on the cooker base, and lower the lid onto the track. Turn the lid clockwise until the symbol on the lid aligns with the symbol on the cooker base. The pressure cooking lid automatically seals for easy pressure cooking, but does not lock into place when closed. The lid can be removed during Pre-heating but locks into place once the cooker has pressurized.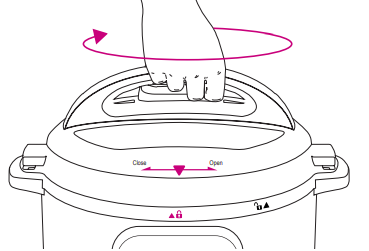
DANGER Do not attempt to remove the lid while the float valve is up.
CAUTION Always check the lid for damage and excessive wear prior to cooking.
WARNING Use only the Instant Pot Duo Crisp lid with the Instant Pot Duo Crisp pressure cooker base. Using any other pressure cooker lids may cause injury and/or damage.
Description
Constructed of premium stainless steel, the Instant Pot Multi-Use Pressure Cooker Air Fryer 8-quart is robust and long-lasting. With eleven in-one features including pressure cooking, air frying, slow cooking, sautéing, steaming, yogurt making, and more, it offers an intuitive digital interface. Because the air fryer uses 95% less oil than conventional frying techniques, it's a healthier way to prepare your favorite fried meals. Big families or people who enjoy entertaining will find the 8-quart capacity to be perfect for cooking up to six chicken breasts or a 6-pound whole chicken.
Quick Release Button
The quick release button controls the steam release valve, sealing and venting the cooker as you desire. Refer to Depressurizing the Cooker (Venting Methods) for details on safe depressurization.

Steam Release Valve
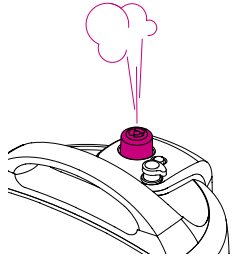
- The steam release valve sits loosely on the steam release pipe. When the cooker releases pressure, steam ejects from the top of the steam release valve. The steam release valve is integral to product safety and necessary for pressure cooking. It must be installed before use and cleaned regularly.
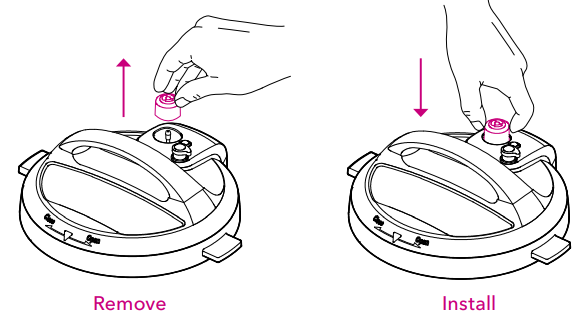
- Remove the Steam Release Valve: Pull steam release valve up and off steam release pipe. Steam release valve must be installed before use and cleaned frequently.
Install the Steam Release Valve: Place the steam release valve on the steam release pipe and press down firmly. The steam release valve sits loosely on the steam release pipe when installed properly but should remain in place when the lid is turned over.
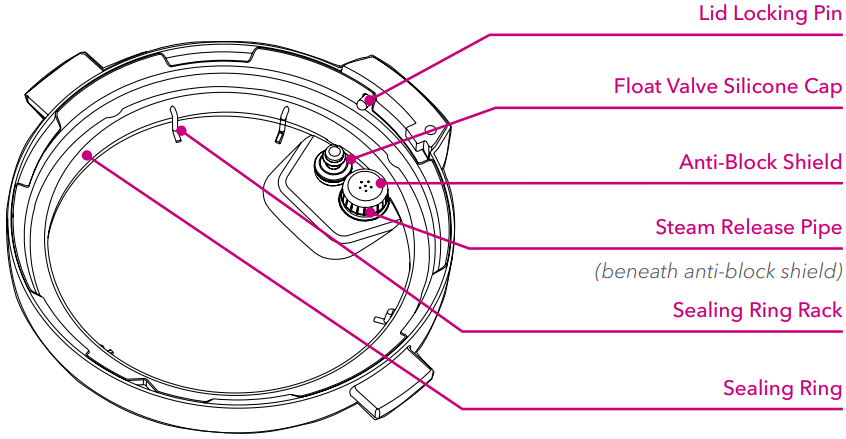
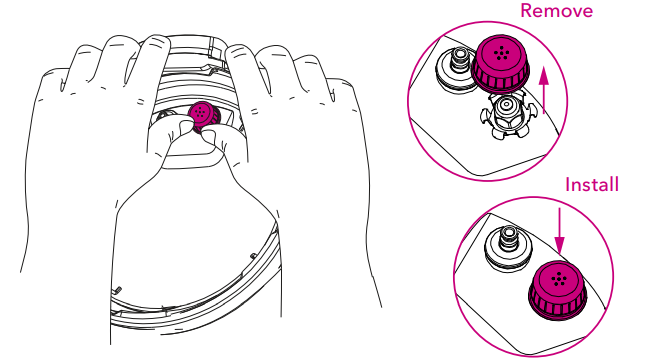
Anti-Block Shield
- The anti-block shield prevents food particles from coming up through the steam release pipe, assisting with pressure regulation. As an integral part of product safety, the anti-block shield must be installed before use and cleaned frequently.
- Remove the Anti-Block Shield: Grip the lid like a steering wheel and use your thumbs to press firmly against the side of the anti-block shield (pressing towards the side of the lid and up) until it pops off the prongs underneath.
Install the Anti-Block Shield: Place anti-block shield over prongs and press down until it snaps into position. Do not attempt to operate the pressure cooker without the anti-block shield installed.
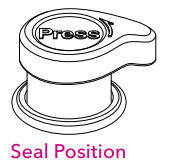
Sealing Ring
When the pressure cooking lid is closed, the sealing ring installed on the underside of the lid creates an air-tight seal between the lid and the cooker base. The sealing ring must be installed before using the cooker and should be cleaned after each use. Only one sealing ring should be installed in the lid when using the cooker. Use one for sweet dishes and one for savory.
Sealing rings stretch over time with normal use. As an integral part of product safety, the sealing ring should be replaced every 12-18 months or sooner if stretching, deformation, or damage is noticed.
- Remove the Sealing Ring: Grip the edge of the silicone and pull the sealing ring out from behind the circular stainless steel sealing ring rack. With the sealing ring removed, inspect the rack to ensure it is secured, centered, and an even height all the way around the lid. Do not attempt to repair a deformed sealing ring rack.
Install the Sealing Ring: Place the sealing ring over the sealing ring rack and press it into place. Press down firmly to ensure there is no puckering. When installed properly, the sealing ring is snug behind the sealing ring rack and should not fall out when the lid is turned over.
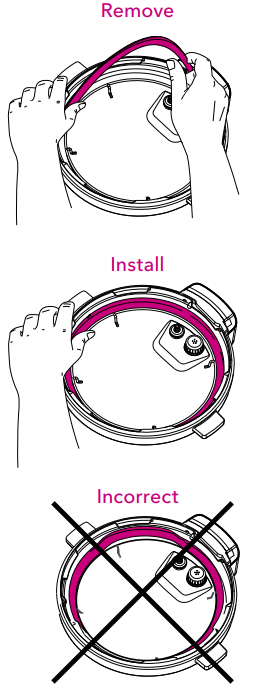
Instant Tip: Silicone is porous, so it may absorb strong aromas and certain flavors. Keep extra sealing rings on hand to limit the transfer of those aromas and flavors between dishes. Visit our store to color code your cooking.
CAUTION Always check for cuts, deformation, and correct installation of the sealing ring prior to cooking. Do not use a stretched or damaged sealing ring. Only use authorized Instant Pot sealing rings. Failure to follow these instructions may cause food to discharge, which may lead to personal injury or property damage.
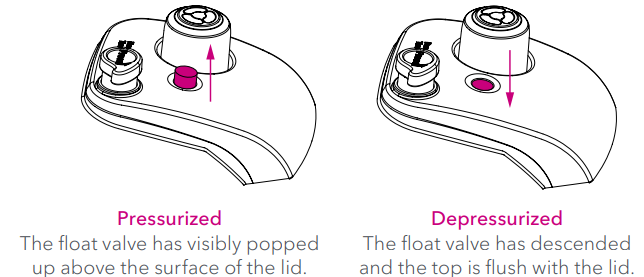
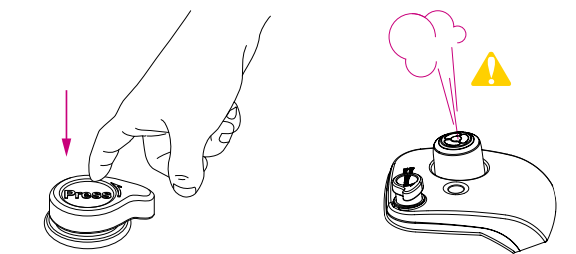
Float Valve
The float valve provides a visual indication of pressure within the cooker and appears in two positions.
- The float valve and silicone cap work together to seal in pressurized steam. These parts must be installed before use and should be cleaned after each use.
DANGER While the float valve is up, contents of the cooker are under extreme pressure. Do not attempt to remove the lid. All pressure must be released, and the float valve must be down. Refer to Depressurizing the Cooker (Venting Methods) for information on releasing pressure. Failure to follow these instructions may result in property damage and/or personal injury.
Remove the Float Valve from the Lid: Place one finger on the flat top of the float valve, then turn the lid over. Detach the silicone cap from the bottom side of the float valve. Remove the float valve from the top of the lid. Do not discard the float valve or silicone cap.
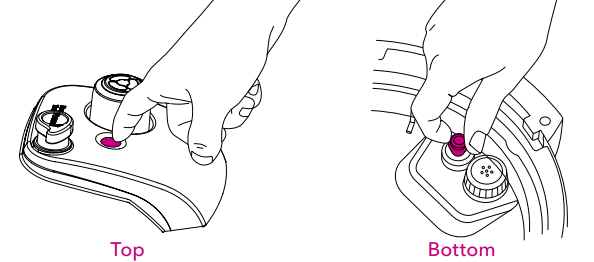
- Install the Float Valve: Drop the narrow end of the float valve into the float valve hole on the top of the lid. Place one finger on the flat top of the float valve, then turn the lid over. Firmly attach the silicone cap to the bottom of the float valve. Do not attempt to operate the pressure cooker without the float valve and/or silicone cap properly installed in the pressure cooking lid.
Condensation Collector
The condensation collector sits at the back of the cooker base and accumulates overflow moisture from the condensation rim. It should be installed before cooking, then emptied and rinsed out after each use.
- Remove the Condensation Collector: Pull the condensation collector away from the cooker base; do not pull down. Note the tabs on the cooker base and the grooves on the condensation collector.
Install the Condensation Collector: Align the grooves on the condensation collector over the tabs on the back of the cooker base and slide the condensation collector into place.
Introduction to Pressure Cooking
Pressure cooking uses steam pressure to raise the boiling point of water above 100ºC / 212ºF. This energy-efficient cooking method is the fastest way to thoroughly cook a variety of your favorite meals.
Pressure cookers go through three stages when pressure cooking:
Pre-Heating and Pressurization
After you have finished inputting your selections, press Start to begin. The display reads On to indicate it has begun pre-heating. While the cooker pre-heats, it vaporizes liquid in the inner pot to create steam. Once enough steam has built up inside the inner pot, the float valve pops up and locks the lid of the cooker in place for safe pressure cooking.
When the float valve pops up, the silicone cap attached to the bottom of the float valve (on the underside of the lid) seals the steam inside the cooking chamber (the inner pot) and allows the pressure to rise even higher. A higher pressure means a higher cooking temperature.
While it is normal to see some steam escaping through the float valve during Pre-Heating, if you see steam escaping from around the sides of the lid, press Cancel and refer to Troubleshooting. Note: The time it takes your cooker to pressurize is determined by a variety of factors, including food and liquid volume.
Cooking
After the float valve pops up, the cooker needs a few minutes to finish building pressure. When the required pressure level is reached, cooking begins. The display switches from On to the cooking countdown timer, displayed in HH
(hours : minutes) format. Smart Program settings (e.g., cooking time, temperature and/or pressure level, and whether Keep Warm will come on automatically or not) can be adjusted at any time during cooking. Refer to Smart Program Settings for details.
Depressurization
After pressure cooking completes, follow your recipe instructions for depressurizing the cooker. If automatic Keep Warm is on after cooking completes, the timer counts up from 00:00 to indicate the elapsed time up to 10 hours. If not, the cooker returns to Standby and displays End.
Note: The cooker cools and depressurizes faster if automatic Keep Warm is off. See Depressurizing the Cooker (Venting Methods) for information on releasing pressure after cooking.
DANGER While the float valve is up, contents of the cooker are under extreme pressure. Do not attempt to remove the lid while the float valve is still up. All pressure must be released, and the float valve must be down before attempting to remove the lid. Never attempt to force the lid open. Failure to follow the instructions may result in property damage and/or personal injury.
Depressurizing the Cooker (Venting Methods)
Always follow recipe instructions for depressurizing the cooker. When the cooker has completely depressurized, the float valve drops into the lid as indicated in Overview of Pressure Control Features—Float Valve.
Natural Release (NR): Leave the quick release button in the popped-up Seal position. As the temperature within the cooker drops, the cooker depressurizes naturally over time.
Depressurization time varies based upon the volume and type of food and liquid. When the cooker has completely depressurized, the float valve drops into the lid.
NOTICE Use NR to depressurize the cooker after cooking high-starch foods (e.g., soups, stews, chilis, pasta, oatmeal, and congee) or after cooking foods that expand when cooked (e.g., beans and grains).Quick Release (QR): Press the quick release button down until it clicks and locks into the Vent position.
When depressed, a stream of steam releases through the top of the steam release valve.
Note: Steam may range in opacity but is always loud!
CAUTION Steam ejected from the steam release valve is hot. Do not place hands, face, or any exposed skin over the steam release valve when releasing pressure. If continuous spatter occurs while venting, set the cooker back to Seal by flicking the quick release button. The button pops back up to indicate that it is sealed and stops the depressurization process. Wait a few minutes before trying to QR again. If spatter continues, use NR to safely release remaining pressure.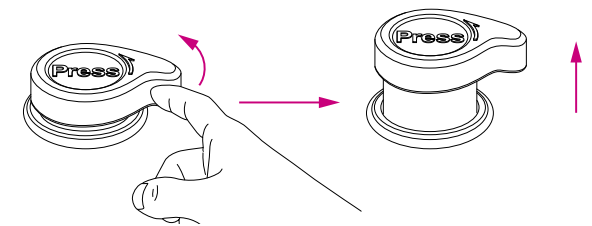
NOTICE Do not use QR when cooking high-starch foods (e.g., stews, chilis, pasta, and congee) or when cooking foods that expand when cooked (e.g., beans and grains).
10-Minute NR
Leave the quick release button in the popped-up Seal position for 10 minutes after cooking has completed, then press the quick release button down until it clicks and locks into the Vent position. When depressed, a stream of steam releases through the top of the steam release valve.
If continuous spatter occurs while venting, set the cooker back to Seal by flicking the quick release button. Wait an additional 5 minutes before trying to QR again. If spatter continues, use NR to safely release remaining pressure.
Setup Guide
It takes little effort to set up the 8-quart Instant Pot Multi-Use Pressure Cooker Air Fryer. First, be sure to give every detachable component a warm, soapy wash. Plug the machine in after that and hit "On". Hit the matching button to select the function you want. Determine the cooking time and, if needed, pressure. Put in your contents and screw the lid on. Verify the steam release handle is set to "Sealing". Turn the steam release handle to "Venting" or employ the "Quick Release" technique to release the pressure when the cooking cycle is over.
IMPORTANT SAFEGUARDS
When using electrical appliances, basic safety precautions should always be followed:
READ THE GETTING STARTED GUIDE AND ALL INSTRUCTIONS, SAFEGUARDS, AND WARNINGS BEFORE OPERATING THE APPLIANCE. FAILURE TO FOLLOW THESE SAFEGUARDS AND INSTRUCTIONS MAY RESULT IN INJURY AND/OR PROPERTY DAMAGE.
- Use only the Instant Pot Duo Crisp pressure cooking lid and Duo Crisp Air Fryer lid with the Instant Pot Duo Crisp cooker base. Using any other pressure cooker lids or air fryer lids may cause injury and/or damage.
- To reduce the risk of pressure leakage, cook only in an authorized stainless steel Instant Pot inner pot. DO NOT use the appliance without the removable inner pot installed.
- Always use an Instant Pot stainless steel inner pot when using the Air Fryer Lid. Do not use a ceramic coated inner pot.
- DANGER When pressure cooking, do not open the appliance until it has depressurized, and all internal pressure has been released. If the float valve is still up and/or the lid is difficult to open, this indicates that the appliance is still pressurized—do not force it open. Any pressure in the appliance can be hazardous. Refer to Depressurizing the Cooker (Venting Methods) for information on releasing pressure. Opening the appliance while it is still pressurized may lead to sudden release of hot contents and may cause burns or other injuries.
- Always operate the appliance on a stable, non-combustible, level surface.
- Do not use the appliance for anything other than its intended use. Failure to follow this instruction may result in injury or property damage.
- For household use only. Do not use outdoors. Not for commercial use.
- CAUTION Do not place the appliance on or in close proximity to a hot gas or electric burner, or a heated oven. Heat from an external source will damage the appliance. Failure to follow these instructions may result in injury or property damage.
- CAUTION Do not use the appliance near water or flame. Keep out of direct sunlight. Failure to follow these instructions may result in injury or property damage.
- CAUTION Do not touch hot surfaces. Only use side handles for carrying or moving. Extreme caution must be used when moving the appliance containing hot liquids. Do not move the appliance when it is under pressure. Read this manual carefully and completely, and retain for future reference.
- WARNING Failure to adhere to safety instructions may result in serious injury or damage.
- CAUTION The cooker base and air fryer lid contain electrical components. To avoid electrical shock, do not put liquid of any kind into cooker base or air fryer lid, and do not immerse power cord, plug, or the appliance in water or other liquid. Do not rinse the appliance under tap.
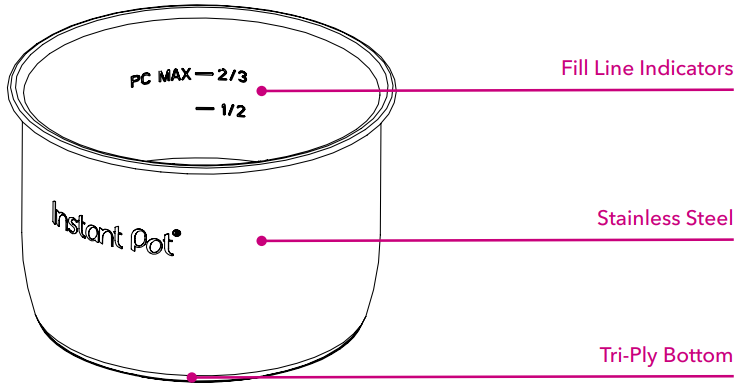
- CAUTION Do not fill over PC MAX — 2/3 as indicated on the inner pot. When cooking foods that expand during cooking such as rice or dried vegetables, do not fill the inner pot over — 1/2 line. Overfilling may cause a risk of clogging the steam release pipe and developing excess pressure.
- WARNING This appliance cooks under pressure. Make certain the appliance is properly closed before operating. Failure to do so may result in burns, injury and/or property damage.
- When cooking meat with skin (e.g., sausage with casing), the skin can swell when heated. Do not pierce the skin while it is swollen; this could result in scalding injury.
- CAUTION When pressure cooking food with a doughy or thick texture, or a high fat/oil content, contents may splatter when opening the lid. Please follow recipe instructions for pressure release method. Refer to Depressurizing the Cooker (Venting Methods).
- CAUTION Before using the pressure cooking lid, check the steam release valve, steam release pipe, anti-block shield and float valve for clogging. Failure to do so may result in injury or property damage.
- Do not use this appliance for deep frying or pressure frying with oil.
- Do not lean over or place your hands or face over the steam release valve or float valve when the appliance is in operation or has residual pressure. Do not touch the metal portion of the lid when the appliance is in operation as this could result in injury.
- Do not cover or obstruct the steam release valve and/or the float valve with cloth or any other objects. Covering or obstructing the steam release valve and/or float valve can create a safety issue and may cause injury.
- Turn the appliance off if steam escapes from the steam release valve and/or float valve in a steady stream for longer than 3 minutes. There may be residual pressure in the appliance. Allow the appliance to depressurize naturally or release all excess pressure before opening. Refer to Depressurizing the Cooker (Venting Methods) for information on releasing pressure.
Care and Cleaning
Part | Instruction | Cleaning Method |
Air Fryer Lid |
a soft,damp cloth or sponge. Ensureit is free of food debrisand/or grease splatter.
|
Damp Cloth Only |
Power Cord |
| |
Cooker Base |
|
Clean your Instant Pot Duo Crisp + Air Fryer after each use. Always unplug the Duo Crisp and let it cool to room temperature before cleaning. Let all surfaces dry thoroughly before use and storage.
Note: To remove baked-on grease and food residue from accessories and the Air Fryer Lid, spray with a mixture of baking soda and vinegar and wipe clean with a damp cloth. For stubborn stains, allow the mixture to sit on the affected area for several minutes before scrubbing clean.
WARNING
- Do not immerse the appliance in water or any other liquid.
- Do not rinse the appliance under a tap.
- Ensure the heating element remains dry at all times.
- Do not submerge the power cord at any time.
- Do not wet the prongs of the power cord.
Without proper cleaning, food and grease splatter may build up around the heating element, leading to the risk of smoke, fire, and personal injury. If you smell smoke, press Cancel and unplug the appliance. Once cool, remove food splatter or grease with a soft cloth and mild detergent.
Troubleshooting
Problem | Possible Reason | Solution |
Air fryer lidis in place but will not turn on | The connection between the airfryer lid andpressure cooker base is loose or broken. |
Ensure the Air FryerLid is seatedcorrectly on the pressure cooker base. |
Bad power connection or no power. | Inspect the power cord on the pressure cooker base to ensure a good connection. Ensure the power cord is pushedfirmly into thecooker base. | |
Electrical fuse has blown. | Contact Customer Care. | |
Microswitch is dirty greaseor damaged. | Contact Customer Care. | |
Black smokeis coming from the air fryer lid |
Using an oil with a low smoke point. | Cancel the Smart Program, unplug the cooker and allow it to cool to room temperature. Choose a neutral oil with a high smoke point, such as Canola, Avocado, Soybean, Safflower, or Rice Bran. |
Food residueon the bottom of the inner pot or around the element on the air fryer lid. | Cancel the Smart Program, unplug the cooker and allow it to cool to room temperature. Remove all accessories from the inner pot and clean the inner pot, air fryer lid, and all accessories thoroughly. | |
Appliancemalfunction. | Contact Customer Care. | |
White Smoke is coming from the air fryer lid | Cooking foodswith a high fat content, such as bacon, sausage, and hamburger. | Avoid air fryingfoods with a high fat content. |
Check the inner pot for excess oil and/or fat and carefully remove as needed before air frying. | ||
Food is moist. | As waterin the foodis vaporized it turns to steam and escapes the cooker. Pat dry moist food ingredients before air frying. | |
Seasoning on food has blown into element | Be mindful when seasoning food. Spray vegetables and meats beforeadding seasoning so they adhere to the ingredients. |
Problem | Possible Reason | Solution |
Difficulty closing pressure cooking lid | Sealing ringnot properly installed | Reposition sealing ring, ensure it is snug behind sealing ring rack. |
Float valve in the popped-upposition | Gently press the float valve downward with a long utensil. | |
Contentsin cooker are still hot | Press quickrelease button downuntil it clicksinto Vent position, then lower lidonto cooker base slowly, allowing heat to dissipate. | |
Difficulty opening the pressure cooking lid | Pressure inside the cooker | Release pressure according to recipe; only open lid after float valvehas dropped down. |
Float valvestuck at the popped-up position due to food debris or residue | Ensure steamis completely released by quick releasing pressure, then press float valve gently with a long utensil. Open lid cautiously and thoroughly clean float valve, surrounding area, and lid before next use. | |
WARNING Contents maybe under pressure; to avoid scalding injury, do not attempt to forcelid open. | ||
Inner pot is stuck to pressure cookinglid when cookeris opened |
Cooling of inner pot may create suction,causing inner pot to adhere to the lid. |
To release the vacuum, press quick release button down until it clicks into Vent position. |
Steam leaks from side of lid | No sealing ring in lid. | Install sealing ring. |
Sealing ring damaged or not properly installed. | Replace sealing ring. | |
Food debrisattached to sealing ring. | Remove sealing ring and clean thoroughly. | |
Lid not closedproperly. | Open, then close lid. | |
Sealing ringrack is warpedor off-centre. | Remove sealingring from lid,check sealing ring rack for bends or warps. Contact Customer Care. | |
Inner potrim may be misshapen. | Check for deformation and contact Customer Care. | |
Problem | Possible Reason | Solution |
Float valve does not rise | Food debris on float valve or float valvesilicone cap. | Remove float valve from lid and clean thoroughly. Perform Initial Test Run to check for function. Record findings and contactCustomer Care. |
Too little liquidin the innerpot. | Check for scorching on bottom of inner pot. Add thincooking liquid according to size: 6 Quart - 1.5 cups (12 oz / 375 mL) 8 Quart - 2 cups(16 oz / 500 mL) | |
Float valvesilicone cap damaged or missing. | Install silicone cap or replace float valve entirely. | |
Float valve obstructed by lid- locking mechanism | Tap float valve with a long utensil. If the float valve does not drop, press Cancel and contact Customer Care. | |
No heat in the innerpot | Check for scorching on bottom of inner pot. Add thincooking liquid according to size: 6 Quart - 1.5 cups (12 oz / 375 mL) 8 Quart - 2 cups(16 oz / 500 mL) | |
Inner potbase may be damaged | Perform Initial TestRun to check for function and record findings. Contact Customer Care. | |
Minor steam leaking/hissing from steam release valve during cook cycle | Quick release button not in Seal position | Flick quick release button to ensureit is in the Seal position. |
Cooker is regulating excess pressure |
This is normal. No action required. | |
Steam gushes from steam release valve when quick release button is in Seal position |
Not enough liquid in the inner pot | Add thincooking liquid according to size: 6 Quart - 1.5 cups (12 oz / 375 mL) 8 Quart - 2 cups(16 oz / 500 mL) |
Pressure sensor controlfailure | Contact Customer Care. | |
Steam release valve not seated properly | Flick quick release button to ensureit is in the Seal position. | |
Display remains blank after connecting the power cord |
Bad power connection or no power | Inspect power cord for damage. If damage is noticed, contact Customer Care. Check outlet to ensure it is powered. |
Cooker’s electrical fuse has blown | Contact Customer Care. | |
Occasional clicking or light cracking sound | The sound of powerswitching and expanding pressure boardwhen changing temperatures |
This is normal; no action needed. |
Bottom of the innerpot is wet | Wipe exterior surfaces of inner pot. Ensure heating element is dry beforeinserting inner pot into cooker base. |
Error Codes
Error Code | Meaning of error code | ||
C1 | |||
C2 | |||
C6 | Faulty sensor | Contact Customer Care. | |
C6H | |||
C6L | |||
C5 |
Temperature is too high because inner pot is not placed in the cookerbase | Press Canceland wait for heating element to cool; ensurethere are no foreign objects in cooker base; insert or reposition inner pot in cooker base and re-enter commands. | |
Temperature is too high because there is no waterin inner pot | Add thin cooking liquidaccording to size, thenreintroduce food: 6 Quart - 1.5 cups (12 oz / 375 mL) 8 Quart - 2 cups (16 oz / 500 mL) | ||
C7 or NoPr |
Not enough liquid | Add thin cooking liquid according to size: 6 Quart - 1.5 cups(12 oz / 375 mL) 8 Quart- 2 cups (16 oz / 500 mL) Add more liquid as required. | |
Error codeappears on display and cooker beeps continuously | Quick release buttonis in the Vent position | Flick quickrelease button to ensure it is in the Seal position. | |
C9 | Sensor connectors on Air Fryer Lid and cooker base are not making fullcontact. | Press the lid down slightly to ensure that .the femalelid sensor connector contacts the male base sensor connector. | |
Lid | Lid is not in the correct position for theselected program | Open and close the lid. Do not use a lid when usingSauté. | |
Pot |
Inner potis missingfrom the cooker base | Insert theinner pot intothe cooker base andtry again. If the error code appears while the inner potis in thecooker base, contact Customer Care. | |
Burn / Food burn |
High temperature detected at bottom of inner pot; cookerautomatically reduces temperature to avoid overheating | Starch deposits at the bottom of the inner pot may have blocked heat dissipation. Turn the cooker off, release pressure according to the recipe, and inspect the bottom of the inner pot. | |
PrSE | Pressure hasaccumulated during a non-pressure cooking program |
Press quick release button down until it clicksinto Vent position. | |
Warranty
Limited Warranty
This Limited Warranty is effective for one year from the date of original consumer purchase. Proof of original purchase date and, if requested by an authorized representative of Instant Brands Inc. (“Instant Brands”), return of your appliance, is required to obtain service under this Limited Warranty. Provided that this appliance is operated and maintained in accordance with written instructions attached to or furnished with the appliance, Instant Brands will, in its sole and exclusive discretion, either:
Warranty Registration
Please visit www.instantpot.com/support/register to register your new Instant Brands™ appliance and validate your warranty within thirty (30) days of purchase.
Pros & Cons
Pros
- Combines multiple appliances in one
- Easy to use digital interface
- Healthier alternative to traditional frying methods
- Large capacity ideal for cooking large meals
- 11-in-1 functions for versatile cooking
Cons
- Expensive compared to individual appliances
- Large size may not fit on all countertops
- May take some time to learn all functions
- Some users may prefer manual controls
Customer Reviews
Customers have given the Instant Pot Multi-Use Pressure Cooker Air Fryer 8-quart glowing reviews, praising its versatility and ease of use. Many users have commented on how much space it saves by combining multiple appliances in one, and how much healthier their meals have become by using the air frying function. However, some users have noted that the machine can be loud during the cooking process and that the price is higher than buying individual appliances.
Most Common Complaints
The most common complaints about the Instant Pot Multi-Use Pressure Cooker Air Fryer 8-quart include the size being too large for some kitchens, the price being too high compared to individual appliances, and the noise level during cooking. Some users have also reported issues with the air fryer function not working properly, but this seems to be an isolated issue.
Faqs
With the Instant Pot Multi-Use Pressure Cooker Air Fryer, what is the maximum capacity that it can hold?
Specifically, what kinds of culinary functions does the Instant Pot Multi-Use Pressure Cooker Air Fryer facilitate?
What are the steps involved in using the air fryer option on this Instant Pot Multi-Use Pressure Cooker Air Fryer 8-quart?
Is there a non-stick coating on it?
What is the level of difficulty in cleaning the Instant Pot Multi-Use Pressure Cooker Air Fryer?
Does the Instant Pot Multi-Use Pressure Cooker Air Fryer 8-quart come with a cookbook when you purchase it?
Can I manually change the temperatures and timings of the cooking process?
When you purchase the Instant Pot Multi-Use Pressure Cooker Air Fryer, what accessories are included with it?
What is the procedure for switching between the functionalities of air frying and pressure cooking?
What is the procedure for releasing pressure after pressure cooking?
Leave a Comment