
Assemble: Jansno Electric Bicycle X70 User Manual
Content
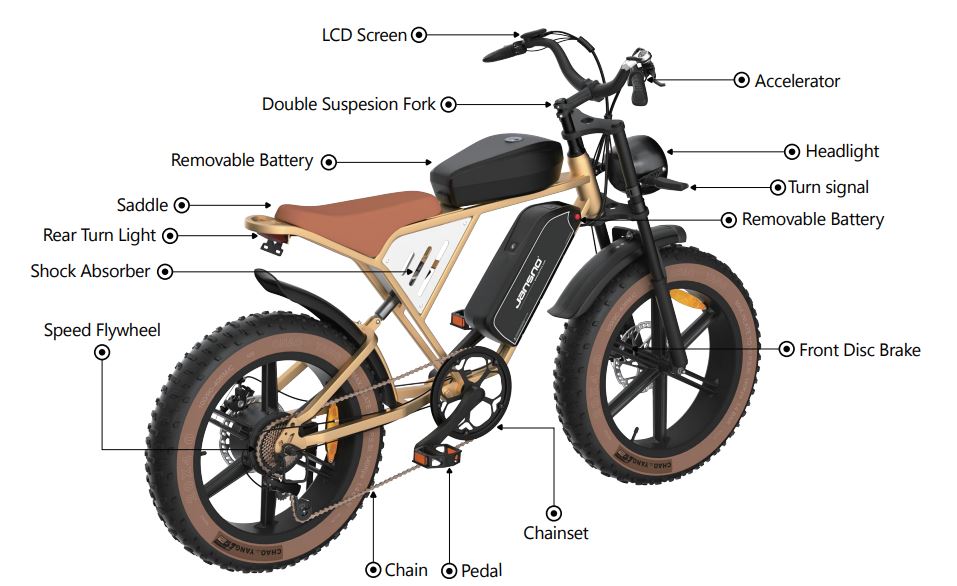
Jansno Electric Bicycle X70

Introduction
The Jansno Electric Bicycle X70 is a cutting-edge, eco-friendly transportation solution designed for both recreational and commuting purposes. This electric bike boasts a sleek and durable design, making it an attractive option for those looking to reduce their carbon footprint. The X70 is expected to launch in the spring of 2024, with an estimated price range of $1,200 to $1,500.
Whether you are navigating through urban streets or exploring off-road trails, the Jansno Electric Bicycle X70 offers a versatile and efficient riding experience. Equipped with advanced technology and robust components, this bike is perfect for individuals seeking a reliable and stylish mode of transportation.
The X70 features a powerful motor and a long-lasting battery, ensuring extended ride times and minimal recharging intervals. Its ergonomic design and adjustable settings make it comfortable for riders of various heights and preferences.
Detailed Specifications
- Motor: 500W Brushless DC Motor
- Battery: 13.4Ah Lithium-Ion Battery
- Range: Up to 60 miles on a single charge
- Top Speed: 28 mph
- Transmission: 7-Speed Shimano Gear System
- Brakes: Hydraulic Disc Brakes
- Tires: 26" x 2.1" All-Terrain Tires
- Frame: Aluminum Alloy Frame
- Weight Capacity: 300 lbs
Bicycle Assembly
Assembly Guides
Individual assembly guides for each bicycle model can be found packaged with your bicycle.
Getting Started
Open the carton from the top and remove the bicycle. Remove the straps and protective wrapping from the bicycle. Inspect the bicycle and all accessories and parts for possible shortages. It is recommended that the threads and all moving parts in the parts package be lubricated prior to installation. Do not discard packing materials until assembly is complete to insure that no required parts are accidentally discarded.
Note: Your bicycle may be equipped with different style components than the ones illustrated.
Pedals & Crank Set
Look for the letters “R” for right, and “L” for left, stamped on each pedal spindle. Start threading each pedal by hand to avoid stripping the threads. Tighten with a 15mm narrow open ended wrench. Note that the right hand pedal attaches to the chainwheel side crank arm with a right-hand (clockwise) thread. The left pedal attaches to the other crank arm and has a left-hand (counter-clockwise) thread. It is very important that you check the crank set for correct adjustment and tightness before riding your bicycle. New cranks may become loose with initial use. Once the pedals have been installed, remove the dust caps from the center of each crank arm. Tighten the spindle nuts securely (approx. 350 in.Ibs.) with a 14mm socket wrench or an 8mm Allen wrench, depending on style, then replace the dust caps.
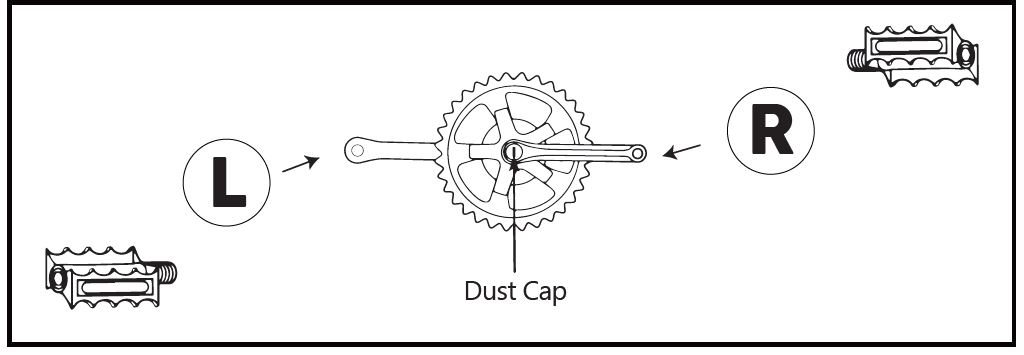
Warning: Attachment of an incorrect pedal into a crank arm can strip pedal threads and cause irreparable damage. Before your first ride, please check to insure your pedals are attached correctly.
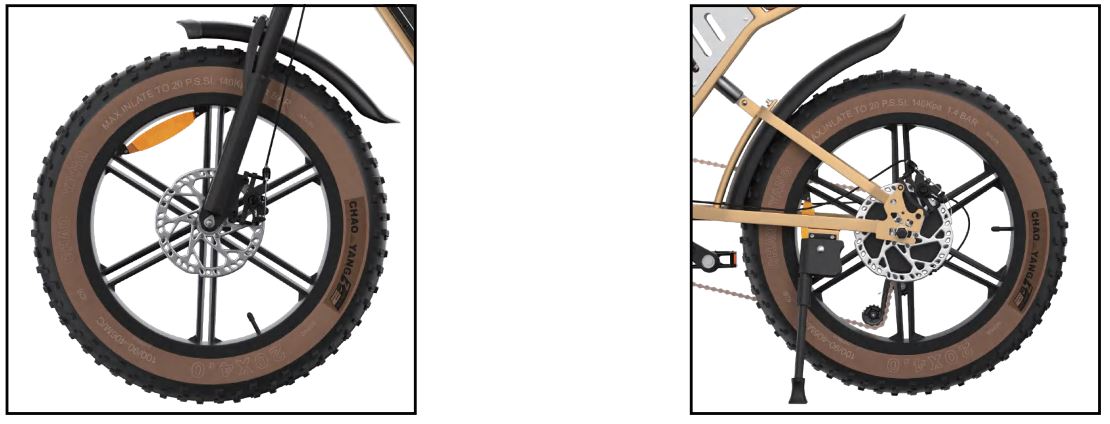
Front Wheel-Bolt-oninstallation
- Make sure the brakes are loose enough to allow the wheel to pass through the brake pads easily.
- Place wheel into fork dropouts.
- Install retaining washers with raised lip pointed towards the fork, and insert into the small hole of the fork blade. NOTE: Some bikes may have step retaining washers in place of the retaining washer (shown in dotted box). If so, install the step retaining washer, raised portion sliding in to the fork dropouts.
- Install axle nut and tighten. Make sure the wheel is centered between the fork blades.
- Spin the wheel to make sure that it is centered and the clears brake shoes. Tighten the brakes if necessary.
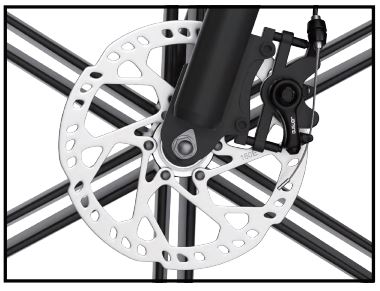
Warning: It is very important to check the front wheel connection to the bicycle. Failure to properly tighten may cause the front wheel to dislodge.
Rear Wheel-Bolt-on installation
- If the bicycle has rim brakes, make sure the brakes are loose enough to allow the wheel to pass through the brake pads easily. For disc brakes, no adjustment is required.
- Place the wheel into frame dropouts.
- Slide a washer onto each side of the axle.
- Install axle nuts and tighten. Make sure the wheel is centered in the frame. This may be easiest with the bike turned upside-down.
- Spin the wheel to make sure that it is centered and clears the brake shoes. Tighten the brakes if necessary.
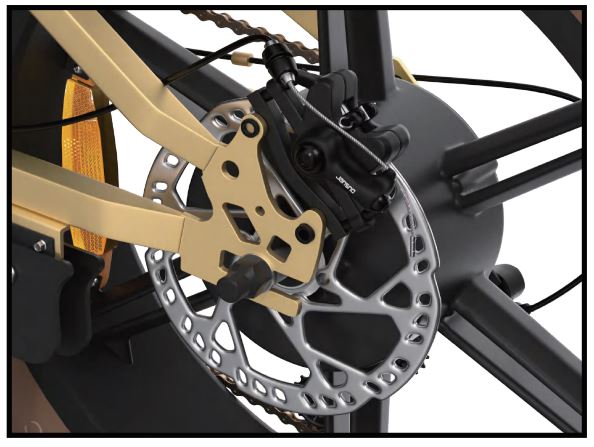
Warning
- Tighten both rear wheel axle nuts securely. Failure to do this may cause the rear wheel to dislodge from the frame dropouts resulting in serious damage or injury.
- Periodically, disassemble the mechanism from the bicycle and inspect for any wear or damage and replace if necessary. When reinstalling, it is very important to ensure the connections are made properly.
Rear Wheel-Bolt-on Removal
- If the bicycle has rim brakes, make sure the brakes are loose enough to allow the wheel to pass through the brake pads easily. For disc brakes, no adjustment is required.
- Most bikes have a plug or quick-disconnect box located on the seat stay or chain stay. These allow the motor to be easily disconnected from the controller. Simply undo the single large plug or open the black plastic box and undo the five plugs inside.
- With the bicycle in a stand or upside-down, loosen the axle nuts then remove the wheel from the bicycle.
Disc Brakes - Tektro
- Check the tightness of the six disc mounting bolts holding the brake rotor onto the wheel. If you need to remove these bolts, be sure to us a thread-locking compound when re-installing them.
- Make sure the two bolts securing the caliper adaptor bracket to the fork are tight.
Thread the brake cable through the caliper as shown and secure it with the cable fixing bolt.
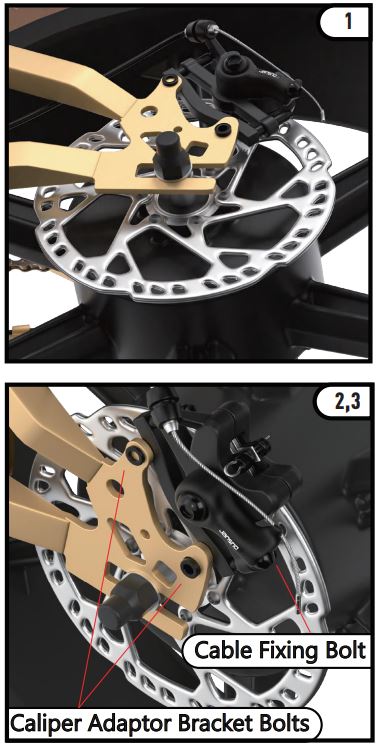
Loosen the two caliper mounting bolts enough to allow the brake caliper to float freely.
Install the wheel, making sure the brake rotor fits into the slot in the caliper. Center the caliper around the brake rotor, then tighten the caliper mounting boits.
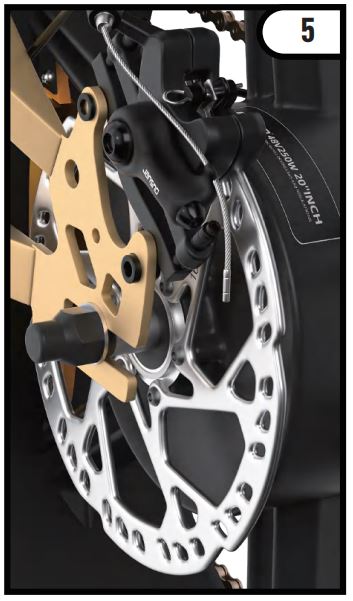
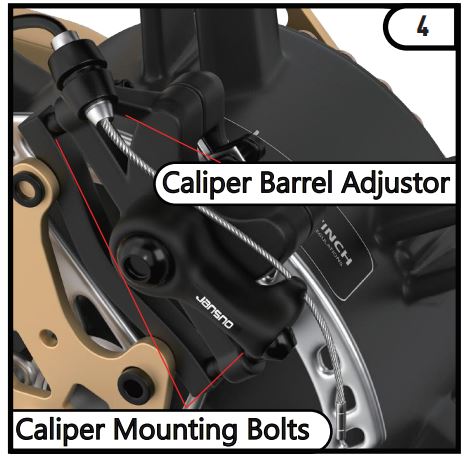
- Using the inner pad adjusting bolt, adjust the inside brake pad so it is as cose as possible to the rotor without rubbing.
- Using the caliper barrel adjustor, adjust the outside brake pad so it is as close as possible to the rotor without rubbing.
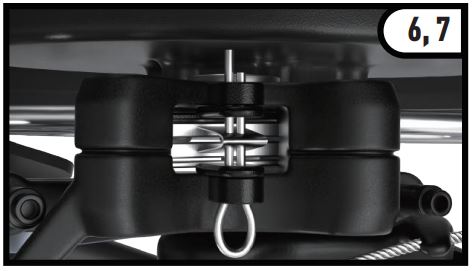
Warning
- Brake rotors get hot! Severe injury could result from contact with the hot rotor. Mind your legs, as well as your hands.
- Disc brakes require breaking in. Ride and use the brakes gently for about 13 miles before using the brakes in downhill conditions, for sudden stops or any other serious braking. Please be aware that your brake system will change in performance throughout the wear in process. The disc brake should be cleaned before the first ride using rubbing alcohol. NEVER use oil or similar products to clean your disc brake system.
- Avoid touching the rotor (disc) with your fingers at any time. naturally oily fingers can contaminate the rotor and/or the brak pads and diminish the brake's effectiveness.
DERAILLEUR SYSTEMS
The derailleur system includes the font and rear derailleurs, the shift levers, and the derailleur control cables, all of which must function correctly for smooth gear shifting to occur.
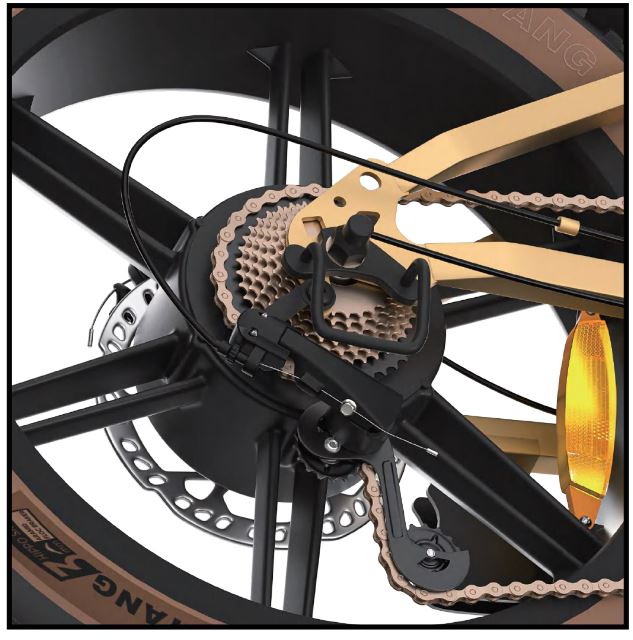
Derailleur
Although the front and rear derailleurs are initially adjusted at the factory, you will need to inspect and readjust both before riding the bicycle.
Rear Derailleur
- Begin by shifting the rear shifter to largest number indicated, loosen the cable from the rear derailleur cable anchor bolt, and place the chain on the smallest sprocket.
- Adjust the High limit screw so the guide pulley and the smallest sprocket are lined up vertically. Re-tighten the cable, pull out any slack, and retighten the anchor bolt securely. Shift through the gears, making sure each gear achieved is done quietly and without hesitation. If necessary, use the barrel adjuster to fine tune the cable tension by turning it the direction you want the chain to go.
- For example, turning clockwise will loosen the cable tension and move the chain away from the wheel, while turning counter-clockwise will tighten cable tension and direct
the chain towards the wheel.
Final Check
- After all adjustments have been made, shift through every gear several times at varying speeds. This will ensure all your adjustments are correct and will allow you to pinpoint any trouble areas. If you encounter any problems, refer to the appropriate section and make any necessary adjustments.
- Check the tire pressure and inflate each tube to the recommended psi as stated on the sidewall of the tire.
- Check that the kickstand operates smoothly and the kickstand bolt is secured tightly.
- Finally, examine the bicycle. Make sure all accessories are attached and all quick releases, nuts and bolts have been tightened securely.
- Correct maintenance of your bicycle will ensure many years of happy riding. Service your bicycle regularly by referring to the relevant sections of this manual, OR take it to a professional bicycle shop.
Remember: Always wear a helmet and obey all traffic laws.
Warning
- Never inflate a tire beyond the maximum pres-sure marked on the tire’s sidewall. Exceeding the recommended pressure may blow the tire off the rim, which could cause damage to the bicycle and injury to the rider and bystanders.
- Tighten both rear wheel axle nuts or the quick release mechanism securely. Failure to do this may cause the rear wheel to dislodge from the frame dropouts resulting in serious damage or injury.
Maintenance
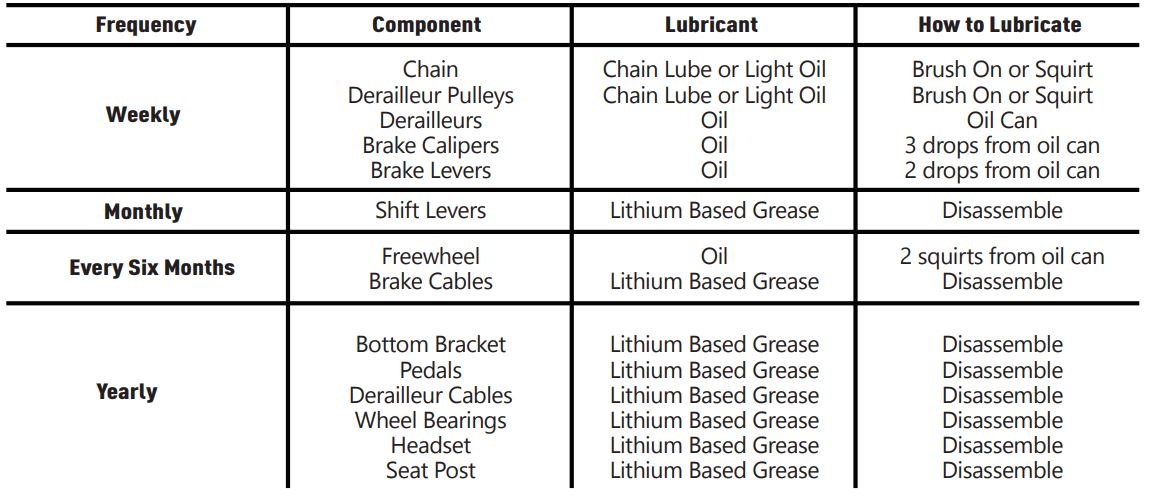
Installation procedures
- First handlebar installation, try to pay attention to not tear off the waterproof wire connector.
- Battery installation to be in place, press down hard, (battery key can be turned to lock the battery) and then open the battery in the upper right corner of the red switch.
- Turn the power door key to the right until it can not be pulled out until the completion of these three steps after the headlights and turn signals can be used normally.
- Long press the middle button on the instrument can be! After the above operation is invalid, then check whether the connector on the waterproof line of the handlebar is loose, and then no reaction to check whether the controller terminal is plugged in.
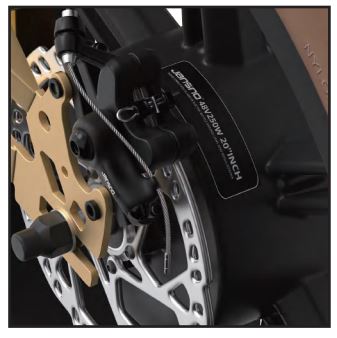
Note: For after-sales contact, please attach the order number and contact information together to facilitate after-sales processing. Thank you for your cooperation. For European law, please put on a 250W motor sticker.
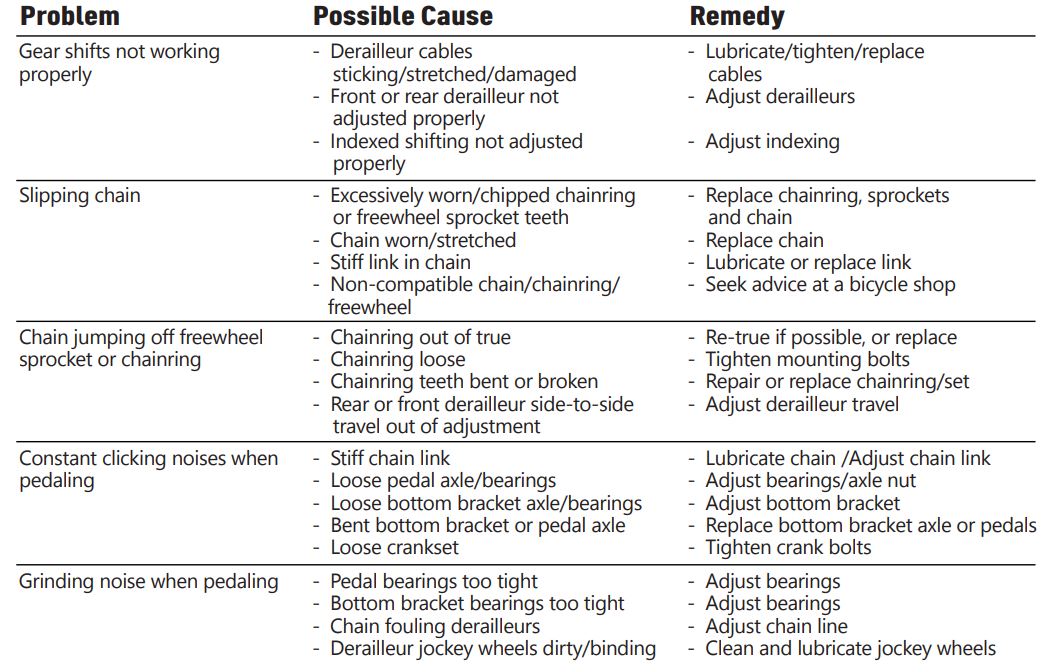
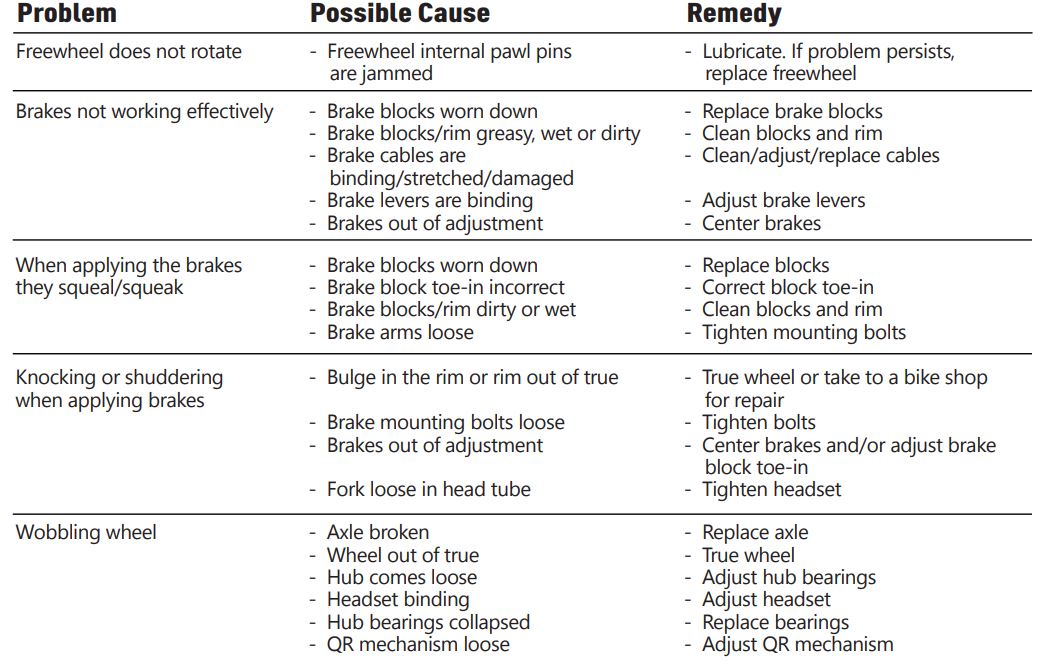
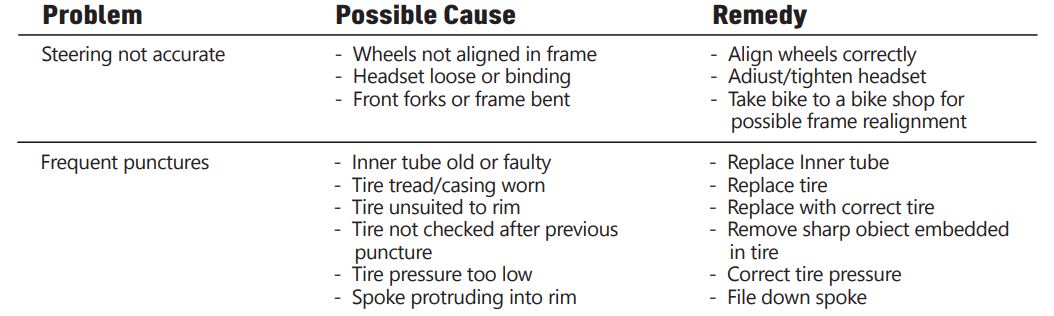
Troubleshooting
Pros & Cons
Pros
- Powerful and efficient motor for smooth rides
- Long-lasting battery with extended range
- Durable and lightweight aluminum alloy frame
- Adjustable settings for comfortable riding
- Integrated lights for enhanced safety
- Eco-friendly and cost-effective transportation solution
Cons
- Higher initial cost compared to traditional bicycles
- Requires regular maintenance to ensure optimal performance
- Limited availability of replacement parts in some regions
- May be heavier due to the battery and motor
Customer Reviews
Customers have praised the Jansno Electric Bicycle X70 for its performance, comfort, and value. Many have noted the ease of assembly and the intuitive controls. However, some users have mentioned that the bike could be lighter and that the customer support could be more responsive.
Most Common Complaints
- Weight of the bike
- Customer support response time
- Availability of replacement parts
Faqs
What is the maximum range of the Jansno Electric Bicycle X70?
How long does it take to fully charge the battery?
Is the Jansno Electric Bicycle X70 suitable for off-road riding?
What is the weight capacity of the Jansno Electric Bicycle X70?
Does the Jansno Electric Bicycle X70 come with any safety features?
Can I customize or upgrade the components of the Jansno Electric Bicycle X70?
What kind of maintenance does the Jansno Electric Bicycle X70 require?
Is the Jansno Electric Bicycle X70 waterproof?
Can I return or exchange the Jansno Electric Bicycle X70 if I am not satisfied?
How does the warranty work for the Jansno Electric Bicycle X70?
Leave a Comment