Kenmore Vacuum Cleaner 21614 User Manual | Features
Content
Introduction
The Kenmore Vacuum Cleaner 21614 is a powerful and versatile cleaning solution designed to tackle pet hair and allergens with ease. Featuring a lightweight, bagless canister design, this vacuum offers exceptional maneuverability and convenience. Its advanced HEPA filtration system effectively captures dust and allergens, ensuring cleaner air in your home. With a range of attachments, including the Pet PowerMate™, it is perfect for various surfaces. Priced at $199.99, the Kenmore 21614 combines performance and practicality for a superior cleaning experience.
PACKING LIST
Your KENMORE VACUUM CLEANER is packaged with the following parts and components assembled separately in the carton:
- Canister Vacuum Cleaner
- PowerMate
- Hose & Handle Assembly
- Pet PowerMate
- Telescoping Wand
- Tool Caddy
- Crevice Tool
- Dusting Brush
- Use & Care Guide
Specifications
- Powerful 12-Amp Motor: Delivers strong suction power for effective cleaning.
- Bagless Design: Uses a dustbin that can be easily emptied and cleaned.
- HEPA Filter: Captures 99.97% of dust, dander, and allergens as small as 0.3 microns.
- Adjustable Suction Control: Allows for customized cleaning power based on the surface.
- Multisurface Cleaning: Includes crevice tool, upholstery brush, and dusting brush for various surfaces.
- Lightweight and Ergonomic: Weighs approximately 15 pounds with an ergonomic handle for easy maneuverability.
PARTS AND FEATURES
It is important to know your vacuum cleaner’s parts and features to ensure its proper and safe use. Review these before using your vacuum cleaner.
REPLACEMENT PARTS
| Part | Part No. |
| Belt | 20-53013* |
| Headlight Bulb | 20-5248 |
| Exhaust Filter | 20-53296* |
| Primary Filter | KC44KDMTZ000 |
To order a replacement part call 1-844-553-6667 or visit http://www.searspartsdirect.com/ * Available online at http://www.sears.com/ | |
NOTE: Detailed illustrations and listings of all vacuum cleaner parts are also available at searspartsdirect.com
TELESCOPING WAND & ATTACHMENTS
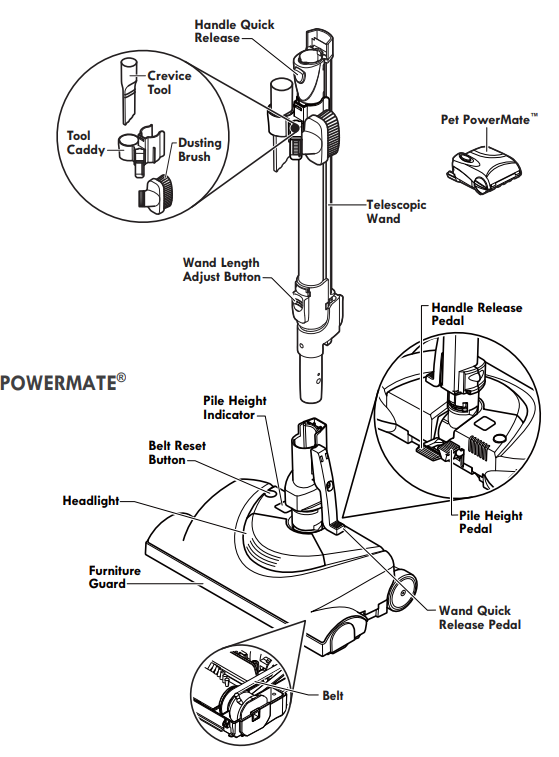
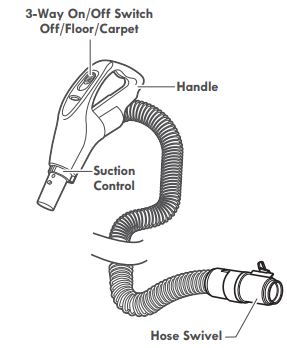
HANDLE & HOSE ASSEMBLY
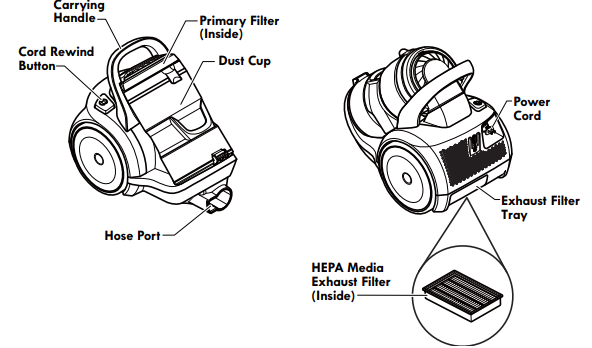
CANISTER
WARNING
Please pay special attention to these hazard alert boxes, and follow any instructions given. WARNING statements alert you to such dangers as re, electric shock, burns and personal injury. CAUTION statements alert you to such dangers as personal injury and/or property damage.
Description
The Kenmore Vacuum Cleaner 21614 boasts a sleek and durable design, making it a stylish addition to any home. The bagless system reduces maintenance costs and makes it easy to see when the dustbin needs to be emptied. The HEPA filter ensures that your home is free from allergens and dust particles, providing a healthier environment for you and your family.
The vacuum comes with several attachments, including a crevice tool for tight spaces, an upholstery brush for furniture, and a dusting brush for delicate surfaces. The adjustable suction control allows you to tailor the cleaning power to the surface you are cleaning, ensuring optimal performance and care for your floors and furniture.
ASSEMBLY INSTRUCTIONS
WARNING: Electrical Shock Hazard
DO NOT plug into electrical supply until assembly is complete. Failure to do so could result in electrical shock or injury.
Before assembling vacuum cleaner. Use this list to verify that you have received all the components of your new Kenmore vacuum cleaner.
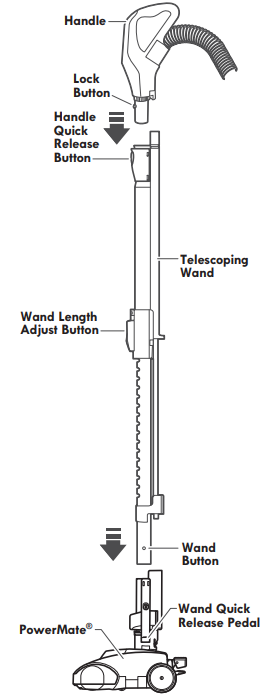
POWERMATE
- Insert telescoping wand into PowerMate until the wand button snaps into place. A noticeable “click” should be heard.
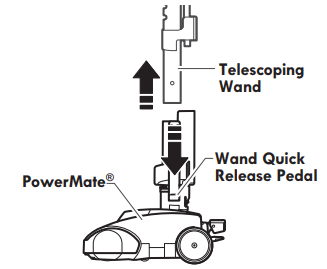
To remove: Press wand quick release pedal and pull telescoping wand out of PowerMate.
HANDLE
- Insert handle into telescoping wand until lock button snaps in place. Be sure hose is not twisted.
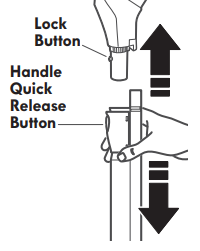
To remove: Press handle quick release button and pull up on handle.
To store: Disconnect hose from telescoping wand and canister to prevent stress on hose during storage. Store hose in a loosely coiled position so the hose covering is not stressed.
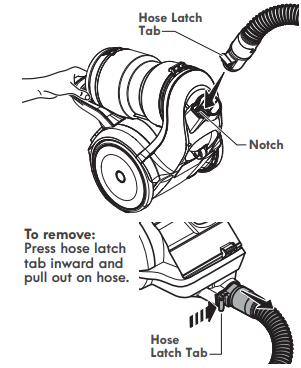
HOSE
- Align the hose latch tab and notch in canister hood and insert hose into canister until it snaps in place.
To remove: Press hose latch tab inward and pull out on hose.
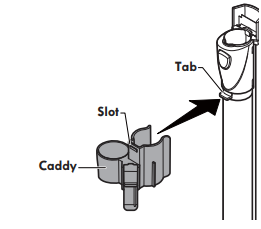
CADDY
- Align the tab on the telescoping wand with the slot in the caddy.
- Press the caddy onto the telescoping wand and snap the caddy into place.
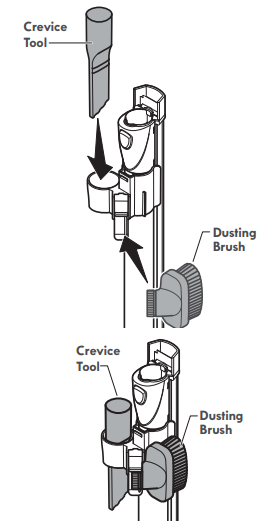
ATTACHMENTS
Install the crevice tool and dusting brush into the caddy as shown.
OPERATING INSTRUCTIONS
CAUTION
Moving parts! To reduce the risk of personal injury, DO NOT touch the agitator when vacuum cleaner is on. Contacting the agitator while it is rotating can cut, bruise or cause other injuries. Always turn and unplug from electrical outlet before servicing.
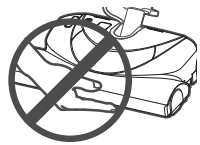
Use caution when operating near children.
HOW TO START
WARNING
Personal Injury and Product Damage Hazard
- DO NOT place hands or feet under the vacuum cleaner at any time.
- DO NOT plug in if the switch is in ON position. Personal injury or property damage could result.
- The cord moves rapidly when rewind-ing. Keep children away and provide a clear path when rewinding the cord to prevent personal injury.
- DO NOT use outlets above counters. Damage from the cord to items in the surrounding area could occur.
- When any abnormality/failure occurs, stop using the product immediately and disconnect the power plug.
Pull the cord out of the canister to the desired length. The cord will not rewind until the cord rewind button is pushed.
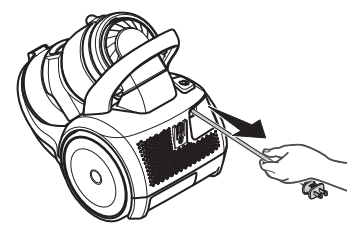
Plug the polarized power cord into a 120-volt outlet located near the floor.
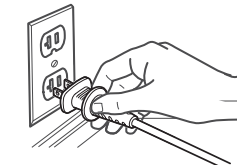
NOTE: To reduce the risk of electric shock, the plug does not fit tully in the ouflet, re- verse the plug. If it still does not fit, contact a qualified electrician to install the proper outlet. Do not change the plug in any way.
To rewind: Unplug the vacuum cleaner. Hold the plug while rewinding to prevent damage or injury from the moving cord. Push cord rewind button.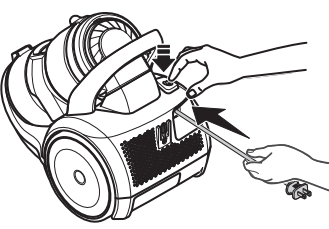
Lower handle from upright position by pressing on the handle release pedal.
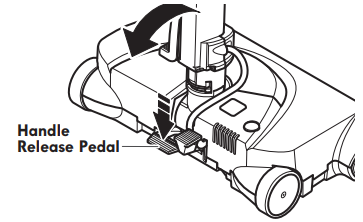
- Select a pile height setting by pressing the small pedal on the rear of the PowerMate. The pile height setting shows on the indicator.
SUGGESTED PILE HEIGHT
SETTINGS:
For best deep-down cleaning, use the XLO setting. However, you may need to raise the height to make some jobs easier, such as scatter rugs and some deep pile carpets, and to prevent the vacuum cleaner from shutting off. Suggested settings are:- HI - Shag, deep pile, super-soft or ultra-plush carpets, and scatter rugs.
- MED - Medium to deep pile.
- LO - Low to medium pile.
XLO - The preferred setting for many carpets and also for bare floors.

NOTE: To protect bare floors, place the 3-Way On/Off switch in the FLOOR position to turn off agitator rotation.
Attention: Refer to your carpet manufacturers' cleaning recommendations. Some more delicate carpets may requirethat they be vacuumed with the PowerMate agitator turned off to prevent carpet damage.
CAUTION: DO NOT leave the PowerMate running in one spot in the upright position for any length of time. Damage to carpet
- Select a switch position on the handle.
OFF - Slide the switch all the way back to turn off both the canister and the PowerMate motors.
FLOOR - turns on the canister motor only. The PowerMate agitator will not spin.
CARPET - turns on both the canister and the PowerMate motors. The PowerMate agitator will spin.
NOTE - When this switch is in the FLOOR position, the headlight DOES NOT function since no electricity flows to the PowerMate
TELESCOPING WAND
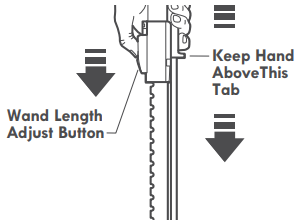
The telescoping wand's length is adjustable and requires no assembly. To adjust, simply push down on the wand adjust button and slide the upper portion of the telescoping wand to the desired height. PowerMate with your hand or foot.
VACUUMING TIPS
WARNING: Personal Injury and Product Damage Hazard
- DO NOT run over the power cord with PowerMate. Personal injury or product damage could result.
- DO NOT pull the plug from the wall by the power cord. If there is damage to the cord or plug, personal injury or property damage could result.
CAUTION:Product Damage Hazard
Use care if the PowerMate and wand are left in the upright position as it may tip over easily. Property damage can occur if tipped.
Suggested sweeping pattern
For the best cleaning action, the PowerMate should be pushed straight away from you and pulled straight back. At the end of each pull stroke, the direction of the PowerMate should be changed to point into the next section to be cleaned. This pattern should be continued across the carpet with slow, gliding motions.
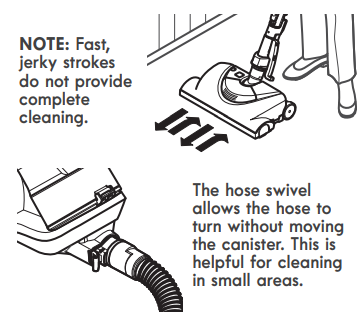
NOTE: Fast, jerky strokes do not provide complete cleaning.
The hose swivel allows the hose to turn without moving the canister. This is helpful for cleaning in small areas.
Check the hose for twisting before pulling the canister.
WARNING: Personal Injury Hazard
Use care if the canister is placed on the stairs. It may fall, causing personal injury or property damage.
CAUTION: Product Damage Hazard
Do not pull on the hose to move the canister from one stair to the next. When finished cleaning in one area use the handle grip on the canister to move the vacuum cleaner to a new location for further cleaning.
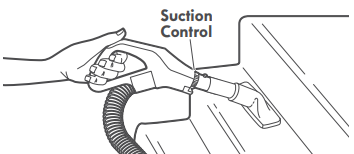
Carpeted stairs need to be vacuumed regularly. For best cleaning results, fully close the suction control.
For best cleaning results, keep the airflow occasionally for clogs. Turn off and unplug vacuum cleaner from outlet before checking.
ATTACHMENTS
CAUTION
DO NOT attach or remove handle or telescoping wand while vacuum cleaner is ON. This could cause sparking and damage the electrical contacts.
ATTACHMENTS ON HANDLE
NOTE: If the PowerMate is attached, turn off and unplug vacuum cleaner before removing handle from telescoping wand.
Press handle quick release button and pull up on handle.
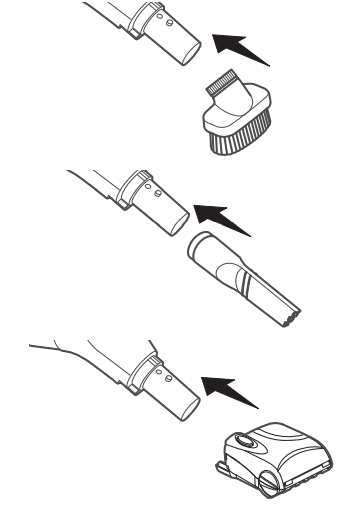
Slide attachments firmly on handle as needed. See ATTACHMENT USE TABLE (page 14).
ATTACHMENTS ON TELESCOPING WAND
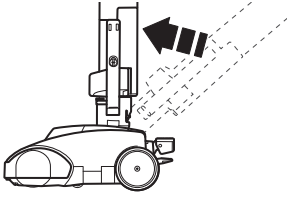
To remove telescoping wand from PowerMate, lock telescoping wand in straight-up position.
Press wand quick release pedal with foot and pull the telescoping wand straight up and out of PowerMate.
- Put attachments on telescoping wand as needed. See ATTACHMENT USE TABLE (page 14).
ATTACHMENT USE TABLE

- Always clean attachments before using on fabrics.
- 3-way switch should be in FLOOR position.
- Pet PowerMate™ attachment instructions are included with the product.
Setup Guide
To set up your Kenmore Vacuum Cleaner 21614,
- Start by unpacking all the components and accessories. Assemble the handle and the main body of the vacuum by following the instructions provided in the user manual.
- Attach the desired cleaning tool or brush according to your cleaning needs.
- Plug in the vacuum and ensure the power cord is securely inserted into both the vacuum and the wall outlet.
- Before first use, make sure to check and clean the filter if necessary.
Refer to the user manual for detailed instructions on how to assemble, operate, and configure your vacuum cleaner.
PERFORMANCE FEATURES
WARNING: Personal Injury Hazard
Always turn off and unplug the vacuum cleaner before cleaning the agitator area as agitator may suddenly restart. Failure to do so can result in personal injury.
THERMAL PROTECTOR
This vacuum cleaner has a thermal protector which automatically trips to protect the vacuum cleaner from overheating. If a clog prevents the normal flow of air to the motor, the thermal protector turns the motor off automatically. This allows the motor to cool in order to prevent possible damage to the vacuum cleaner. Ten of able ugt the owe cord from the outlet to allow the vacuum cleaner to cool and the thermal protector to reset.
Check for and remove clogs, if necessary. Also check and replace any clogged filters. Wait approximately fifty (50) minutes and plug the vacuum cleaner in and turn back on to see if the motor protector has reset.
MOTOR PROTECTOR
This vacuum cleaner also has a motor protector by-pass valve which prevents motor overheating and damage. The valve opens to provide cooling air when a clog prevents normal air flow to the vacuum cleaner suction motor. You will notice a change of sound as air rushes through the valve opening.
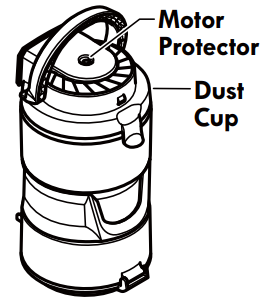
To correct problem: Empty the dust cup and clean the primary filter and pre-filter. Check for and remove clogs, and empty dust cup if necessary.
NOTE: Do not block motor protector.
NOTE: The motor protector may open when using attachments or when cleaning new carpet due to reduced airflow caused by the attachments themselves or by new carpet.
BELT RESET
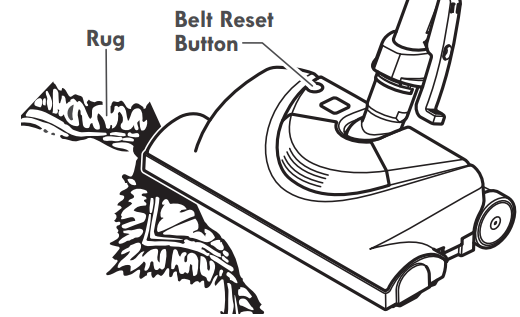
The PowerMate has built-in protection against motor and belt damage should the agitator jam. If the agitator slows down or stops, the belt reset shuts off the PowerMate. The canister motor will continue to run.
To correct problem: Turn off and unplug vacuum cleaner, remove obstruction, then press BELT RESET button. If the problem persists, have the vacuum cleaner serviced by a Sears or other qualified service agent.
EDGE CLEANER
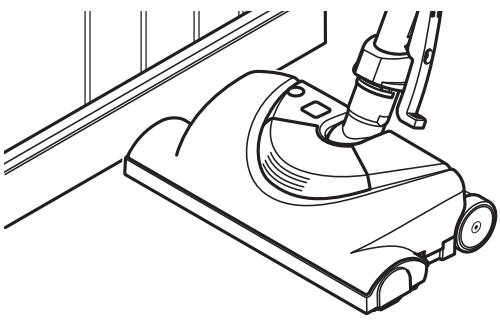
Active brush edge cleaners are on both sides of the PowerMate. Guide either side of the PowerMate along base-boards or next to furniture to help remove dirt trapped at carpet edges.
SUCTION CONTROL
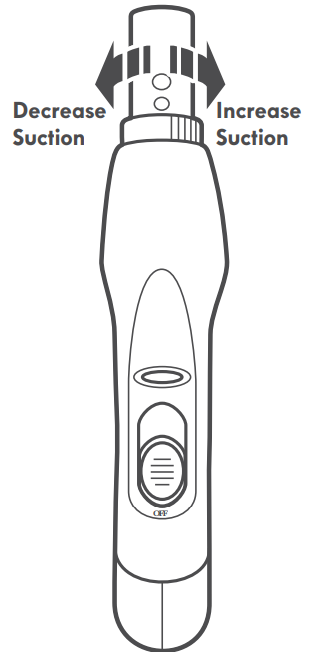
The suction control allows you to change the vacuum suction for different fabrics and carpet weights.
Opening the control decreases suction for draperies and suction forreases upholsteries and carpets.
Kenmore Vacuum Cleaner 21614 Troubleshooting
Review this table to find do-it-yourself solutions for minor performance problems. Any other service needed should be performed by a Sears or other qualified service agent.
WARNING Aways leaner. Fire go do so could result in petrical shock or personal injury.
PROBLEM
Vacuum cleaner won’t start. | POSSIBLE CAUSE
1. Unplugged at wall outlet.
2. Tripped circuit breaker/ blown fuse at household service panel. 3. Loose hose electrical connections. | POSSIBLE SOLUTION
1. Plug in firmly, move switch to FLOOR or CARPET position. 2. Reset circuit breaker or replace fuse. 3. Reconnect hose ends. |
| Poor job of dirt pick-up. | 1. Full or clogged dust cup. 2. Clogged airflow passages. 3. Dirty filters. 4. Wrong pile height setting. 5. Suction control is open. 6. Hole in hose. 7. Worn PowerMate agitator. 8. Worn or broken belt. 9. Dirty agitator or end caps. 10. Dust cup installed incorrectly. 11. Dust cup lid and dust cup missassembly. | 1. Empty and clean dust cup. 2. Clear airflow passages. 3. Change/clean filters. 4. Adjust setting. 5. Adjust control. 6. Replace hose. 7. Change agitator. 8 & 9. See BELT CHANGING AND AGITATOR CLEANING. 10. See EMPTYING DUST CUP. 11. See PRE-FILTER CLEANING. |
| Vacuum cleaner starts but shuts off. | 1. Hose electrical connection.
2. Tripped overload protector in PowerMate.
3. Tripped thermal protector in canister. | 1. Check connections, reconnect hose ends. 2. Remove any items that may be caught or jammed, then reset. If vacuum cleaner starts and stops again, clean agitator and end caps, then reset. 3. Reset thermal protector. |
| PowerMate will not run when attached. | 1. PowerMate connections unplugged. 2. Worn or broken belt. 3. Dirty agitator or end caps. 4. Tripped overload protector in PowerMate.
5. Switch not in CARPET position. | 1. Plug in firmly.
2 & 3. See BELT CHANGING AND AGITATOR CLEANING. 4. Remove any items that may be caught or jammed, then reset. If vacuum cleaner starts and stops again, clean agitator and end caps, then reset. 5. Move switch to CARPET position. |
PROBLEM
Vacuum cleaner picks up moveable rugs -or- PowerMate pushes too hard. | POSSIBLE CAUSE
1. Wrong pile height setting. 2. Suction too strong. | POSSIBLE SOLUTION
1. Adjust setting. 2. Open suction control. | |
| Light won’t work. | 1. Burned out light bulb. 2. Tripped overload protector in PowerMate. | 1. Change light bulb. 2. Remove any items that may be caught or jammed, then reset. If vacuum cleaner starts and stops again, clean agitator and end caps, then reset. | |
| Cord won’t rewind. | 1. Dirty power cord. 2. Cord jammed. | 1. Clean the power cord. 2. Pull out cord and rewind. | |
| Vacuum cleaner leaves marks on carpet. | 1. Wrong vacuuming pattern. | 1. See VACUUMING TIPS. | |
Pros & Cons
Pros
- Powerful Suction: Effective at cleaning various surfaces including carpets, hardwood floors, and upholstery.
- Lightweight and Ergonomic: Easy to maneuver around furniture and up stairs.
- HEPA Filter: Captures allergens and dust particles, providing a healthier environment.
- Affordable: Priced competitively compared to other vacuums with similar features.
- Versatile Attachments: Includes multiple tools for detailed cleaning of different surfaces.
Cons
- Noisy Operation: Some users find it louder than expected during operation.
- Dustbin Capacity: Smaller dustbin capacity may require more frequent emptying.
- Cord Length: The power cord could be longer for more convenience.
Customer Reviews
Customers generally praise the Kenmore Vacuum Cleaner 21614 for its strong suction power, lightweight design, and affordability. Many users appreciate the variety of attachments that come with the vacuum, making it versatile for different cleaning tasks. However, some users have noted that it can be noisy during operation and that the dustbin capacity is somewhat small, requiring more frequent emptying.
A common complaint is the relatively short power cord, which can limit mobility during cleaning sessions.
WARRANTY
KENMORE LIMITED WARRANTY
FOR ONE YEAR from the date of sale this appliance is warranted against defects in material or workmanship when it is correctly installed, operated and maintained according to all supplied instructions.
This warranty applies for only 90 DAYS from the sale date if this appliance is ever used for other than private household purposes.
Faqs
How do I assemble the Kenmore Vacuum?
Why is my Kenmore Vacuum not turning on?
How often should I clean the HEPA filter in my Kenmore Vacuum?
What are the dimensions of the Cleaner 21614?
How do I empty the dustbin of my Kenmore Vacuum?
Is the Kenmore Vacuum Cleaner 21614 suitable for pet owners?
Can I purchase replacement parts for my Cleaner?
How long is the warranty on the Kenmore?
Is the Kenmore Vacuum Energy Star certified?
Leave a Comment
