Kitchenaid Compact Coffee Maker 4-Cup Instruction Guide

Content

KitchenAid Compact Coffee Maker 4-Cup
The Compact Coffee Maker 4-Cup is a stylish and functional appliance designed for coffee lovers who enjoy a small but flavorful batch. With a suggested retail price of $79.99 and a compact design, this coffee maker is perfect for offices, apartments, or any space where countertop real estate is at a premium. This model was launched in 2021, making it a fresh addition to the KitchenAid lineup.
Detailed Specifications
- Brews 4 5-ounce cups of coffee
- Stainless steel coffee spigot and durable die-cast metal handle
- One-touch brew start
- 24-hour programmability
- Auto-start and auto-stop features
- Removable gold-tone, mesh filter for easy cleaning
- Removable water reservoir with water-level indicator
- Cord storage
- Dimensions: 7.8 x 12.2 x 11.8 inches
- Weight: 6.3 pounds
Compact Coffee Maker Features

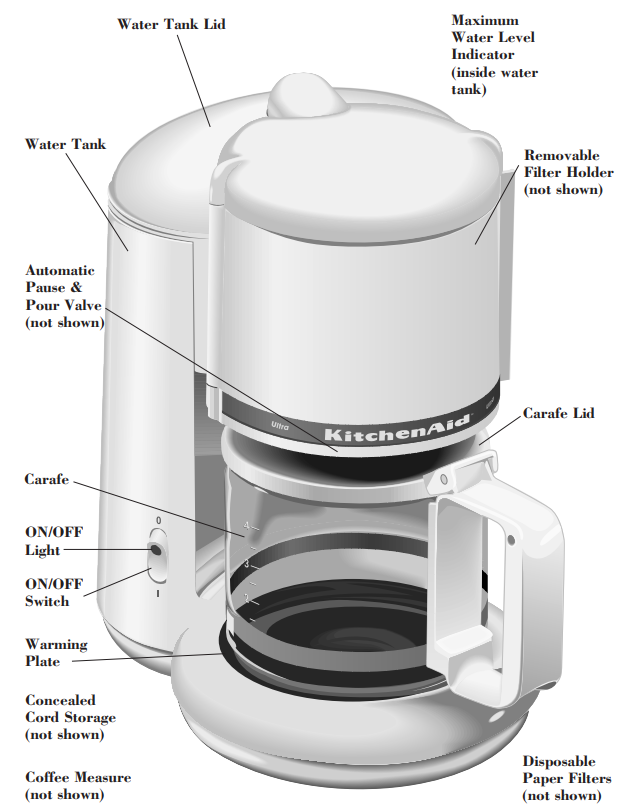
- Water Tank holds up to 22 oz. (to maximum fill line) of fresh water –enough to make four large cups of coffee.
- Water Tank Lid lifts for easy filling.
- Carafe with no-drip pouring spout. Dishwasher safe.
- Carafe Lid fits snugly, must be in position for Automatic Pause & Pour valve to function properly. Dishwasher safe.
- Removable Filter Holder accepts paper filter to hold ground coffee. Dishwasher safe.
- Warming Plate maintains temperature of brewed coffee.
- ON/OFF Switch starts and stops coffee maker operation.
- ON/OFF Light glows to show at a glance that the coffee maker is operating.
- Disposable Paper Filters are used to hold ground coffee. Made with unbleached paper for maximum coffee flavor (#2 cone shape).
- Coffee Measure makes it possible to measure correct amount of ground coffee for small or large cups.
- Automatic Pause & Pour Valve lets you enjoy your day’s first cup of coffee without waiting for the entire carafe to brew. Simply remove the carafe, pour a cup, and then return the carafe to the coffee maker within 30 seconds. When the carafe is removed, coffee is still brewing, only the flow into the carafe has been paused.
- Concealed Cord Storage at back of coffee maker provides out-of-the-way storage for electric cord.
- Maximum Water Level Indicator provides enough water for 4 brewed cups that are 5 ounces each.

Description of KitchenAid Compact Coffee Maker 4-Cup
The KitchenAid Compact Coffee boasts a sleek design with a die-cast metal handle and brushed stainless steel accents. The compact size saves space without sacrificing functionality, featuring one-touch brew start, 24-hour programmability, and auto-start and auto-stop features. The removable gold-tone filter and water reservoir make cleaning easy, while the cord storage function maintains a clutter-free countertop.
Operating Your Compact Coffee Maker
Good quality water is vital to the brewing of good coffee, so it is important to follow these recommendations when using your KitchenAid Compact Coffee Maker
- Use fresh tap water or filtered water only; distilled or spring/mineral water is NOT recommended.
- Remove calcium build-up from your coffee maker regularly.
BEFORE USING YOUR COFFEE MAKER
Before using, rinse the coffee maker by running it through a cycle with water only. Wash all removable parts in hot, soapy water; rinse with clean hot water and dry. (All removable parts are dishwasher safe.)
WARNING
- Electrical Shock Hazard Plug into a grounded 3 prong outlet.
- Do not remove ground prong.
- Do not use an adapter. Failure to follow these instructions can result in death, fire or electrical shock.
TO MAKE COFFEE
- Plug in the coffee maker.
- Remove the Carafe from the Warming Plate.
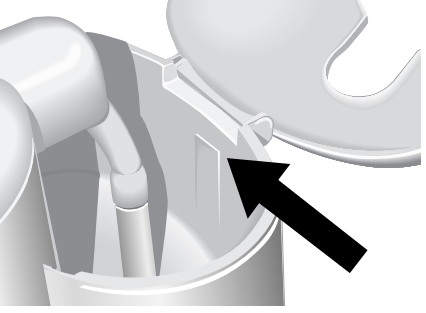
- Open the Water Tank Lid.
- Using the Carafe filled with fresh, cool water, fill the Water Tank with the amount of water needed for the amount of coffee you wish to make. DO NOT fill to a level higher than the top marking on the Water Tank.
- Swing the Filter Holder out of the coffee maker. Place a paper filter in the Filter Holder. Use a #2 cone shape filter.
- Fill the filter with one rounded scoop of medium to coarse ground coffee for each cup you are making, using the included scoop. Use more coffee for a stronger brew, less for weaker.
- Swing the Filter Holder back into the coffee maker until it clicks into closed position.
- Place the Carafe on the Warming Plate. Make sure the Carafe Lid is in position on the Carafe.
- Switch the coffee maker ON; the ON/OFF Light will come on. (If you remove the Carafe from the Warming Plate during brewing, the Automatic Pause & Pour Valve will prevent liquid from dripping on the Warming Plate. NOTE: The Lid must be in place on the Carafe for the Automatic Pause & Pour Valve to operate.)
NOTE: There are a couple indications that your coffee maker needs to be decalcified- It takes longer than 8 minutes to brew 4 cups of coffee.
- Excessive steam around the top of the Filter Holder during brewing.
If either one of these indications are present, see page 12, “How to Remove Calcium Buildup from your Coffee Maker.”
- When brewing is complete, pour coffee. Return Carafe to the Warming Plate to maintain temperature. However, coffee quality is optimal when it is freshly brewed.
- Turn coffee maker OFF when you no longer wish to keep coffee hot.
- Remove the Filter Holder from the coffee maker. Discard the paper filter and coffee grounds. If you wish to make another carafe of coffee immediately, turn off the coffee maker and allow to cool for five minutes, then repeat Steps 1 through 11.
USING THE OPTIONAL KITCHENAID™ GOLD TONE PERMANENT FILTER
The Gold Tone Permanent Filter is designed for easy installation in the Filter Holder. Do not use a paper filter with the Gold Tone Permanent Filter.
- Insert the Gold Tone Permanent Filter into the bottom of the Filter Holder.
- Use the desired amount of a medium to coarse grind coffee; a very fine grind may clog the filter. Place the ground coffee in the center of the filter to ensure complete wetting and to help prevent overflowing.
- After each use, rinse the filter under running water.
HOW TO CLEAN YOUR GOLD TONE PERMANENT FILTER
After several uses, clean the filter with a soft brush or sponge. Avoid using abrasive cleansers or steel wool pads, which could damage the filter screen. The filter can also be cleaned in the top rack of the dishwasher.
HOW TO CLEAN YOUR COFFEE MAKER
- Unplug the coffee maker.
- Removable parts can be washed in hot soapy water, rinsed with clean hot water and dried or washed in the dishwasher.
- All other parts should be wiped clean with a damp cloth. DO NOT immerse the coffee maker in water.
HOW TO REMOVE CALCIUM BUILDUP FROM YOUR COFFEE MAKER
Calcium deposits from water can build up in your KitchenAid Coffee Maker and should be removed to maintain brewing efficiency and coffee quality. As a rule of thumb, calcium buildup should be removed every three months. Local water conditions or use of the coffee maker more than once a day may require more frequent descaling.
- If using the optional Unique Charcoal Filter or the Gold Tone Permanent Filter, remove them from the coffee maker. DO NOT put a paper filter or ground coffee in the Brew Basket.
- Use a descaling agent or vinegar to remove calcium deposits.
When using a descaling agent
- Following the instructions on the package for the amounts of descaling agent and water to use, run the coffee maker through a complete cycle.
- If the cleaning cycle takes longer than eight minutes to complete, turn the coffee maker off and allow to cool for five minutes. Discard used solution and, using new solution, run through the cleaning cycle again. Continue this process until the cycle is completed in eight minutes or less.
- Turn off the coffee maker and allow to cool for five minutes.
- Run the coffee maker through two cycles using fresh, cool water. Discard the water after each cycle.
- Wash the Brew Basket, Glass Carafe and Lid in hot, soapy water. Rinse with hot water.
When using vinegar
- Run the coffee maker through two cycles, using a mixture of six cups of vinegar and four cups of water in each cycle. Discard the mixture after each cycle.
- If the cleaning cycle takes longer than eight minutes to complete, turn the coffee maker off and allow to cool for five minutes and, using a fresh vinegar and water mixture, run through the cleaning cycle again. Continue this process until the cycle is completed in eight minutes or less.
- Turn off the coffee maker and allow to cool for five minutes.
IMPORTANT SAFEGUARDS
When using electrical appliances, basic safety precautions should always be followed to reduce the risk of fire, electric shock, and/or injury to persons including the following
- Read all instructions.
- Do not touch hot surfaces. Use handles or knobs.
- To protect against electric shock, do not place cord, plugs or appliance in water or other liquid.
- Close supervision is necessary when any appliance is used by or near children.
- 5. Unplug from outlet when not in use and before cleaning. Allow to cool before putting on or taking off parts, and before cleaning the appliance.
- Do not operate any appliance with a damaged cord or plug or after the appliance malfunctions, or has been damaged in any manner. Return appliance to an authorized service facility for examination, repair or adjustment.
- The use of an accessory not evaluated for use with this appliance may cause injuries.
- Do not use outdoors.
- Do not let cord hang over edge of table or counter, or touch hot surfaces.
- Do not place on or near a hot gas or electric burner, or in a heated oven.
- Do not use this appliance for other than its intended use.
- Do not use appliance without lid properly placed on container.
- The container is designed for use with this appliance. It must never be used on a range top.
- Do not set a hot container on a wet or cold surface.
- Do not use a cracked container or a container having a loose or weakened handle.
- Do not clean container with cleansers, steel wool pads, or other abrasive material.
- This product is designed for household use only.
Electrical Requirements
Volts: 120 A.C. only
Hertz: 60
Note: Your coffee maker has a
3-prong grounded plug. To reduce the risk of electrical shock, this plug will fit in an outlet only one way. If the plug does not fit in the outlet, contact a qualified electrician. Do not modify the plug in any way.
A short power-supply cord is to be provided to reduce risks resulting from becoming entangled in or tripping over a longer cord. Longer extension cords are available and may be used if care is exercised in their use.
If a long extension cord is used,
- the marked electrical rating of the extension cord should be at least as great as the electrical rating of the appliance,
- the extension cord should be a grounding-type 3-wire cord, and
- the longer cord should be arranged so that it will not drape over the counter top or table top where it can be pulled by children or tripped over.
Troubleshooting
- Common Issue: Coffee is not hot enough
Solution: Make sure you are using the correct amount of water and coffee grounds, and ensure that the coffee maker is heating to the appropriate temperature. If the issue persists, consult the user manual or contact KitchenAid customer support. - Common Issue: The coffee maker is leaking
Solution: Ensure the carafe and coffee maker are properly aligned, and check for any cracks or damage. If the problem continues, consider replacing the gasket or contacting KitchenAid for further assistance.
Pros & Cons of Compact Coffee Maker 4-Cup
Pros
- Compact design that saves space
- Easy-to-use one-touch brew start
- Programmable for added convenience
- Attractive design
- Durable, easy-to-clean materials
Cons
- Limited to brewing 4 cups at a time
- May not maintain temperature as well as larger coffee makers
Customer Reviews of KitchenAid Compact Coffee Maker 4-Cup
Users appreciate the compact size and easy-to-use functionality of the Compact Coffee Maker, with some reporting that the coffee stays warm for an extended period. However, some users note that the coffee may not be as hot as they prefer.
Most Common Complaints
- Coffee may not be hot enough
- The brewing process can be noisy
Faqs
What distinguishing qualities does the OXO 9-Cup Coffee Maker offer?
How is the ideal coffee brewing temperature guaranteed by the OXO 9-Cup Coffee Maker?
Can I use the OXO 9-Cup Coffee Maker to brew only one cup of coffee?
With the OXO 9-Cup Coffee Maker, what kind of coffee grounds should I use?
How should my OXO 9-Cup Coffee Maker be cleaned?
What components goes into making the OXO 9-Cup Coffee Maker?
How long does the OXO 9-Cup Coffee Maker take to brew a whole pot?
Can I programme the OXO 9-Cup Coffee Maker?
What does the OXO 9-Cup Coffee Maker's freshness indication mean?
Is there a warranty for the OXO 9-Cup Coffee Maker?
Leave a Comment
