How to Use: Kitchenaid Espresso Machine KES6503 User Manual
Content

Introduction of KitchenAid Espresso Machine KES6503
The KitchenAid Espresso Machine KES6503 is a powerful and elegant addition to any kitchen, allowing you to create barista-quality espresso drinks at home. With a sleek design and robust feature set, this machine is perfect for coffee enthusiasts who want to take their homemade espresso to the next level. The estimated price ranges from $600 to $700, making it a worthwhile investment for those serious about their coffee.
KitchenAid PARTS AND FEATURES
- Water Tank (Capacity: 47 ounces)
- Water Tank Handle
- Water Tank Lid
- Cup Warmer
- Drip Tray Plate
- Drip Tray
- Main Power On/Off Switch
- Steam Wand
- Steam Wand Release Button
- Portafilter (58 mm)
- Mode Button
- Espresso
- Steam
- Hot Water
- Dose Button
- (1 shot)
- (2 shot)
- Clean Cycle Button
- Start/Cancel Button
- Empty Drip Tray Indicator
- Group Head
Detailed Specifications
The KitchenAid Espresso Machine KES6503 boasts the following key features:
- 15-bar Italian-pump system for consistent espresso extraction
- Integrated burr grinder with stainless steel conical burrs for adjustable grind settings
- Temperature control system for precise water temperature regulation
- Programmable milk frother for customized milk textures
- Clever dual-wall filter baskets for both single and double shots
- Hot water spout for Americanos and tea preparation
- Large 60-ounce water reservoir for multiple brews
- Sturdy stainless steel housing for durability and longevity
- Dimensions: 16.3" x 11" x 14.6" (H x W x D), weighing approximately 22 lbs
GETTING STARTED
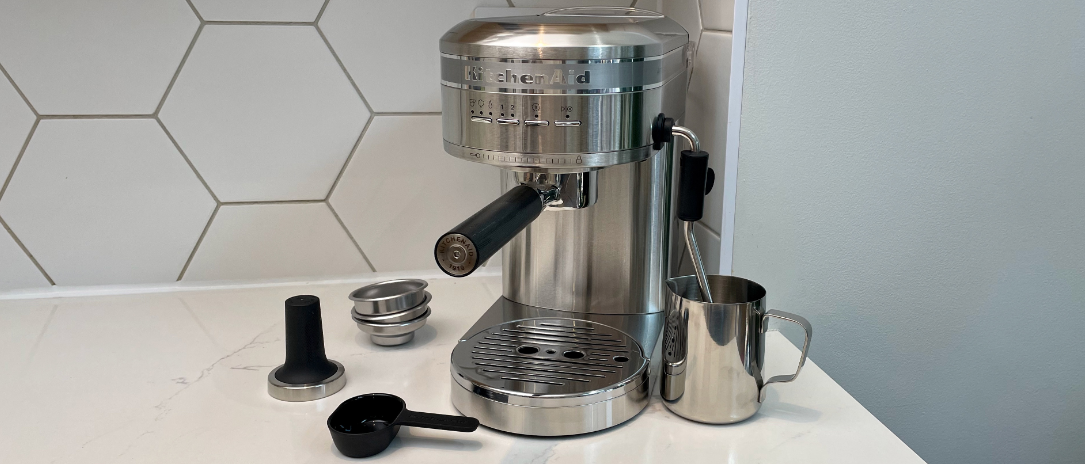
First, clean all parts and accessories. Place the Espresso Machine on a dry, flat, level surface such as a countertop or table.
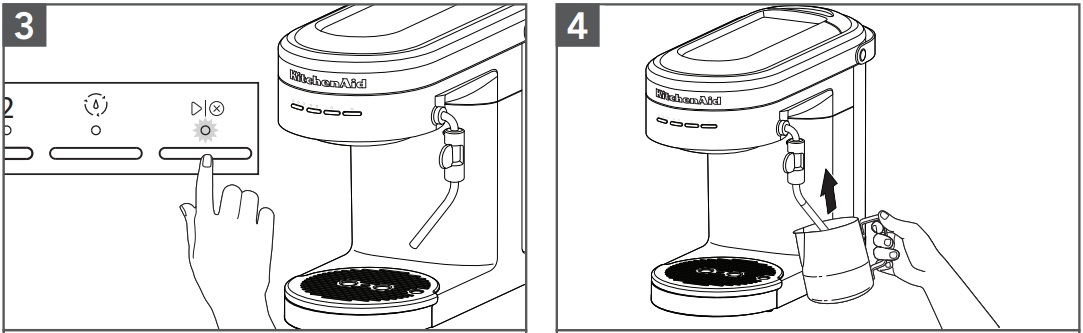
- Fill the Water Tank with fresh water (max. 47 ounces / 1.4 liters). Replace the Water Tank Lid.
Insert the Steam Wand until you hear a click.
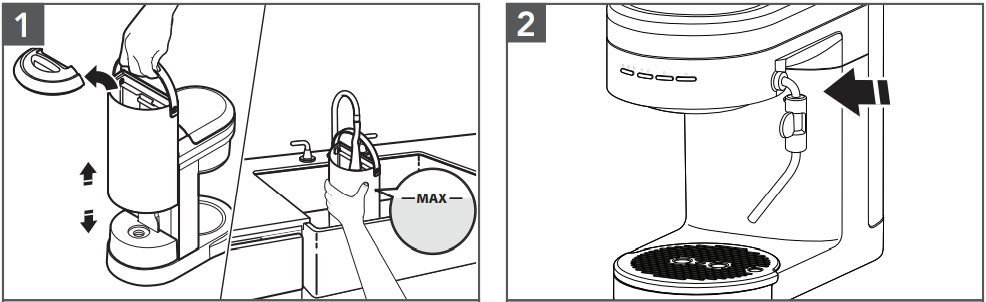
- Plug into a grounded 3 prong outlet. Press the Main power switch to “ON (-)”.
The machine automatically pumps water into the heater and starts heating. When lights stop blinking, the Espresso Machine is ready for use.
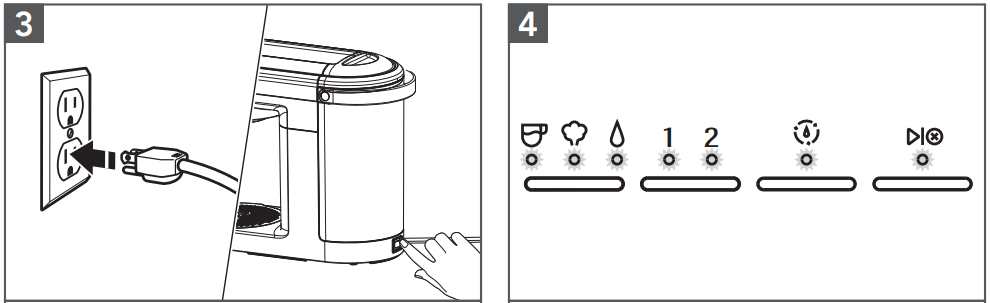
- To rinse the Group Head, place a container under the Group Head. Toggle the Mode Button to select Espresso. Toggle Dose Button to 1 and press
 button. The machine will flush water through the Group Head and automatically stop when the cycle is complete.
 To rinse the Steam Wand, direct the Steam Wand towards the Drip Tray or into a cup. Then, toggle the Mode Button to select Hot Water and press
button to start. Allow water to flow for 3 to 5 seconds then, press button to stop.
KitchenAid Espresso Machine Product Usage
BREWING ESPRESSO
- Select desired Filter basket (see Basket selection chart). Press the Filter basket into the Portafilter until it clicks into place.
Fill the Filter basket with fine Espresso coffee grounds (see Basket selection chart for dosing recommendations).
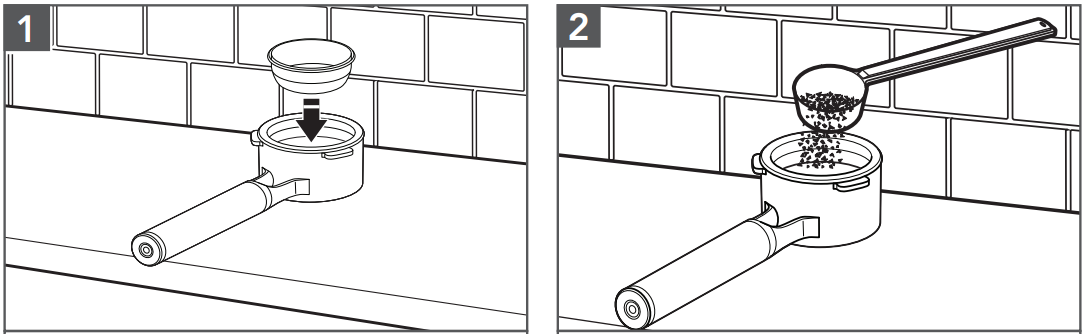
- Tap the Portafilter to level the ground coffee bed and rest on a flat surface. Use the Tamper to tamp down the ground coffee. Sweep excess coffee grinds from the rim.
Position the Portafilter under the Group Head with the handle align to unlock. Raise the Portafilter into the Group Head and twist to the right side to lock.
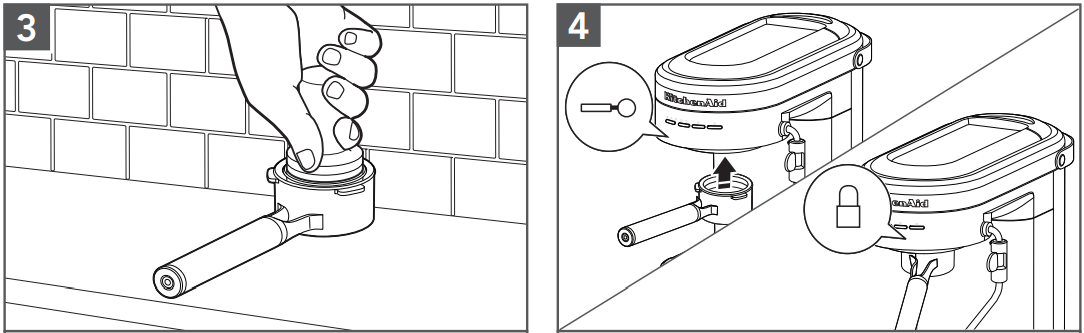
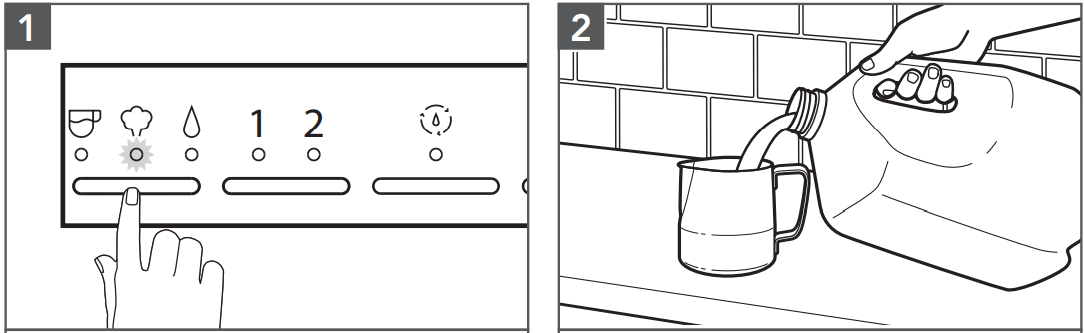
- Toggle the Mode Button to select Espresso. Toggle the Dose Button to select desired number of shots 1 (~ 1 ounce) or 2 (~ 2 ounces).
Press
button to run selected Espresso cycle.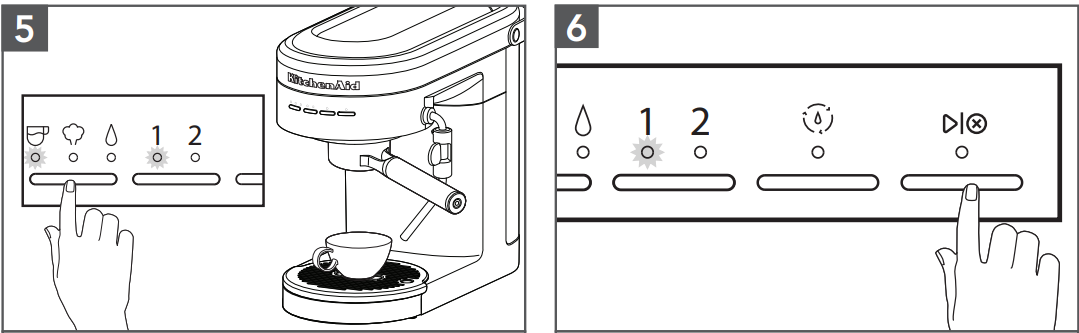
NOTE: Do not remove the Portafilter when brewing.
TIP: Shot duration should be between 20-30 seconds for 1 and 2 shot selections.
- If less than 20 seconds: decrease grind size and/or increase tamp pressure.
- If more than 30 seconds: increase grind size and/or reduce tamp pressure.
USING THE STEAM MODE FOR MILK
- Toggle the Mode Button to select Steam. The machine will automatically start heating, indicated by the flashing Steam light. The Steam light will go solid when machine is ready for steaming.
Fill the Milk pitcher with desired amount of cold milk.
TIP: Fill to bottom of the pour spout.
- Angle the Steam Wand towards the Drip Tray or into a cup. Press button to start. Once water turns to steam, press button to stop.
Adjust the Steam Wand to desirable position. Submerge the tip of the Steam Wand just below the surface of milk in the Milk pitcher.
Press
button to initiate the steam.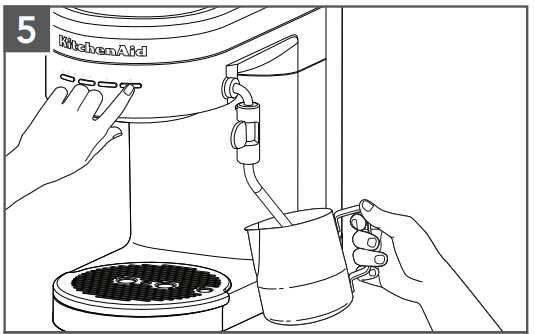
- Froth until desired level of foam and temperature is reached. To stop the steam, press button again.
- To avoid splattering, wait until the steam stops before removing the Steam Wand from the milk.
- Froth until desired level of foam and temperature is reached. To stop the steam, press
USING HOT WATER FEATURE
- Toggle the Mode Button to select Water. Place a cup under the Steam Wand.
Press Dose Button to select the volume of water 1 (~ 4 ounces) or 2 (~ 6 ounces). Press
button to start water cycle. Water flows out from the Steam Wand.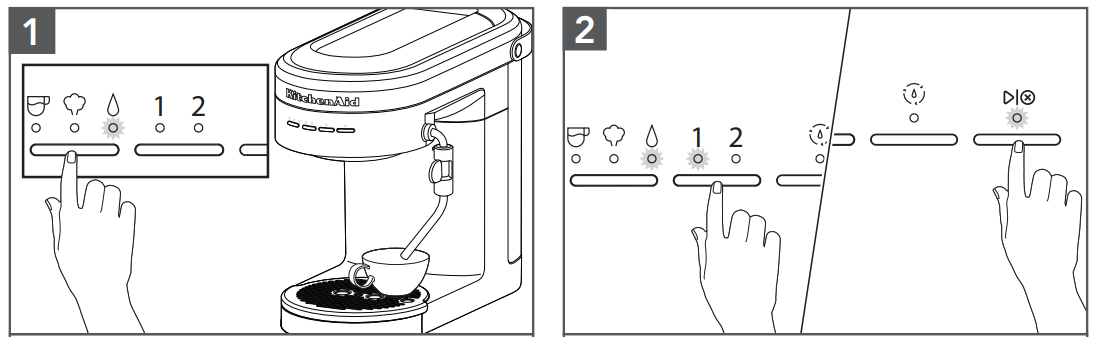
NOTE: You can pause the cycle by pressing button to stop the flow of water before the cycle complete.
PROGRAMING FUNCTION
The Espresso Machine is equipped with programing functionality. Any customized settings will be saved even in the event power is lost to the machine.
PROGRAMING THE ESPRESSO AND HOT WATER AMOUNT
- To change pre-programmed Espresso Volume for 1 or 2: Toggle the Mode Button to select Espresso. Select the dose you desire to program (1 or 2). Press and hold button until desired espresso amount is reached in your cup. While programing your selected dose, the dose and the button lights will blink. Lights will stop blinking when programing is complete.
To change pre-programmed Water Volume for 1 or 2: Toggle the Mode Button to select Water. Select the dose you desire to program (1 or 2). Press and hold
button until desired water amount is reached in your cup. While programing your selected dose, the dose and the button light will blink. Lights will stop blinking when programing is complete 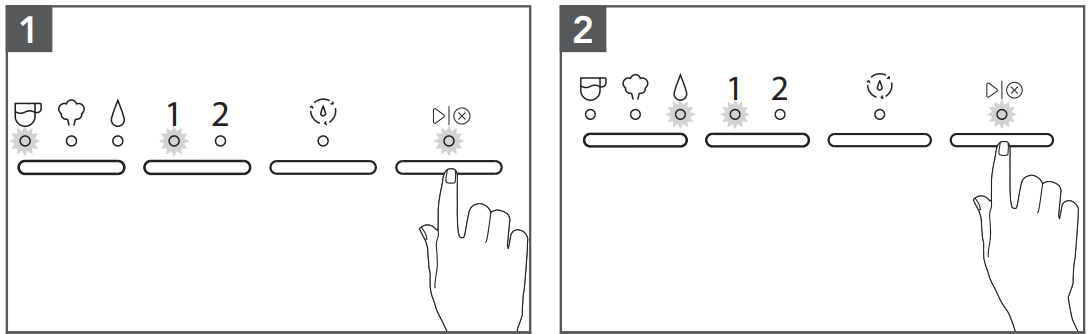
TIP: To restore all factory settings, Press and Hold “Dose Button” for 3 seconds. Changing the factory default Espresso or Water Volumes may impact the intended performance of the machine.
PROGRAMING THE WATER TEMPERATURE AND WATER HARDNESS
- To change pre-programmed Water Temperature: Toggle the Mode Button to select Espresso, press and hold for 3 seconds.
- The indicator lights will show the default factory setting or previous saved setting (see Indicator light chart for reference).
- Toggle the Mode Button between Low-Mid-High to select desired temperature.
- To save your selection, press button or wait for 10 seconds.
- To change pre-programmed Water Hardness: Toggle the Mode Button to Water, Press and hold for 3 seconds.
- The indicator lights will show the default factory setting or previous saved setting (see Indicator light chart for reference)
- Toggle the Mode Button between Low-Mid-High to select desired water hardness.
To save your selection, press
button or wait for 10 seconds.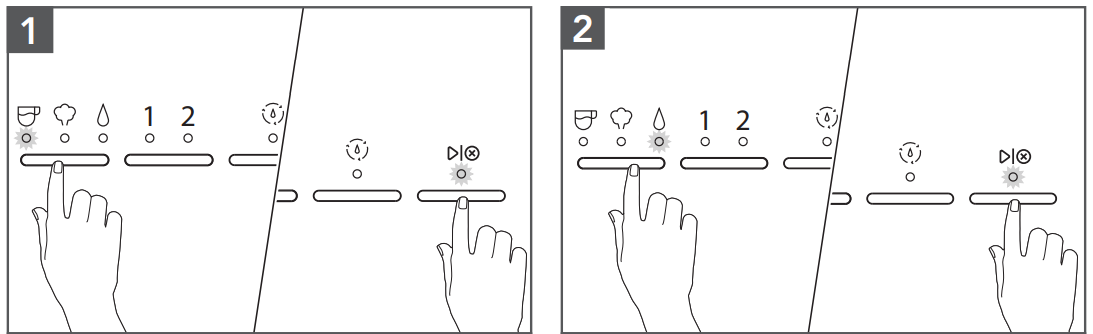
INDICATOR LIGHT CHART
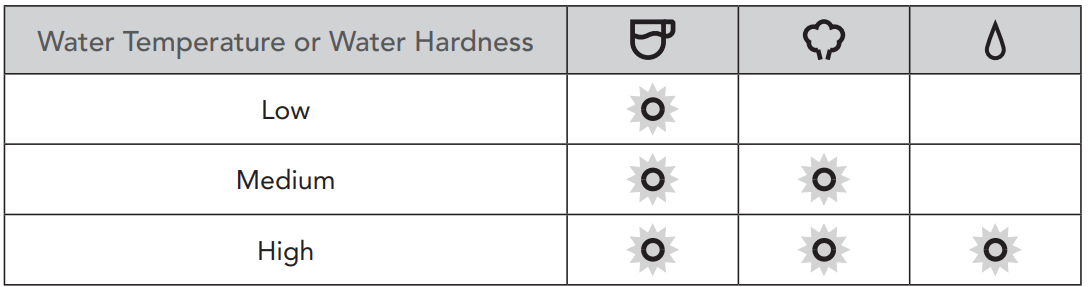
NOTE: Water Hardness
- Low: 0 to 60 ppm
- Medium: 60 to 120 ppm
- High: more than 120 ppm
KES6503 Description
The KitchenAid Espresso Machine KES6503 combines elegance and functionality, offering a high-quality espresso experience in the comfort of your home. The integrated burr grinder allows for adjustable grind settings, ensuring the perfect grind for your preferred brewing method. The 15-bar Italian-pump system delivers consistent espresso extraction, while the temperature control system maintains precise water temperatures for optimal flavor. The programmable milk frother enables you to customize milk textures for cappuccinos, lattes, and other specialty drinks, while the dual-wall filter baskets accommodate both single and double shots. Additionally, the hot water spout is perfect for preparing Americanos or tea, making the KES6503 a versatile addition to your kitchen.
Setup Guide
Before using the KitchenAid Espresso Machine KES6503, make sure to:
- Wash and dry all removable parts before the initial use.
- Prime the machine by filling the water reservoir, attaching the portafilter, and running a cleaning cycle without coffee grounds.
- Adjust the grinder settings according to your preference and the coffee beans used.
- Experiment with the right amount of coffee grounds and tamping pressure for optimal espresso extraction.
- Clean the machine regularly to maintain its performance and longevity.
CARE AND CLEANING
For best results, regularly clean the Espresso Machine and accessories.
IMPORTANT: Unplug the Espresso Machine before cleaning. Allow the Espresso Machine and accessories to cool down.
NOTE: Do not use abrasive cleansers or scouring pads when cleaning the Espresso Machine, parts, or accessories. Do not immerse the Espresso Machine or cord in water or other liquids.
- When the Drip Tray indicator rises and becomes visible above the surface of the Drip Tray Plate, empty the Drip Tray and rinse with warm water.
Wipe the Espresso Machine housing and Group Head with a clean soft damp cloth.
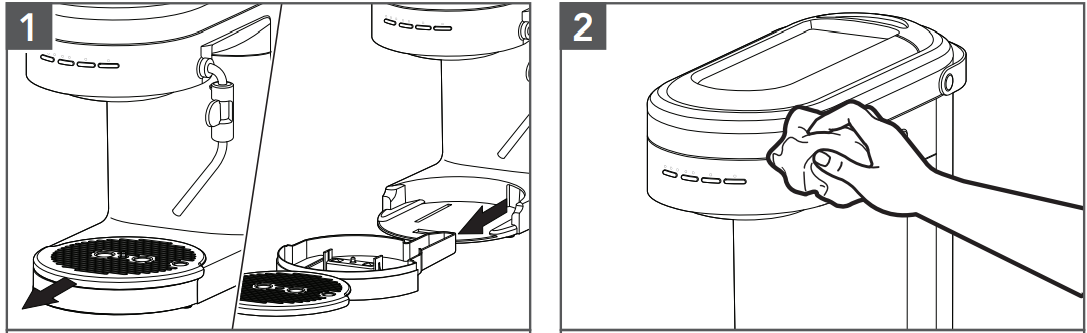
- Wash the Drip Tray, Portafilter, Filter baskets, Milk pitcher, and Drip Tray Plate in warm, soapy water and rinse with clean water. Dry with a soft cloth.
Clean the Steam Wand after every use. Toggle the Mode button to select Water. Position the Steam Wand over Drip Tray or into a cup. Press
button, wait 3 to 5 seconds. Press button to stop. Wipe down Steam Wand exterior with a soft damp cloth. 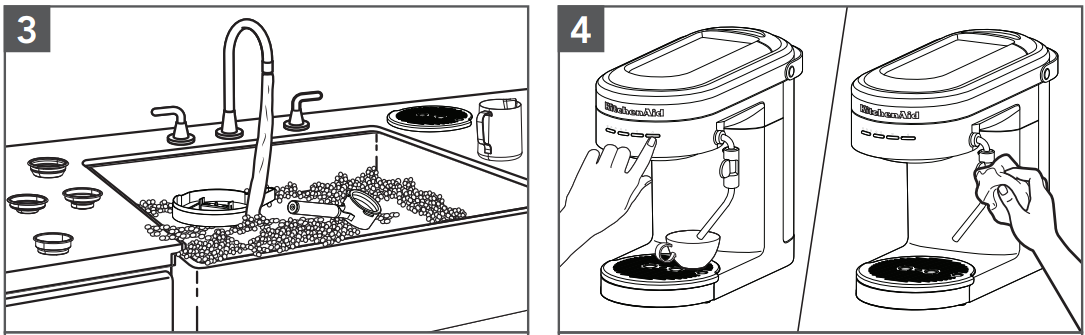
NOTE: To remove the Steam Wand press the Steam Wand Release Button.
DESCALING THE ESPRESSO MACHINE
The descaling program enables simple and effective descaling of your Espresso Machine. Descale the Espresso Machine regularly, but a minimum whenever the “Clean” indicator is blinking. The frequency of descaling depends on the hardness of the water in your region. Therefore, it is important to program the Espresso Machine according to the water hardness level of your location.
NOTE: The descaling process runs in 4 phases, takes approximately 10 minutes and must be completed before next use. At any time during the descaling program you can pause the cycle by pressing button. And, resume too by pressing button.
IMPORTANT: Only use descaling solution intended for Espresso Machines.
SET UP OF GROUP HEAD DESCALING
- Fill 8.5 ounces water and 4.25 ounces descaling solution inside the Water Tank.
NOTE: The clean cycle is designed to run as per the above mentioned water and descaling solution volumes. The cycle cannot be completed with any less volume than mentioned above.
- Place a container (~ 17 ounces) on the Drip Tray below the Group Head.
- Press the Clean cycle (
 ) button for 3 seconds or until Clean light is solid. Then, press button to start first phase of decalcification cycle.
 Start/Cancel (
) will blink fast after the first phase is complete. Empty the container.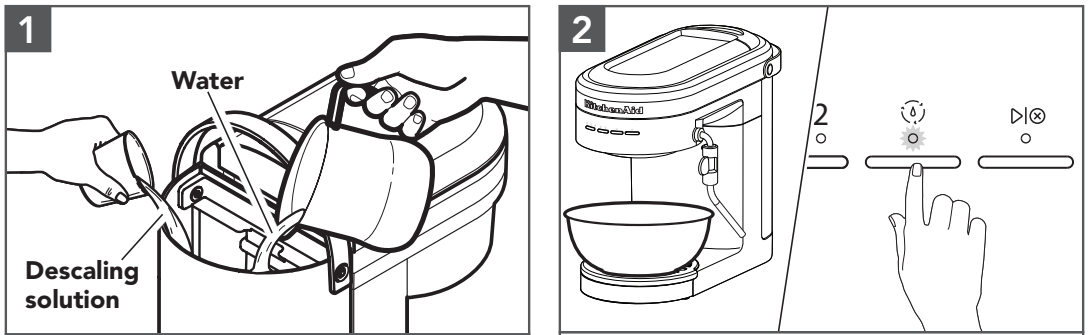
- Press the Clean cycle (
- Place the container (~ 17 ounces) below the Steam Wand. Then, press button. Start/Cancel ( ) and Water Mode lights will blink fast after the second phase is complete. Empty the container.
- Place the container (~ 17 ounces) below the Steam Wand. Empty, rinse and refill the Water Tank with fresh water to Max fill line.
- Replace the Water Tank. Press button.
Start/Cancel (
) will blink fast after the third phase is complete. Empty the container.
- Replace the Water Tank. Press
- Place the container (~ 17 ounces) on the Drip Tray below Group Head. Then, press button.
- Clean light and button light will blink fast after the fourth and final phase is complete. Empty the container.
Press
button to complete the Clean cycle. Machine will go back into heating mode.
- Clean light
TROUBLESHOOTING of KitchenAid Espresso Machine KES6503
Problem | Solution |
No Crema is being produced | Coffee is ground too coarsely.Useslightly finer grind. |
Coffee tamped too softly. Use slightly firmer tamp between 30-40 lb or 15-20 kg of force. | |
Single wall filter basket might have been used with pre-ground coffee. Please see the “Basket selection chart” section. | |
Knocking/pumping sound occurs during espresso, steam, or hotwater cycle | The Espresso Machine is going through a normal operation, therefore no action is required. |
All Mode/Dose lights are blinking | Machine is in protection mode to avoid the pump from over heating. TurnOff the machine for 7.5 minutes. |
The Steamlight and all Dose lights are blinking | Machine is in the protection mode to avoid from overheating. Turn Off the machine for 10 minutes. |
Water light continuously blinks | Ensure water is in the Water Tank and ensure Water Tank is properly assembled. |
Steam Wandis blocked. Removeit from Espresso Machine and thoroughly clean it. | |
Coffee puck is too dense, adjust to larger grind size. If using a Double wall basket, then clean exit hole with a pin. | |
All lightsare blinking at the same time | Turn off the Espresso Machine and unplug for approximately 10 minutes. Then, plug back in and restart the machine. If problem persists call service. |
All lights are continuously on | Turn off the Espresso Machine and unplug for approximately 5 minutes. Then,plug back in and restartthe machine. If problem persists call Service. |
If theproblem is notdue to one of the aboveitems | See the“Arranging for Service” chapter in the“Warranty and service” section. Do not return the Espresso Machine to the retailer as they do not provide service. |
Warranty Espresso Machine KES6503
HASSLE-FREE REPLACEMENT WARRANTY – 50 UNITED STATES, DISTRICT OF COLUMBIA, AND PUERTO RICO
We’re so confident the quality of our products meets the exacting standards of KitchenAid that, if your Espresso Machine should fail within the first year of ownership, KitchenAid will arrange
to deliver an identical or comparable replacement to your door free of charge and arrange to have your original Espresso Machine returned to us. Your replacement unit will also be covered by our one year limited warranty.
Pros & Cons
Pros
- Integrated burr grinder for freshly ground espresso
- 15-bar Italian-pump system for consistent extraction
- Programmable milk frother for customized milk textures
- Temperature control system for precise water temperature regulation
- Large water reservoir for multiple brews
Cons
- Potential learning curve for those new to making espresso at home
- Higher price point than some competing espresso machines
- Requires regular cleaning and maintenance
KitchenAid Customer Reviews
Customers rave about the KitchenAid Espresso Machine KES6503's ability to produce rich, velvety espresso with a consistent crema. Many also appreciate the versatility of the programmable milk frother and the convenience of the integrated burr grinder. Some common complaints include the machine's initial learning curve, the need for regular cleaning, and the higher price point compared to other models.
Faqs
How do I start my first brew with the KitchenAid Espresso Machine KES6503?
Can the KitchenAid Espresso Machine KES6503 use coffee pods?
How do I froth milk with the KitchenAid Espresso Machine KES6503?
What maintenance is required to keep the KitchenAid Espresso Machine KES6503 in good condition?
How do I descale the KitchenAid Espresso Machine KES6503?
Can I adjust the temperature of my espresso with the KitchenAid Espresso Machine KES6503?
What should I do if my KitchenAid Espresso Machine KES6503 espresso is too weak or too strong?
Can I make both espresso and regular coffee with this KitchenAid Espresso Machine KES6503?
What do I do if the espresso KitchenAid Espresso Machine KES6503 is not producing steam?
How long is the warranty for the KitchenAid Espresso Machine KES6503, and what does it cover?
Leave a Comment