Kobe Range Hoods IN2630SQB-650-5A Instruction Guide
Content
Introduction of Kobe Range Hoods IN2630SQB-650-5A
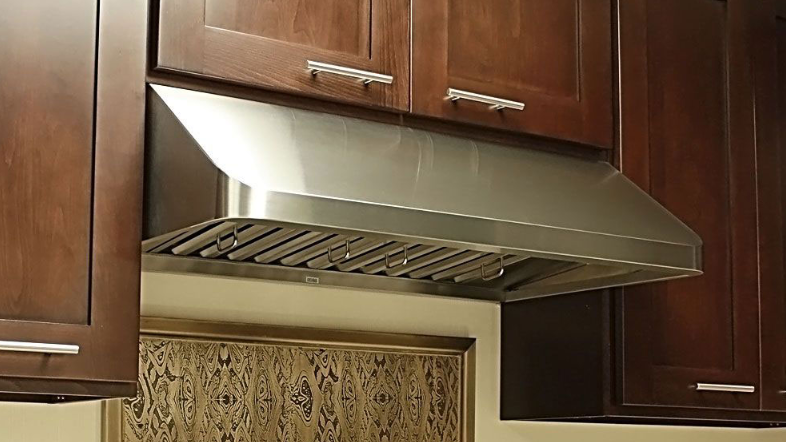
Kobe Range Hoods IN2630SQB-650-5A is a powerful and stylish range hood that will make a great addition to any kitchen. This hood is designed to provide efficient ventilation while adding a touch of sophistication to your cooking space. With a sleek stainless steel finish, this hood is not only functional but also aesthetically pleasing. It is suitable for professional and residential use and is expected to be launched in the market soon. The estimated price of this product is around $1500 to $2000.
Components Of Package
(Must keep all material for returns or refunds)
Range Hood Box
{A} KOBE Range Hood
{B} Warranty Registration Card
{C} Quick Ref Guide
{D} Baffle Filters x 2
{E} Oil Tunnel
{F} Spacer x 2
{G} Baffle Handle Package

{H} Rectangular Exhaust Plate
{I} Rectangular Exhaust Adapter
{J} Power cord
{K} 6” round Plastic Exhaust
{L} Twist-on wire connector
{M} Screws
{N} Screws Package

Optional Accessories (Sold Separately)
{O} Remote Control

Kobe Range Hoods IN2630SQB-650-5A Parts List
MODEL NO.
IN2630SQB-650-5A (30”)
IN2636SQB-650-5A (36”)
| NO. | DESCRIPTION | MODEL/SIZE | PART NO. |
| 1 | Rectangular Exhaust Plate | L1-0241-0001B | |
| 2 | Rectangular Vent Cover | L1-0241-0002A | |
| 3 | Round Exhaust Plate | L1-0241-0001A | |
| 4 | Rectangular Exhaust Adapter | L1-0241-0002B | |
| 5 | Hood Casing | IN2630SQB-650-5A | 10-2630B-700-2 |
| IN2636SQB-650-5A | 10-2636B-700-1 | ||
| 6 | Motor Transformer | L1-0402-6120-40V | |
| 7 | Processor Board | L1-0404-6001-D | |
| 8 | Blower Bracket | L1-0233-2630-A | |
| 9 | Capacitor x 1 pc | L1-0401-0120-24 | |
| 10 | Oil Tunnel | IN2630SQB-650-5A | B101-2630-14A |
| IN2636SQB-650-5A | B101-2636-14A | ||
| 11 | Blower System | X5-L1-0302-0120-590RE | |
| 12 | Bottom Casing | IN2636SQB-650-5A | B101-2630-09 |
| IN2636SQB-650-5A | B101-2636-09 | ||
| 13 | Baffle Filter Support | IN2630SQB-650-5A | B101-2630-15B |
| IN2636SQB-650-5A | B101-2636-15B | ||
| 14 | Stainless Steel Spacer {1-13/16” (46) x 9-1/4” (235)} | IN2630SQB-650-5A | B101-2630-14B |
| Stainless Steel Spacer {4-5/6” (110) x 9-1/4” (235)} | IN2636SQB-650-5A | B101-2636-14B | |
| 15 | Baffle Filter | B101-2630-15 | |
| 16 | Control Unit | L1-0404-6001-C | |
| 17 | Light Panel Support | IN2630SQB-650-5A | B101-2630-06-1 |
| IN2636SQB-650-5A | B101-2636-06-1 | ||
| 18 | LED Light (3W) x2 | L1-0403-0301 |
MODEL NO.:
IN2630SQB-650-5A (30”)
IN2636SQB-650-5A (36”)

CIRCUIT DIAGRAM
MODEL NO.
IN2630SQB-650-5A (30”)
IN2636SQB-650-5A (36”)

Specifications of Kobe Range Hoods IN2630SQB-650-5A
| Attribute | Description |
|---|---|
| Model / Size | IN2630SQB-650-5A / 30” |
| Color | Commercial Grade Stainless Steel |
| Consumption / Ampere | 290W / 2.5A |
| Voltage | 120V 60Hz |
| Number of Blowers | 1 |
| Blower Type | Centrifugal Single Horizontal Squirrel Cage |
| Exhaust | Top: 6” Round, 3-1/4” x 10” Rectangular Rear: 6” Round, 3-1/4” x 10” Rectangular |
| Controls | Electronic Control (5 Buttons) with LED Display 3-Minute Delay Shut-Off ECO Mode Wireless Remote Control (Sold Separately) |
| Lights | LED Lights (3W) x 2 – 3-Level Lighting |
| Hood Dimension (W x D x H) | 28-3/8” x 18-1/8” x 12” |
| Hood Weight | Net: 38.5, Gross: 49.0 |
| Blower Air Capacity (cfm) | Quiet Mode: 300, 1: 360, 2: 430, 3: 500, 4: 590, 5: 700 |
| Sone* | 1.0, 2.0, 3.5, 5.0, 5.4, 6.0 |
One Sone is equivalent to 40 decibels.
Specifications are subject to change without notice.
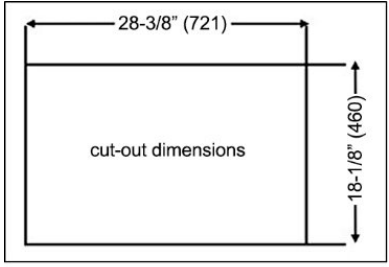
MEASUREMENTS & DIAGRAMS
All ( ) are in millimeters.
All inch measurements are converted from millimeters. Inch measurements are estimated.
MODEL NO: IN2630SQB-650-5A (30”)


All ( ) are in millimeters.
All inch measurements are converted from millimeters. Inch measurements are estimated.


Installation
PLEASE READ ENTIRE INSTRUCTIONS BEFORE PROCEEDING Calculation Before Installation
To calculate installation, please refer to TABLE 1. (All calculations in inches.)
FOR BUILT-IN / INSERT
A = Height of Floor-to-ceiling
B = Height of Floor to Counter Top (Standard: 36″)
C = Height of Counter Top to Wood Frame Bottom (Minimum 26″ to 30″)
D = Height of Wood Frame

SAFETY WARNING
THE HOOD MAY HAVE VERY SHARP EDGES; PLEASE WEAR PROTECTIVE GLOVES IF REMOVING ANY PARTS FOR INSTALLING, CLEANING OR SERVICING.
NOTE: BE CAREFUL WHEN USING AN ELECTRICAL SCREWDRIVER, DAMAGE TO THE HOOD MAY OCCUR.
Preparation Before Installation
NOTE: TO AVOID DAMAGE TO YOUR HOOD, PREVENT DEBRIS FROM ENTERING THE VENT OPENING.
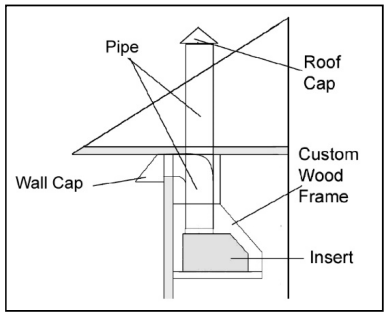
Decide the location of the venting pipe from the hood to the outside. Refer to Figure 1.
A straight, short vent run will allow the hood to perform more efficiently.
Try to avoid as many transitions, elbows, and long run as possible. This may reduce the performance of the hood.
Temporarily wire the hood to test for proper operation before installing.
Important: Peel protective film off the hood, if any.
Use duct tape to seal joints between pipe sections.
CAUTION: If moving the cooking range is necessary to install the hood, turn off the power in an electric range at the main electrical box. SHUT OFF THE GAS BEFORE MOVING A GAS RANGE. And use a protective covering to protect cooktop and/or countertop from damage.
Custom Hood Preparation
The custom hood frame must be designed according to the shape and the weight of the hood. Refer to Measurements and Diagrams on Page 13-14.
A sturdy base (3/4-inch thick plywood recommended) is needed to sustain the weight of the hood.
It is recommended to install front & rear stud support (not included).
For safety purposes, extra installation holes on the side of the hood are provided. Prepare the side stud support if needed.
Determine and mark the centerlines on the base of the wood frame where the hood will be installed.
Location the proper location for the Power Supply Cable. Make a wiring access hole using a drill bit. Install the wire cable and seal the gap around the hole.
Cut out the opening where the hood will be installed.
Hood Preparation Before Installation
CAUTION: If moving the cooking range is necessary to install the hood, turn off the power in an electric range at the main electrical box. SHUT OFF THE GAS BEFORE MOVING A GAS RANGE.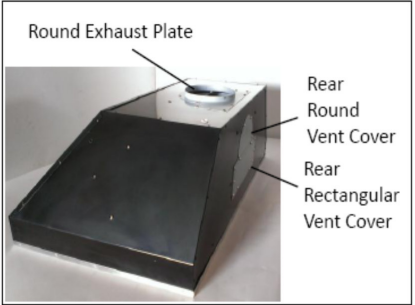
Choose the required vent option. The Round Exhaust Plate is pre-installed for top vent.
For Top 3-1/4” x 10” rectangular installation only:
Remove the pre-installed Round Exhaust Plate, Keep screws to attach Rectangular Exhaust Plate and Rectangular Exhaust Adapter.
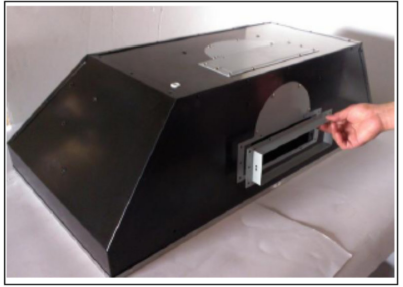
Place a Rectangular Exhaust Plate over vent and secure with 2 screws. Place Rectangular Exhaust Adapter over the Rectangular Exhaust Plate and secure with 10 screws.
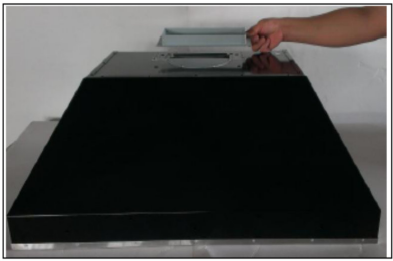
Use remaining screws to secure exhaust plate.
For Rear Vent Options Only:
NOTE: The blower is pre-installed for top vent. If installing as rear vent, follow the steps below.
For Rear 6” Round installation only:
Remove the Rear Round Vent Cover and Rear Rectangular Vent Cover. Keep screws to attach Round Exhaust Plate to rear vent.
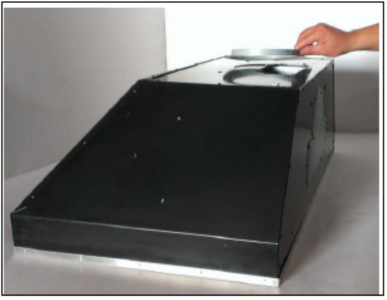
Remove the pre-installed Round Exhaust Plate from top vent. Attach it to the rear vent using the screws removed from vent covers.
Use the Round and Rectangular vent covers removed from rear vent to seal top vent.
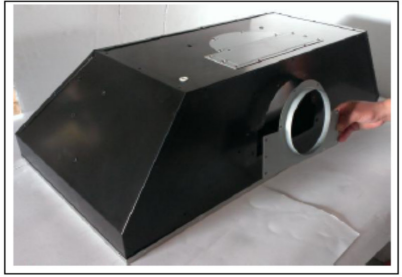
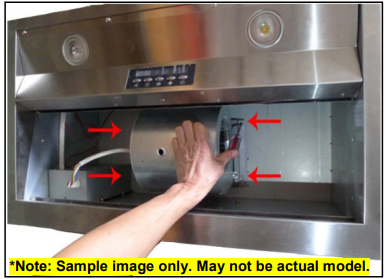
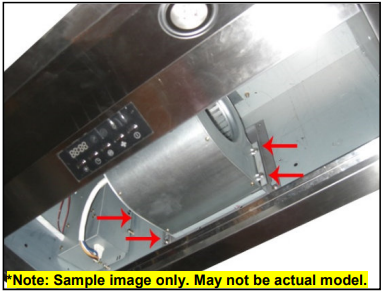
Remove the 4 screws that secure the blower system.. Hold the blower to keep it from dropping as you remove screws. Keep screws to reattached blower. Slowly rotate blower system to align with mounting holes at the back of the hood. Secure blower using 4 screws
For Rear 3-1/4” x 10” Rectangular installation only:
Remove the Rear Round Vent Cover and Rear Rectangular Vent Cover . Keep screws to attach Rectangular Exhaust Plate and Rectangular Exhaust Adapter.
Place the Rectangular Exhaust Plate over vent and secure with 2 screws. Place Rectangular Exhaust Adapter over the Rectangular Exhaust Plate and secure with 10 screws (Refer to Figure 10).
Use remaining screws to secure exhaust plate.
Remove the pre-installed Round Exhaust Plate from top vent and keep screws. Use the Round and Rectangular vent covers removed from rear to seal top vent.
Remove the 4 screws that secure the blower system.
Hold the blower to keep it from dropping as you remove screws. Keep screws to re-attach blower. Slowly rotate blower system to align with mounting holes at the back of the hood. Secure the blower using 4 screws.Ductwork Installation
Determine and make all necessary cuts in the wall or ceiling for the ductwork.
NOTE: Install the ductwork before installing the hood.Use steel pipe to connect the exhaust on the hood to the ductwork above. Use duct tape to make all joints secure and air tight.
Please refer to local building codes for the usage of a damper.
Wiring to Power Supply
SAFETY WARNING: RISK OF ELECTRICAL SHOCK. THIS RANGE HOOD MUST BE PROPERLY GROUNDED. MAKE SURE THIS IS DONE BY QUALIFIED ELECTRICIAN IN ACCORDANCE WITH ALL APPLICABLE NATIONAL AND LOCAL ELECTRICAL CODES. BEFORE CONNECTING WIRES, SWITCH POWER OFF AT SERVICE PANEL AND LOCK SERVICE PANEL TO PREVENT POWER FROM BEING SWITCHED ON ACCIDENTALLY.Connect electrical wires.
Connect three wires (black, white and green) to house wires and cap with wire connectors. Connect wires corresponding to their colors (i.e. black to black, white to white, and green to green).
Store wires in a wiring box.
NOTE: Range hood should have its own dedicated circuit outlet. If sharing with other appliances, the range hood may turn off itself due to mutual interference from other appliances.Hood Installation
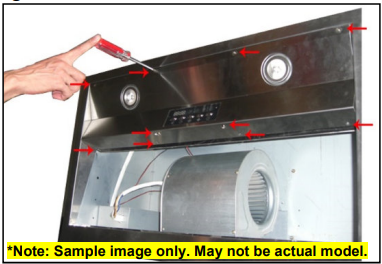
NOTE: USE HAND TOOLS ONLY. DO NOT OVER-TIGHTEN SCREWS, MAY CAUSE DAMAGE TO THE HOOD.Remove the light panel by removing 10 screws located at the bottom of the hood. Carefully remove the light support panel.
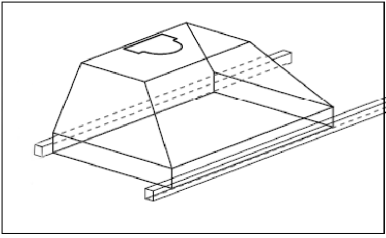
Position the hood inside the custom wood frame, and secure the hood to the front and rear stud support (Refer to Figure 2) by using the front and rear mounting holes (Screws included).
For a more secure installation, use the mounting holes located on the side of the hood.
Make sure the hood is secure before releasing.
Re-install the light support panel. (Do not over-tighten screws.)
CAUTION: MAKE SURE HOOD IS SECURE BEFORE RELEASING.
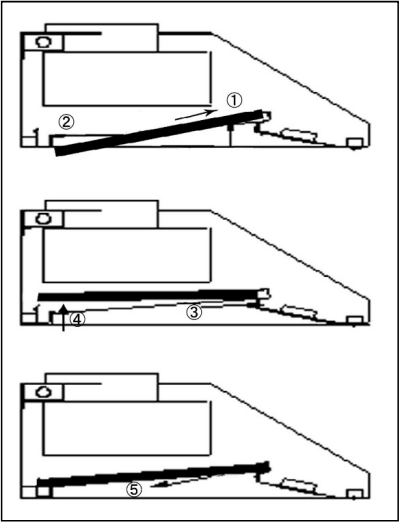
Final AssemblyInstall the oil tunnel into recess support near rear of hood.
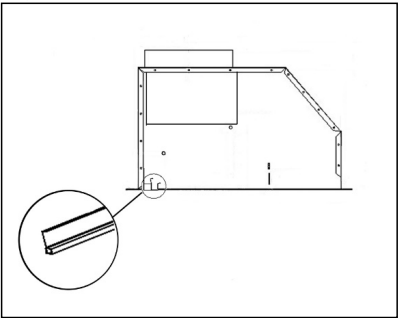
Install baffle filters. Angle baffle filter toward back of hood
Push baffle filter up until almost level
Slide forward into recess behind the front of hood
Lower baffle filter
Slide back until it fits into resting position
Description
The Kobe Range Hoods IN2630SQB-650-5A is a wall-mounted range hood that features a 600 CFM (cubic feet per minute) blower to ensure efficient ventilation. It has a stylish and modern design, with a stainless steel finish that will complement any kitchen decor. The hood has a width of 30 inches, making it ideal for use in larger kitchens. It also features LED lights that provide bright and energy-efficient lighting for your cooking space. This range hood is easy to clean and maintain, with dishwasher-safe filters that can be removed and replaced as needed.
Operating Instructions

Note: For best results, turn fan on prior to any preparation or cooking and keep fans running while cooking. Adjust speed as needed.
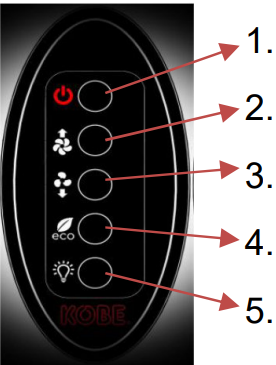
Button Control

Power Control
To turn the hood ON/OFF, press the power button once.
Speed Control
The hood starts on speed #3 by default.
To decrease the speed level, press the Decrease Fan Speed. To increase speed level, press the Increase Fan Speed.
3-Minute Delay Shutoff
To activate the 3-minute delay shutoff, press and hold the power button for about 3 seconds. Once the delay shutoff has been activated the LED display will flash and the fan speed will change to speed #3. While the 3 minute countdown is running, the speed level can be adjusted by pressing the increase/decrease fan speed buttons. To turn the fan off immediately, press the power button a second time.
Light Control
Press the light button to turn the LED lights ON. Each press of the light button will cycle the light intensity through bright, medium bright, dim and off. Lights are controlled independently from power control and delay shutoff. Turning the fan off will not turn the lights off.
ECO Mode Control
ECO Mode is set to turn the fan on Quiet Mode setting for 10 minutes every hour to remove excess moisture, microscopic particles and odors for better kitchen air quality.
ECO Mode is independent from the power control and delay shutoff.
ECO Mode can be activated while fan is running on or off. Press and hold the ECO button until the “E” icon briefly appears in the LED display. While the fan is running, you can change the speed, use delay shutoff or turn off the fan without disabling the ECO Mode.
When the fan is off and ECO Mode has been activated, the “E” icon will appear in the LED display. The “E” icon will flash while ECO Mode is operating on Quiet Mode. To deactivate, press and hold the ECO button until the “E” icon no longer appears in the LED display.
NOTE: Press the power button while ECO Mode is active will activate the regular fan function and the speed will be displayed on the LED display.
WARNING: Make sure there is sufficient make-up air when ECO Mode is activated by opening doors or windows.
Kobe Range Hoods IN2630SQB-650-5A Remote Control
Power control and 3-minute delay shutoff control (press and hold for 3 seconds).
Increase fan speed.
Decrease fan speed.
ECO Mode control. Press and hold for 3 seconds to activate ECO Mode.
Light control. Turns on the brightest setting by default.
The remote control has magnet to allow it to be attached on any magnetic surface.
NOTE: Remote control uses CR2032 batteries (provided). Remote control range is up to 16 feet.
Setup Guide of Kobe Range Hoods IN2630SQB-650-5A
Setting up the Kobe Range Hoods IN2630SQB-650-5A is a straightforward process that can be done in a few simple steps. First, ensure that the hood is securely mounted to the wall and that the electrical connections are properly made. Next, install the filters and blower according to the instructions provided in the user manual. Once the hood is installed, you can turn it on and adjust the ventilation and lighting settings to your preference.
Maintenance
For optimal performance, clean the range hood surface and baffles regularly.
To Clean Hood Surface
CAUTION: NEVER USE ABRASIVE CLEANERS, PADS, OR CLOTHS.
Regular care will help preserve its fine appearance.
Use only mild soap or detergent solutions. Dry surfaces using soft cloth.
If hood looks splotchy (stainless steel hood), use a stainless steel cleaner to clean the surface of the hood. Avoid getting cleaning solution onto or into the control panel. Follow directions of the stainless steel cleaner. Caution: Do not leave on too long as this may cause damage to hood finish. Use soft towel to wipe off the cleaning solution, gently rub off any stubborn spots. Use dry soft towel to dry the hood.
DO NOT allow deposits to accumulate or remain on the hood.
DO NOT use ordinary steel wool or steel brushes. Small bits of steel may adhere to the surface and cause rusting.
DO NOT allow salt solutions, disinfectants, bleaches, or cleaning compounds to remain in contact with stainless steel for extended periods. Many of these compounds contain chemicals, which may be harmful. Rinse with water after exposure and wipe dry with a clean lint-free cloth.
Clean Baffle Filter/Oil Tunnel
For Baffle Filter models only:
CAUTION: DRAIN OIL FROM BAFFLE FILTER & OIL TUNNEL REGULARLY TO PREVENT OVERFLOW.
Remove all the baffle filters, spacers and oil tunnel. Note: Not all models have spacers and oil tunnels.
Using a sponge, wash with warm soapy water. Dry completely before returning into place.
CAUTION: SHARP EDGES (Note: Baffle Filters are top rack dishwasher safe.)
Kobe Range Hoods IN2630SQB-650-5A Troubleshooting
| Issue | Possible Cause | Solution |
| After Installation, both motors and lights are not working. | The power is not on. | Make sure the circuit breaker and the unit’s power is ON. Use a voltage meter to check the power supply. |
| The wire connection is not secure. | Check and tighten wire connection. | |
| The control unit and processor board wiring are disconnected. | Check wire continuity from control unit to processor board. | |
| Lights are working, but motor(s) is not. | The control unit and processor board is defective. | Replace the control unit or processor board. |
| The motor(s) is defective. | Replace the motor. | |
| The capacitor(s) is defective. | Replace capacitor(s). | |
| The range hood is vibrating. | The control unit or processor board is defective. | Replace the control unit or processing board. |
| The blower system is not secure. | Tighten the turbine impeller/squirrel cage and air chamber. | |
| The turbine impeller/squirrel cage is not balanced. | Replace the turbine impeller/squirrel cage. | |
| The motor is working, but the lights are not working. | Hood is not secured in place. | Check the installation of hood, tighten the mounting bracket. |
| LED light fixture(s) is defective. | Replace LED light fixture(s) | |
| The light wiring(s) is loose. | Check wire continuity from processor board to light transformer to LED light fixture(s). | |
| The range hood is not venting out correctly. | The control unit or processor board is defective. | Replace the control unit or processing board. |
| The range hood is installed outside of the manufacture recommended clearance. | Adjust the clearance between the range hoods and cook top to 26” to 30”. For Island range hood, the clearance between the range hoods and cook top is 30” to 36”. | |
| There is no make-up air inside the house. | Open the window to enhance the performance of the range hood by creating a sufficient make-up air. | |
| Obstacle blocking the pipe work. | Remove all obstacles from the duct work. | |
| Cold air is coming into the home. | The pipe size is smaller than the suggested pipe size. | Change the ducting according to the manufacture suggestion. |
| The pipe connection is not properly sealed. | Check the pipe installation. | |
| The damper is not properly installed or is missing from the installation. | Check the damper installation. |
Warranty
ONE-YEAR LIMITED LABOR WARRANTY ON KOBE DELUXE SERIES
For one year from the date of your original invoice from a KOBE authorized dealer, we will repair any parts or components free of charge that failed due to manufacturing defects. KOBE reserves the right to replace, rather than repair the product free of charge at our sole discretion.
It is your sole responsibility to ensure the product is readily accessible for the service technician to perform repairs. The service technician will not, under any circumstance, remove, alter or modify any fixture built around and/or connected to the product to gain access to perform repairs.
TWO-YEAR LIMITED PARTS WARRANTY ON KOBE DELUXE SERIES
For two years from the date of your original invoice from a KOBE authorized dealer, we will provide non-consumable replacement parts or components free of charge that failed due to manufacturing defects. Consumable parts such as lights bulbs, filters, fuses, and oil cups are not covered by this warranty.
Pros & Cons
Pros
- Powerful 600 CFM blower for efficient ventilation
- Sleek and modern stainless steel design
- LED lights for bright and energy-efficient lighting
- Dishwasher-safe filters for easy cleaning and maintenance
Cons
- May be too loud for some users
- Expensive compared to other range hoods in the market
Customer Reviews about Kobe Range Hoods IN2630SQB-650-5A
Customers who have purchased the Kobe Range Hoods IN2630SQB-650-5A have praised its powerful ventilation and stylish design. However, some have noted that it can be quite loud, especially when operating at high speeds. Overall, customers have expressed satisfaction with the performance and quality of this product.
Faqs
What is the energy consumption of the Kobe Range Hoods IN2630SQB-650-5A?
What voltage does the Kobe Range Hoods IN2630SQB-650-5A operate on?
How many blowers does the Kobe Range Hood IN2630SQB-650-5A have, and what type are they?
What types of exhaust configurations does the Kobe Range Hoods IN2630SQB-650-5A support?
What is the Kobe Range Hoods IN2630SQB-650-5A dimensions and weight?
What type of lighting does the Kobe Range Hood IN2630SQB-650-5A feature?
Can the Kobe Range Hoods IN2630SQB-650-5A be vented outside?
What certifications does the Kobe Range Hoods IN2630SQB-650-5A hold?
How often should the filters of the Kobe Range Hoods IN2630SQB-650-5A be cleaned?
What is the warranty of the Kobe Range Hoods IN2630SQB-650-5A?
Leave a Comment