How to Install: Lenovo ThinkPad USB 3.0 Secure Hard Drive User Guide
Content
Introduction
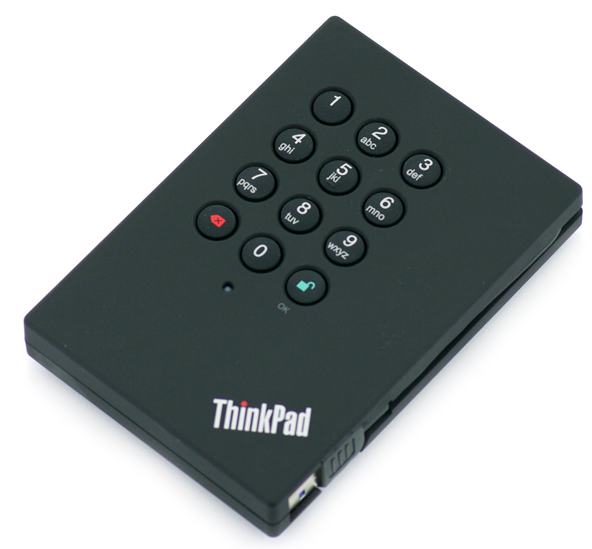
The Lenovo ThinkPad USB 3.0 Secure Hard Drive is a high-performance external storage solution designed for business professionals and power users. This secure hard drive offers fast data transfer rates, hardware encryption, and a sleek design that fits perfectly with your ThinkPad laptop. With a estimated price range of $70 - $150, this product is a great investment for anyone looking for a reliable and secure external storage option.
ThinkPad USB 3.0 Overview
The following figure shows the overview of the secure hard drive.
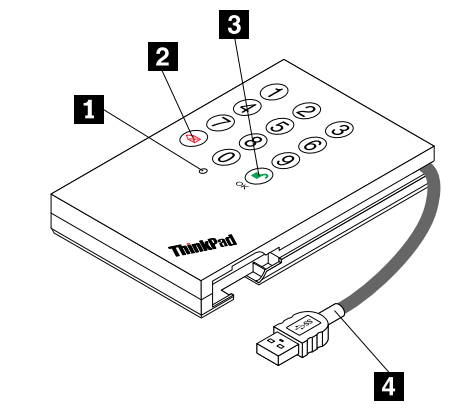
- Status LED (light-emitting diode)
The status LED indicates the working modes:- Red: standby mode
- Blue: administrator mode
- Green: user mode
-
 button: Use this button to do the following:
- Canceling the current operation
- Returning to the previous step when you accidently input a wrong password
- Exiting administrator mode and user mode
- Manually locking the secure hard drive
 button: Use this button to access the secure hard drive or give an OK acknowledgement for the following operations:
- Inputting a password
- Confirming a new password
- Integrated USB cable: You can connect the secure hard drive to your computer using the integrated USB cable. For more information, refer to “Installing the secure hard drive” on page 3.
Lenovo ThinkPad Detailed Specifications
The Lenovo ThinkPad USB 3.0 Secure Hard Drive comes with the following key features:
- USB 3.0 interface for fast data transfer rates
- Available in 500GB, 1TB, and 2TB capacities
- Hardware encryption for data security
- Sleek and durable design
- Compatible with Windows, Mac, and Linux operating systems
Installing the secure hard drive
Before you begin
Be sure to carefully read the following information before installing and using the secure hard drive.
Attention
- Make sure that you use the integrated USB cable on the secure hard drive or the provided USB 3.0 Y cable to install the secure hard drive. Using any cables other than the two cables might damage the secure hard drive.
- Carefully handle the secure hard drive. When the secure hard drive is not in use or you need to ship it to a different location, place it in the provided carrying case.
- To get reliable performance of the secure hard drive, make sure that the integrated USB cable on the secure hard drive or the provided USB 3.0 Y cable is connected to the USB connectors on your computer or to an ac-powered USB hub. Do not connect the two cables to a non-ac-powered USB hub.
Installing the secure hard drive
To install the secure hard drive, do one of the following:
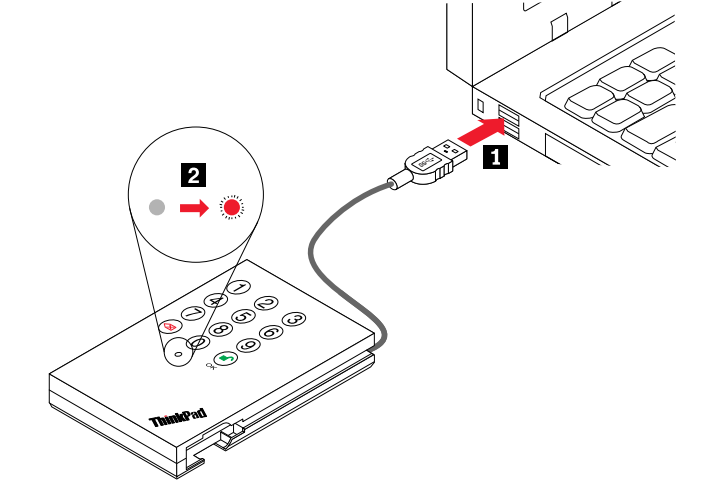
Connect the integrated USB cable on the secure hard drive to a USB 2.0 or USB 3.0 connector on your computer. When the connection is established, the status LED turns red.
- Connect the USB receptacle connector of the USB 3.0 Y cable to the integrated USB cable on the secure hard drive, and then connect the two USB connectors at the other end of the USB 3.0 Y cable to two USB 2.0 or USB 3.0 connectors on your computer. When the connection is established, the status LED turns red.
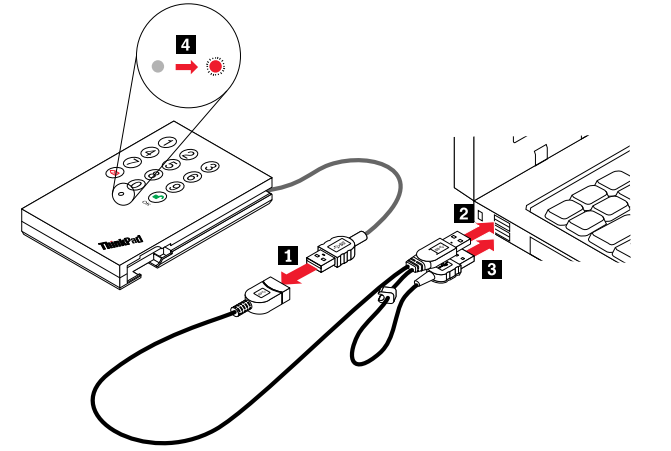
Note: For computers with USB 3.0 connectors, you can connect the secure hard drive to a USB 3.0 connector on the computer using only the main connector of the USB 3.0 Y cable. For computers with only USB 2.0 connectors, to ensure sufficient power supply, it is recommended that you connect both the main connector and the additional power supply connector of the USB 3.0 Y cable to the computer.
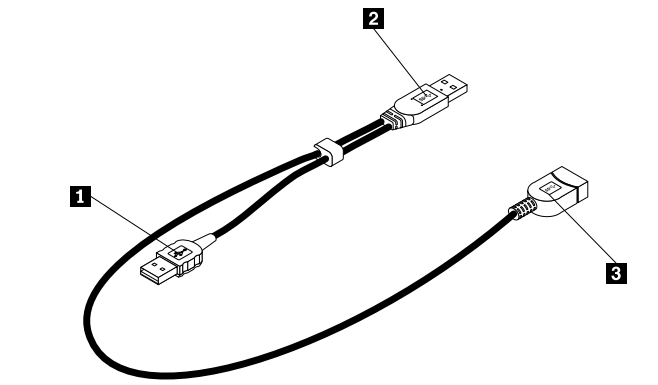
- Additional power supply connector
- Main connector
- USB receptacle connector
Using the secure hard drive
Entering and exiting the working modes
This section provides information about how to enter and exit standby mode, administrator mode, and user mode of the secure hard drive.
Entering standby mode
Standby mode is the default working mode of the secure hard drive. In this mode, the secure hard drive
is locked; therefore, it cannot be recognized by the operating system. However, standby mode enables you to enter and switch between administrator mode and user mode.
To enter standby mode, connect the secure hard drive to your computer. When the status LED turns red, it indicates that the secure hard drive goes into standby mode. For more information about how to connect the secure hard drive, refer to “Installing the secure hard drive” on page 3.
Note: To switch between administrator mode and user mode, you are required to firstly switch to standby mode, and then you can enter your desired mode.
Entering administrator mode
In administrator mode, you can change the administrator password, create up to 10 user passwords, delete all user passwords, and set the auto-lock function. For more information, see “Password management” on page 6 and “Lock the secure hard drive with the auto-lock function” on page 8. The secure hard drive is locked in this mode; therefore, it cannot be recognized by the operating system.
To enter administrator mode, do the following:
- Connect the secure hard drive to your computer. When the status LED turns red, it indicates that the secure hard drive goes into standby mode. For more information about how to connect the secure hard drive, refer to “Installing the secure hard drive”.
- Hold +0 for five seconds until the status LED flashes in red. This indicates that you can input the administrator password.
- Input the administrator password and press to enter administrator mode. The default administrator password is 12345678. When the status LED turns blue, it indicates that the secure hard drive goes into administrator mode.
Note: If the status LED flashes in red for a few seconds after you input the administrator password, it indicates that the secure hard drive has returned to standby mode. You need to go back to step 2 to enter administrator mode again. This problem is caused by one of the following reasons:
- An incorrect administrator password is input in step 3.
- No activity is detected within two minutes in administrator mode.
Exiting administrator mode
To exit administrator mode, hold until the status LED turns red. The secure hard drive goes into standby mode.
Entering user mode
In user mode, you can access the secure hard drive and change the current user password. The secure hard drive is unlocked in this mode; therefore, you can use it to transfer data.
To enter user mode, do the following:
- Connect the secure hard drive to your computer. When the status LED turns red, it indicates that the secure hard drive goes into standby mode. For more information about how to connect the secure hard drive, refer to “Installing the secure hard drive”.
- Input the user password or the administrator password, and then press . When the status LED turns green, it indicates that the secure hard drive goes into user mode. If the status LED flashes in red, this indicates that an incorrect password is input. You can choose either to input again or to reset your secure hard drive. For more instructions about resetting your secure hard drive, see “Completely resetting the secure hard drive”.
Notes
- If you incorrectly input the user password or the administrator password six consecutive times, the secure hard drive will no longer respond and the status LED will turn off. You need to disconnect the secure hard drive, and then reconnect it to your computer for additional password attempts.
- If you incorrectly input the user password or the administrator password 25 consecutive times, the secure hard drive will be locked and the status LED will quickly flash in red. To unlock the secure hard drive, do the following:
- Disconnect the secure hard drive from your computer.
- Hold 5 while reconnecting the secure hard drive to your computer. The status LED alternately flashes in red and in green.
- Press 5278879. The status LED turns red, indicating that the secure hard drive is unlocked for additional password attempts.
- If you incorrectly input the user password or the administrator password 50 consecutive times, the secure hard drive will be locked and the status LED will quickly flash in red. The secure hard drive has to be completely reset and then formatted. For more information, see “Completely resetting the secure hard drive” on page 9 and “Initializing and formatting the secure hard drive after a complete reset”.
Exiting user mode
Attention: Be sure to save all documents on the secure hard drive before exiting user mode.
To exit user mode, do one of the following:
- Hold until the status LED turns red.
- Click the Safely Remove Hardware icon in the notification area on your computer screen. A message will be displayed, prompting you that you can safely disconnect the secure hard drive from your computer. Then, depending on your operating system, the status LED stays in green or turns red. You can choose whether to disconnect the secure hard drive or not.
Note: It is not recommended to exit user mode when the secure hard drive is transferring data.
Password management
This section provides information about managing your administrator password and user password.
Changing the administrator password
To change the administrator password, do the following:
- Enter administrator mode.
- Hold +9 until the status LED flashes in blue.
- Input a new administrator password (a minimum of eight digits and a maximum of 16 digits), and then press . The status LED flashes in green three times.
Note: If the status LED flashes in red three times, it indicates that the new administrator password is less than eight digits or more than 16 digits. After the status LED flashes in blue, input an administrator password that contains eight to 16 digits. - Input the new administrator password again, and then press . The status LED stays in green for three seconds, indicating that the administrator password is successfully changed.
Notes
- If the status LED flashes in red three times and then flashes in blue, go back to step 3. This problem is caused by one of the following reasons:
- You wait longer than 10 seconds before inputting the new administrator password.
- The new administrator password is incorrectly input.
- If no activity is detected within two minutes in administrator mode, the secure hard drive will return to standby mode.
Adding a new user password
The secure hard drive enables you to have up to 10 user passwords. To add a new user password, do the following:
- Enter administrator mode.
- Hold +1 until the status LED flashes in blue.
- Input a new user password (a minimum of eight digits and a maximum of 16 digits), and then press . The status LED flashes in green three times.
Note: If the status LED flashes in red three times, this indicates that the new user password is less than eight digits or more than 16 digits. After the status LED flashes in blue, input a user password that contains eight to 16 digits. - Input the new user password again, and then press . The status LED stays in green for three seconds, indicating that the user password is successfully added.
Notes
- If the status LED flashes in red three times and then flashes in blue, go back to step 3. This problem is caused by one of the following reasons:
- You wait longer than 10 seconds before inputting the new user password.
- The new user password is incorrectly input.
- If no activity is detected within two minutes in administrator mode, the secure hard drive will return to standby mode.
Changing the user password
Note: If you have more than one user password, you can change only one user password at a time.
To change the user password, do the following:
- Enter user mode.
- Hold +1 for five seconds until the status LED flashes in red.
- Input the current user password, and then press . The status LED turns green for three seconds, and then it flashes in blue.
Note: If the status LED flashes in red, go back to step 2. This problem is caused by one of the following reasons:- You wait longer than 10 seconds before inputting the new user password.
- The current user password is incorrectly input.
- Input a new user password (a minimum of eight digits and a maximum of 16 digits), and then press . The status LED flashes in green three times, and then it flashes in blue.
Note: If the status LED flashes in red three times, this indicates that the new user password is less than eight digits or more than 16 digits. After the status LED flashes in blue, input a user password that contains eight to 16 digits. - Input the new user password again, and then press . The status LED stays in green, indicating that the user password is successfully changed.
Note: If the status LED flashes in red three times and then flashes in blue, go back to step 4. This problem is caused by one of the following reasons:- You wait longer than 10 seconds before inputting the new user password.
- The new user password is incorrectly input.
Note: The administrator password can be used as a user password. An administrator password can be changed only in administrator mode.
Deleting the user password(s)
To delete the user password(s), do the following:
- Enter administrator mode. See “Entering administrator mode” on page 5 for more information.
- Hold 7+8+ for five seconds until the status LED flashes in blue. After that, the status LED flashes in green three times, and then flashes in blue.
- Hold 7+8+ for five seconds again until the status LED becomes green for three seconds and then turns blue. This indicates that the user password(s) are successfully deleted.
Attention: If you have more than one user password, all user passwords will be deleted at a time.
Lock the secure hard drive
To ensure the data security of your secure hard drive when you are away from your computer, you can manually lock the secure hard drive or use the auto-lock function.
Manually lock the secure hard drive
To manually lock the secure hard drive, hold until the status LED turns red.
Lock the secure hard drive with the auto-lock function
If there is no data transmission after an auto-lock interval, which you need to set in advance, the secure hard drive will lock itself. Then, the status LED will turn red, and you will not be able to access the secure hard drive unless you unlock it by inputting the correct user password and then press .
To set the auto-lock interval, do the following:
- Enter administrator mode. See “Entering administrator mode” for more information.
- Hold +6 until the status LED alternately flashes in red and in blue.
- Set the auto-lock interval by pressing the following numeric keys:
- 0: If you press this numeric key, the auto-lock function will be disabled.
- 1: If you press this numeric key, the auto-lock interval will be five minutes.
- 2: If you press this numeric key, the auto-lock interval will be 10 minutes.
- 3: If you press this numeric key, the auto-lock interval will be 20 minutes.
Hibernating, suspending, or logging off from the operating system
Before hibernating, suspending, or logging off from the operating system, do the following:
- Save and close all the files on the secure hard drive.
- Click the Safely Remove Hardware icon in the notification area on your computer screen. Then, a message is displayed, prompting you that you can safely disconnect the secure hard drive from your computer. You can choose whether to disconnect the secure hard drive or not.
Note: To ensure the data integrity of your secure hard drive, be sure to lock or disconnect your secure hard drive if you are away from your computer or you are sharing your computer with others using different Windows® user accounts.
Completely resetting the secure hard drive
If you forget all user passwords or the administrator password, you can perform a complete reset to delete all user passwords, and restore the administrator password to 12345678.
Attention: Completely resetting the secure hard drive will erase all the data on the secure hard drive. You need to initialize and format the secure hard drive with the disk management application. For more information, see “Initializing and formatting the secure hard drive after a complete reset”.
To completely reset the secure hard drive, do the following:
- Hold while you connect the secure hard drive to your computer. The status LED alternately flashes in blue and in red.
Note: If no activity is detected for 30 seconds in this step, the secure hard drive will go into standby mode. - Hold + + 2 for 10 seconds until the status LED turns green for three seconds. The complete reset finishes.
- Disconnect the secure hard drive from your computer.
Initializing and formatting the secure hard drive after a complete reset
A complete reset of the secure hard drive will erase all information and partition settings on the secure hard drive. You need to initialize and format the secure hard drive after a complete reset.
Attention: It is not recommended to initialize and format the secure hard drive on a Microsoft® Windows XP operating system because this might decrease the writing speed of the secure hard drive.
To initialize and format the secure hard drive, do the following:
- After a complete reset, connect the secure hard drive to your computer.
- Input the default user password 12345678, and then press to enter user mode. The operating system automatically installs all the USB device drivers for the secure hard drive.
- Depending on your Start mode, click Start and then right-click My Computer or Computer. Select Manage, and the Computer Management window opens.
- In the Computer Management window, click Disk Management. The Disk Management window opens, and the secure hard drive is recognized as an unknown device that is uninitialized and unallocated.
- Do one of the following to make the secure hard drive recognized:
- If the Initialize and Convert Disk Wizard window opens, click Next ➙ Next ➙ Finish.
- If the Initialize and Convert Disk Wizard window does not open, do the following:
- Right-click Unknown Disk, and then select Initialize Disk.
- In the Initialize Disk window, click OK.
- Right-click your mouse in the blank area of the unallocated device section, and then select New Partition. The Welcome to the New Partition Wizard window opens.
- Click Next ➙ Next ➙ Next.
- Input a name for the volume label and select Perform a quick format. Then, click Next.
- Click Finish. Wait until the format process completes. The secure hard drive will be recognized and it will be ready for use.
Product description of ThinkPad USB 3.0 Secure Hard Drive
The secure hard drive is a portable, light-weight, and high-speed USB (Universal Serial Bus) 3.0 standard option that offers high-level data security. You can transfer data using the integrated USB cable on the secure hard drive or the provided USB 3.0 Y cable. In addition to regular USB 3.0 hard disk drive functions, it also provides you with an easy-to-use full disk encryption solution. All the functions are integrated into the secure hard drive; therefore, you can access the secure hard drive and manage passwords without using other software applications.
The secure hard drive has three working modes: standby mode, administrator mode, and user mode. For more information about the working modes, refer to Chapter 3 “Using the secure hard drive”.
Note: Passwords are required for administrator mode and user mode. Accordingly, they are called the administrator password and the user password.
Your option package includes the following:
- ThinkPad USB 3.0 Secure Hard Drive
- USB 3.0 Y cable
- Carrying case
- Setup and warranty poster
Troubleshooting
If you encounter any of the following problems when using the secure hard drive, refer to the corresponding answers.
- Q: Why could I not enter user mode after I connect the secure hard drive to the computer and input the correct user password?
A: The secure hard drive needs several seconds to be ready for password input. To solve the problem, wait for several seconds after you connect the secure hard drive to the computer, and then input your user password. - Q: What can I do if I forget the user password?
A: You can create a user password. To create a user password, do the following:- Enter administrator mode. See “Entering administrator mode” for more information.
- Delete all user passwords. See “Deleting the user password(s)” for more information.
- Create your new user password. See “Adding a new user password” for more information.
- Q: What can I do if I forget the administrator password?
A: There is no other way to retrieve the administrator password except a complete reset of the secure hard drive. After a complete reset, all data will be lost and you need to manually initialize and format the secure hard drive. Then you will be able to use the default administrator password 12345678. For more information, see “Completely resetting the secure hard drive” and “Initializing and formatting the secure hard drive after a complete reset”. - Q: Why does the operating system not recognize the secure hard drive after I completely reset it and enter user mode?
A: You need to manually initialize and format the secure hard drive before you can use it. For more information, refer to “Initializing and formatting the secure hard drive after a complete reset”. - Q: Can I initialize and format the secure hard drive with a Windows user account?
A: No, this is a limitation of the Windows operating systems. You should use the Windows administrator account to initialize and format the secure hard drive. - Q: How do I use the secure hard drive without a password?
A: As a full disk encryption product, the secure hard drive can never be used without a password. - Q: What encryption algorithm is used in this product?
A: The secure hard drive uses the Advanced Encryption Standard (AES) 256-bit algorithm. - Q: Why could I not initialize, partition, or format the secure hard drive?
A: Ensure that you have administrator privileges. You can use only the Windows administrator account to initialize, partition, or format the secure hard drive in administrator mode. - Q: Why could the operating system not be started from the secure hard drive?
A: As this is a secure hard drive, before you use it, you will need several seconds to input a password and unlock the secure hard drive. When the secure hard drive is unlocked, the operating system has already finished the startup process.
Pros & Cons
Pros
- Fast data transfer rates
- Hardware encryption for data security
- Sleek and durable design
- Compatible with Windows, Mac, and Linux operating systems
- Available in 500GB, 1TB, and 2TB capacities
Cons
- No USB-C support
- No included software for encryption management
- No biometric authentication options
- No ruggedized features for protection against drops or shocks
Lenovo Limited Warranty
This Lenovo Limited Warranty applies only to Lenovo hardware products you purchased for your own use and not for resale. This Lenovo Limited Warranty is available in other languages at https://support.lenovo.com/pk/en/warranty-lookup#/. Lenovo warrants that each Lenovo hardware product that you purchase is free from defects in materials and workmanship under normal use during the warranty period. The warranty period for the product starts on the original date of purchase as shown on your sales receipt or invoice or as may be otherwise specified by Lenovo. The warranty period and type of warranty service that apply to your product are as specified in “Part 3 - Warranty Service Information” below. This warranty only applies to products in the country or region of purchase.
Customer Reviews
Customers have praised the Lenovo ThinkPad USB 3.0 Secure Hard Drive for its fast data transfer rates, hardware encryption, and sleek design. However, some have criticized the lack of USB-C support and the absence of included software for encryption management. The most common complaints include issues with the hard drive's durability and the lack of biometric authentication options.
Faqs
What is the USB interface of the Lenovo ThinkPad USB 3.0 Secure Hard Drive?
What capacities is the Lenovo ThinkPad USB 3.0 Secure Hard Drive available in?
What is the price range for Lenovo ThinkPad USB 3.0 Secure Hard Drive?
Is the Lenovo ThinkPad USB 3.0 Secure Hard Drive compatible with Windows, Mac, and Linux operating systems?
Does the Lenovo ThinkPad USB 3.0 Secure Hard Drive have a USB-C interface?
Does the Lenovo ThinkPad USB 3.0 Secure Hard Drive come with software for encryption management?
Does the Lenovo ThinkPad USB 3.0 Secure Hard Drive have biometric authentication options?
Is the Lenovo ThinkPad USB 3.0 Secure Hard Drive ruggedized for protection against drops or shocks?
What are the dimensions of the Lenovo ThinkPad USB 3.0 Secure Hard Drive?
What is the weight of the Lenovo ThinkPad USB 3.0 Secure Hard Drive?
Leave a Comment