Lippert Components Flow Max Pump DS-01233-D User Guide

Content
Introduction
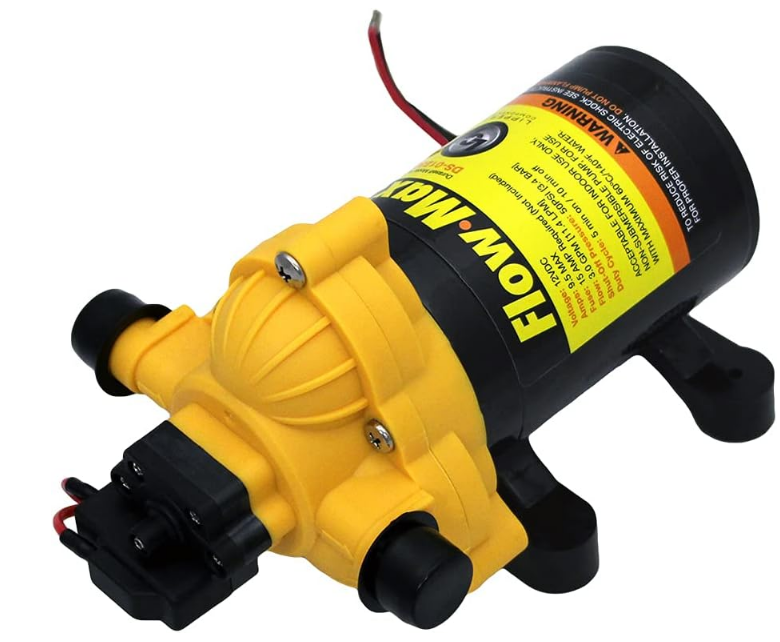
The Lippert Components Flow Max Pump DS-01233-D is a high-performance 12V RV water pump designed for reliable and efficient water delivery. With a maximum flow rate of 3.3 gallons per minute and 45 PSI, it ensures a steady supply of water for various RV applications. This self-priming pump features a built-in screen filter to prevent debris from entering, enhancing durability and performance. Priced at $129.99, the Flow Max Pump is an essential upgrade for any RV enthusiast seeking dependable water management.
Resources Required
- Cordless or Electric Drill or Screw Gun
- Appropriate Drive Bits
- Cutting Implement for Tubing
- Flexible, Reinforced Hose with 1/2" Minimum Inner Diameter
- Appropriate Pipe Fittings as Needed
- Four Screws To Fasten Pump to Mounting Surface
- 15 Amp Electrical Cutoff Switch
Specifications
- Model Number: DS-01233-D
- Flow Rate: Up to 5.3 GPM (Gallons Per Minute)
- Pressure Rating: Up to 55 PSI (Pounds per Square Inch)
- Power Consumption: 12V DC, 7.5 Amps
- Material: Durable thermoplastic and stainless steel components
- Dimensions: 10.5" x 7.5" x 5.5"
- Weight: Approximately 10 lbs
- Includes: Pump, mounting hardware, and installation instructions
Description
To ensure longevity and performance, the Lippert Components Flow Max Pump DS-01233-D is constructed with premium materials. Because of its thermoplastic and stainless steel construction, it is resistant to corrosion and wear even in harsh environments. This pump can operate silently while yet producing a powerful water flow thanks to its efficient and silent construction.
Because of its compact size, the pump is easy to install in most RVs and comes with all the mounting hardware and instructions required. Its 12V DC operation makes it compatible with most RV electrical systems, and its 7.5 Amp power consumption ensures that it won't place an excessive strain on your RV's battery.
Lippert Components Flow Max Pump DS-01233-D Installation
The following guidelines should be considered to achieve optimum pump performance. Mount the pump with four screws. In many instances, the pump is being utilized as a replacement pump. Adjust instructions as needed.
NOTE: The mounting feet are intended to isolate the pump from the mounting surface. Overtightening, flattening or the use of oversize screws will reduce the ability to isolate vibration and noise through the lines.
NOTE: Always follow all local or national installation codes and standards.
General Installation Instructions
- Solid surface should be available for mounting to prevent vibration and noise.
- Accessible location away from living quarters.
- Properly-sized wiring.
- Proper electrical protection.
- Flexible hose on inlet and outlet.
- Strainer on plumbing elbows and valves near the pump.
- Minimize flow restrictions in the system.
Mounting Instructions
- The pump may be located at the same level or below the water tank. However, if necessary, the pump may be positioned above the water tank since it is capable of a 6 ft. vertical prime. Also, horizontal inlet tubing will allow priming to 30 ft.
- Consider a dry location that allows easy access, if maintenance is required.
- Installation space for the pump should be at least 1 cubic foot to allow for adequate ventilation and prevent overheating.
NOTE: Excessive heat may trigger the integral thermal breaker and interrupt operation. When the temperature drops, the breaker will automatically reset. - The pump may be mounted in any position. However, if pump is mounted vertically, the pump head should be in the down position to avoid leakage into the motor casing during a malfunction.
Plumbing The System
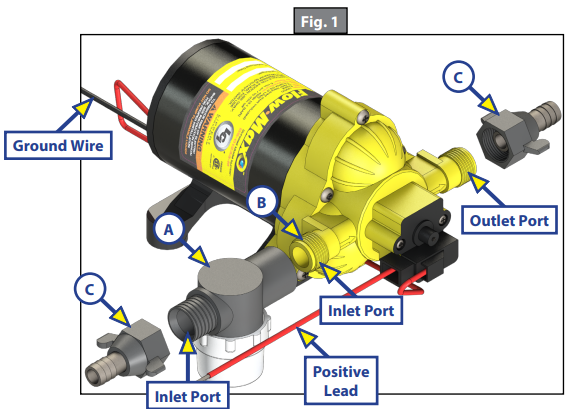
- Install in-line screen (Fig. 1A) on the inlet port of the pump (Fig. 1B) to prevent debris from entering the pump.
- Using the supplied 1/2" swivel connectors (Fig. 1C), connect flexible, high-pressure hoses to both the outlet port of the pump and the inlet port of the in-line screen (Fig. 1).
Note: The pump ports and strainer should not be connected to plastic or rigid pipe. At least 1' of flexible, high-pressure tubing is recommended. The pump's normal oscillation may be transmitted through rigid plumbing, causing noise and possibly loosening or cracking components. Plumb the system with flexible pipe/tubing that is a minimum of 1/2" inner diameter reinforced hose for main lines.
Note: Hex/swivel barb fittings provide easy removal if maintenance or access is required. The fittings are designed with a "taper seal" to create a watertight connection when hand tightened. Always secure barb tubing connections with properly-sized stainless steel clamps to prevent leaks.
Note: Never use thread sealing tape or sealing compounds on threads. Tape or sealing compounds may enter the pumps and cause a failure.
Rapid cycling may be caused by excessive back pressure created by one or more of the following within the plumbing system:
- Water filters and purifiers not on separate feed lines;
- Flow restrictors in faucets and shower heads;
- Small inner diameter lines;
- Restrictive fittings and connections, e.g. elbows, Ts and feeder lines to faucets.
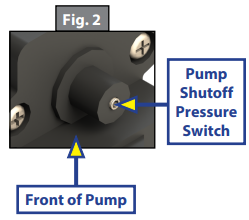
To reduce rapid cycling, the pump shutoff pressure switch setting (Fig. 2) can be increased by turning the screw clockwise 1 1/2 turns maximum.

Electrical Connections
CAUTION: Proper wire sizing is required for good pump operation. If the wire is too small, low voltage will affect the pump performance and can create a fire hazard.
NOTE: The pump should be on a dedicated circuit protected by the specified fuse as indicated on the motor label.
The chart lists the minimum wire size for a 10% voltage drop on a 12V DC 10 amp circuit. Length is the distance in feet from the power source to the pump and back to ground.
Determine the proper wire size for good pump operation.
Pump Wire Chart
Length
AWG
0-25
16
25-50
14
50-70
12
70-110
10
- Install a 15 amp switch (ignition protected) on the positive lead (red wire) (Fig. 1). The switch should be mounted in an easily accessible location.
NOTE: For marine use, a 15 amp marine duty (ignition protected) switch is required. - Connect the positive lead (red) to the switch.
- A second positive lead wire of the same size should be connected to the battery from the switch.
NOTE: A 10 amp fuse is required as per applicable codes. - Connect the negative ground wire (black) to the negative (black) terminal of the battery.
NOTE: The ground, positive and switch wires must all be of the same gauge.
NOTE: Shut off power to the pump when leaving the unit unattended.
Sanitizing
Potable water systems require maintenance to keep components working properly to deliver a consistent flow of fresh water. Sanitizing is recommended prior to storing. After a period of time in storage or any time the system is opened or contaminated, sanitizing is also recommended. Systems with new components or ones that have been subjected to contamination should also be disinfected.
- Determine the amount of common household bleach needed to sanitize the tank.
- Multiply the gallons of tank capacity by 0.13. The result is the number of ounces of bleach needed to sanitize the tank.
- Mix the bleach with water in a container.
- Pour the bleach solution into the tank and fill the tank with potable water.
- Open all faucets (hot and cold) and allow water to run until the odor of chlorine is detected. Then shut off the faucets.
- Allow 4 hours contact time to disinfect the tank.
- At the conclusion of the prescribed contact time, drain the tank.
- Refill the tank with clean, potable water and flush the system once or twice until the chlorine odor has decreased. The residual chlorine odor and taste is not harmful.
Winterizing
If water is allowed to freeze in the system, damage to the plumbing and pump may occur. To protect against damage from freezing, completely drain the tank, pump and plumbing and perform winterizing tasks.
NOTE: When used per the RVIA recommendations, non-toxic antifreeze for potable water is safe for use in the pump.
WARNING
Do not use automotive antifreeze to winterize potable water systems. Such solutions are highly toxic. Ingestion may cause serious injury or death.
- Drain the water tank.
NOTE: If the tank doesn't have a drain valve, open all faucets while allowing the pump to operate (15 minutes on/15 minutes off) until the tank is empty. - Open all the faucets, including the lowest valve or drain in the plumbing, and allow the pump to purge the water from the plumbing. Then turn off the pump.
- Using a pan to catch the remaining water, remove the hoses at the pump's inlet and outlet ports.
- Turn the pump on, allowing it to operate until the water is expelled.
- Once the plumbing is emptied of water, turn off power to the pump. Do not reconnect the hoses to the pump.
- Make a note at the water tank's filler cap as a reminder: “Plumbing is disconnected. Do not fill.”
- Leave all faucets open to guard against damage.
NOTE: Sanitize the plumbing system before putting it back into service. See Sanitizing section.
Setup Guide
Use these procedures to configure the Lippert Components Flow Max Pump DS-01233-D:
- Make sure the pump is accessible and shielded from the weather by selecting a good site.
- Following the manufacturer's directions, connect the pump's input and output hoses.
- Use the mounting hardware that comes with the pump to secure it.
- Link the electrical cabling to the pump, making sure that every connection is tight and satisfies the 12V DC requirement.
- Check for leaks and make sure the pump is operating properly after turning it on.
System and Safety Information
The Flow Max Fluid Pump by Duraself, Model Number DS-01230-M2, delivers smooth, consistent flow at all ranges of operation while drawing low current. The motor design incorporates ball bearings for long life and the motor is equipped with an integral thermal breaker. The RV/marine duty pump has sealed switches and is finished with electrocoating to inhibit corrosion. The pump is also enclosed to prevent incidental moisture from entering.
The Flow Max Fluid Pump is capable of self-priming up to 6 vertical feet and can run dry. The pump is designed for intermittent duty only. Do not use the pump for running a Reverse-Osmosis (RO) Filtration System. Continuous running under higher pressure may reduce pump life. There are no replaceable parts for the pump.
For safety, it is recommended that power to the pump is shut off when leaving the unit unattended.
WARNING
The “WARNING” symbol above is a sign that an installation procedure has a safety risk involved and may cause death or serious injury if not performed safely and within the parameters set forth in this manual. Always wear eye protection when performing this installation procedure. Other safety equipment to consider would be hearing protection, gloves, and possibly a full face shield, depending on the nature of the installation procedure.
CAUTION
Moving parts can pinch, crush or cut. Keep clear and use caution.
Troubleshooting
Vibration caused by driving, sea conditions or transporting can loosen plumbing, strainers and pump hardware. Check for loose system components. Many symptoms can be resolved by tightening the hardware. Refer to the chart for troubleshooting tips.
| What Is Happening? | What Should Be Done? |
Pump Will Not Start/Blows Circuit | Check electrical connections, fuse or breaker, main switch andground connection. |
Is the motor hot? Thermal breaker may have triggered; it will reset when cool. | |
| Is voltage present at switch? | |
| Check charging system for correct voltage (+ or - 10%) and good ground. | |
| Check for an open or grounded circuit, motor or improperly-sized wire. | |
| Check for seized or locked diaphragm assembly - water frozen? | |
Will Not Prime/Sputters (No Discharge/Motor Runs) | Check if the strainer is clogged with debris. |
Check if there is water in the tank or whether air has collected in the hot water heater. | |
Check if theinlet tubing/plumbing is sucking air at plumbing connections - vacuum leak? | |
| Is the inlet/outlet plumbing severely restricted or kinked? | |
| Check proper voltage with the pump operating: + or - 10% | |
| Check for debris in the pump inlet/outlet valves or if there are swollen or dry valves. | |
| Check pump housing for cracks or loose drive assembly screws. | |
Rapid Cycling | Check for restrictive plumbing and flow restrictions in faucets/shower heads. |
| Ensure water filter/purifier is on seperate line feed. | |
| Check if pressure switch shutoff needs adjustment. | |
Pump Will Not Shut Off/ Runs When Faucet Closed. | Check output side (pressure) plumbing for leaks and inspect for leaky valves or toilet. |
| Check for trapped air in outlet side (water heater) or pump head. | |
| Check for correct voltage to pump (+ or - 10%). | |
| Check for loose drive assembly or pump head screws. | |
Check if the valves or internal check valve is held open by debris or if the rubber is swollen. | |
| Check pressure switch operation. Refer to shutoff adjustment for switch. | |
Noisy or Rough Operation | Check plumbing, which may have vibrated loose. |
Check if the pump is plumbed with rigid pipe,causing noise to be transmitted. | |
Does the mounting surface amplify the noise? Check for loose mounting feet or if mounting feet are compressed too lightly. | |
| Check for loose pump head to motor screws. There are three long screws. | |
Leaks From Pump Head or Switch | Check for loose screws at the switch or pump head. |
| Check if the switch diaphragm is ruptured or pinched. | |
Check for punctured pump diaphragm if water is present in the drive assembly. |
Pros & Cons
Pros
- High pressure and flow rate
- Sturdy and resistant to corrosion construction
- Silent operation
- Installation simplicity
- Suitable for the majority of RV electrical systems
Cons
- More expensive than some other models
- requires cautious installation to prevent electrical problems or leaks.
- Additional accessories might be necessary for optimum operation.
Customer Reviews
The Lippert Components Flow Max Pump DS-01233-D has received high marks from customers for dependability and strong performance. Numerous people have reported that it greatly increases the water pressure in their RVs, which greatly simplifies daily chores. But according to some customers, the installation procedure might be a little difficult and may need for further assistance or accessories.
Common complaints
Add sporadic noise problems and the requirement for routine upkeep to guarantee peak performance.
Faqs
What is the flow rate of the Lippert Components Flow Max?
What is the power consumption of the Flow Max Pump?
Is the Lippert Components Flow Max Pump DS-01233-D easy to install?
What materials is the Lippert Components Flow Max Pump made of?
How quiet is the operation of the Lippert Components?
What are some common issues with the Flow Max Pump?
Does the Components Flow come with any warranties?
Can I use the DS-01233-D in extreme weather conditions?
How do I troubleshoot low water pressure with my Flow Max Pump?
What are some pros of using the Lippert Components DS-01233-D?
Leave a Comment
