Lippert Components Solera Slider Awning kit User Manual
Content
Introduction
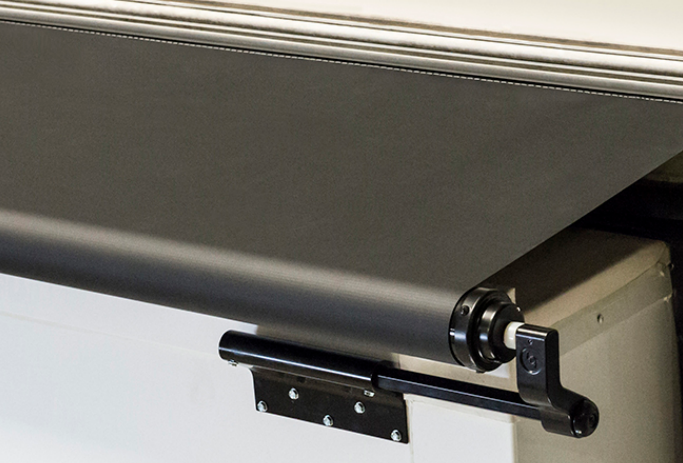
Solera Sliders are a high-quality, cost-effective way to help keep slide-outs free of dirt, leaves and debris. Solera Sliders are permanently attached to the slide-out and retract/extend with the room. The easy-to-install kits are designed to fit rooms from 66" to 192" in length. All Solera Slider fabric produced before August 2014 allows for a 58" projection and all fabric produced after that date allows for a 48" projection. The hardware hole pattern is universal and will match most competitive brands, which alleviates the need to patch holes.
Launched recently, the kit is priced at approximately $299, ensuring quality and functionality for your camping experience.
- The Solera Slider kit comes complete with mounting hardware.
- Awning rail included.
- All fabric is 6” shorter than slide topper length, which is measured from centerline of torsion arm to centerline of torsion arm.
- Box width is measured on the outside front of the box. Include the T-molding for a proper fit.
Additional information about this product can be obtained from lci1.com/support or by using the my app. Replacement kits can be ordered from https://store.lci1.com/ or by using the myLCI app. The myLCI app is available for free on iTunes for iPhone and iPad and also on Google Play for Android users. iTunes, iPhone, and iPad are registered trademarks of Apple Inc. Google Play and Android are trademarks of Google Inc.
Safety Information
Read and fully understand all instructions before installing or operating this product.
Adhere to all safety labels.
This manual provides general installation procedures. Many variables can change the circumstances of the procedure, i.e., the degree of difficulty involved in the service operation and the ability level of the individual performing the operation.
This manual cannot begin to plot out procedures for every possibility, but will provide the general instructions for effectively installing the system. In the event the skill level required is too advanced or the procedure too difficult, a certified technician should be consulted before performing the necessary installation. Failure to correctly install the system may result in voiding the warranty, inflicting injury or even death.
WARNING
FAILURE TO FOLLOW THE INSTRUCTIONS PROVIDED IN THIS MANUAL MAY RESULT IN DEATH, SERIOUS INJURY, UNIT DAMAGE OR VOIDING OF THE COMPONENT WARRANTY.
CAUTION
ALWAYS WEAR EYE PROTECTION WHEN PERFORMING SERVICE OR MAINTENANCE TO THE UNIT. OTHER SAFETY EQUIPMENT TO CONSIDER WOULD BE HEARING PROTECTION, GLOVES AND POSSIBLY A FULL FACE SHIELD, DEPENDING ON THE NATURE OF THE SERVICE.
CAUTION
MOVING PARTS CAN PINCH, CRUSH OR CUT. KEEP CLEAR AND USE CAUTION.
NOTE: Part numbers are shown for identification purposes only. Not all parts are available for individual sale. All parts with a link to the Lippert Store can be purchased.
Resources Required
- 1-2 people, depending on task
- Cordless or electric drill or screw gun
- Appropriate drive bits
- Screwdriver
- Tape measure
- Silicone sealant or butyl tape
- Silicone lubricant
Solera Sliders Parts List
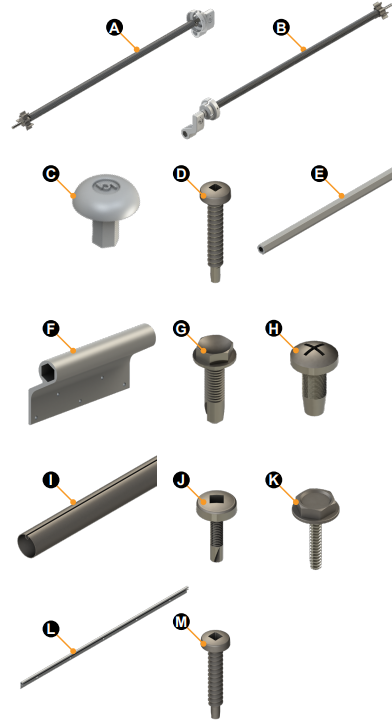
| Solera Slide Topper - White | |||
| Letter | PN | Description | Qty |
| A | 272455 | Drive Head (incl w/ roll tube) | 1 |
| B | 272454 | Idler Head (incl w/ roll tube) | 1 |
| C | 2724561 | Torsion Arm Cap | 2 |
| D | 362117 | Screw, #10 - 16 x 1 1/4” Pan Head, Self Drilling | 10 |
| E | 3452071 | Extension Rod | 2 |
| F | 2724411 | Extension Rod Bracket | 2 |
| G | 300247 | Screw, #10 - 16 x 3/4”, Hex Washer Head, Self Drilling | 4 |
| H | 280648 | Screw, 1/4” - 20 x 5/8” Slotted Pan Head, Self Tapping | 2 |
| I | 382228 | Roll Tube | 1 |
| J | 675906 | Screw, #8 - 18 x 1/2” Pan Head, Self Drilling (incl w/ roll tube) | 8 |
| K | 281079 | Screw, #6 - 20 x 1/2” Hex Washer, Self Drilling | 2 |
| L | 281928 | Awning Rail | 1 |
| M | 252593 | Screw, #8 - 18 x 1” Square Pan Head, Self Drilling | 26 |
| Solera Slide Topper - Black | |||
| Letter | PN | Description | Qty |
| A | 285149 | Drive Head (incl w/ roll tube) | 1 |
| B | 285148 | Idler Head (incl w/ roll tube) | 1 |
| C | 2724562 | Torsion Arm Cap | 2 |
| D | 362118 | Screw, #10 - 16 x 1 1/4” Pan Head, Self Drilling | |
| E | 3452072 | Extension Rod | 2 |
| F | 2724412 | Extension Rod Bracket | 2 |
| G | 300247 | Screw, #10 - 16 x 3/4”, Hex Washer Head, Self Drilling | 4 |
| H | 280648 | Screw, 1/4” - 20 x 5/8” Slotted Pan Head, Self Tapping | 2 |
| I | 676498 | Roll Tube | 1 |
| J | 276611 | Screw, #8 - 18 x 1/2” Pan Head, Self Drilling (incl w/ roll tube) | 8 |
| K | 281079 | Screw, #6 - 20 x 1/2” Hex Washer, Self Drilling | 2 |
| L | 281929 | Awning Rail | 1 |
| M | 364290 | Screw, #8 - 18 x 1” Square Pan Head, Self Drilling | 26 |
Specifications
The Solera Slider Awning Kit comes with several key features that make it stand out:
- Easy-to-use manual or motorized operation
- Durable and weather-resistant fabric
- Sturdy aluminum frame for stability and strength
- Adjustable arms for customizable fit and angle
- Available in various sizes to fit different RV models
- Includes mounting hardware and installation instructions
Lippert Components Descriptions
Solera Kit is designed with convenience and functionality in mind. The kit includes a sturdy aluminum frame, durable fabric, and adjustable arms that allow for a customizable fit. The awning can be operated manually or with the optional motorized system, making it easy to set up and adjust.
The weather-resistant fabric ensures that the awning can withstand various conditions, providing reliable shade and protection. The kit also includes all necessary mounting hardware and detailed installation instructions, making the setup process straightforward even for DIY enthusiasts.
Installation of Awning Kit
All screws supporting the awning assembly MUST have a backer within the structure of the wall of the unit. Refer to unit manufacturer for proper location.
Installing the Awning Rail
Awning rail included.
- Position the awning rail along the line where the roof and wall meet or a minimum of 3” above the upper edge of the slide room the Solera Slider will cover.
The awning rail must be level and parallel with the top of slide room box of the unit. - After determining the awning rail’s proper location,mark its position with a non-permanent method of marking.
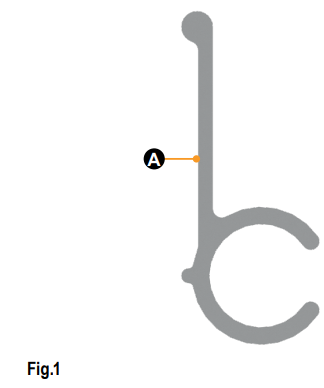
- Apply sealant to the back of the awning rail (Fig.1A).
Align the awning rail on the wall and secure with #8 - 18 X 1” screws, using all fastener holes.
Assemble the Extension Rod and Cap
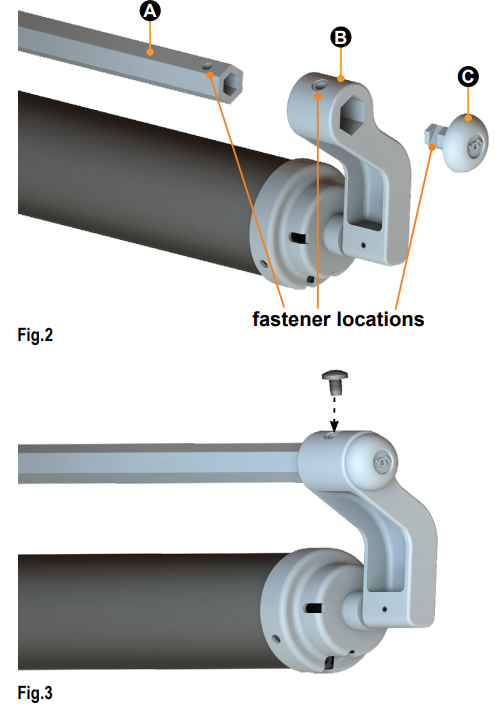
- Slide the extension rod (Fig.2A) into the spring head assembly torsion arm (Fig.2B), aligning the fastener locations (Fig.2).
Slide the spring head assembly torsion arm end cap (Fig.2C) into the extension rod (Fig.2A), aligning all three fastener locations (Fig.2). Fasten using the provided 1/4” - 20 x 5/8” slotted pan head, self-tapping screw (Fig.3).
NOTE: Do not secure the second extension rod to the spring head assembly torsion arm until the Solera Slider is ready for installation on the unit.
- Seal the back side of the extension rod bracket screw holes with sealant so that the sealant is against the unit when mounting the extension rod bracket.
Place the support arm bracket against the bottom of the T-molding at the top corner of the slide-out. Make sure to keep the support arm bracket parallel with the T-molding. Fasten using the provided #10 - 16 x 1 ¼” self-tapping screws (Fig.4).
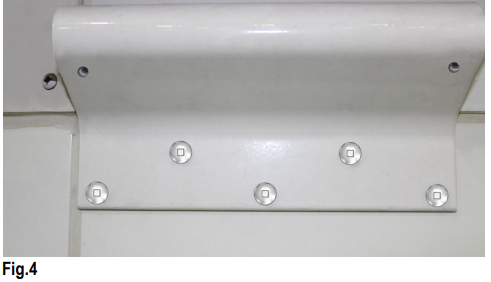
- Repeat Steps 1-4 for the other end, but do not secure the second hex extension rod to the spring head assembly torsion arm until the Solera Slider is ready for installation on the unit.
Installing the Solera Slider Assembly
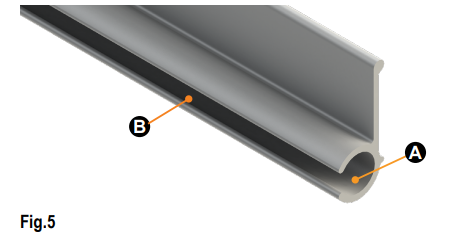
- To prepare for fabric installation, use a screwdriver to spread open either end of the awning rail on the installation end (Fig.5A).
- To protect the fabric from damage during installation, file any sharp edges or burrs from the awning rail.
Spray the inside of the awning rail channel with silicone lubricant (Fig.5B).
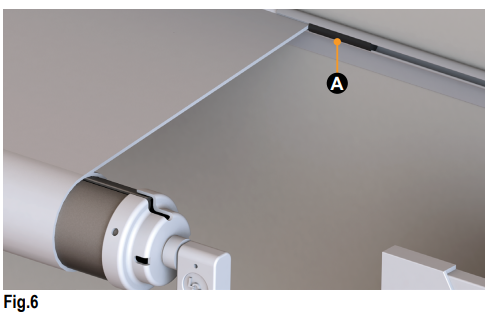
- Remove packaging from the roll tube and unroll a small portion of fabric, no more than one turn.
CAUTION: UNROLLING THE FABRIC MORE THAN ONE TURN WILL CAUSE THE SLIDE TOPPER TO LOSE TENSION AND CREATE SLACK WHEN CLOSING THE SLIDE ROOM. MAKE SURE TO LEAVE THE SLIDE ROOM CLOSED OR NOT TO EXTEND MORE THAN 6”. Using at least two people, feed the polycord through the awning rail channel (Fig.6A).
- Feed one of the extension rods into the extension rod bracket. By pulling the extension rod all the way into the extension rod bracket, the opposite end extension rod can now slide into the extension bracket or optional access bracket at the opposite end.
- Angle the extension rod so that the roll tube will not be touching the slide room.
- Secure the second extension rod to the spring head assembly torsion arm using the provided 1/4” - 20 x 5/8” slotted pan head, self-tapping screw (Fig.3).
- Center the Solera Slider over the slide room using a tape measure.
Fasten the extension rods to the extension rod brackets by installing two of the provided #10 - 16 x ¾” self drilling hex washer head screws in each extension rod bracket
(Fig.7A).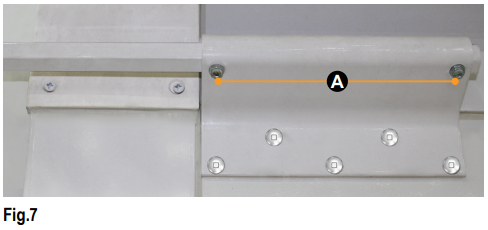
WARNING: ROLL TUBE SPRINGS ARE UNDER TENSION. IMPROPERLY SECURED ROLL TUBE SPRINGS CAN CAUSE PERSONAL INJURY AND/OR PRODUCT DAMAGE. SLOWLY RELEASE SPRING TENSION TO AVOID PERSONAL INJURY AND/OR PRODUCT DAMAGE.- Firmly hold the roll tube when removing the spring clip to relieve spring tension.
Securing the Fabric
- Extend and retract the room several times to ensure that the fabric is square on the roll tube.
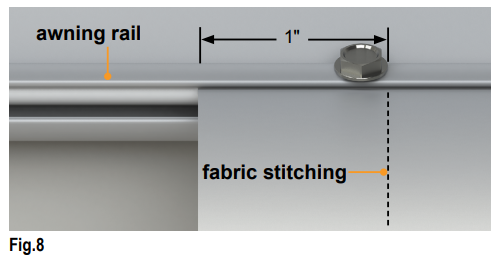
Secure the fabric in the awning rail no more than 1” inside the edge of the fabric on both ends using a #6 x ½” hex head screw. Install the screw down through the awning rail into the fabric and the polycord (Fig.8).
Setup Guide
Setting up the Solera Slider Awning Kit involves several steps:
- Unpack and inspect all components to ensure everything is included.
- Follow the provided instructions to attach the mounting brackets to your RV.
- Assemble the awning frame and attach the fabric.
- Adjust the arms to achieve the desired angle and fit.
- Test the awning to ensure proper operation.
For motorized models, additional steps may include wiring the motor and installing any necessary control units.
Maintenance
Fabric Care
If the awning is retracted while wet, extend the awning and let it dry as soon as conditions allow before retracting. This will help prevent the formation of mildew and add greatly to the life of the awning. Mildew does not form on the fabric itself, but on the accumulated dust, dirt and grime.
Periodically clean vinyl or woven acrylic fabric using a mixture of ¼ cup of dish soap and 5 gallons of warm water. Liberally apply the mixture on the top of the fabric and retract the awning for five minutes. This will apply the mixture to the bottom of the fabric as well. Extend the awning and hose off with fresh water. Repeat if necessary. Allow fabric to dry before retracting.
Troubleshooting
| Solera Slide Topper Troubleshooting Chart | |
| What’s Happening? | What Should Be Done? |
| Rub marks appear on the fabric. | Check that there is no debris in the track where fabric goes into the case. |
| Fabric sags or is loose. | Check tension on springs. |
| Make sure the end caps are properly secured. | |
| Fabric will not roll up. | Check tension on springs. |
| Make sure there are no debris or foreign objects in the fabric opening or case. | |
| Fabric will not unroll. | Make sure the spring clips that lock the tension for install have been removed from both ends of the end caps. |
| Fabric appears to roll up at an angle. | Make sure the rail that is mounted to the unit is square with the main housing of the slide topper. |
| Make sure fabric is cut square. | |
Solera Slider Awning Kit Pros and Cons
Pros
- Ease of use and quick setup
- Durable and weather-resistant materials
- Adjustable arms for customizable fit
- Available in manual and motorized options
- Comprehensive installation kit with clear instructions
Cons
- Higher cost compared to some other awning solutions
- Requires periodic maintenance to ensure longevity
- May require additional tools or help for installation
Customer reviews
Customer reviews of the Solera Slider Awning Kit are generally positive, with many users praising its ease of use, durability, and aesthetic appeal. However, some users have noted that the installation process can be complex and time-consuming, especially for those without prior experience.
Common complaints
This includes issues with the motorized system and occasional fabric tears due to excessive wind or wear. Despite these minor issues, the overall satisfaction with the product remains high.
Faqs
What sizes are available for the Solera Slider Awning Kit?
Is the Lippert Components Solera Slider Awning Kit easy to install?
Can I customize the angle of the awning?
What materials are used in the construction of the awning?
Does the kit include all necessary mounting hardware?
Can I use this awning in high wind conditions?
Is there a warranty on the Solera Slider Awning Kit?
How do I maintain my Solera Slider Awning Kit?
Can I purchase replacement parts for my awning?
Is this awning compatible with all types of RVs?
Leave a Comment
