How to Use: Lorex N882 Network Video Recorder User Guide
Content
Introduction of Lorex N882 Network Video Recorder
The Lorex N882 Network Video Recorder is a powerful and advanced security solution designed for both residential and commercial use. This NVR supports up to 8 IP cameras, providing high-quality footage with a resolution of up to 8MP. The estimated price of the Lorex N882 NVR is around $400, and it was launched in late 2021.
Lorex Package Contents
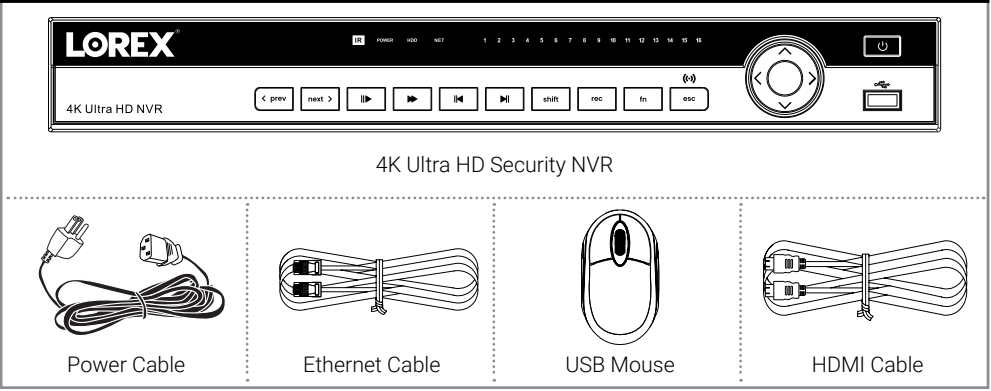
Dimensions

Lorex N882 Specifications
The Lorex N882 NVR features a 2TB hard drive, expandable up to 6TB, providing ample storage for your recorded footage. It supports H.265 video compression, reducing storage requirements and improving streaming efficiency. The NVR has a recording speed of up to 160Mbps and features a real-time recording resolution of up to 8MP. It also comes with 4 PoE (Power over Ethernet) ports, making it easy to connect and power your IP cameras.
Setting Up Your Recorder
See the steps below (expanded instructions to the right) to complete initial setup of the recorder

Overview of extra ports

Connect cameras
Test your cameras prior to selecting a permanent mounting location by temporarily connecting the cameras and cables to your NVR using one of the following 2 methods:
Connect cameras directly to the recorder (recommended).

Connect cameras to a PoE switch or router on your network (not included).
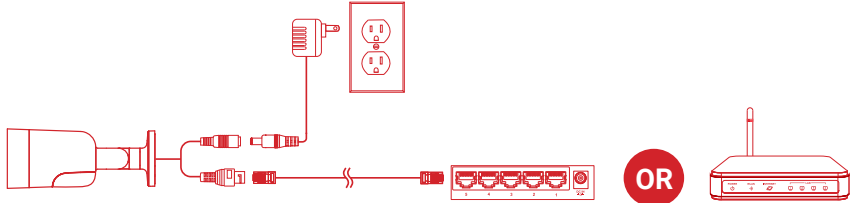
NOTES
- It may take up to 1 minute for cameras to start up and transmit video to your recorder.
- This guide covers connecting IP cameras to your security recorder only. For full instructions on installing your cameras, please refer to your camera’s documentation at lorex.com.
- Connecting cameras to a router, or a network switch without PoE, requires a power adapter for each camera. Refer to your camera’s documentation at lorex.com for the correct power adapter model number.
Connect monitor
Connect the recorder to a monitor using the included HDMI cable or a VGA cable (not included). The HDMI port supports up to 4K resolution, and VGA supports up to 1080p.

IMPORTANT: To optimize picture quality, set the recorder’s video output to match the resolution of your monitor. See the section Changing the Recorder’s Output Resolution on the rear for details.
Connect router
Connect the recorder to your router using the included Ethernet cable.

NOTES
- If you are using a PoE switch, ensure the switch is connected to the same network as your recorder.
- To receive automatic firmware updates and enable remote viewing with mobile apps, a high speed Internet connection is required (minimum upload speed of 5Mbps required for 4K viewing; 3.5Mbps for lower resolutions). All other system features can be used without an Internet connection.
Connect mouse
Connect the included mouse to a USB port on the recorder.

Connect power
Use the included power adapter to connect the recorder to a nearby outlet. Turn the recorder on using the power switch on the back panel.

Lorex Setup Wizard
When you first power up your recorder, the Lorex Setup Wizard will begin. The Wizard will help you configure core system settings. You will also create a secure password. For future reference, it is recommended that you record your password here:

Using the Mouse
NOTE: In live view, hover the mouse cursor over the top of the screen to open the Navigation Bar. Move the mouse cursor away from the top of the screen to close the Navigation Bar.

Using the Quick Menu

- Select camera/live display view.
- Control PTZ cameras (not included).
- Control auto focus cameras (not included).
- Adjust camera color and image settings.
- View system information.
- Start/stop sequence mode.
- Temporarily disable all current audible warnings.
- Search and play back recordings.
- Search for and play back person / vehicle detection events.
- Open manual recording controls.
- Add IP cameras over the LAN.
- Open Main Menu.
Adding Cameras from the LAN
Follow the steps below to add cameras that are not directly connected to the Power over Ethernet (PoE) ports on the back of the recorder.
NOTE: Please visit lorex.com/compatibility for a list of compatible Lorex IP cameras.
To add cameras from the LAN
- Connect the camera to a router or switch on the same network as the recorder.
- Right-click and select Device Search. If prompted, log in using the system user name (default: admin) and your new, secure password.
- Configure the following:
- Click Device Search.
- Check the camera(s) you would like to add.
- Click Add. The status indicator turns green to show the camera is successfully connected.
The added device(s) will appear in the Added Device list. Right-click to exit to live view.
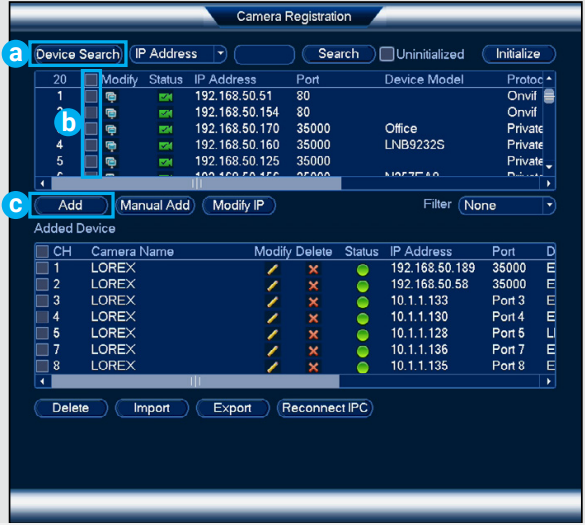
NOTE: If the icon in the Status column appears red, there may be a password issue with the camera. Select the camera and click Reconnect IPC.
Playback and Search
Search through and play video recordings from the hard drive.
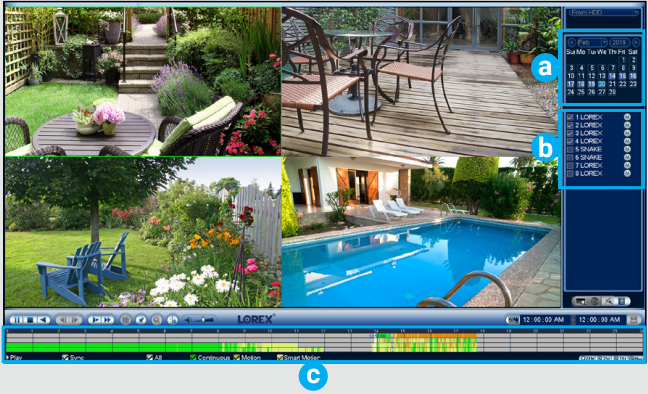
To search for and play recordings
- From live view, right-click and then click Playback. If prompted, log in using the system user name (default: admin) and your new, secure password.
- Configure the following:
- Use the calendar on the right to select the date to playback.
- Check channels you want to play back. Click the grey icon beside each selected channel to select Main Stream (M) or Sub Stream (S) video quality.
Click inside the video bar to select the playback time. Playback starts immediately at the selected time.
Backup
Back up recordings from the hard drive to a USB flash drive (not included).
To back up recordings
- Insert a USB flash drive (not included) into a free USB port on the recorder.
- From live view, right-click and then click Main Menu. If prompted, log in using the system user name (default: admin) and your new, secure password.
- Click
 , then click BACKUP.
 - Configure the following:
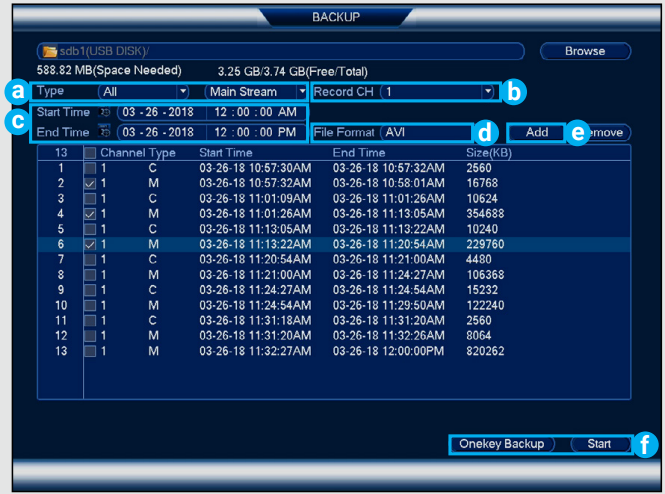
- Select the type and quality of recordings to search for.
- Select the channel(s) to search by.
- Select a Start Time and End Time for your search.
- Choose a file format for your backed up files.
- Click Add to see recordings that match your search.
Check boxes next to recordings you want to back up, then click Start. You may also click Onekey Backup to back up all files that match your search.
Smart Motion Detection & Deterrence Settings
Configure smart motion detection and/or active deterrence settings. For a complete list of compatible cameras, navigate to your recorder series at lorex.com/compatibility.
To configure smart person/vehicle detection or active deterrence
- In live view, right-click and click Main Menu. If prompted, log in using the system user name (default: admin) and your new, secure password.
- Click , then select EVENT. Select the Smd/Deterrence tab.
- Configure the following:
Smart Person/Vehicle Detection Cameras
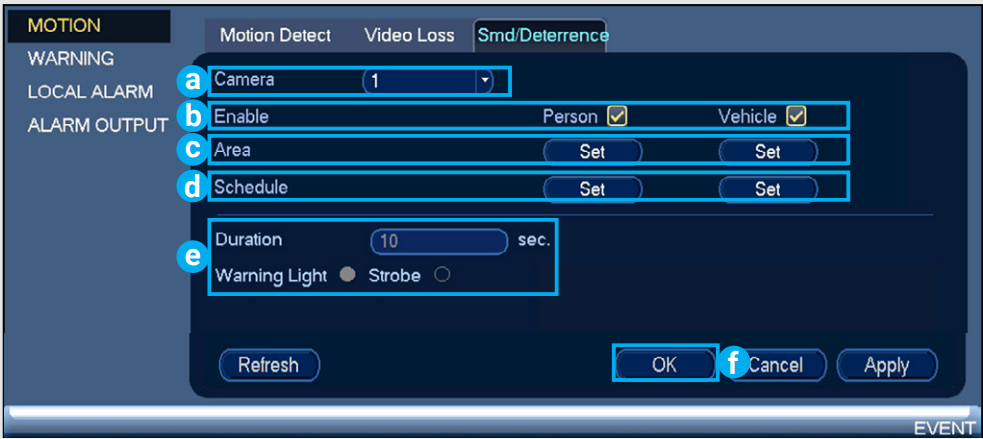
- Select the channel of a connected camera with person/vehicle detection.
- Check Enable underneath Person and/ or Vehicle.
- Click Set next to Area to set active areas for person/vehicle detection. See Figure 1 below for details.
- Click Set next to Schedule to set a weekly schedule for person/ vehicle detection. See Figure 2 below for details.
- Set preferences for the warning light and siren.
Click OK.
Detection Area
The default schedule, shown in Figure 2, is active during the night, between 5pm and 7am.
Click Set to change the schedule for the corresponding day of the week.Click OK when finished.
Schedule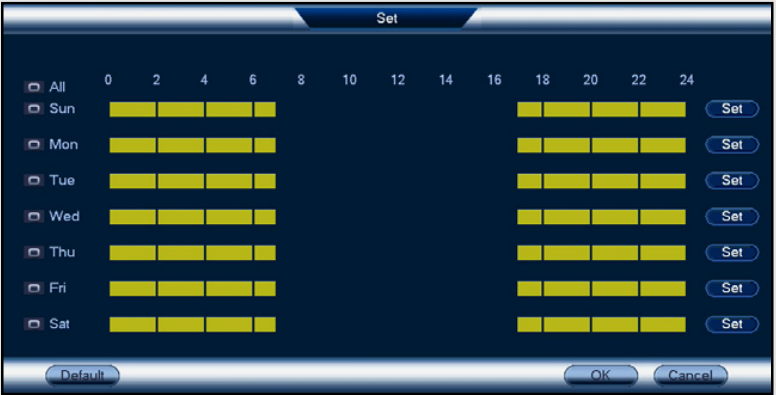
Active Deterrence Cameras
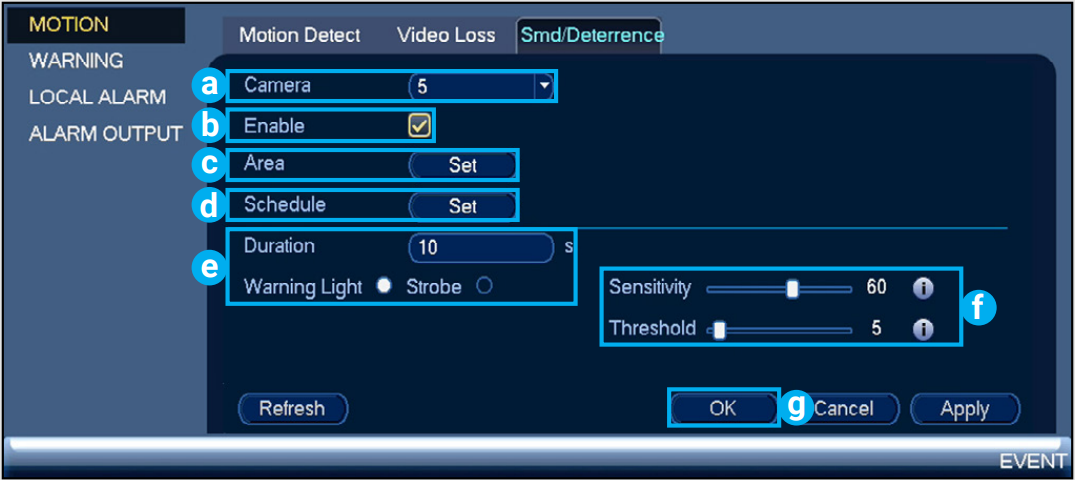
- Select the channel of a connected deterrence camera.
- Check Enable.
- Click Set next to Area to set active areas for person and/or vehicle detection. See Figure 3 below for details.
- Click Set next to Schedule to set a weekly schedule for person and/or vehicle detection. See Figure 2 above for details.
- Set preferences for the warning light and siren.
- Set Sensitivity and Threshold levels to your preference.
Click OK.
Deterrence Area
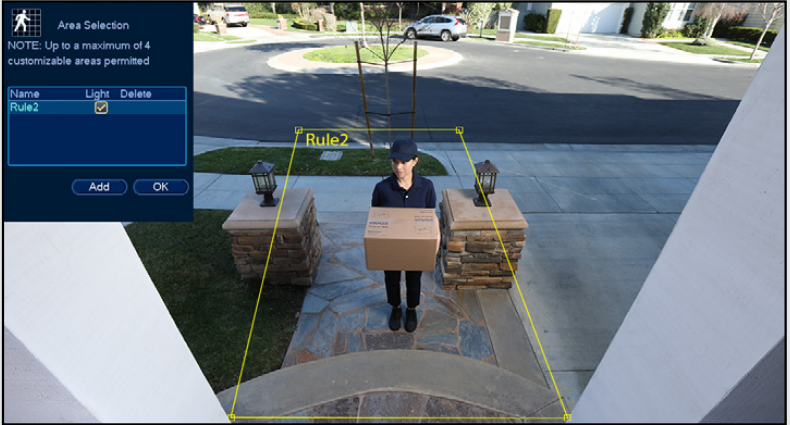
- The camera image appears with a grid overlay. The green area is the active area for deterrence.
- Click or click-and-drag to add / remove boxes from the active area.
- In Figure 3, only motion around the doorway will trigger the warning light.
- Right-click when finished.
WARNING: To set off all connected deterrence cameras’ warning lights and sirens, press and hold the front panel button for 3 seconds.
Changing the Recorder’s Output Resolution
The system will automatically match the resolution of the connected monitor the first time you use the recorder.
IMPORTANT: If you need to switch the monitor, make sure you set the recorder to an output resolution supported by the new monitor before switching.
To change the recorder’s output resolution
- From live view, right-click and then click Main Menu. If prompted, log in using the system user name (default: admin) and your new, secure password.
- Click Display, then configure the following:
Set Resolution to match the highest resolution supported by your monitor. For example, select 3840×2160 for 4K monitors, or 1920×1080 for 1080p.
Click OK. The recorder will restart before changes take effect.
Description of Network Video Recorder
The Lorex N882 NVR is a reliable and advanced security solution that provides high-quality footage and easy-to-use features. The NVR supports up to 8 IP cameras, providing comprehensive coverage of your property. The PoE ports make it easy to connect and power your cameras, while the H.265 video compression reduces storage requirements and improves streaming efficiency. The Lorex N882 NVR also features remote viewing capabilities, allowing you to monitor your property from anywhere in the world using your smartphone, tablet, or computer.
Lorex N882 Troubleshooting
Problem: Insufficient storage space is a common reason for the inability to write data. Ensure that the NVR's hard drive has enough free space for recording. If it's full, consider deleting older recordings or upgrading to a larger capacity hard drive.
Solution: If the NVR is connected to a network, network congestion can affect write speeds. Try reducing network traffic or connecting the NVR directly to the recording devices if possible.Problem:File system errors can occur due to improper shutdowns or disk corruption. Use the NVR's built-in diagnostics tools to check the file system integrity and repair any errors.
Solution: Check the performance of the hard drive installed in the NVR. A slow or failing hard drive can significantly impact write speeds. Consider replacing the hard drive if necessary.Problem:If the hard drive installed in the NVR is compatible with the device. Some NVRs have specific requirements regarding the type and size of hard drives they support.
Solution: Adjust the recording settings on the NVR to optimize write speeds. Lowering the resolution or frame rate of recordings can reduce the amount of data being written, potentially improving write speedsProblem:Check if there are any firmware updates available for the NVR. Sometimes, firmware updates include fixes for issues related to data writing and storage management.
Solution: If the NVR's firmware is up to date. Firmware updates often include performance improvements that can help optimize write speeds.
Some background processes or tasks running on the NVR can consume resources and slow down write speeds. Check for any unnecessary processes and disable or close them if possible.Problem:If the NVR is connected to a network, ensure that it has a stable connection to the network. Network interruptions or connectivity issues can prevent data from being written to tables.
Solution: If the NVR has a stable power supply. Power fluctuations or insufficient power can cause data writing issues.Problem:If all else fails, consider performing a factory reset on the NVR to restore it to its default settings. Be aware that this will erase all configurations and settings, so back up any important data before proceeding.
Solution: If the NVR is properly ventilated and operating within its recommended temperature range. Overheating can affect the performance of internal components, including the hard drive.
Pros & Cons
Pros
- Supports up to 8 IP cameras
- Features H.265 video compression
- Expandable storage up to 6TB
- PoE ports for easy camera connection and power
- Remote viewing capabilities
Cons
- No built-in monitor
- May require professional installation
- May be expensive for some users
- Limited to 8 cameras
Customer Reviews about Lorex N882
Customers have praised the Lorex N882 NVR for its high-quality footage, easy-to-use features, and reliable performance. However, some customers have noted issues with the setup process and the limited number of cameras supported. Overall, the Lorex N882 NVR has received positive reviews and is a popular choice for those seeking a reliable and advanced security solution.
Faqs
How should your Lorex N882 Network Video Recorder be initially configured?
How does one add cameras to the Lorex N882 Network Video Recorder? What are the necessary steps?
How can I set up the Lorex N882 to record at the best possible quality for storage?
How should the Lorex N882 NVR be positioned in your house or place of business?
How can I view or replay live content on my Lorex N882 NVR from a distance?
Changing the Lorex N882 Network Video Recorder's motion detection settings to lower false alarms?
If a connected camera is not detected by your Lorex N882 Network Video Recorder, what should you do?
What networking specifications are necessary to make the most out of the Lorex N882 Network Video Recorder?
How can the factory settings of the Lorex N882 NVR be restored?
What is the cost of the network video recorder Lorex N882?
Leave a Comment