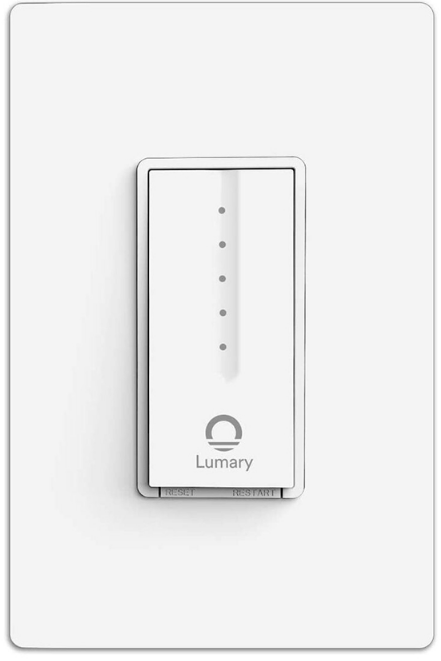
Lumary Dimmer Smart Light Switch L-DS100 User Guide
Content
Introduction
The Lumary Dimmer Smart Light Switch L-DS100 is a cutting-edge device designed to enhance your home lighting experience. Compatible with both Alexa and Google Assistant, it allows for seamless voice control and remote operation via a smartphone app. The switch features customizable dimming options, enabling users to set the perfect ambiance for any occasion. Priced at approximately $35, it offers an affordable solution for modernizing your lighting system with smart technology.
Technical Specifications
- Rated Current: 3A
- Input: 100V-240V, 50/60HZ
- Wireless Frequency: 2.4GHz
- Max Output: 300W INC, 150W LED
What’s in the Box

Get Ready
- Turn OFF power supply at the circuit breaker or fuse. Use a noncontact voltage tester to ensure that power is off. More than one disconnect switch may be needed to turn off power.
- Confirm that you are replacing a single pole (single switch), one-way switch (not a 3-way switch where two switches control one fixture).
- Make sure the existing switch box has a neutral wire.
Instructions
Download the Lumary app

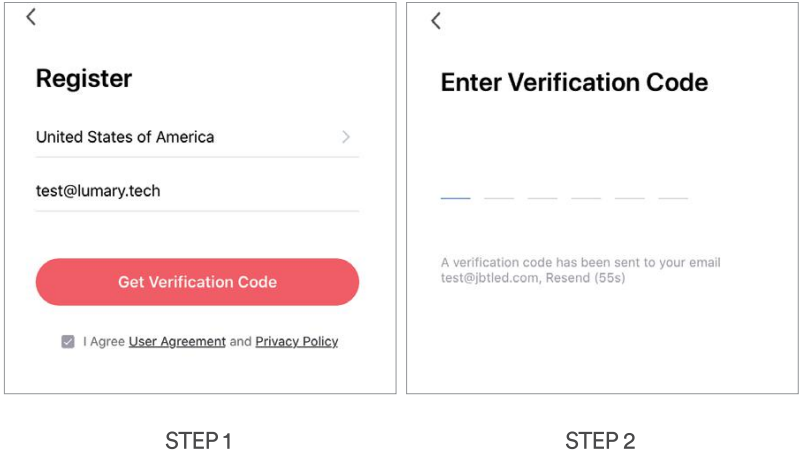
- Register a Lumary account
- STEP 1: Enter your email address.
STEP 2: Enter the verification code and create a password.
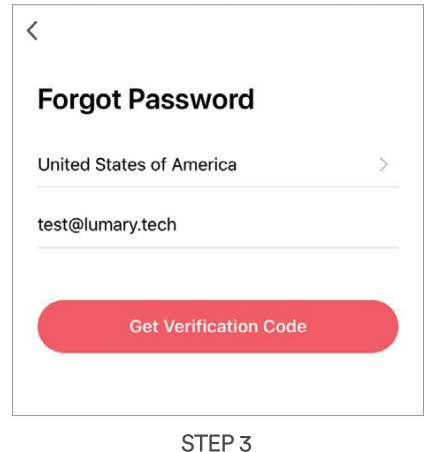
Reset Password
STEP 3: Follow the prompts to reset your password.
Description
The Lumary Dimmer Smart Light Switch L-DS100 combines advanced technology with a user-friendly design. This smart switch allows you to adjust the brightness of your lights with a simple touch or through your smartphone app. Its compatibility with popular smart home platforms ensures seamless integration into your existing setup. The energy-saving mode helps reduce power consumption, making it an eco-friendly choice. The switch is designed to be compact and stylish, fitting perfectly into any standard switch plate.
Installation of Lumary Dimmer Smart Light Switch
STEP 1
Shut off power at the circuit breaker for the switch that you are replacing. More than one disconnection may be required to turn off power. Use a noncontact voltage tester to ensure that power is off.

STEP 2
Make sure the existing switch box has a neutral wire*. Remove old switch by disconnecting all wires. Neutral wire is typically white.

STEP 3

- Connect Switch’s neutral wire (white) to your home’s neutral wire.
- Connect Switch’s two load (black) wires (labeled as “SW” on the back of Switch) to your home’s load wires, then connect the live wire.
- Be mindful not to reverse the live and load wires.
- Connecting the Switch’s ground wire (green) to your home’s ground wire is optional.
- Check that all wire nuts are secured.
- Mark all wires with included stickers for next reference
STEP 4

Use screws to secure TAP into your wall. Snap on the included faceplate.
STEP 5
Restore power by reversing step 1.
STEP 6
Once power is connected, the blue indicator light will blink to indicate that TAP is ready to connect to Wi-Fi.

Setup Guide
Setting up the Lumary Dimmer Smart Light Switch is straightforward and can be completed in a few steps.
- First, ensure you have a stable internet connection and download the Lumary app from your app store.
- Next, turn off the power to the circuit and replace your existing light switch with the L-DS100.
- Once installed, turn the power back on and follow the in-app instructions to connect the switch to your Wi-Fi network.
- You can then configure the switch settings and pair it with your preferred smart home system.
Reset and restart
QUICK TIP: On the Switch Faceplate, the Reset button as the Power Reset button and the Restart button is also known as the Wi-Fi Reset button.

How do I reset TAP and what does the blinking light mean?
Reset TAP by pressing and holding the Wi-Fi Reset (Restart ) button for 3 seconds until the indicator begins to rapidly flash. The Wi-Fi Reset button is located on the bottom right side of the switch (not the swashplate) labeled “Restart”.
- Reset one time (press and hold) to reach Easy Mode (Rapidly blinking blue, 2x per second)
- Reset again (press and hold) to reach AP Mode (Slowly blinking blue, every 3 seconds)

Connect Easy Mode
- STEP 1 Open the Lumary app. In the top corner of the Devices screen, click (+). Choose “Smart Power”.
STEP 2 Make sure TAP’s light is rapidly flashing blue.
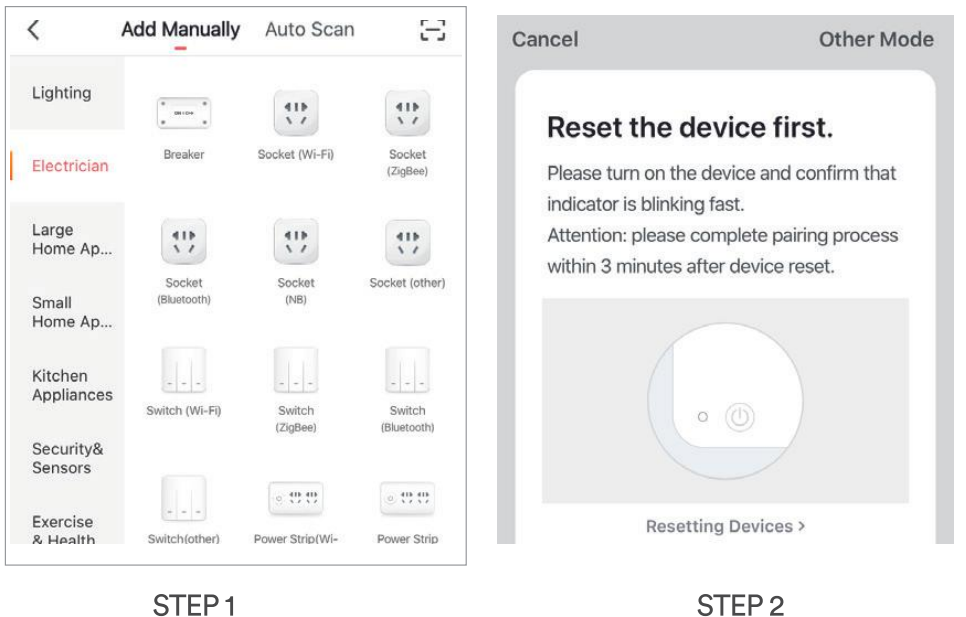
If not, reset to reach Easy Mode to connect (Page 9).
Press “Next Step” in the app.- STEP 3 Enter your Wi-Fi network and password.
STEP 4 The Lumary app will connect to TAP.
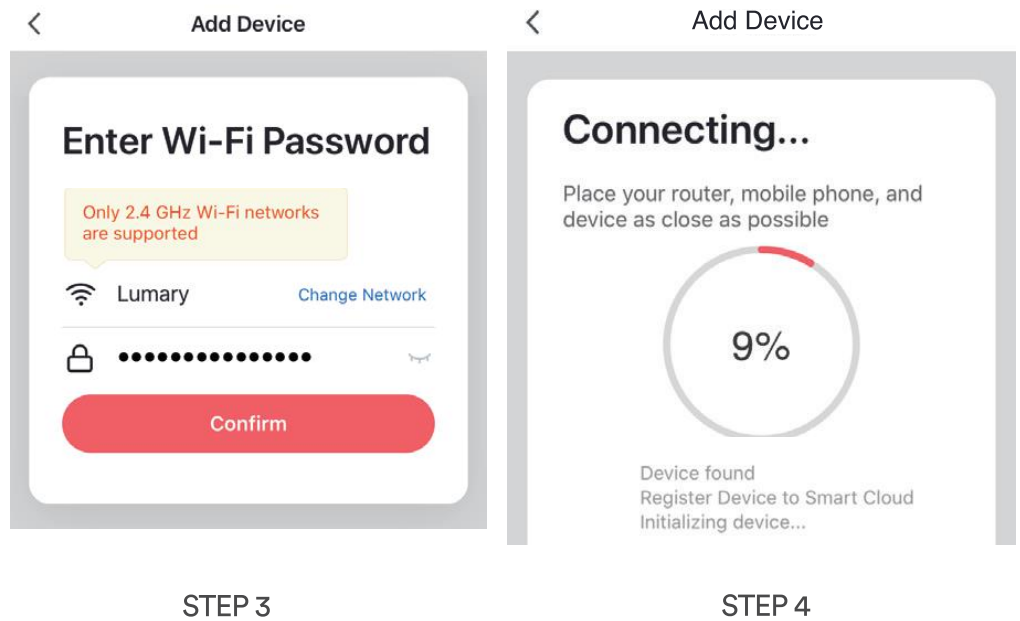
NOTE: Lumary can’t connect to 5GHz networks. *If the connection fails, try to connect using AP Mode.
Connect AP Mode
- STEP 1 Make sure TAP’s light is slowly flashing blue. If not, reset to reach AP mode (page 9).
- STEP 2 Open the Lumary app. In the top corner of the Devices screen, click (+). Choose “Smart Power”. Choose “AP Mode” in the top corner.
STEP 3 Press “Next” and enter your Wi-Fi details.
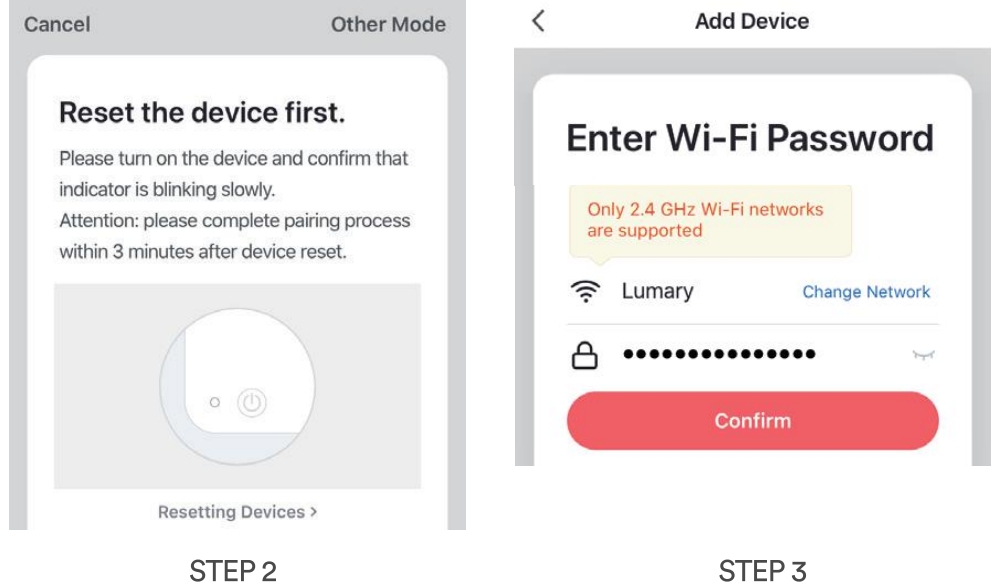
- STEP 4 Follow the instructions to choose the device from your Wi-Fi list.
STEP 5 The Lumary app will connect to TAP.
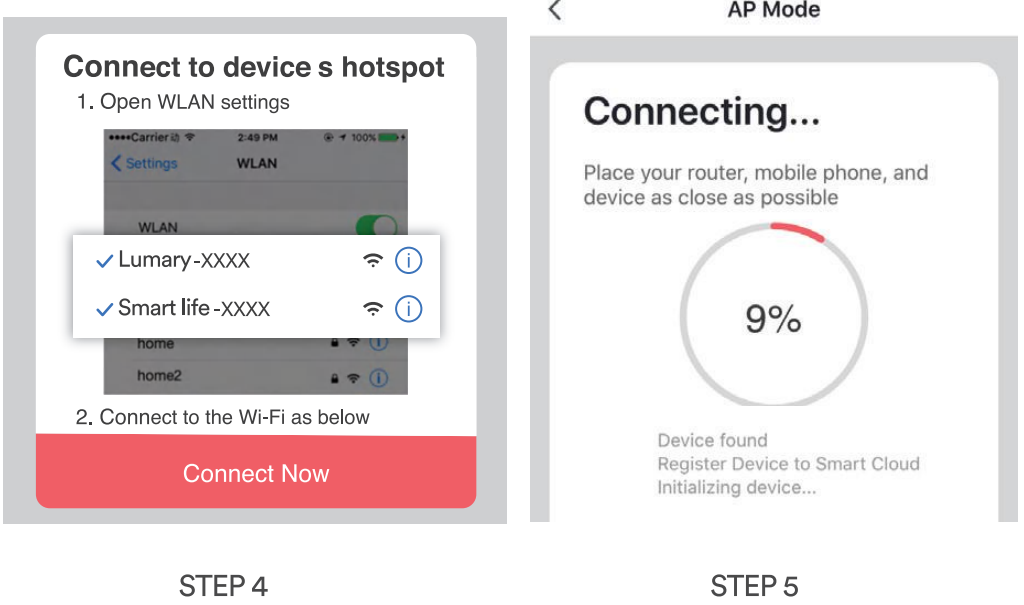
NOTE: Lumary can’t connect to 5GHz networks. 13
Connect Auto Scan
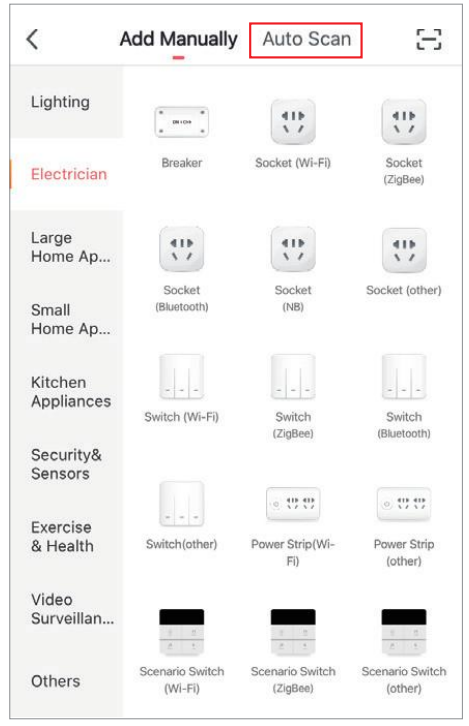
- STEP 1
Connect your smart phone to a 2.4GHz Wi-Fi, open the Lumary app. In the top right corner of screen, click (+). Choose "Auto Scan". - STEP 2
Power on the smart device, press and hold the reset button for 5 seconds until it is rapidly flashing white. STEP 3
Click "Start scan", the app will search for device automatically. Wait 5-20s until the device appears on the screen. Click "Next", customize the device name as needed, then click "Done" to complete connection.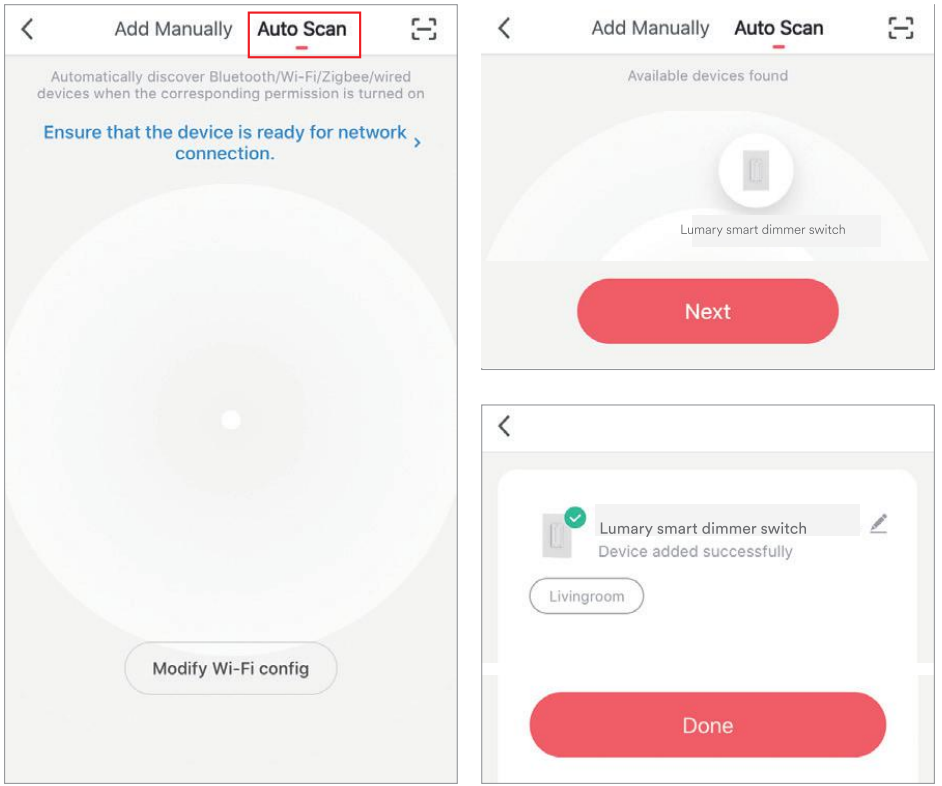
Lumary Dimmer Smart Light Switch Troubleshooting
Can’t connect to Wi-Fi?
Make sure you entered the correct Wi-Fi password during the Wi-Fi setup. Check whether there are any Internet connection problems. If the Wi-Fi signal is too weak, reset your Wi-Fi router and try again.
Reset the device
To reconnect to Wi-Fi, hold down the Reset button for 3 seconds.
- Reset 1 time (press and hold) to reach Easy Mode, indicated by rapidly blinking blue light. Refer to page 10 to connect in Easy Mode.
- Reset 2 times (press and hold) to reach AP Mode, indicated by slowly blinking blue light. Refer to page 12 to connect in AP Mode.
System Requirements
- Existing neutral wire
- Existing single pole, one-way (not multi-location) light switch with box more than 2 inches deep
- Phone with iOS 9® or later, or Android™ 4.1 or later
- Existing 2.4GHz Wi-Fi network (not compatible with 5GHz Wi-Fi networks)
- Lumary app
IMPORTANT: TAP requires a neutral wire and single pole. TAP is a one-way switch, not a multi-location switch. Please consult a licensed electrician if you cannot locate a neutral wire or are unfamiliar with electrical installations.
Pros & Cons
Pros
- Easy Installation: No neutral wire required, making installation straightforward.
- Multi-Control Options: Control via manual switch, app, or voice commands.
- Energy Efficiency: Energy-saving mode reduces power consumption.
- Compatibility: Works with major smart home platforms like Alexa, Google Assistant, and Apple HomeKit.
- Compact Design: Fits standard switch plates for a seamless look.
Cons
- Compatibility Issues with Bulbs: Not all bulbs are compatible with the dimming range.
- Dependence on Internet Connection: Requires a stable internet connection for full functionality.
- Potential App Lag: Some users may experience occasional lag in app response.
Customer Reviews
Customers have praised the Lumary Dimmer Smart Light Switch for its ease of use and energy-saving features. However, some users have reported compatibility issues with certain types of bulbs and occasional connectivity problems. Overall, the switch has received positive feedback for its sleek design and seamless integration into smart home systems.
Common complaints include the need for a stable internet connection and occasional app lag. Despite these minor issues, the L-DS100 remains a popular choice for those seeking to upgrade their home lighting to a smart solution.
Faqs
Can I use the Light Switch in a multi-switch setup?
How do I reset the Dimmer Smart Light?
Is the Lumary Dimmer compatible with home automation routines?
What is the warranty period for the Light Switch?
Can I share with family and friends?
Can I group multiple Lumary Dimmer Smart Light Switch L-DS100 devices together?
How many devices can I control?
My Lumary device has a funny name. How do I rename it?
What should I do if the device appears offtine or is unreachable?
What's the wireless ran!;le?
What do the green and blue lights mean?
Leave a Comment
