Makita Brushless Blower XBU02 Instruction Manual
Content
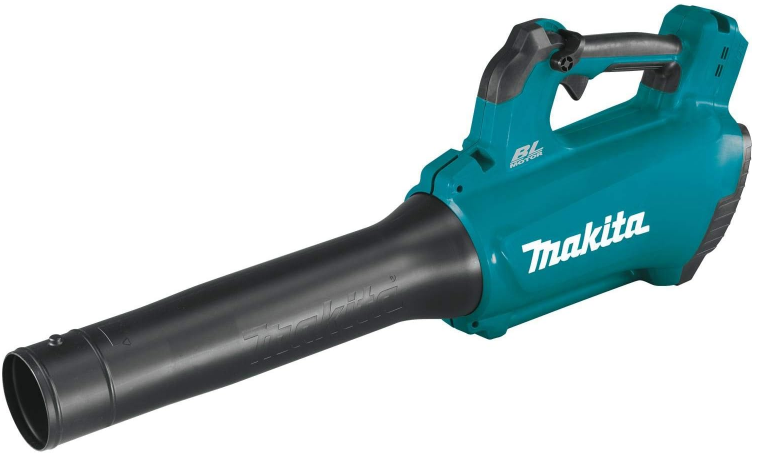
Introducing the Makita Brushless Blower XBU02
The Makita is a powerful cordless tool designed for efficient outdoor cleanup. Utilizing two 18V LXT batteries, it delivers impressive performance with air speeds up to 120 MPH and an airflow capacity of 473 CFM, making it suitable for both residential and commercial applications. The lightweight design and ergonomic handle enhance maneuverability, while the brushless motor ensures longer run times and durability. The XBU02 is priced at approximately $329.00, offering excellent value for its capabilities.
Specifications
- Due to our continuing program of research and development, the specifications herein are subject to change without notice.
- Specifications and battery cartridge may differ from country to country.
- The weight may differ depending on the attachment(s), including the battery cartridge. The lightest and heavi-est combinations, according to EPTA-Procedure 01/2014, are shown in the table.
Applicable battery cartridge and charger
- Some of the battery cartridges and chargers listed above may not be available depending on your region of residence.
WARNING: Only use the battery cartridges and chargers listed above. Use of any other battery cartridges and chargers may cause injury and/or fire.
Recommended cord-connected power source
- The cord connected power source(s) listed above may not be available depending on your region of residence.
- Before using the cord connected power source, read instruction and cautionary markings on them.
Description
The Makita Brushless Blower XBU02 is built with durability and efficiency in mind. Its brushless motor ensures long tool life and consistent performance. The blower features a three-speed control, allowing users to adjust the air velocity according to their needs. The ergonomic design includes a rubberized grip for improved comfort and reduced vibration. Additionally, the blower is environmentally friendly with zero emissions and operates at a lower noise level compared to gas-powered blowers.
FUNCTIONAL DESCRIPTION
CAUTION: Always be sure that the tool is switched off and the battery cartridge is removed before adjust-ing or checking function on the tool.
Installing or removing battery cartridge
CAUTION:
- Always switch off the tool before installing or removing of the battery cartridge.
- Hold the tool and the battery cartridge firmly when installing or removing battery car-tridge. Failure to hold the tool and the battery cartridge firmly may cause them to slip off your hands and result in damage to the tool and battery cartridge and a personal injury.
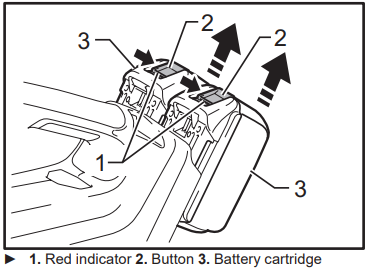
To remove the battery cartridge, slide it from the tool while sliding the button on the front of the cartridge. To install the battery cartridge, align the tongue on the battery cartridge with the groove in the housing and slip it into place. Insert it all the way until it locks in place with a little click. If you can see the red indicator on the upper side of the button, it is not locked completely.
CAUTION:
- Always install the battery cartridge fully until the red indicator cannot be seen. If not, it may acci-dentally fall out of the tool, causing injury to you or someone around you.
- Do not install the battery cartridge forcibly. If the cartridge does not slide in easily, it is not being inserted correctly.
NOTE:
- The tool does not work with only one battery cartridge.
Tool / battery protection system
The tool is equipped with a tool/battery protection sys-tem. This system automatically cuts off power to the motor to extend tool and battery life. The tool will automatically stop during operation if the tool or battery is placed under one of the following con-ditions. In some conditions, the indicators light up.

Overload protection
When the tool is operated in a manner that causes it to draw an abnormally high current, the tool automatically stops without any indication. In this situation, turn the tool off and stop the application that caused the tool to become overloaded. Then turn the tool on to restart.
Overheat protection for tool
When the tool is overheated, the tool stops automat-ically, the battery indicator blink about 60 seconds. In this situation, let the tool cool down before turning the tool on again.
Overdischarge protection
When the battery capacity becomes low, the tool stops automatically. If the product does not operate even when the switches are operated, remove the batteries from the tool and charge the batteries.
Indicating the remaining battery capacity
(Only for battery cartridges with "B" at the end of the model number.)
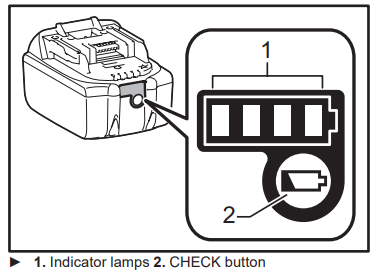
- Press the check button on the battery cartridge to indi-cate the remaining battery capacity. The indicator lamps light up for few seconds.
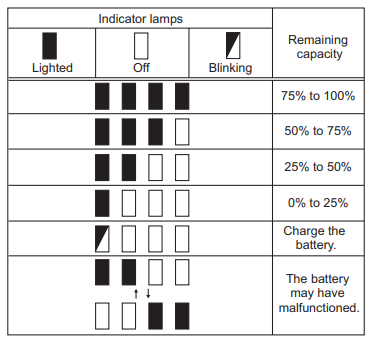
NOTE: Depending on the conditions of use and the ambient temperature, the indication may differ slightly from the actual capacity.
Remaining battery capacity indication
(Country specific)
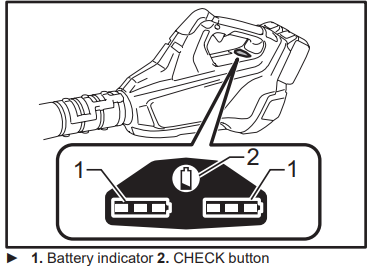
- Press the check button to make the battery indicators show the remaining battery capacities. The battery indicators correspond to each battery.
Remaining battery capacity indication
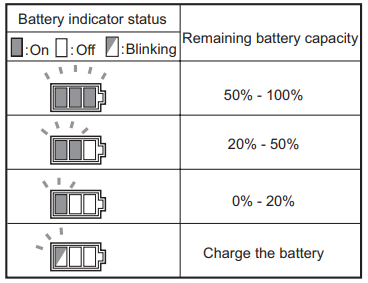
Switch action
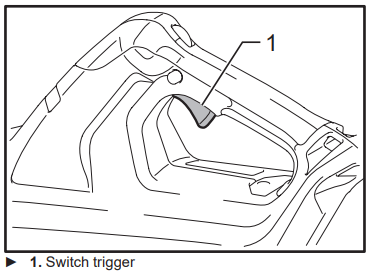
CAUTION: Before inserting the battery cartridge into the tool, always check to see that the switch trigger actuates properly and returns to the "OFF" position when released.
To start the tool, simply pull the switch trigger. Tool speed is increased by increasing pressure on the switch trigger. Release the switch trigger to stop.
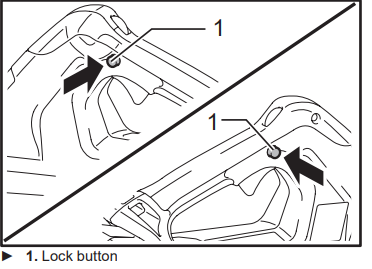
- For continuous operation, pull the switch trigger, push in the lock button and then release the switch trigger.
To stop the tool from the locked position, pull the switch trigger fully, then release it.
Speed change
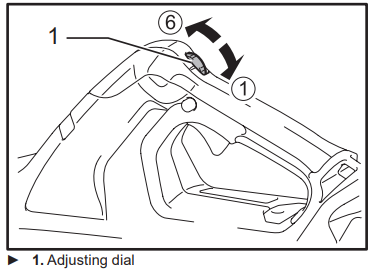
The maximum air volume can be adjusted just by turning the adjusting dial. This can be done even while the tool is running. The dial is marked 1 (lowest) to 6 (highest).
NOTICE: The speed adjusting dial can be turned only as far as 6 and back to 1. Do not force it past 6 or 1, or the speed adjusting function may no longer work. When working in a high temperature circum-stance, the tool may be stopped because of the overheat protection system. In that case let the tool cool down. Avoid setting to speed 6 (highest) in high temperature circumstances.
ASSEMBLY
CAUTION: Always be sure that the tool is switched off and the battery cartridge is removed before carrying out any work on the tool.
Installing the long nozzle
To install the long nozzle:
Align the small projection of the housing with the groove of the long nozzle.
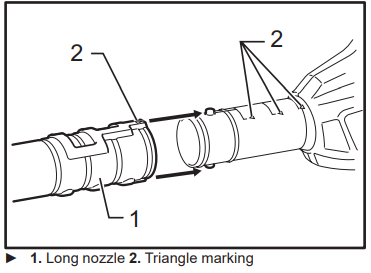
Slide in the long nozzle, and turn it clockwise until the triangle markings on the long nozzle and the housing meet each other.
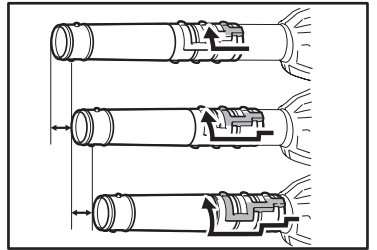
The length of the nozzle can be adjusted by changing the locking position.
Installing the flat nozzle or extension nozzle
Optional accessory
The extension nozzle / flat nozzle can be installed on the tip of the long nozzle in the same way as above.
Installing the gutter nozzle
Optional accessory
The gutter nozzle can be installed on the blower. The adapter pipe designed exclusively for this model is required to install the gutter nozzle.
Attaching the shoulder strap
Optional accessory
CAUTION: When you use the tool in combination of the backpack-type power supply such as portable power pack, do not use the shoulder strap included in the tool package.
If you put on the shoulder strap included in the tool package and the shoulder harness of the back- pack-type power supply at the same time, removing the tool or backpack-type power supply is difficult in case of an emergency, and it may cause an accident or injury.
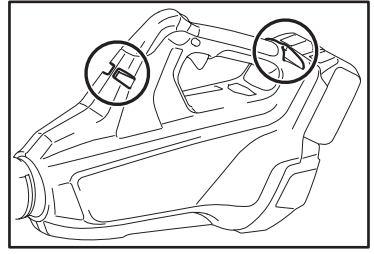
Hook the shoulder strap onto the hanger of the tool. Before use, adjust the length of strap so that it is easy to work with it.
OPERATION
Blowing
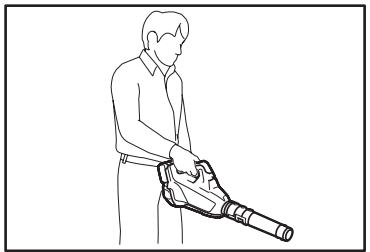
CAUTION: Do not place the blower on the ground while it is switched on. Sand or dust may enter from suc-tion inlet, and they may result in personal injury.
- Hold the blower firmly with a hand and perform the blowing operation by moving it around slowly.
- When blowing around a building, a big stone or a vehi-cle, direct the nozzle away from them.
- When performing an operation in corner, start from the corner and then move to wide area.
Setup Guide
To operate the Makita Brushless Blower XBU02, follow these steps:
- Attach the nozzle and blower tube according to the manufacturer's instructions.
- Insert the 18V LXT Lithium-Ion battery into the battery compartment.
- Adjust the speed control to your desired setting using the variable speed trigger.
- Hold the blower securely by the handle and grip, ensuring proper balance and control.
- Start the blower by pulling the trigger and adjust as needed for optimal performance.
Makita Brushless Blower XBU02 MAINTENANCE
CAUTION:
- Always be sure that the tool is switched off and the battery cartridge is removed before attempt-ing to perform inspection or maintenance.
- Never use gasoline, benzine, thinner, alcohol or the like. Discoloration, deformation or cracks may result.
Cleaning
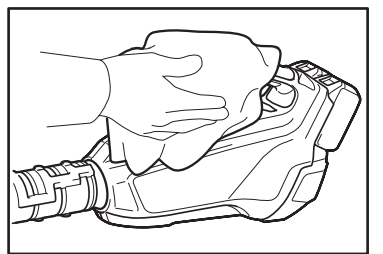
From time to time, wipe off the outside of the tool using a cloth dampened in soapy water. To maintain product SAFETY and RELIABILITY, repairs, any other maintenance or adjustment should be performed by Makita Authorized or Factory Service Centers, always using Makita replacement parts.
OPTIONAL ACCESSORIES
CAUTION: These accessories or attachments are recom-mended for use with your Makita tool specified in this manual. The use of any other accessories or attachments might present a risk of injury to persons. Only use accessory or attachment for its stated purpose.
If you need any assistance for more details regard-ing these accessories, ask your local Makita Service Center.
- Makita genuine battery and charger
- Shoulder strap
- Extension nozzle
- Flat nozzle
- Gutter nozzle
- Adapter pipe
NOTE: Some items in the list may be included in the tool package as standard accessories. They may differ from country to country.
Troubleshooting
Common issues and solutions for the Makita Brushless Blower XBU02 include:
- Blower not turning on: Check the battery level and ensure it is fully charged. Also, verify that the battery is correctly inserted into the compartment.
- Reduced air velocity: Clean the nozzle and blower tube to remove any blockages. Ensure the speed control is set to the highest setting if more power is needed.
- Vibration or imbalance: Check that all parts are securely attached and balanced properly.
Instructions and Warnings: Always wear protective gear including safety glasses, gloves, and a dust mask. Use on firm ground to avoid slipping, and keep children away from the area of operation.
WARRANTY
Please refer to the annexed warranty sheet for the most current warranty terms applicable to this product. If annexed warranty sheet is not available, refer to the warranty details set forth at below website for your respective country http://www.makita.ca
Makita Brushless Blower XBU02 Pros & Cons
Pros
- High air velocity and CFM for effective debris clearing
- Lightweight and ergonomic design for reduced user fatigue
- Environmentally friendly with zero emissions
- Multiple speed control for adjustable performance
- Compatible with 18V LXT Lithium-Ion battery system
Cons
- Battery life may vary depending on usage intensity
- Noisy operation compared to some other electric blowers
- Higher cost compared to some gas-powered alternatives
Customer Reviews
Customers have praised the Makita Brushless Blower XBU02 for its powerful performance, lightweight design, and ease of use. Some common complaints include the higher cost and limited battery life during heavy use. However, many users find the benefits outweigh these drawbacks, particularly in terms of environmental impact and convenience.
Faqs
What is the air velocity and CFM of the Makita Brushless?
Is the Makita Brushless Blower compatible with all Makita batteries?
How long does the battery last on a single charge?
What are the main benefits of using a brushless motor in this blower?
Is the Makita Blower suitable for commercial use?
How do I troubleshoot if my Makita Brushless Blower XBU02 is not turning on?
What safety precautions should I take when using this blower?
Can I use this blower for light snow removal?
How do I maintain my Makita Brushless Blower?
Is the Makita Brushless Blower XBU02 environmentally friendly?
Leave a Comment
