Makita Hedge Trimmer XHU02 Instruction Manual
Content
Makita Hedge Trimmer XHU02 Introduction
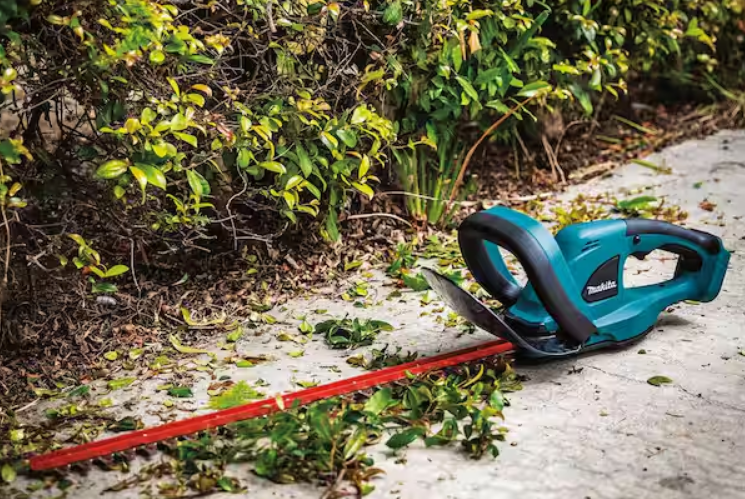
The Makita Hedge Trimmer XHU02 is a lightweight and efficient cordless tool designed for precise trimming of hedges and shrubs. Powered by an 18V LXT Lithium-Ion battery, it features a dual-action 22-inch blade that delivers a cutting speed of 2,700 strokes per minute, ensuring clean and fast cuts. With a noise level of only 87 dB(A), it operates quietly, making it ideal for residential areas. The XHU02 is priced at approximately $139.00, excluding the battery.
Specifications
| Model | XHU02 |
| Blade length | 520 mm (20-1/2") |
| Strokes per minute | 1,350 /min |
| Rated voltage | D.C. 18 V |
| Overall length (Depending on the battery) | 923 mm - 938 mm (36-1/4" - 37") |
| Net weight | 3.0 - 3.4 kg (6.7 - 7.5 lbs) |
- Due to our continuing program of research and development, the specifications herein are subject to change without notice.
- Specifications may differ from country to country.
- The weight may differ depending on the attachment(s), including the battery cartridge. The lightest and heavi-est combination, according to EPTA-Procedure 01/2014, are shown in the table.
Applicable battery cartridge and charger
| Battery cartridge | BL1815N / BL1820B / BL1830 / BL1830B / BL1840B / BL1850B / BL1860B |
| Charger | DC18RC / DC18RD / DC18RE / DC18SD / DC18SE / DC18SF / DC18SH
|
Some of the battery cartridges and chargers listed above may not be available depending on your region of residence.
WARNING: Only use the battery cartridges and chargers listed above. Use of any other battery cartridges and chargers may cause injury and/or fire.
Recommended cord connected power source
| Portable power pack | PDC01 |
- The cord connected power source(s) listed above may not be available depending on your region of residence.
- Before using the cord connected power source, read instruction and cautionary markings on them.
Description
The Makita Hedge Trimmer XHU02 is built with durability and performance in mind. The brushless motor provides a high level of efficiency, reducing the need for frequent battery replacements. The 22-inch double-sided cutting blade allows for efficient cutting of both sides of the hedge without needing to reposition the trimmer. The ergonomic grip and lightweight design ensure comfortable use over extended periods. Additionally, the tool-free blade adjustment feature makes it easy to customize the cutting length to suit different tasks.
FUNCTIONAL DESCRIPTION
CAUTION: Always be sure that the tool is switched off and the battery cartridge is removed before adjust-ing or checking function on the tool.
Installing or removing battery cartridge
CAUTION:
- Always switch off the tool before installing or removing of the battery cartridge.
- Hold the tool and the battery cartridge firmly when installing or removing battery car-tridge. Failure to hold the tool and the battery cartridge firmly may cause them to slip off your hands and result in damage to the tool and battery cartridge and a personal injury.
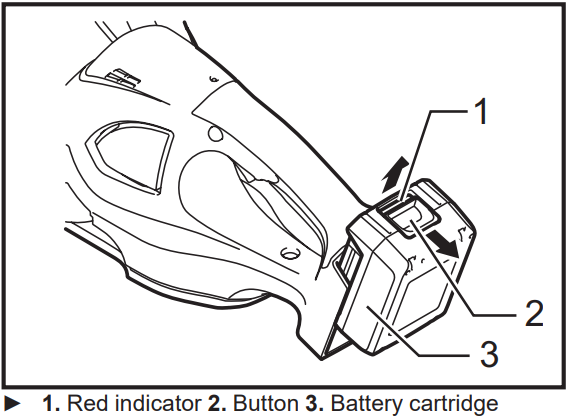
To remove the battery cartridge, slide it from the tool while sliding the button on the front of the cartridge. To install the battery cartridge, align the tongue on the battery cartridge with the groove in the housing and slip it into place. Insert it all the way until it locks in place with a little click. If you can see the red indicator on the upper side of the button, it is not locked completely.
CAUTION:
- Always install the battery cartridge fully until the red indicator cannot be seen. If not, it may acci-dentally fall out of the tool, causing injury to you or someone around you.
- Do not install the battery cartridge forcibly. If the cartridge does not slide in easily, it is not being inserted correctly.
Battery protection system (Lithium-ion battery with star marking)
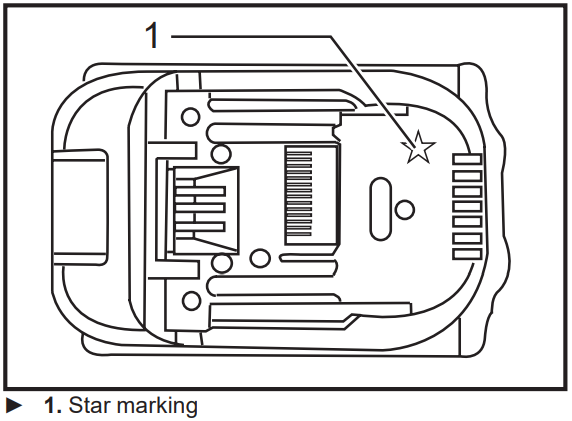
Lithium-ion batteries with a star marking are equipped with a protection system. This system automatically cuts off power to the tool to extend battery life. The tool will automatically stop during operation if the tool and/or battery are placed under one of the following conditions:
Overloaded:
The tool is operated in a manner that causes it to draw an abnormally high current. In this situation, release the trigger switch on the tool and stop the application that caused the tool to become overloaded. Then pull the trigger switch again to restart. If the tool does not start, the battery is over-heated. In this situation, let the battery cool before pulling the trigger switch again.
Low battery voltage:
The remaining battery capacity is too low and the tool will not operate. In this situation, remove and recharge the battery.
Indicating the remaining battery capacity
(Only for battery cartridges with "B" at the end of the model number.)
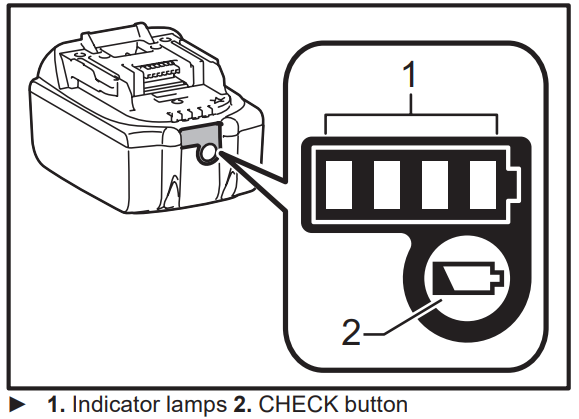
Press the check button on the battery cartridge to indi-cate the remaining battery capacity. The indicator lamps light up for few seconds.
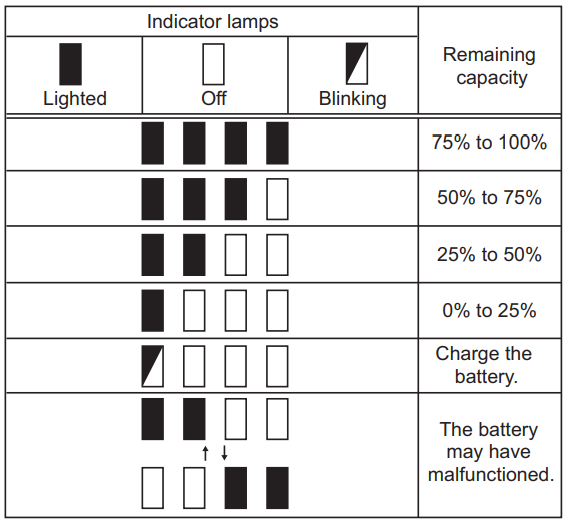
NOTE: Depending on the conditions of use and the ambient temperature, the indication may differ slightly from the actual capacity.
Switch action
CAUTION: Before inserting the battery cartridge into the tool, always check to see that the switch trigger actuates properly and returns to the "OFF" position when released.
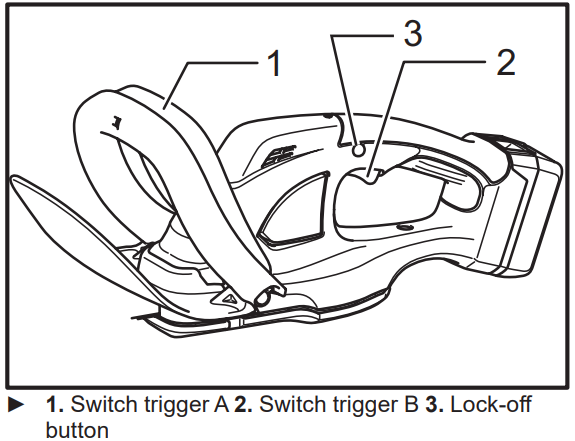
For your safety, this tool is equipped with a dual switch-ing system. To turn on the tool, press the lock-off button and triggers A and B. Release either one of the two pressed triggers to turn off. The sequence of switch-ing is unimportant as the tool only starts when both switches are activated.
Indication lamp
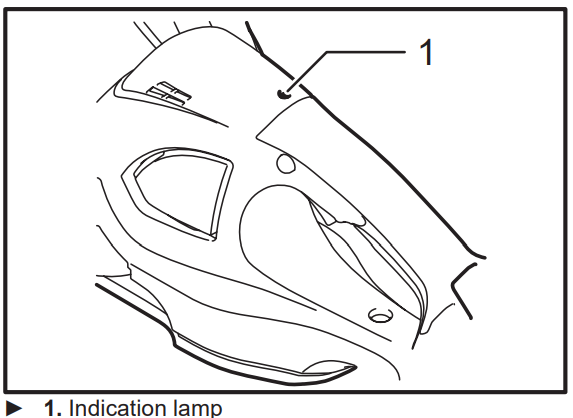
Running the tool allows the indication lamp to show the battery cartridge capacity status. When the tool is also overloaded and has stopped during operation, the lamp lights up in red. Refer to the following table for the status and action to be taken for the indication lamp.
Red Indicator Light | Condition | Action to be taken |
Light Blinks |
This indicates the battery level is getting low. |
Recharge the battery cartridge. |
Light Stays On (See Note 1 below) | The remaining battery capacity is too low and the tool will not operate. | Remove and recharge the battery. |
The battery protection system has been activated due to the tool being overloaded. | Release the switch trigger on the tool and stop the application that caused the tool to become overloaded. Then pull the switch trigger again to restart. |
Note 1: When attempting to switch the tool on, the indicator light may continue to come on due to the tool and/or the battery pack being too warm. The battery tool and battery pack will need to be allowed to cool down before further use.
OPERATION
CAUTION:
- Be careful not to accidentally contact a metal fence or other hard objects while trimming. The blade will break and may cause serious injury.
- Overreaching with a hedge trimmer, particularly from a ladder, is extremely dangerous. Do not work from anything wobbly or infirm.
NOTICE: Do not attempt to cut branches thicker than 10 mm (3/8") in diameter with the tool. Cut branches to 10 cm (4") lower than the cutting height using branch cutters before using the tool.
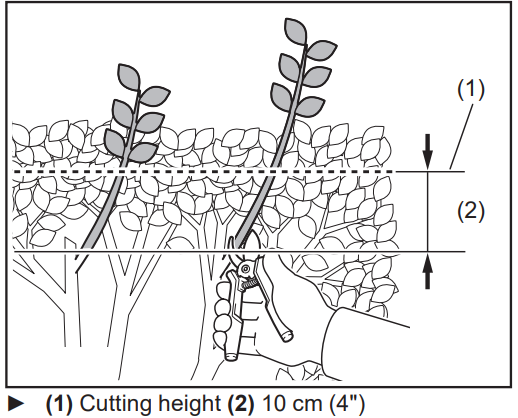
CAUTION: Do not cut off dead trees or similar hard objects. Failure to do so may damage the tool.
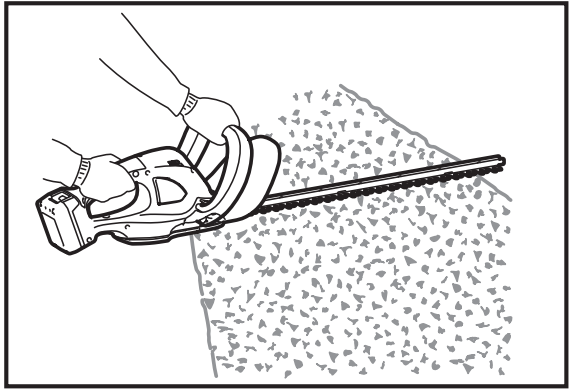
Hold the trimmer with both hands and pull the switch trigger A or B and then move it in front of your body.
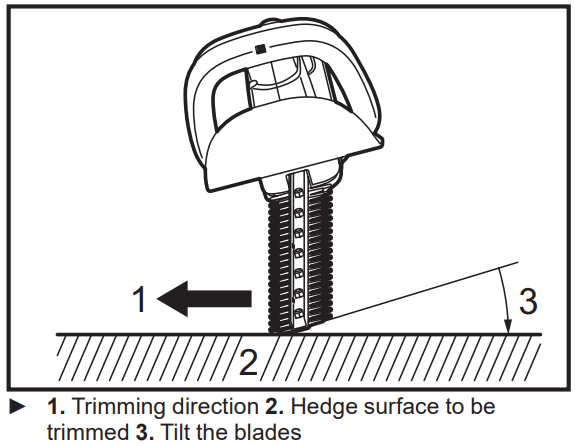
As a basic operation, tilt the blades towards the trim-ming direction and move it calmly and slowly at the speed rate of 3 - 4 seconds per meter.
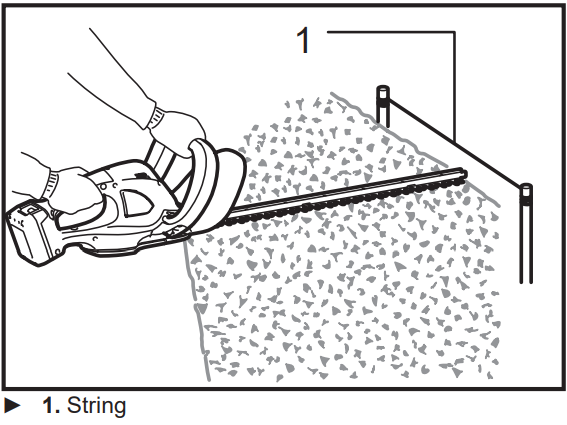
To cut a hedge top evenly, it helps to tie a string at the desired hedge height and to trim along it, using it as a reference line.
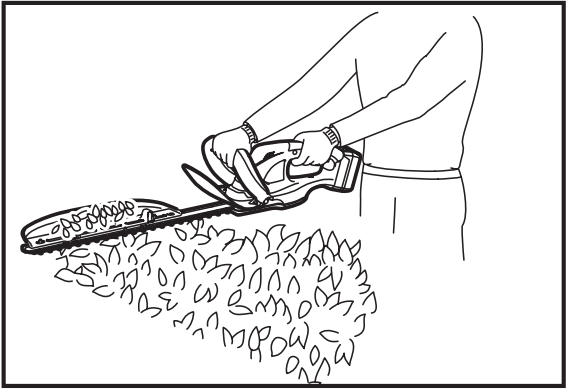
Attaching the chip receiver (optional accessory) on the tool when trimming the hedge straight can avoid cut off leaves’ being thrown away.
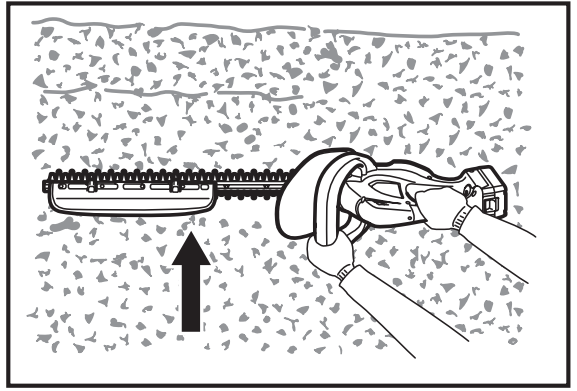
To cut a hedge side evenly, it helps to cut from the bottom upwards.
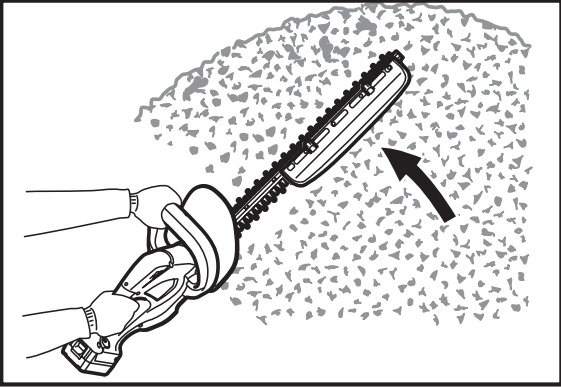
- Trim boxwood or rhododendron from the base toward the top for a nice appearance and good job.
Installing or removing chip receiver (optional accessory)
CAUTION: Always be sure that the tool is switched off and unplugged before installing or removing chip receiver.
- When replacing the chip receiver, always wear gloves so that hands and face does not directly contact the blade. Failure to do so may cause personal injury.
- Always be sure to remove the blade cover before installing the chip receiver.
- The chip receiver receives cut-off leaves and alleviates collecting thrown-away leaves. This can be installed on either side of the tool.
Press the chip receiver on the shear blades so that its slits overlap with the nuts on the shear blades.
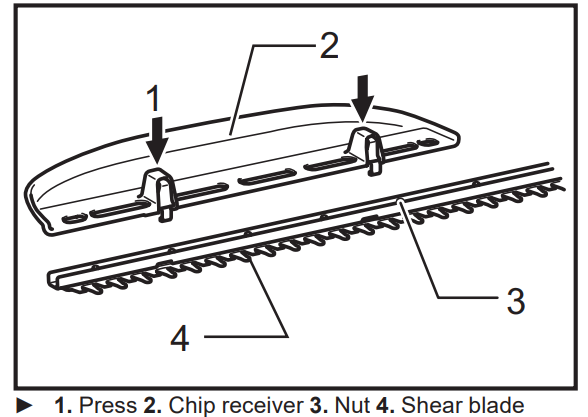
At this time, the chip receiver needs to be installed so that its hooks fit into grooves in the shear blade unit.
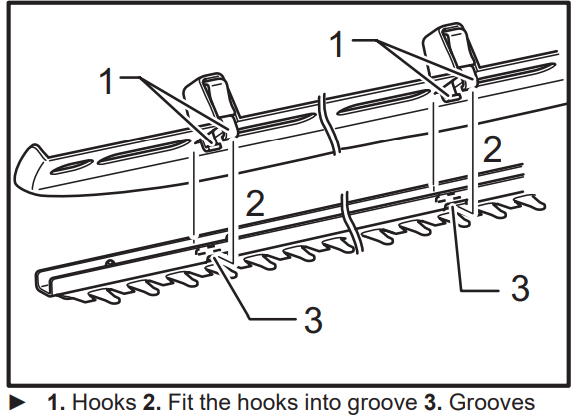
To remove the chip receiver, press its lever on both sides so that the hooks are unlocked.
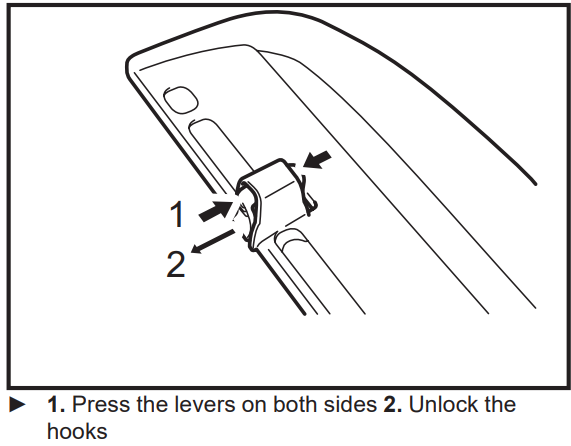
CAUTION: The blade cover (standard equipment) cannot be installed on the tool with the chip receiver being installed. Before carrying or storing, unin-stall the chip receiver and then install the blade cover to avoid blade exposure.
NOTICE:
- Check the chip receiver for secure installment before use.
- Never try to uninstall the chip receiver by an excessive force with its hooks locked in the blade unit grooves. Using the excessive force may damage it.
Setup Guide
To operate the Makita Hedge Trimmer XHU02, follow these steps:
- Assembly: Simply attach the battery to the trimmer and ensure the blade is properly secured.
- Configuration: Adjust the blade length if necessary using the tool-free adjustment feature.
- Pairing: There is no need for pairing as this is a standalone device.
- Operation: Hold the trimmer firmly with both hands, ensure proper balance, and start trimming your hedges or shrubs.
MAINTENANCE
CAUTION:
- Always be sure that the tool is switched off and the battery cartridge is removed before attempting to perform inspection or maintenance.
Cleaning the tool
- Clean out the tool by wiping off dust with a dry or soapdipped rag.
CAUTION:
- Never use gasoline, benzine, thinner, alcohol or the like. Discoloration, deformation or cracks may result.
Blade maintenance
- Smear the blade before and once per hour during operation using machine oil or the like.
NOTE:
- Before smearing the blade, remove the chip receiver.
- After operation, remove dust from both sides of the blade with wired brush, wipe it off with a rag and then apply enough low-viscosity oil, such as machine oil etc. and spray-type lubricating oil.
CAUTION:
- Do not wash the blades in water. Failure to do so may cause rust or damage on the tool. Removing or installing shear blade
CAUTION:
- Before removing or installing shear blade, always be sure that the tool is switched off and the battery cartridge is removed.
- When replacing the shear blade, always wear gloves without removing blade cover so that hands and face does not directly contact the blade. Failure to do so may cause personal injury.
NOTE:
- Do not wipe off grease from the gear and crank. Failure to do so may cause damage to the tool.
Removing the shear blades
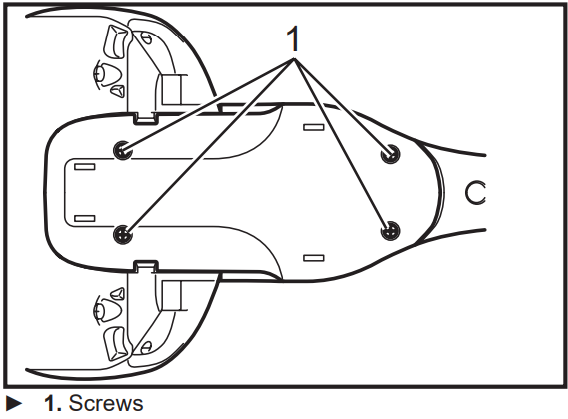
Reverse the tool and loosen four screws and remove the under cover.
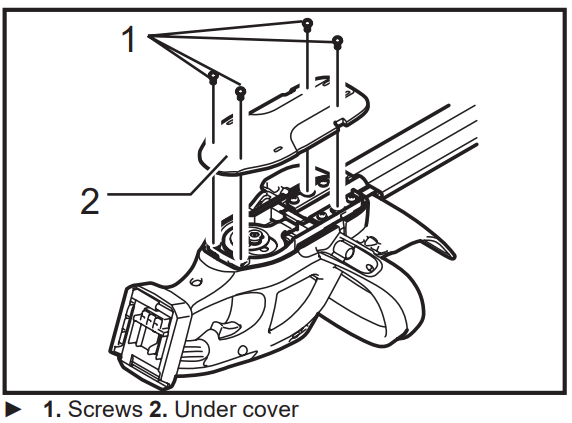
NOTE:
- Be careful not to get your hands dirty as grease is applied in the shear blade driving area.
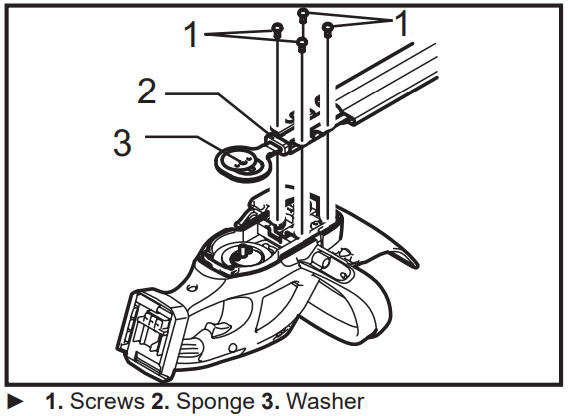
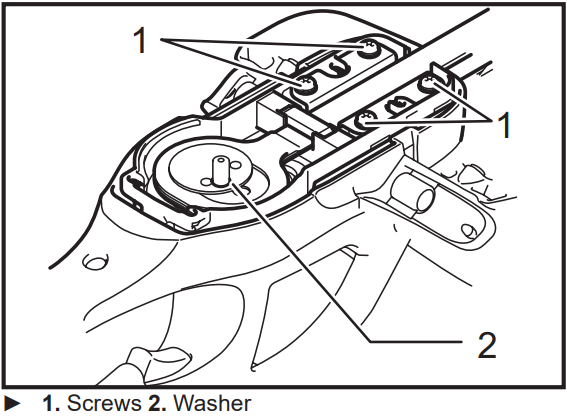
Loosen four screws and remove the blades. Remove the washer and sponge from the shear blades and put them aside. They are required for the later installation.
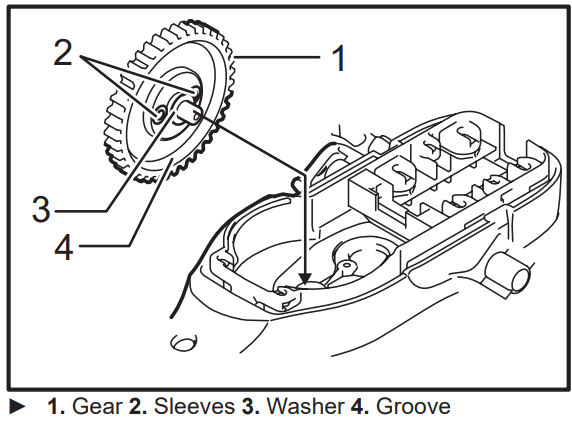
If the sleeves are still left in the holes of the gear, remove the gear and push the sleeves out of it with a screwdriver or the like.
NOTE: The washer underneath the gear may come off by mistake when removing the gear. In this case, return it to the original position as it was installed.
Installing the shear blade
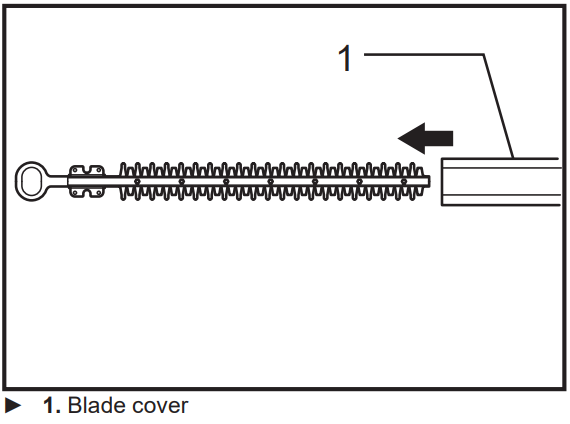
Remove the blade cover from the old shear blades and fit it onto the new ones to avoid contact with blades.
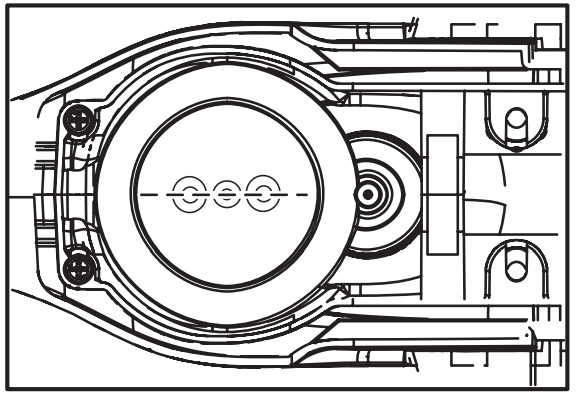
Adjust the hole positions by turning the gear as illustrated.
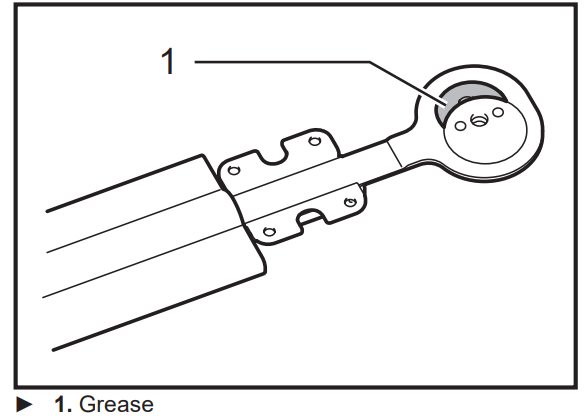
Apply some grease provided with the new shear blades as illustrated.
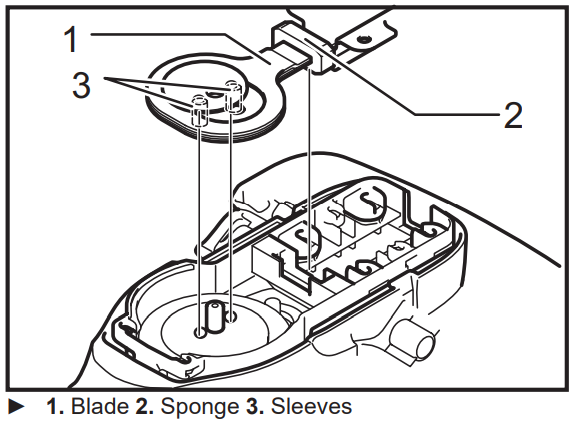
Put the removed sponge in the same position as the old one. Make sure that the sleeves provided with the new shear blades are put on the pins of the blade. Place the new shear blades on the tool so that the pins fit in the holes of the gear. If the sleeves on the pins come off mistakenly, put them into the holes of the gear beforehand.
Install the blade and tighten the four screws and put the removed washer in the same position as the old one.
Install the under cover on the tool and tighten the four screws firmly.
Storage
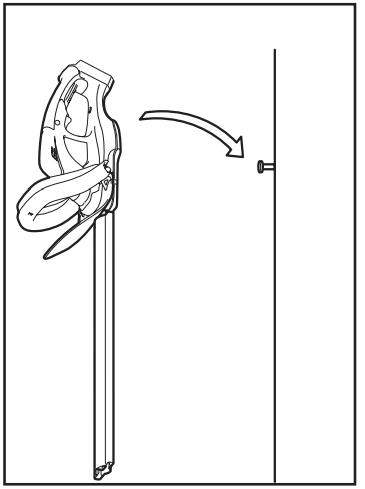
The hook hole in the tool bottom is convenient for hang-ing the tool from a nail or screw on the wall.
Remove the battery cartridge and put the blade cover on the shear blades so that the blades are not exposed. Store the tool out of the reach of children carefully. Store the tool in the place not exposed to water and rain.
To maintain product SAFETY and RELIABILITY, repairs, any other maintenance or adjustment should be per-formed by Makita Authorized Service Centers, always using Makita replacement parts.
OPTIONAL ACCESSORIES
CAUTION:
These accessories or attachments are recom-mended for use with your Makita tool specified in this manual. The use of any other accessories or attachments might present a risk of injury to persons. Only use accessory or attachment for its stated purpose.
- Blade cover
- Shear blade assembly
- Makita genuine battery and charger
- Chip receiver
NOTE: Some items in the list may be included in the tool package as standard accessories. They may differ from country to country.
Troubleshooting
Hedge Trimmer Not Starting
Possible Causes:
- The battery is not properly installed or fully charged.
- Safety switch is not engaged.
- Loose or damaged wiring connections.
Solutions:
- Ensure the battery is properly inserted and fully charged.
- Make sure to press the safety lock button while pulling the trigger to start the tool.
- Check for any damaged or loose wiring and consult an authorized service center if necessary.
Makita Hedge Trimmer XHU02 Pros & Cons
Pros
- Powerful Performance: Delivers consistent and efficient cutting results.
- Long Battery Life: 18V LXT battery provides extended runtime.
- Ergonomic Design: Reduces user fatigue with its lightweight and comfortable grip.
- Durable Construction: Built to last with high-quality materials.
Cons
- Cost: May be more expensive than some other cordless trimmers on the market.
- Weight Distribution: Some users may find it slightly heavy when fully assembled.
- Noisier than Some Models: Though still relatively quiet, it can be louder than some other trimmers.
Customer Reviews
Customers generally praise the Makita Hedge Trimmer XHU02 for its powerful performance and long battery life. Many professional landscapers appreciate its durability and ease of use. However, some users have noted that it can be a bit heavier than expected and that the price might be higher than some other cordless trimmers available.
Common complaints include the occasional difficulty in maintaining sharp blades over time and minor issues with battery connectivity.
IMPORTANT: Read Before Using.
MAKITA WARRANTY
Please refer to the annexed warranty sheet for the most current warranty terms applicable to this product. If annexed warranty sheet is not available, refer to the warranty http://www.makitatools.com details set forth at the below website for your respective country
Faqs
What type of battery does the Makita Hedge Trimmer use?
How long does it take to charge the battery?
What is the cutting capacity of the Makita Hedge Trimmer?
Is the Makita Hedge Trimmer XHU02 suitable for heavy-duty use?
Can I adjust the blade length on the Makita Hedge Trimmer XHU02?
How much does the Makita Hedge Trimmer XHU02 weigh?
Is the Makita Hedge Trimmer noisy?
What is included in the package?
Can I use other Makita batteries with this trimmer?
What kind of maintenance is required for the Makita Hedge Trimmer?
Leave a Comment
