Makita Pole Hedge Trimmer XNU05 Instruction Manual
Content
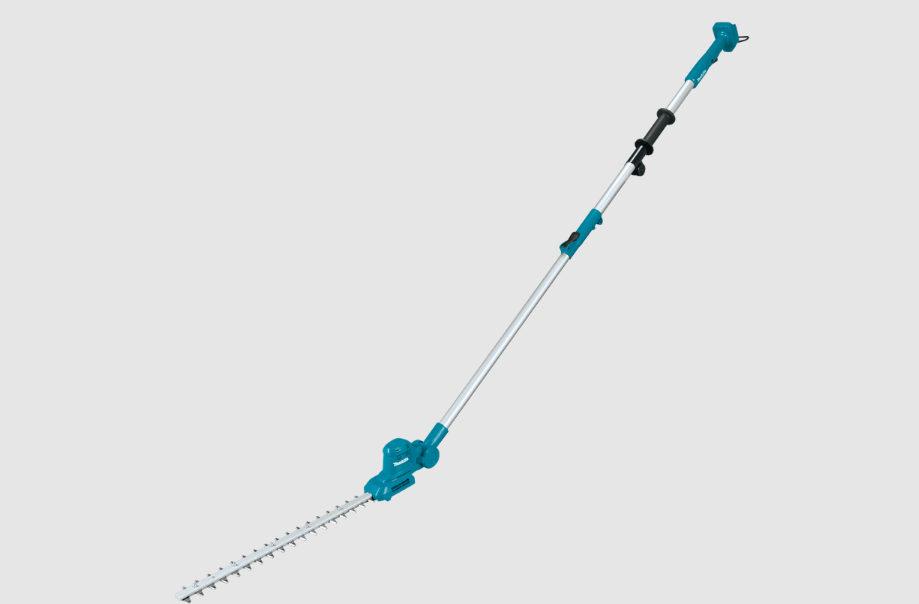
Introducing the Makita Pole Hedge Trimmer XNU05
The Makita Pole Hedge Trimmer XNU05 is a powerful and versatile tool designed for professional-grade hedge trimming. Equipped with a brushless motor, it delivers up to 3,600 strokes per minute, ensuring efficient cutting performance. The telescoping shaft extends from 6 to 8 feet, allowing easy access to overhead and hard-to-reach areas. With ten angle settings, it adapts to various trimming tasks. The cost of the XNU05 is approximately $249, reflecting its advanced features and capabilities.
Specifications
Model: | XNU05 |
Blade length | 460 mm (18-1/8") |
Strokes per minute | 3,600 /min |
Cutting blade angle | 135° (up 60°, down 75°) |
Overall length | 1,889 - 2,511 mm (74-1/2" - 99") |
Rated voltage | D.C. 18 V |
Net weight | 3.0 - 3.3 kg (6.6 - 7.3 lbs) |
- Due to our continuing program of research and development, the specifications herein are subject to change without notice.
- Specifications may differ from country to country.
- The weight may differ depending on the attachment(s), including the battery cartridge. The lightest and heavi-est combination, according to EPTA-Procedure 01/2014, are shown in the table.
Applicable battery cartridge, battery adapter and charger
Battery cartridge | BL1815N / BL1820B / BL1830 / BL1830B / BL1840B / BL1850B / BL1860B |
Battery adapter | PDC01 |
Charger | DC18RC / DC18RD/ DC18RE / DC18SD / DC18SE / DC18SF / DC18SH |
- Some of the battery cartridges, battery adapters and chargers listed above may not be available depending on your region of residence.
- Before using the battery adapter, read instruction and cautionary markings on the battery adapter.
WARNING: Only use the battery cartridges, battery adapters and chargers listed above. Use of any other battery cartridges,battery adapters and chargers may cause injury and/or fire.
PARTS DESCRIPTION
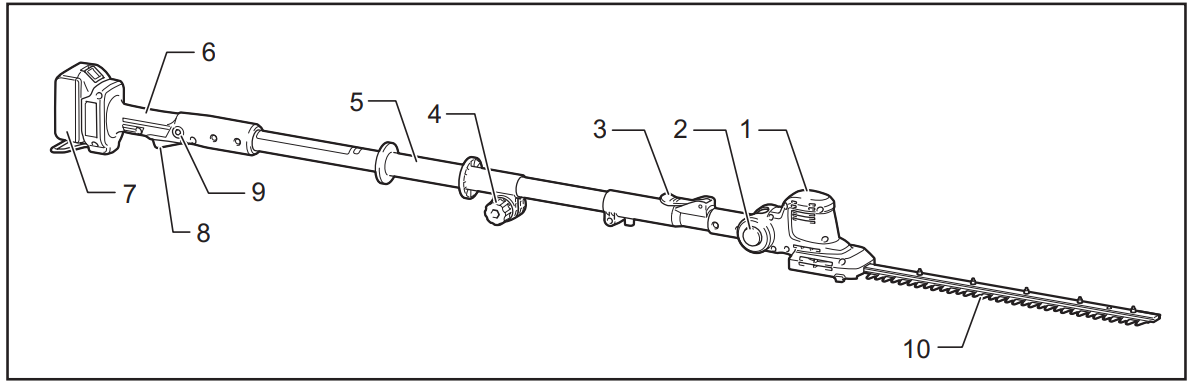
1 | Head | 2 | Angle adjustment button | 3 | Lock-lever | 4 | Thumb nut |
5 | Front grip | 6 | Rear grip | 7 | Battery cartridge | 8 | Switch trigger |
9 | Lock-off button | 10 | Shear blades | - | - | - | - |
FUNCTIONAL DESCRIPTION
CAUTION: Always be sure that the tool is switched off and the battery cartridge is removed before adjusting or checking function on the tool.
Installing or removing battery cartridge
CAUTION: Always switch off the tool before installing or removing of the battery cartridge.
CAUTION: Hold the tool and the battery cartridge firmly when installing or removing battery cartridge. Failure to hold the tool and the battery cartridge firmly may cause them to slip off your hands and result in damage to the tool and battery cartridge and a personal injury.
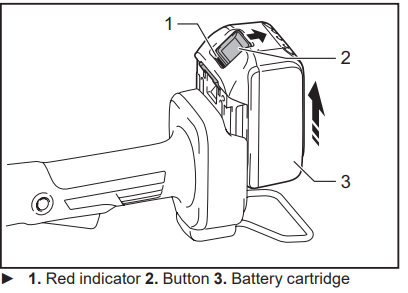
To remove the battery cartridge, slide it from the tool while sliding the button on the front of the cartridge.
To install the battery cartridge, align the tongue on the battery cartridge with the groove in the housing and slip it into place. Insert it all the way until it locks in place with a little click. If you can see the red indicator as shown in the figure, it is not locked completely.
CAUTION: Always install the battery cartridge fully until the red indicator cannot be seen. If not, it may accidentally fall out of the tool, causing injury to you or someone around you.
CAUTION: Do not install the battery cartridge forcibly. If the cartridge does not slide in easily, it is not being inserted correctly.
Indicating the remaining battery capacity
Only for battery cartridges with the indicator
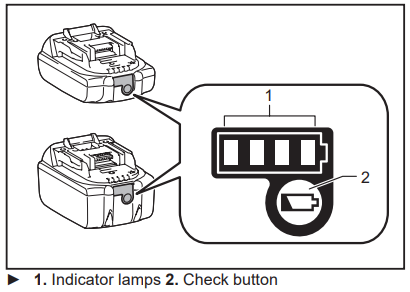
Press the check button on the battery cartridge to indi-cate the remaining battery capacity. The indicator lamps light up for a few seconds.
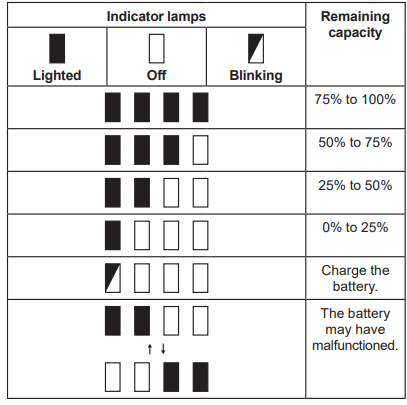
NOTE: Depending on the conditions of use and the ambient temperature, the indication may differ slightly from the actual capacity.
NOTE: The first (far left) indicator lamp will blink when the battery protection system works.
Tool / battery protection system
The tool is equipped with a tool/battery protection system. This system automatically cuts off power to the motor to extend tool and battery life. The tool will automatically stop during operation if the tool or battery is placed under one of the following conditions:
Overload protection
When the tool or battery is operated in a manner that causes it to draw an abnormally high current, the tool automatically stops. In this situation, turn the tool off and stop the application that caused the tool to become overloaded. Then turn the tool on to restart.
Overheat protection
When the tool or battery is overheated, the tool stops automatically. In this case, let the tool and battery cool before turning the tool on again.
Overdischarge protection
When the battery capacity is not enough, the tool stops automatically. In this case, remove the battery from the tool and charge the battery.
Switch action
WARNING: Before installing the battery car-tridge into the tool, always check to see that the switch trigger actuates properly and returns to the "OFF" position when released.
WARNING: For your safety, this tool is equipped with the lock-off button which prevents the tool from unintended starting. Never use the tool if it starts when you pull the switch trigger without pressing the lock-off button. Ask your local Makita Service Center for repairs.
WARNING: Never disable the lock function or tape down the lock-off button.
NOTICE: Do not pull the switch trigger forcibly without pressing the lock-off button. The switch may break.
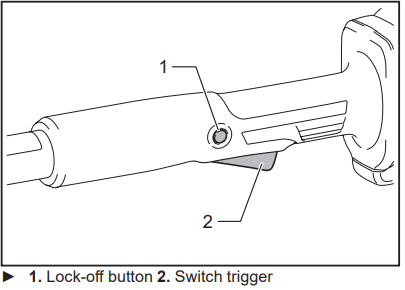
To prevent the switch trigger from being accidentally pulled, a lock-off button is provided.
To start the tool, press the lock-off button and pull the switch trigger. Release the switch trigger to stop. The lock-off button can be pressed from either the right or left side.
Adjusting the cutting angle
CAUTION: Always be sure that the tool is switched off before folding or unfolding the head.
CAUTION: When folding the head for carrying the tool or after using the tool, be sure to attach the blade cover before folding the head.
CAUTION: When folding the head, be careful not to pinch your fingers between the head and the tool body.
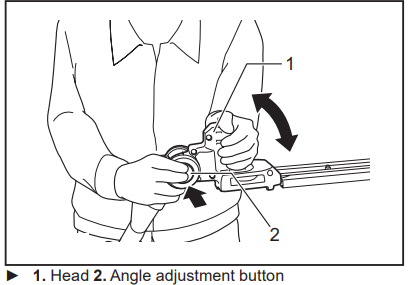
The angle of the head can be adjusted in 10 steps. To change the angle of the head, follow the steps below.
- Hold the head and the tool body as shown in the figure.
- Adjust the angle of the head while holding down the angle adjustment button, and then release the angle adjustment button.
- Move the head slightly until it is locked with a click.
NOTE: Make sure that the head is securely locked before operating the tool.
Adjusting the pipe length
CAUTION: Always be sure that the tool is switched off before adjusting the pipe length.
CAUTION: When adjusting the pipe length, be sure to attach the blade cover before adjusting the pipe length.
CAUTION: When adjusting the pipe length, be careful not to pinch your fingers.
CAUTION: Make sure that the lock lever is locked securely.
Loosen the lock-lever, then adjust the length of the pipe, and then lock the lock-lever.
Adjusting the front grip position
CAUTION: Always be sure that the tool is switched off before adjusting the position of the front grip.
CAUTION: When adjusting the position of the front grip, be careful not to pinch your fingers.
CAUTION: Make sure that the thumb nut is tightened securely.
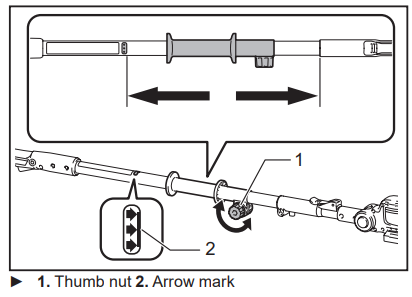
CAUTION: Do not move the front grip beyond the arrow mark.
To adjust the position of the front grip, loosen the thumb nut by turning it counterclockwise, then adjust the posi-tion of the front grip, and then tighten the thumb nut by turning it clockwise.
ASSEMBLY
CAUTION: Always be sure that the tool is switched off and the battery cartridge is removed before carrying out any work on the tool.
CAUTION: When replacing the shear blades, always wear gloves so that your hands do not directly contact the blades.
Installing or removing the shear blades
CAUTION: Attach the blade cover before removing or installing the shear blades.
NOTICE: When replacing the shear blades, do not wipe off grease from the gear and crank.
NOTE: Before installing or removing the shear blades, unfold the head of the tool so that the head is straight to the tool body.
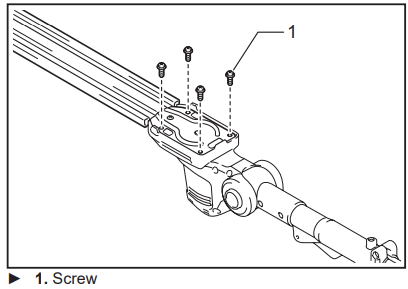
- Place the tool upside down.
Remove 4 screws with a screwdriver and remove the shear blades.
Remove the crank from the shear blades.
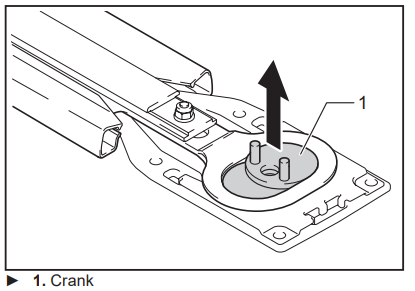
NOTE: The crank may remain in the tool.
Prepare the crank and new shear blades.

- Remove the blade cover, and then attach it to the new shear blades.
Apply a small amount of grease to the periphery of the crank. Attach the washer, gear, and the crank to the pin in order.

Adjust the crank so that the 2 small holes on the crank are lined up on the alignment line as shown in the figure.

Slide the shear blades so that the hole on the guide plate is positioned at the center of the rings of blades.

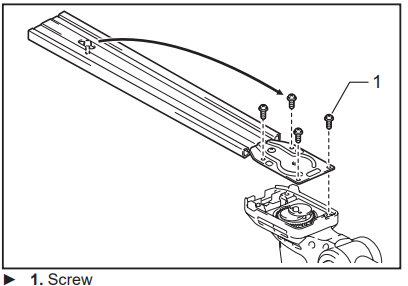
- Insert the screw removed in step 2 into the hole on the shear blades through the hole on the blade cover.
Attach the shear blades to the tool, and then tighten 3 screws with the screwdriver.

Remove the screw inserted into the hole on the shear blades in step 9, and then tighten it to fix the shear blades.
NOTICE: If the shear blades do not operate prop-erly, the blades are not engaging the crank prop-erly. Remove the blades and install them again.
NOTICE: If the parts other than the shear blades such as the crank are worn out, ask Makita Authorized Service Centers for parts replacement or repairs.
Installing or removing the chip receiver
Optional accessory
CAUTION: When installing or removing the chip receiver, always wear gloves so that your hands do not directly contact the shear blades.
CAUTION: Attach the blade cover before installing or removing the chip receiver.
The chip receiver gathers discarded leaves and makes clean-up afterward much easier. It can be installed on either side of the tool.
Align the holes on the chip receiver with the nuts on the shear blades.
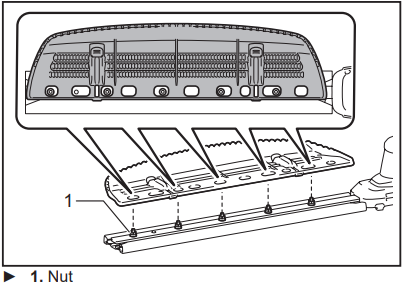
Hook the claws of the chip receiver to the groove on the shear blades.
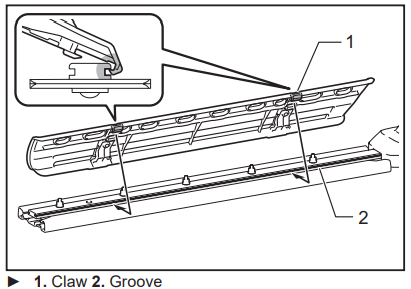
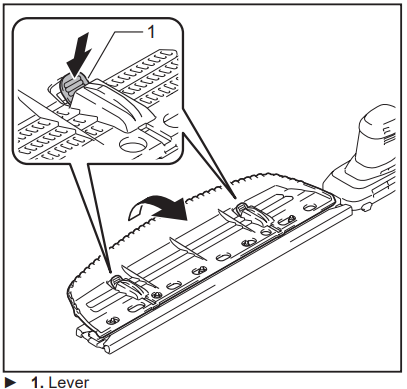
Press the levers on the chip receiver, and then hook the claws on the other side to the groove on the shear blades.

To remove the chip receiver, press the levers to release the claws.
NOTICE: Never try to remove the chip receiver by an excessive force with its claws locked in the grooves of the shear blades.
OPERATION of Makita Pole Hedge Trimmer XNU05
Operating the tool
WARNING: Do not use the tool near any electrical power lines. Contacting with power lines or using the tool near power lines may cause serious injury or electric shock resulting in death.
WARNING: Keep hands away from shear blades.
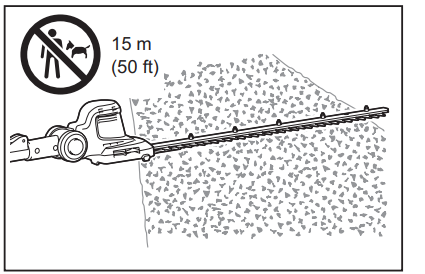
WARNING: Be extremely careful to maintain control of the tool at all times. Do not allow the tool to be deflected toward you or anyone in the work vicinity. Failure to keep control of the tool could result in serious injury to the bystander and the operator.
CAUTION: Avoid operating the tool in very hot weather as much as practicable. When operat-ing the tool, be careful of your physical condition.
CAUTION: Be careful not to accidentally contact a metal fence or other hard objects while trimming. The shear blades may break and cause an injury.
CAUTION: Be careful not to allow the shear blades to contact the ground. The tool may recoil and cause an injury.
CAUTION: Overreaching with a hedge trim-mer, particularly from a ladder, is extremely dangerous. Do not work while standing on anything wobbly or infirm.
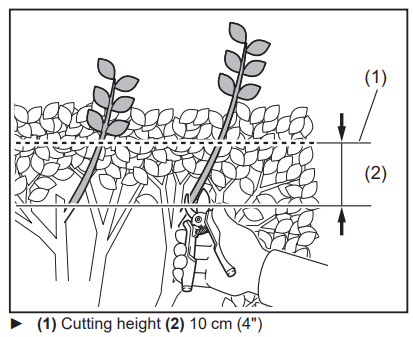
NOTICE: Do not attempt to cut branches thicker than 10 mm (3/8") in diameter with the tool. Cut branches to 10 cm (4") lower than the cutting height using branch cutters before using the tool.
NOTICE: Do not cut down dead trees or similar hard objects. Doing so may damage the tool.
NOTICE: Do not trim the grass or weeds while using the shear blades. The shear blades may become tangled in the grass or weeds.
Hold the tool with both hands by holding the front grip and the rear grip.
Pull the switch trigger while pressing the lock-off button, and then move the tool forward.
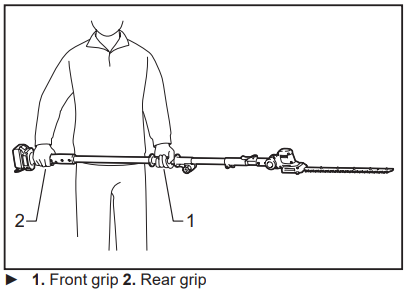
For basic operation, tilt the shear blades toward the trimming direction and move it calmly and slowly at the speed rate of 3 to 4 seconds per meter.
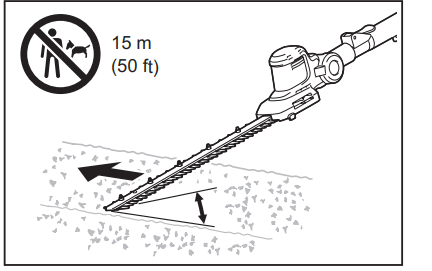
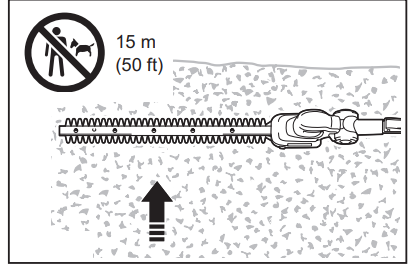
To cut a hedge side evenly, cut from the bottom to top.
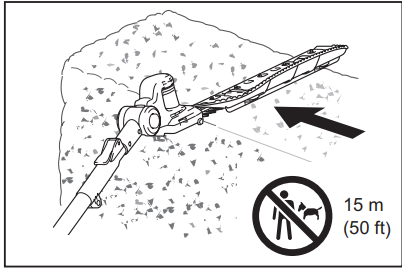
When trimming to make a round shape (trimming boxwood or rho-dodendron, etc.), trim from the root to the top for a beautiful finish.
If the chip receiver is attached to the shear blades, it gathers discarded leaves and makes clean-up afterward much easier.
MAINTENANCE
CAUTION: Always be sure that the tool is switched off and the battery cartridge is removed before attempting to perform inspection or maintenance.
CAUTION: When inspecting or maintaining the tool, always put the tool down. Assembling or adjusting the tool in an upright position may result in serious injury.
To maintain product SAFETY and RELIABILITY, repairs, any other maintenance or adjustment should be performed by Makita Authorized or Factory Service Centers, always using Makita replacement parts.
Cleaning the tool
Clean the tool by wiping off dust with a dry cloth or one dipped in soapy water and wrung out.
NOTICE: Never use gasoline, benzine, thinner, alcohol or the like. Discoloration, deformation or cracks may result.
Shear blade maintenance
Before the operation or once per hour during operation, apply low-viscosity oil (machine oil, or spray-type lubri-cating oil) to the shear blades.
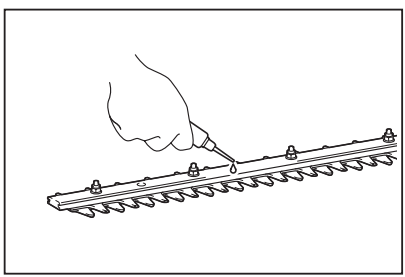
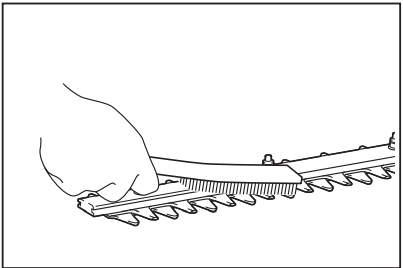
After operation, remove dust from both sides of the shear blades with a wired brush, wipe it off with a cloth and then apply low-viscosity oil (machine oil, or spray-type lubricating oil) to the shear blades.
NOTICE: Do not wash the shear blades in water. Doing so may cause rust or damage to the tool.
NOTICE: Dirt and corrosion cause excessive blade friction and shorten the operating time per battery charge.
Storage
Attach the blade cover to the shear blades so that the blades are not exposed. Store the tool out of the reach of children. Store the tool in a place not exposed to moisture or rain.
TROUBLESHOOTING
Before asking for repairs, conduct your own inspection first. If you find a problem that is not explained in the manual, do not attempt to dismantle the tool. Instead, ask Makita Authorized Service Centers, always using Makita replace-ment parts for repairs.
State of abnormality | Probable cause (malfunction) | Remedy |
Motor does not run. | Battery cartridge is not installed. | Install the battery cartridge. |
| Battery problem (under voltage) | Recharge the battery. If recharging is not effective, replace battery. | |
| The drive system does not work correctly. | Ask your local authorized service center for repair. | |
Motor stops running after a little use. | Battery's charge level is low. | Recharge the battery. If recharging is not effective, replace battery. |
| Overheating. | Stop using of tool to allow it to cool down. | |
Tool does not reach maximum RPM. | Battery is installed improperly. | Install the battery cartridge as described in this manual. |
| Battery power is dropping. | Recharge the battery. If recharging is not effective, replace battery. | |
| The drive system does not work correctly. | Ask your local authorized service center for repair. | |
Shear blades do not move: stop the machine immediately! | Inappropriate angle of shear blades. | Make sure that the head is properly fixed in the operational angle. |
Foreign objects are caught between the shear blades. | Switch off the tool and remove the battery cartridge, and then remove the foreign objects using tools such as pliers. | |
| The drive system does not work correctly. | Ask your local authorized service center for repair. | |
Abnormal vibration: stop the machine immediately! | Shear blades are broken, bent or worn. | Replace the shear blades. |
| The drive system does not work correctly. | Ask your local authorized service center for repair. | |
Shear blades and motor cannot stop: Remove the battery immediately! | Electric malfunction. | Remove the battery and ask your local authorized service center for repair. |
OPTIONAL ACCESSORIES
CAUTION: These accessories or attachments are recommended for use with your Makita tool specified in this manual. The use of any other accessories or attachments might present a risk of injury to persons. Only use accessory or attachment for its stated purpose.
If you need any assistance for more details regard-ing these accessories, ask your local Makita Service Center.
- Shear blade assembly
- Chip receiver
- Grease vessel
- Makita genuine battery and charger
NOTE: Some items in the list may be included in the tool package as standard accessories. They may differ from country to country.
Setup Guide
To operate the Makita Pole Hedge Trimmer XNU05,
- Start by fully charging the 18V LXT Lithium-Ion battery. Once charged, attach the battery to the trimmer.
- Extend the pole to the desired length by unlocking the locking mechanism and adjusting the pole accordingly. Ensure all parts are securely locked before use.
- Assemble the protective sheath over the blade when not in use to prevent accidental injuries.
- For assembly, simply attach the blade to the trimmer head using the tool-less blade change system. Follow the manufacturer's instructions for any additional setup or configuration requirements.
Makita Pole Hedge Trimmer XNU05 Troubleshooting
- Low Battery Life: Ensure the battery is fully charged before use. Check for any battery malfunctions or damage.
- Jamming Blade: Turn off the trimmer and carefully remove any debris or branches that may be causing the jam.
- Difficulty Extending Pole: Check if the locking mechanism is properly released. Apply lubricant if necessary.
- Warning Instructions: Always wear protective gear including gloves, safety glasses, and a dust mask when operating the trimmer.
MAKITA WARRANTY
Please refer to the annexed warranty sheet for the most current warranty terms applicable to this product. If annexed warranty sheet is not available, refer to the warranty details set forth at below website for your respective country http://www.makitatools.com
Pros & Cons
Pros
- Efficient Performance: Powerful motor and sharp blade ensure quick and clean cuts.
- Extended Reach: Adjustable pole length reduces the need for ladders.
- Long Battery Life: 18V LXT Lithium-Ion battery provides extended runtime.
- Tool-Less Blade Change: Easy maintenance with quick blade changes.
- Durable Construction: High-quality materials ensure long-lasting performance.
Cons
- Weight: May be heavy for some users, especially when fully extended.
- Cost: Higher price point compared to some other models on the market.
- No Charger Included: Users must purchase the charger separately if not already owned.
- Storage Space: Requires adequate storage space due to its length when fully extended.
Customer Reviews
Customers have praised the Makita Pole Hedge Trimmer XNU05 for its reliability and performance. Many appreciate the extended reach and ease of use, making it a favorite among both professionals and homeowners. However, some have noted that it can be somewhat heavy and that the price is on the higher side. Common complaints include issues with battery life under heavy use and occasional jamming of the blade.
Faqs
How long does the battery last on the Makita Pole Hedge Trimmer XNU05?
Is the Makita Pole Hedge Trimmer XNU05 suitable for thick branches?
Can I use any 18V battery with the Makita Pole Hedge Trimmer?
How do I store the Makita Pole Hedge Trimmer safely?
What safety precautions should I take when using the Trimmer?
Can I extend the pole to any length?
How do I change the blade on the Makita Pole Hedge Trimmer?
What is included in the package when purchasing the Makita Pole Hedge Trimmer?
Is there a warranty on the Makita Pole Hedge?
Can I use the Makita Pole Hedge Trimmer for other types of pruning tasks?
Leave a Comment