Meco Eleverde Outdoor Security Camera User Manual
Content
Meco Eleverde Outdoor Security Camera Introduction
A dependable and adaptable security tool for improving home security is the MECO Eleverde outdoor security camera. With its infrared night vision capabilities, it offers great image clarity in 1080P HD video resolution, making it suitable for both day and night use. Using the CloudEdge app, the camera's PIR motion sensor instantly notifies your smartphone when it detects activity within a 26–40 foot range.
Detailed Specifications
The Meco Eleverde Outdoor Security Camera offers a range of advanced features, including:
- 1080p Full HD resolution
- Night vision up to 30 feet
- 130-degree wide-angle view
- Motion detection with instant alerts
- Two-way audio communication
- Weather-resistant IP65 rating
- Wi-Fi and Bluetooth connectivity
- Up to 128GB microSD card support
- Rechargeable battery with solar panel charging option
Note:
- The camera only supports 2.4GHz WiFi. It does not support 5GHz WiFi.
- Before connecting this camera to the WiFi, please ensure the WiFi signal strength is over 85%. If the camera is far away from the signal source, it won't be connected successfully for the first time.
- If your router is connected with too many devices, the camera will fail to connect to WiFi because of the IP address conflict.
- To safeguard your privacy, this camera only supports CloudEdge control. It does not support PC Browser and other Software.
- This wireless camera supports events recording when WiFi is disconnected. Video playback works in the CloudEdge APP only. It does not support third-party players.
- Manually snapshot and recording files are saved in mobile. Events snapshot files are saved in the Cloud. Events recording files are saved on the Micro SD card.
- It will speed up the power consumption of the battery if you always watch the live footage or the recorded videos from the SD card. Please charge the camera timely based on the low power reminder. (Before using the camera for the first time, please fully charge the camera with the power cord in the package).
Description
With crisp video and quick motion detection, the Meco Eleverde outdoor security camera offers a flexible and dependable home security option. Its design is resistant to weather, therefore it will continue to function in different outside environments. For tech-savvy households, the camera is a great option because of its simple setup and interoperability with well-known smart home platforms. Furthermore, the two-way audio capability makes it easier for you and guests to communicate clearly, which improves the security of your house overall.
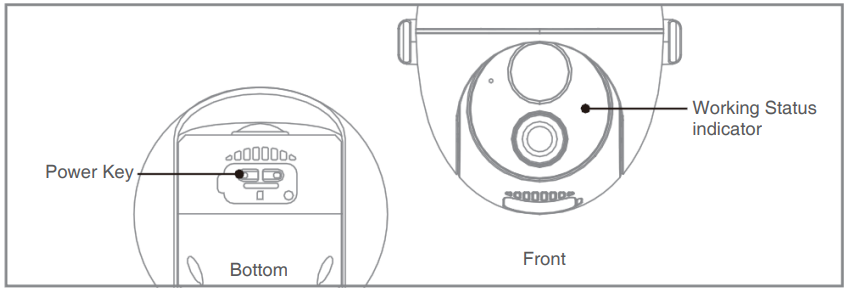
Product Overview
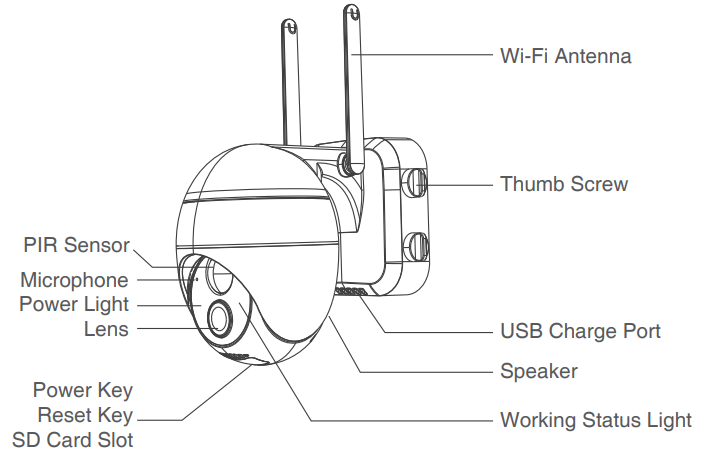
Power Key | Press and hold for 5s for power on/ power off the camera |
Reset Key | Press and hold for 5s to reset or restore to factory setting |
SD Card Slot | Support local SD card storage (up to 128G) |
Power Light | Red means charging, blue means fully charged |
Microphone | Capture sound for your videos |
Working Status Light | Solid on red: Network is abnormal |
Slow flickering red: Awaiting Wi-Fi connection and start adding devices | |
Wi-Fi fast flickering red: Wi-Fi connecting | |
Solid on blue: Wi-Fi connected successfully, the camera running normally | |
Speaker | Two-way audio output |
USB Charge Port | Use 5V/2A mini usb cable to charge this camera |
APP Installation and Account Registration
3Download 'CloudEdge' APP
- Method 1: Download ‘CloudEdge’ APP from the APP Store (iOS) or Google Play (Android).
Method 2: Scan the 'CloudEdge' APP QR code to download it.

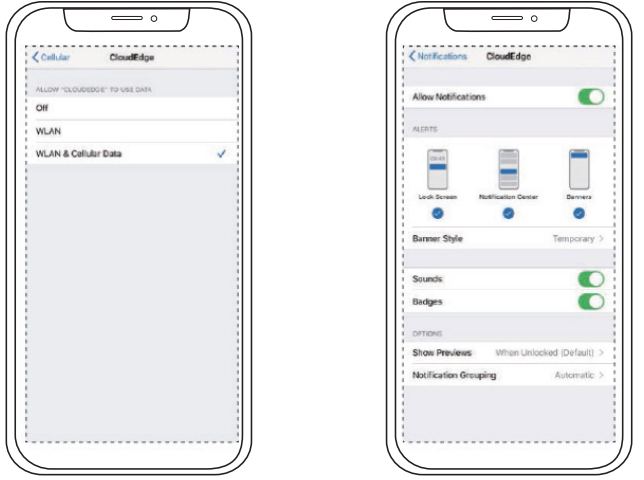
Tips:
- Allow 'CloudEdge' APP to access mobile cellular data and wireless LAN to avoid failure in adding the IP camera.
Allow 'CloudEdge' APP to receive pushed messages so the phone will receive alarm pushes when motion detection or an audible alarm is triggered.
Register Account
New users need to register by email. The steps are as follows:
- Click "Register".
- Follow the steps to complete the registration of the account.
- Log in.
Note: When registering a new account, please choose the region you are actually in and the correct country code. (Different registered regions can't share the camera.) Please choose to register by e-mail.
How to Add a Camera to APP
Install Micro SD card
Please insert a Micro SD card to record videos when motion is detected and for playback. (Micro SD card is not included; the camera supports up to 128GB Micro SD card)
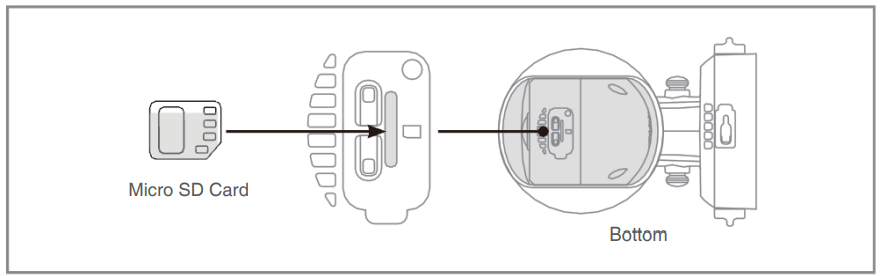
Note: Please insert the Micro SD card before powering on; otherwise, the SD card cannot be detected.
Power on Camera
Press and hold the power button for 5 seconds to turn on the camera. If it can't be powered on, please plug in a DC 5V/2A power adapter to charge the camera for 15 minutes first. The indicator with a red light blinking slowly means the camera has started successfully. If the indicator is not in red light blinking slow condition, please reset this camera.
Cannot turn on my camera?
- Charge the camera, and then try to turn it on.
- Press and hold the power key until turning on the camera (try multiple times).
- If you tried the above steps, but still no luck, please message your order and problem to [email protected].
Connect the Camera
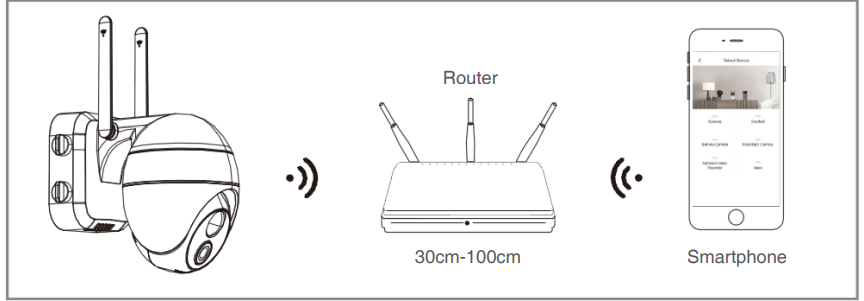
Note: Put the camera and smartphone 3 feet (30 to 100 cm) away from the router to set Wi-Fi. The camera only supports 2.4GHz Wi-Fi. It doesn't support 5GHz Wi-Fi.
Wi-Fi Connection Steps
- Turn on the camera.
- Press and hold the reset button for 5 seconds to reset or restore factory settings until you hear the sound "Boogu" (meaning reset successfully).
- Run the CloudEdge App, click "+" at the top right, and select "Battery Camera". According to the guide on the APP, ensure the camera is activated (The LED indicator light is turning red and flickering slowly).
- Choose 2.4GHz Wi-Fi SSID, enter the password, and then click “next step”.
- Click “OK" to confirm the Wi-Fi information.
After entering the following operation interface, click "Next” to see the "Scan QR Code" interface.
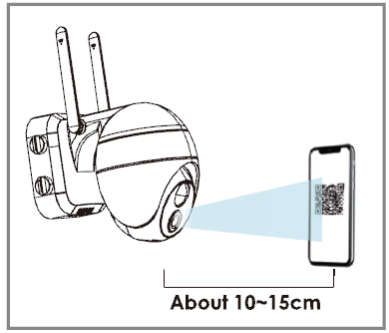
- Put the QR code in front of the camera lens about 10-15 cm away. The device lens should aim at the QR code on the phone screen at a distance of 10-15 cm. After the device recognizes the QR code, the camera will make a sound 'Boogu'. After hearing it, please click 'next'.
- The camera will start connecting to Wi-Fi. After the connection is finished, it will skip to the 'Device Found' page. You can edit the camera name, click 'Done', and then go to your device list to start viewing videos.
My camera fails to connect to Wi-Fi?
- Make sure the Wi-Fi the camera connected to is 2.4GHz. Network connection failure is often caused by users using 5GHz Wi-Fi.
- Ensure the password of the Wi-Fi is correct. (Note: the Wi-Fi password cannot include single quotes, underscores, spaces, and slashes (/)).
- Check the number of devices your router is connected to. Routers have connection limits. If the devices connected to your router exceed its maximum limit, other devices cannot connect.
- Ensure the QR code on the phone screen is normal and the distance between the phone and the camera lens is 10-15 cm (3.9-5.9 inches) during the scanning process.
- After checking the above information, if the camera still cannot connect to Wi-Fi, try re-downloading the APP, resetting the camera, and restarting the router, then add the camera again.
- If you tried all the steps, but still no luck, please message your order and problem to [email protected].
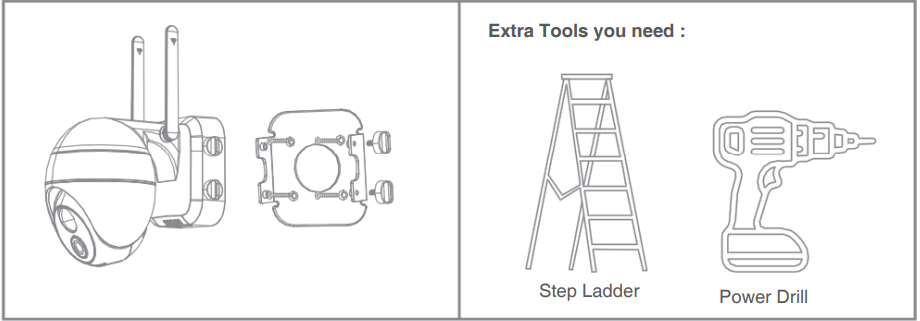
Camera Installation
How to install with a wall mount?
- Select the installation location.
- Take the camera and your phone to the installation location.
- Use the Installation Guide in the App to diagnose the signal strength of your Wi-Fi network. (It is suggested to install the camera in a place that has a strong Wi-Fi signal so that this camera can work well for you).
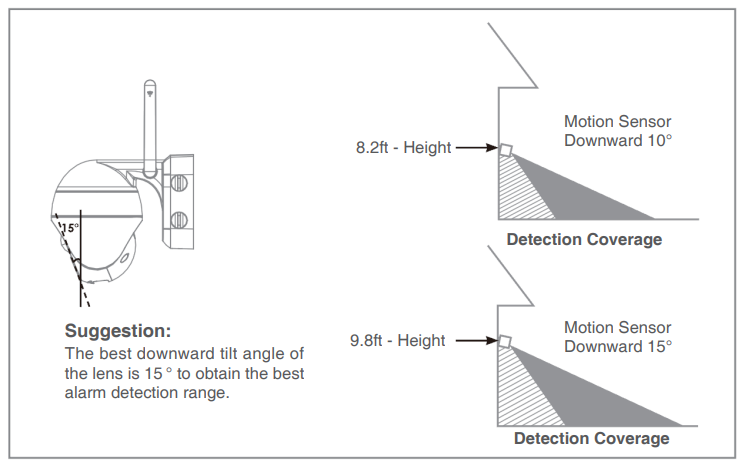
- Use a power drill and four screws to fix the metal bracket on the wall. It is suggested to install this camera 2.4-3m from the ground.
Clip the camera into the metal bracket and use the four screws to fix the camera.
Tips:
- Ensure the wall or surface where you want to install the camera is flat. For easier installation, it is suggested to use a drill. Concrete walls may not be suitable for installation.
- Do not install the camera near heat sources, such as air conditioner outdoor units and kitchen smoke outlets.
- Avoid installing the product on the side of a lively road. Frequent passing pedestrians and vehicles will keep waking up the camera, resulting in frequent alarm messages and extremely fast power consumption.
- Do not install the camera too far from the router. The product needs a good Wi-Fi signal to work well.
When installing the camera, it is not suggested to make the PIR sensor vertically face the moving object, otherwise, it may not detect motion events. It is suggested to make the angle between the PIR sensor and the detected object larger than 15 degrees.
Function Introduction
APP Interface Introduction
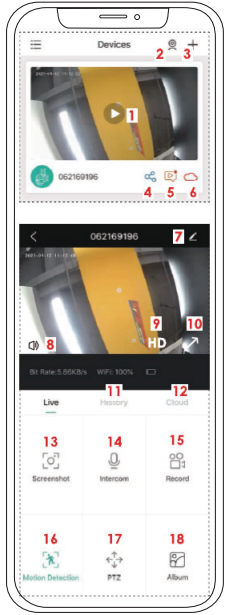
1 | Enter the video browsing page |
2 | Multi-screen viewing |
3 | Add a camera |
4 | Device share |
5 | Check the picture and video of alarm |
6 | Cloud storage |
7 | Camera settings options, such as SD card, alarm setting etc. |
8 | Turn on/off the speaker |
9 | Video definition Settings (SD, HD) |
10 | Full screen option |
11 | SD card video playback |
12 | Cloud storage video playback |
13 | Screenshot button |
14 | Intercom option, long press it to talk |
15 | Record button (Manually capture video) |
16 | Human motion detection function |
17 | PTZ remote control |
18 | Album (Store screenshots and manual video files) |
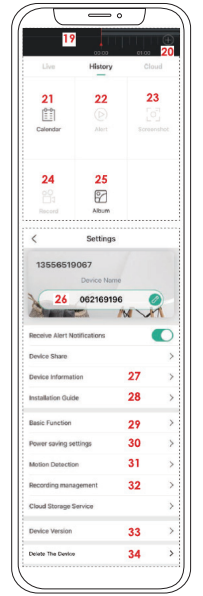
19 | Video Timeline, can drag it to select the time |
20 | Timeline zoom button |
21 | Calendar option, click it to select the date |
22 | Choose the alarm video footage |
23 | Screenshot, video snapshot |
24 | Recording (First click to start recording, then click again to end recording) |
25 | Album (Store screenshots and manual video files) |
26 | Modify the name of your camera |
27 | Get device information (network informa- tion, Mac address, time zone) |
28 | Installation guide. Network Diagnosis |
29 | Turn on/off the indicator; night vision setting; battery capacity |
30 | Set the recording time and alarm interval |
31 | Motion detective setting |
32 | Recording setting; SD card capacity checking |
33 | Firmware version of your camera |
34 | Delete the device |
Device Share
The steps for sharing your cameras with other users:
- Invite your friends to download and install the "CloudEdge" APP and log in.
- Click on the "Device Share" icon to watch the operation video and follow the steps to complete device sharing.
Tip: When sharing, ensure your APP account is registered in the same region. Otherwise, you will not be able to share successfully.
SD Card Record
The product doesn't include an SD card. If you need an SD card to store files, please buy it yourself.
SD card requirements:
- It is recommended to use San Disk, Samsung, and other brand cards.
- Support 8-128GB capacity.
- It is recommended to use a standard Class 10 SD card.
- Only FAT32 format is supported.
Note: Insert the memory card into the SD card slot of the device, and the device will automatically start saving videos.
How to watch the videos on the SD card?
- Method 1: Click the "History" or "Video Play" button of the alarm information icon in the APP to enter the video playback interface. Drag the timeline or select the alarm point to find the corresponding time period record.
- Method 2: Insert the SD card into the computer and convert the video format to MP4 via a third-party. When the video is in MP4 format, you can directly watch it on the computer.
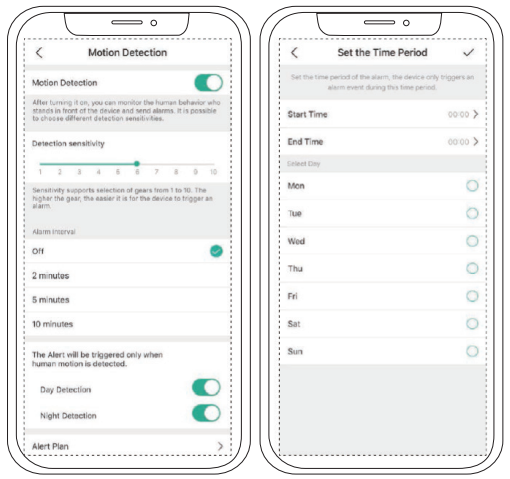
PIR Motion Detection Settings
Enter the application-"Parameter Setting"-"Motion Detection" interface.
Sensitivity | Detecting Distance (For moving objects) |
Level 1 -3 (Low) | Up to 4-5 meters |
Level 4-7 (Med) | Up to 5-8 meters |
Level 8-10 (High) | Up to 8-13 meters |
Warm Tip: When you encounter the following problems while using this camera, you can adjust the motion detection sensitivity to solve them.
Note:
- It is recommended to set the alarm sensitivity to level 8-10 if experiencing frequent missed or delayed alarms.
- It is advised to set the alarm sensitivity to level 1-3 if experiencing frequent false alarms.
- Adjust the sensitivity to a lower level if alarm sensitivity and detecting distance from a high level are too far, causing easier false triggering. In winter, it easily causes false alarms due to a bigger temperature range. Also, PIR alarms will be interfered with by weather and temperature.
- Adjust the sensitivity to a higher level in summer, as it causes missed or delayed alarms due to a smaller temperature range.
- If noticing poor performance of motion detection in the night environment, try turning off "Night Detection".
Setup Guide
The following procedures will help you set up your Meco Eleverde outdoor security camera:
- Before installation, give the camera a full charge.
- Create an account and download the Meco app on your smartphone.
- To enter pairing mode, turn on Bluetooth and Wi-Fi on your phone and then press and hold the power button on the camera.
- To link the camera to your Wi-Fi network, follow the directions on the app.
- Make sure the placement is appropriate and has a good view before installing the camera with the mounting kit.
- To guarantee optimum performance, check the motion detection and adjust the camera angle.
Battery Management
Charging the camera
It is recommended to use a 5V/2A power adapter for charging. Please use the USB cable in the package to charge this camera.
Note: If a 5V/2A power adapter is not available, other sizes of 5V power heads can also be used for charging.
How to judge whether the charging is successful?
The device's charging indicator light is red, which means it is charging. A blue light means that charging is complete. It will take approximately 10 hours or more to fully charge.
What should I do if the charge fails?
- Determine whether the power adapter is good, and try another one.
- Determine whether the USB charging cable is good, and try another one.
- The charging indicator may be defective, please check the charging condition in the phone APP.
- Determine whether the charging port of the device is in good contact with the USB charging cable.
- The device has a low-temperature charging protection module, please don't charge the device at low temperatures.
Battery life
- If the device does not detect a moving object, it will enter sleep mode, reducing the power consumption of the device.
- If the device detects a moving object, it quickly wakes up and starts within 1 second, taking screenshots with recorded video.
Warm Tip: When the temperature is below -20°C, the battery may enter self-protection mode, causing the camera to shut down automatically. When the temperature rises, the battery will automatically return to a normal state.
- At low temperatures, if you need to charge this camera, please place it indoors for several hours first. In room temperature, the self-protection mode of the battery will automatically be shut off, allowing you to charge this camera safely.
Why is the battery life of my device poor?
- Check whether the number of alarms is too frequent. The working time of the device determines the battery life. The more frequent the PIR wake-ups, the faster the battery consumption due to the longer working time. It is recommended to lower the motion detection sensitivity of the device and set the alarm interval and alarm time plan appropriately.
(Note: Outdoor air conditioning units, moving cars, and passing pedestrians will cause frequent alarms. Please adjust the angle of the device to avoid these objects). - In cold weather, the battery capacity will be reduced, affecting the endurance of the device.
Troubleshooting
Common issues and solutions:
Problem: Camera is not connecting to Wi-Fi.
Solution: Verify your network credentials and try restarting both the camera and your router.
Problem: Motion detection alerts are not working.
Solution: Adjust the motion detection sensitivity settings within the app and ensure the camera has a clear view.
Problem: Video quality is poor.
Solution: Check for any obstructions or low light conditions, and consider adjusting the camera's placement or enabling night vision.
Meco Eleverde Outdoor Security Camera Pros & Cons
- Pros
- Full HD video
- Motion detection alerts
- Two-way audio
- Weather-resistant design
- Cons
- Limited field of view compared to some competitors
- No local streaming option
Customer Reviews
Users have praised the Meco Eleverde Outdoor Security Camera for its ease of use, responsive motion detection, and clear video quality. Most common complaints include the limited field of view and the lack of a local streaming option.
Faqs
What resolution does the Meco Eleverde Outdoor Security Camera provide?
Can one see in the dark with the Meco?
Can we waterproof the Meco Eleverde outdoor security camera?
How sophisticated is the camera's motion detecting system?
What Meco Eleverde Outdoor Security Camera storage choices are there?
What is the power source for the Meco Eleverde outdoor security camera?
How should I configure my outdoor security camera, the Meco Eleverde?
Does cloud storage require a monthly subscription fee?
Is it possible to integrate the Meco Eleverde Outdoor Security Camera with other smart home appliances?
How long is the Meco Eleverde outdoor security camera warranty?
Leave a Comment