Moen Digital Shower Controller TS3304 Instruction Manual
Content
Introduction
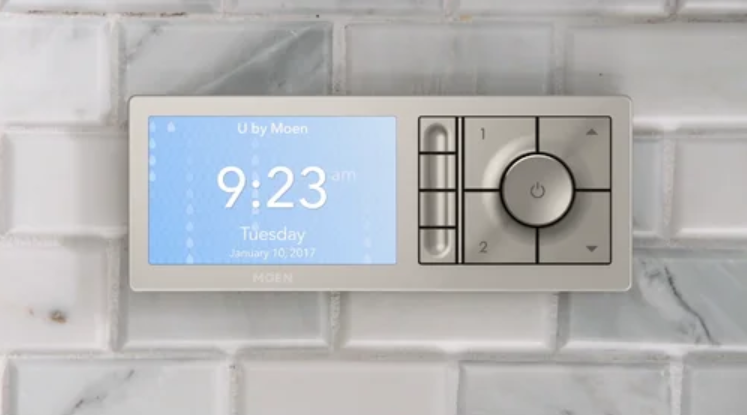
The Moen Digital Shower Controller TS3304 is a state-of-the-art shower system that offers a luxurious and customizable showering experience. With its sleek and modern design, this shower controller is perfect for any bathroom. The TS3304 is estimated to be priced around $400 and was launched in early 2021. This shower controller offers precise temperature control, multiple spray settings, and the ability to control the shower from anywhere in the room with its wireless digital controller.
Parts List
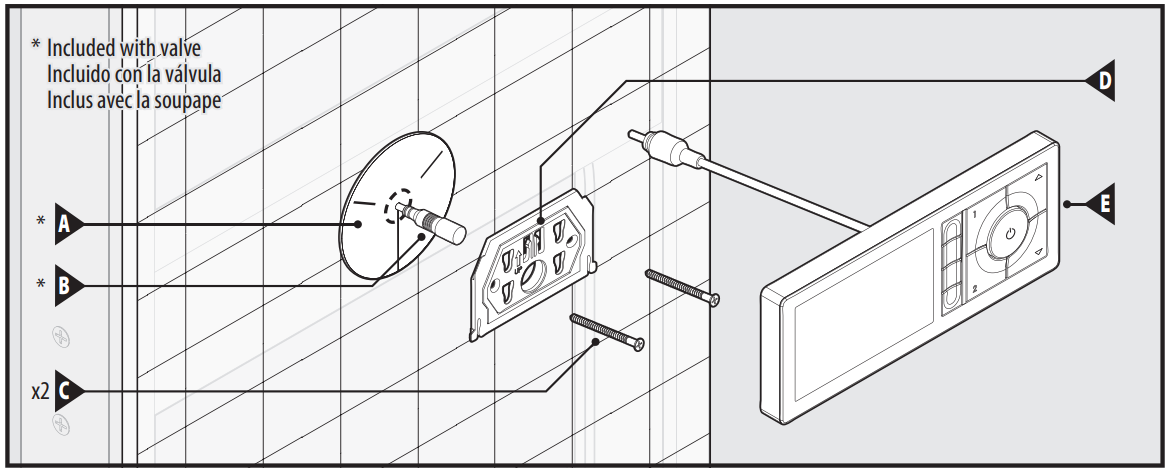
- A. Data Cable Retainer *
- B. Data Cable *
- C. #6 x 2" Mounting Screws (x2)
- D. Mounting Bracket
- E. Controller
- Supplied with Shower Valve
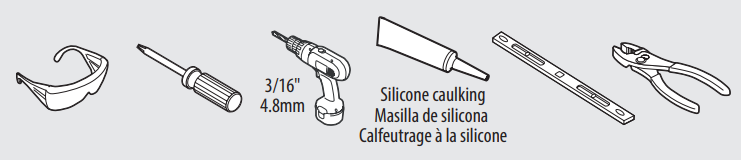
HELPFUL TOOLS
For safety and ease of faucet replacement, Moen recommends the use of these helpful tools
Detailed Specifications
The Moen Digital Shower Controller TS3304 comes with a variety of features that make it stand out from other shower systems. Some of its key features include:
- Precise temperature control with a digital display
- Multiple spray settings, including rain shower, massage, and gentle mist
- Wireless digital controller for easy operation
- Built-in timer for convenient shower timing
- Durable and water-resistant construction
- Easy installation with Moen's patented M-PACT system
Description of Moen Digital Shower Controller TS3304
The Moen Digital Shower is a premium shower system that offers a spa-like experience in the comfort of your own home. With its precise temperature control, you can enjoy the perfect shower temperature every time. The multiple spray settings allow you to customize your shower to your liking, whether you prefer a gentle mist or a powerful rain shower. The wireless digital controller is easy to use and allows you to control the shower from anywhere in the room. The TS3304 is also built to last with its durable and water-resistant construction. Installation is easy with Moen's patented M-PACT system, which allows for quick and easy upgrades and changes.
Mounting Information
Caution: A flat area in the final shower surface of 10" wide by 6" high is required to mount the controller.
- Remove Data Cable Retainer (A).
Caution: Ensure Data Cable (B) is secure so it does not fall back into wall. Ensure Mounting Bracket (D) is level on the finished wall.

- Mark drill holes with a pencil within the bracket. Set Mounting Bracket (D) aside.
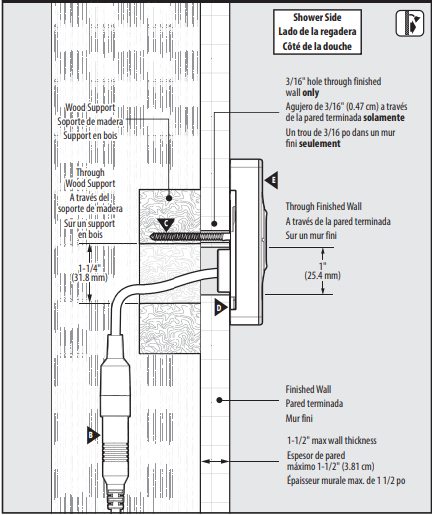
- Drill both marked holes using a 3/16" drill bit.
Caution: Only drill through the finished wall. - Apply a bead of silicone caulking only within the groove of Mounting Bracket (D).
- Adhere Mounting Bracket (D) to the finished wall. Ensure Data Cable (B) goes through the opening of the bracket.
Secure Mounting Bracket (D) using only Moen supplied #6 x 2" Mounting Screws (C).
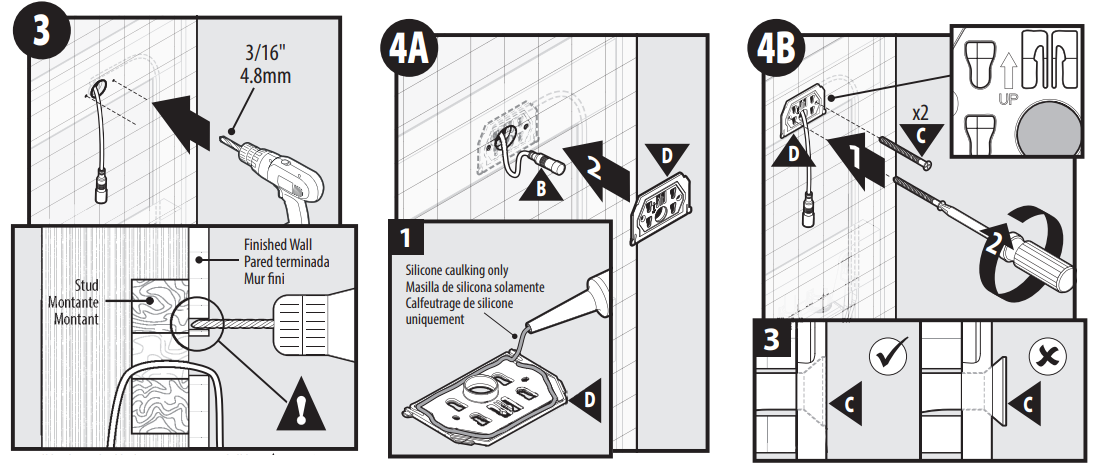
- Tighten with a Phillips screwdriver.
- Ensure the screw head is flush or slightly recessed. Do not overtighten.
- Re-check that the Mounting Bracket (D) is still level. Adjust if necessary.
- Clean off excess silicone caulk.
- Remove and discard the protective cap from Data Cable (B).
Attach Controller (E) to Data Cable (B).
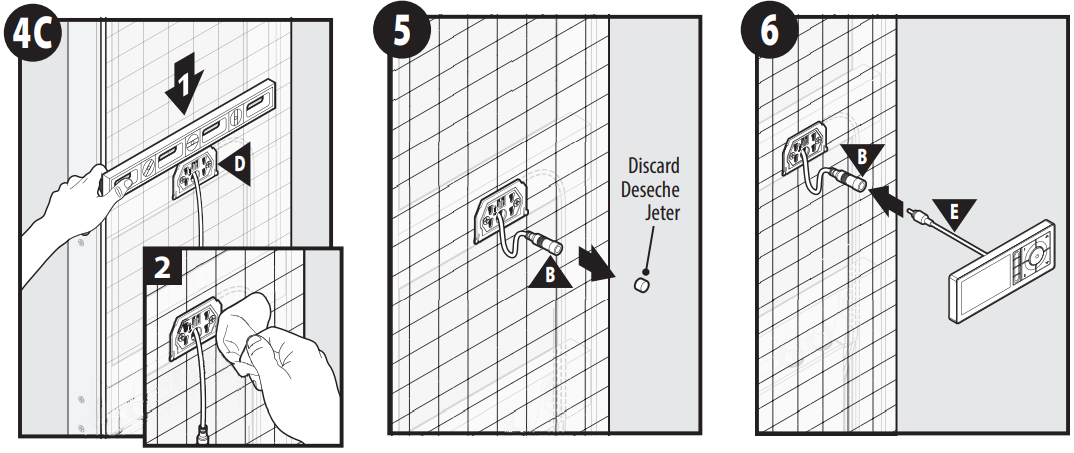
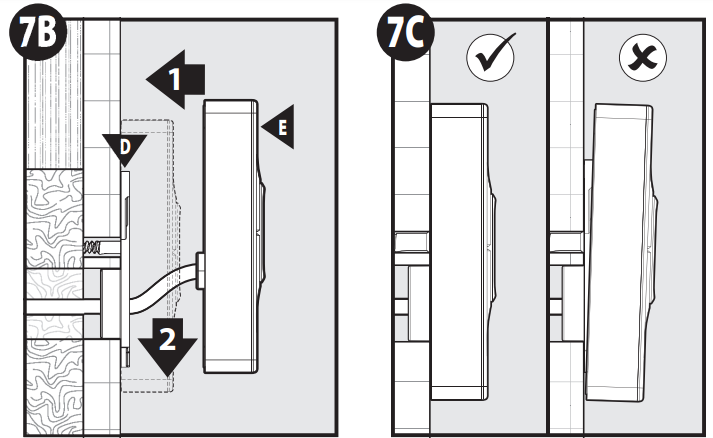
Feed cabling connection (B & E) back into the wall through Mounting Bracket (D).
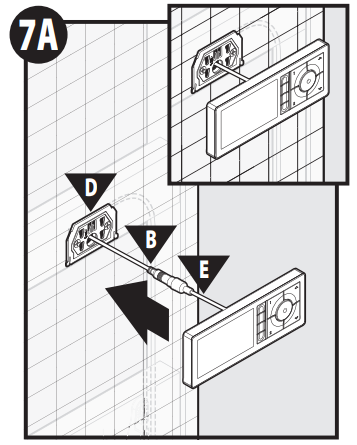
- Attach Controller (E) to Mounting Bracket (D). Press Controller parallel and flush to the wall.
- Slide Controller down to lock into place.
Ensure Controller is parallel and flush to the wall.
Initial Controller Setup
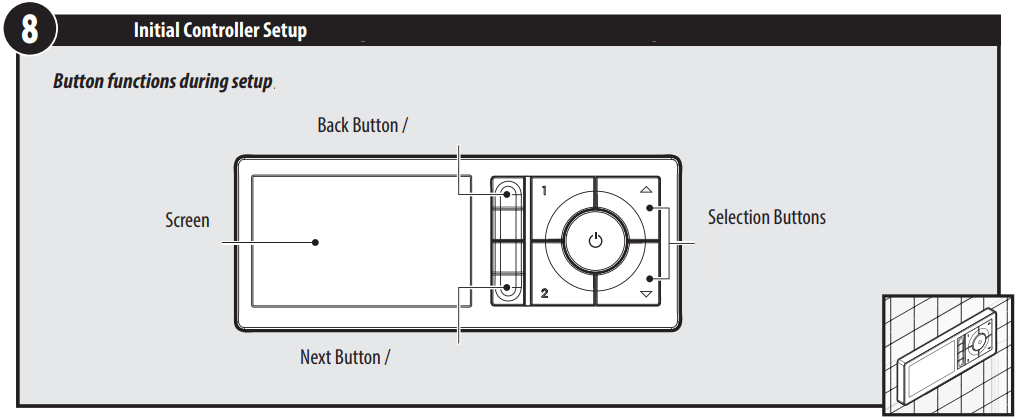
Button functions during setup
Once the Data Cable on the Controller has been connected you will need to make selections on the screen for language, time zone, temperature units, and water-saving mode. Use the Selection Buttons and step through the screen prompts using the Next & Back Buttons to complete the setup. Installation is complete.
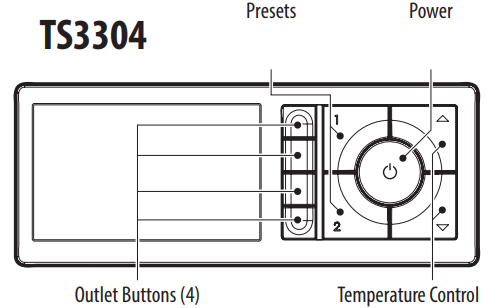
Setting Presets at Controller
Button functions during operation
- Press the Power Button on the controller to activate the shower. Adjust to the desired temperature. Then activate the desired shower devices.
Press and hold Preset 1 button for 5 seconds. The screen will display “Preset is saved.”
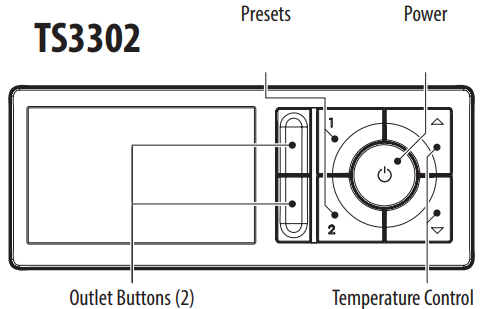
- Repeat steps A2 & A3 to set Preset 2.
For more customization, please download and use the U by Moen app.
System Overview
Smartphone cellular connection allows access to settings screens only in the U by Moen app.

Note: Smartphone and controller must be on the same home WiFi connection for full shower control using the U by Moen app.
General Information
Supported Smart Phones
For supported smartphone operating systems: See www.moen.com/u/support for the current list of supported operating systems.
Use of the Works with Apple HomeKit logo means that an electronic accessory has been designed to connect specifically to iPod touch, iPhone, or iPad, respectively, and has been certified by the developer to meet Apple performance standards. Apple is not responsible for the operation of this device or its compliance with safety and regulatory standards. Apple, Apple Watch, iPad, iPad Air, iPhone, and iPod touch are trademarks of Apple Inc., registered in the U.S. and other countries. HomeKit is a trademark of Apple Inc.
Setup Guide
Setting up the Moen Digital Shower Controller TS3304 is easy with the following steps:
- Turn off the water supply to the shower.
- Remove the old showerhead and shower arm.
- Install the M-PACT system to the shower arm.
- Connect the shower valve to the M-PACT system.
- Attach the showerhead to the shower valve.
- Turn on the water supply and test the shower for proper operation.
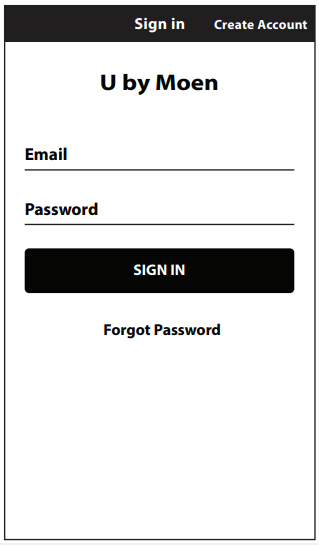
Setting Up Smartphone with Mobile App
App will display languages based on smartphone language settings. Note: App screen images may vary slightly from those shown in the following steps.
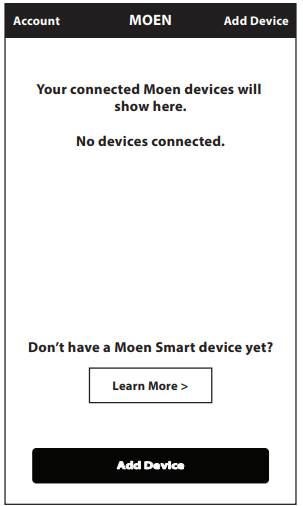
- On smartphone, go to your app provider store to search and download the U by Moen app.
After the U by Moen app is installed, open the app and select "Create Account." Then follow the steps in the app to activate your account. Visit https://www.moen.com/smart-home/smart-shower/support for more information on how to create your user account.
To synchronize the U by Moen shower with your smartphone, first select "Add Device" in the app. With the controller powered off, hold the Up temperature button for 5 seconds. The controller screen will then display a unique PIN you’ll enter during the app setup process. Follow the remaining steps shown in the app to complete the synchronization.
- Utilize the settings in the U by Moen app to customize your display and personalize your presets.
Setup Instructions
- Turn off water at stops before filter cleaning.
- Turn on power to release pressure in valve, then power off by pressing again.
- Press inward on the locking tab of the Shower Valve.
Slide locking tab to the unlock position.
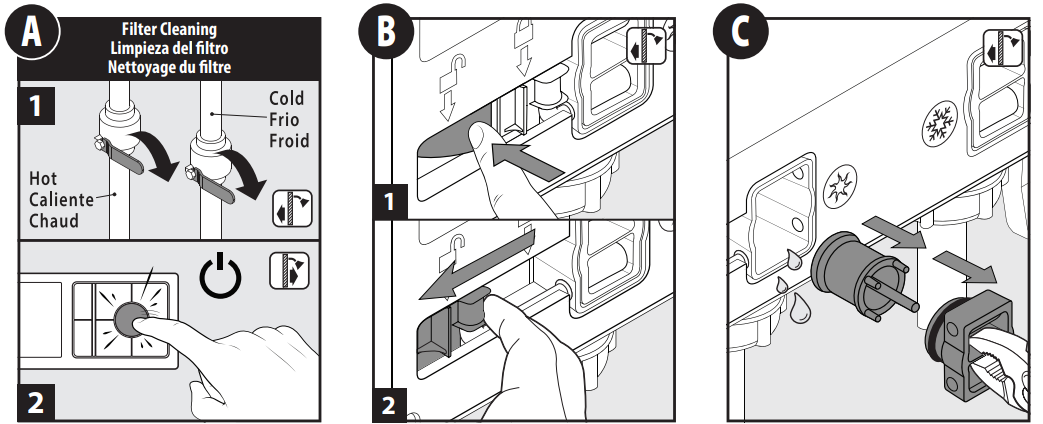
Carefully remove the Filter Cap. Then remove the Screen Filter.
Note: Small volumes of water may drip when removing filters.- Rinse debris from Screen Filter.
- Re-install the Screen Filter into Shower Valve. Then re-install Filter Cap.
Slide the locking tab to the locked position. Repeat steps B through F for cold side filter cleaning.
Caution: Must be in a locked position before turning water on.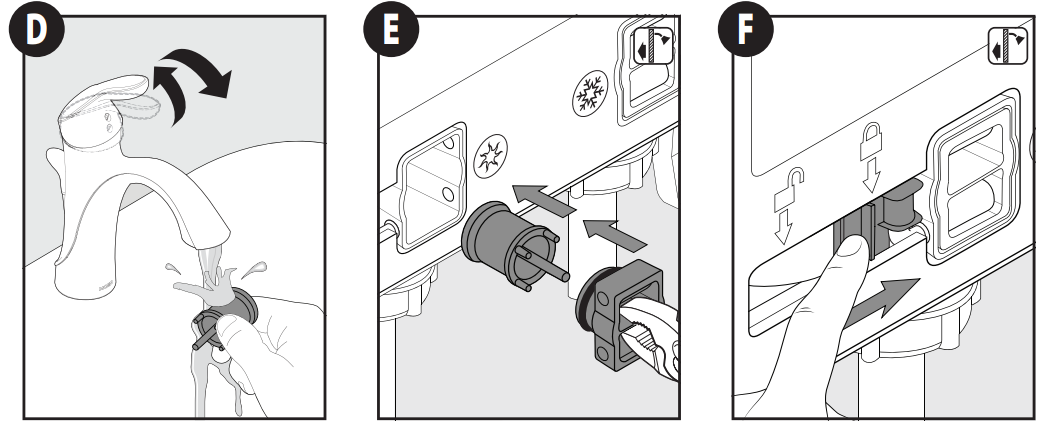
LAYOUT CONSIDERATIONS
Determine location of controller and its distance to the valve to allow for adequate slack in the 30-foot data cable. A drip loop in the cable must be included at the Shower Valve connection. A flat area in the final shower surface of 10" wide by 6" high is required to mount the controller.
Caution: Do not plug in controller until valve has been installed and pressure tested.
Caution: Avoid damage to data cable and pipes when drilling holes and mounting controller back plate. Ensure no sharp edges around wall opening. Damage to cable from controller or data cable in wall may result in malfunction and risk of property damage.
Caution: Risk of Damage to Product: The controller must not be installed where the ambient temperature is likely to fall below 41˚F or can exceed 158˚F.
Changes or modifications not expressly approved by Moen Incorporated could void the user's authority to operate the equipment.
Max outlet temperature is factory set to 115˚F and cannot be adjusted higher than 120˚F.
Note: Valve will shut off if temperature exceeds 120˚F.
Moen Digital Shower Controller TS3304 Troubleshooting
System reset procedure: Unplug AC Power Adapter cable from Shower Valve, wait one minute, then reinsert the AC Power Adapter cable into Shower Valve to reset the system. See page 8 for system overview.
| Symptom | Probable Causes | Recommended Actions |
|---|---|---|
| 1. No power at Controller | Data Cable not connected properly at Controller or at Shower Valve | Ensure Data Cable is fully inserted at Controller connection (Step 6) and fully inserted into Shower Valve |
| AC Power Adapter may not be connected properly | Ensure AC Power Adapter is properly plugged into electrical outlet. Ensure AC Power Adapter Cable is fully inserted into Shower Valve | |
| Home power circuit breaker is tripped or GFCI tripped | Reset circuit breaker or GFCI | |
| Home power is off, no battery backup kit | Restore Home power or use optional battery backup kit | |
| Home power is off, using optional battery backup kit | Restore Home power. Unplug optional battery backup cable. Install the batteries in proper orientation into the optional battery backup. Replace with new batteries if necessary. Plug the optional battery backup cable into Shower Valve. | |
| System reset required | Perform system reset * | |
| 2. Controller powers up but no buttons work | System reset required | Perform system reset * |
| 3. Controller has power but no water flows | Water supplies are not turned ON | Turn on water supplies |
| No water pressure in hot OR cold line | Perform system reset * | |
| System reset required | Perform system reset * | |
| 4. Water shuts off unexpectedly | Auto shut-off after preset time limit reached | To resume, start shower normally |
| Shower turned off remotely using app | Check water pressure at other water fixtures. If water is available at other water fixtures, perform system reset * | |
| Loss of hot/cold water pressure | Perform system reset * | |
| 5. Water does not turn off | System reset required | Perform system reset * |
| 6. Water does not reach set temperature | Hot water supply depleted | Wait for hot water to heat up |
| Hot water supply device temperature set too low | Adjust set temperature higher on home hot water supply device | |
| 7. Low flow | Clogged Screen Filter | Clean screen filters |
| Hot and Cold water supply lines reversed | Correct water supply lines | |
| 8. Water temperature unstable | More than 5 psi difference between hot and cold pressure | Run dedicated lines to Shower Valve |
| Unstable water pressure | Pressure regulators may be required in line in advance of Shower Valve. Consult a plumber. | |
| 9. No Date or Time on Controller screen | Controller has not been setup with smart phone | Follow instructions in app on smart phone to setup user account and synchronize smart phone with Controller |
| Controller not connected to Home WiFi | Verify that “WiFi Signal Lost” indicator is not on, | |
| 10. Cannot operate shower system using smart phone | Smart phone not connected to Home WiFi | In smart phone WiFi Settings - Connect to Home WiFi |
| WiFi Password, Security PIN not entered | Enter WiFi Password and Security Pin in app setup screen | |
| Smart phone WiFi is OFF | Turn ON smart phone WiFi | |
| Home WiFi is OFF | Turn ON Home WiFi (base station) | |
| Controller has not been setup with smart phone | See page 9 of Instruction Sheet | |
| Smart phone not on same Home WiFi as Controller | Switch to same Home WiFi in smart phone WiFi settings | |
| 11. Controller can’t see Home WiFi (“WiFi Signal Lost” - icon visible on Controller) | Home WiFi name changed or Controller not on same network as Home WiFi | Check Home WiFi name is proper. If name changed, re-setup Controller through app using new Home WiFi name |
| Changed Home WiFi password | Re-enter Home WiFi password in app | |
| 12. Controller can’t see Home WiFi (no “WiFi Signal Lost” - icon visible on Controller) | Home WiFi lost power or disconnected | RESTART Home WiFi (base station) |
| Weak Home WiFi signal at Controller location | Consider adding WiFi extender near Controller | |
| 13. Error message when reconnecting smart phone to Controller | Incorrect Home WiFi password entered | Enter correct Home WiFi password in app on smart phone |
| Incorrect Security PIN number entered | After initiating the connection using the app, the PIN number will appear on the Controller screen. Enter this PIN number into the app. | |
| 14. Cannot download app to smart phone | Smart phone is not running a supported operating system version | Upgrade smart phone to a supported operating system. |
| Smart phone memory is full | Clear items off smart phone to free up memory. Download app. | |
| 15. App does not open | App did not update properly from the Apple App store or Google Play store | Delete app from smart phone and reinstall |
| 16. Slow app response | Weak Home WiFi signal at smart phone location | Consider adding WiFi extender near the location of smart phone |
| 17. Icons of shower devices on Controller do not match actual shower devices | Controller has not been setup with smart phone | Follow instructions in app on smart phone to setup user account and synchronize smart phone with Controller. Then in the app settings the device icons can be properly assigned. |
| Default device icons will display until customized in app. | - | |
| 18. Low battery or dead battery indicator on Controller if using the optional battery backup kit | Batteries need to be replaced in the optional battery backup kit | Replace the batteries in the optional battery backup kit |
| 19. When shower is off, controller screen is blank, and only power button is illuminated | Home power is off and system is using battery power from the optional battery backup kit | Restore Home power. Shower will operate with limited control functionality under this condition. Smart phone functionality is deactivated during battery power mode. |
Moen Limited Lifetime Warranty
What is Covered by This Limited Warranty, and the Applicable Warranty Periods
Moen (“Seller”) warrants that the Product will be free from defects in materials and manufacturing workmanship. The warranty on the Housing runs for the lifetime of the Original Consumer Purchaser, and runs for five years from the date of purchase for the Original Commercial Purchaser (but only so long as the Original Consumer/Commercial Purchaser continues to own the dwelling or premises). The warranty on the Digital System runs for five years from the date of purchase for an Original Consumer Purchaser, or for one year from the date of purchase for an Original Commercial Purchaser (but only so long as the Original Consumer/Commercial Purchaser continues to own the dwelling or premises). This Limited Warranty may not be transferred to subsequent owners of the dwelling or premises, or to any other person.
Pros & Cons
Pros
- Precise temperature control
- Multiple spray settings
- Wireless digital controller
- Durable and water-resistant construction
- Easy installation
Cons
- Expensive compared to other shower systems
- Wireless controller may have connectivity issues
Customer Reviews about Moen Digital Shower Controller TS3304
Customers love the Moen Digital Shower Controller TS3304 for its luxurious showering experience. Some of the most common compliments include its precise temperature control, multiple spray settings, and easy installation. However, some customers have reported issues with the wireless digital controller's connectivity. Overall, the TS3304 is a high-quality shower system that is worth the investment for its premium features and customizable showering experience.
Faqs
How do I install the Moen Digital Shower Controller TS3304?
What comes in the package of Moen Digital Shower Controller TS3304?
How do I connect the Moen Digital Shower Controller TS3304 to my home WiFi?
What should I do if the Moen Digital Shower Controller TS3304 screen is blank?
How do I perform a system reset Moen Digital Shower Controller TS3304?
What should I do if the water temperature is Moen Digital Shower Controller TS3304 unstable?
Why is there low water flow from the Moen Digital Shower Controller TS3304?
How do I set the time and date on the Moen Digital Shower Controller TS3304?
What should I do if the Moen Digital Shower Controller TS3304 is not connecting to WiFi?
What is the warranty period for the Moen Digital Shower Controller TS3304?
Leave a Comment