Msi PRO-VDH WIFI ProSeries Motherboard B550M User Guide
Content
Introduction
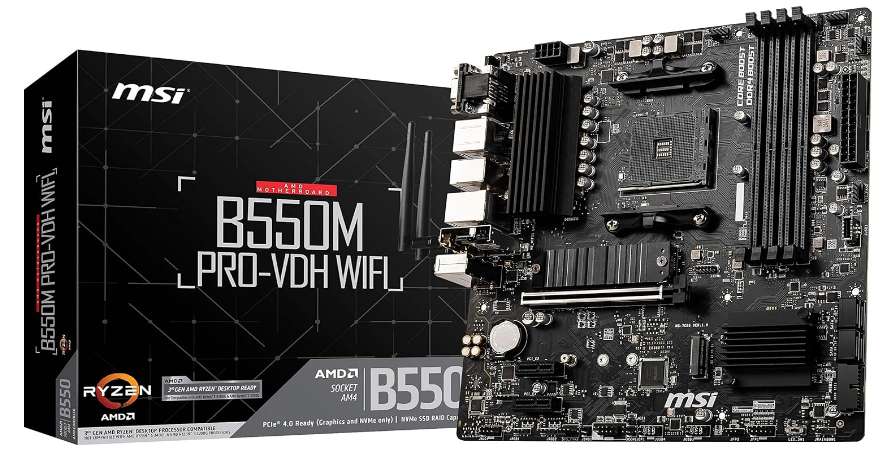
The MSI PRO-VDH WIFI ProSeries Motherboard B550M is a feature-rich motherboard designed for AMD Ryzen processors, offering exceptional performance and stability for gamers and professionals alike. With support for DDR4 memory up to 4400MHz and PCIe 4.0 technology, it ensures fast data transfer and efficient multitasking. The integrated Wi-Fi provides seamless connectivity, while the compact micro-ATX form factor makes it suitable for various builds. Priced at approximately $129, this motherboard delivers great value for high-performance computing.
Specifications
CPU | Supports AM4 socket 3rd Gen AMD Ryzen™ processors, and future AMD Ryzen™ processors with BIOS update |
Chipset | AMD B550Chipset |
Memory |
/3466 /3600/ 3733 /3866 /4000 /4133 /4266 /4400+ MHz by A-XMP OC MODE ▫ 1DPC 1R max speed 4400 MHZ ▫ 1DPC 2R max speed3733 MHZ ▫ 2DPC 1R max speed3866 MHZ ▫ 2DPC 2R max speed3466 MHZ
* Please refer www.msi.com formore information on compatible memory. |
Expansion Slot |
*The supported specification depends on installed processor. |
Onboard Graphics |
* Available for the processor with integrated graphics. **Graphics specifications mayvary depending on the CPU installed. |
Storage | AMD B550Chipset
▫ Supports PCIe 4.0/ 3.0 x4 * ▫ Supports SATA 6Gb/s ▫ Supports 2242/ 2260/ 2280 storage devices
▫ Supports PCIe 3.0x4 ▫ Supports 2242/ 2260/ 2280 storage devices *The supported specification depends on installed processor. |
RAID |
|
USB | AMD B550Chipset
USB3.2 Gen 1 5Gbps connector)
AMD Processor
|
Audio | Realtek® ALC892/ ALC897 Codec
|
LAN |
|
Wireless LAN & Bluetooth® | Intel® Dual Band Wireless-AC 3168 (For B550M PRO-VDH WIFI)
Intel® Wi-Fi6 AX200 (ForB550M PRO-VDH WIFI6)
|
Internal Connectors |
|
LED Features |
|
Back Panel Connectors |
|
I/OController | NUVOTON NCT6687-R Controller Chip |
Hardware Monitor |
|
Form Factor |
|
BIOS Features |
|
Software |
|
Dragon Center Features |
|
Special Features |
|
Package contents
Please check the contents of your motherboard package.
Motherboard | B550M PRO-VDHWIFI/ B550M PRO-VDHWIFI6 | |
Cable | SATA 6G cables (2 cables/pack) | 1 |
Accessories | Wi-Fi antenna | 1 |
M.2screws (3 pcs./pack) | 1 | |
Case badge | 1 | |
Product registration card | 1 | |
Application | Driver DVD | 1 |
Documentation | Quick installation guide | 1 |
MSI components compatibility & reward program card | 1 | |
It should contain:
Important
If any of the above items are damaged or missing, please contact your retailer.
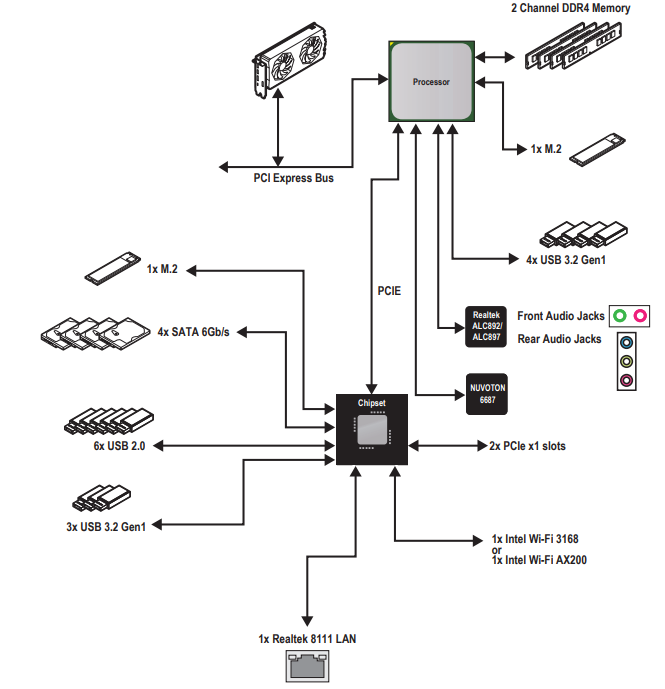
Block Diagram
Rear I/O Panel
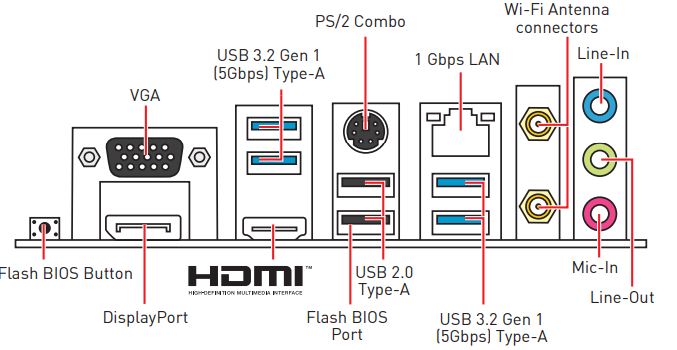
Flash BIOS Port/ Button - Please refer to page 46 for Updating BIOS with Flash BIOS Button.
LAN Port LED Status Table

Realtek Audio Console
After Realtek Audio Console is installed. You can use it to change sound settings to get better sound experience.
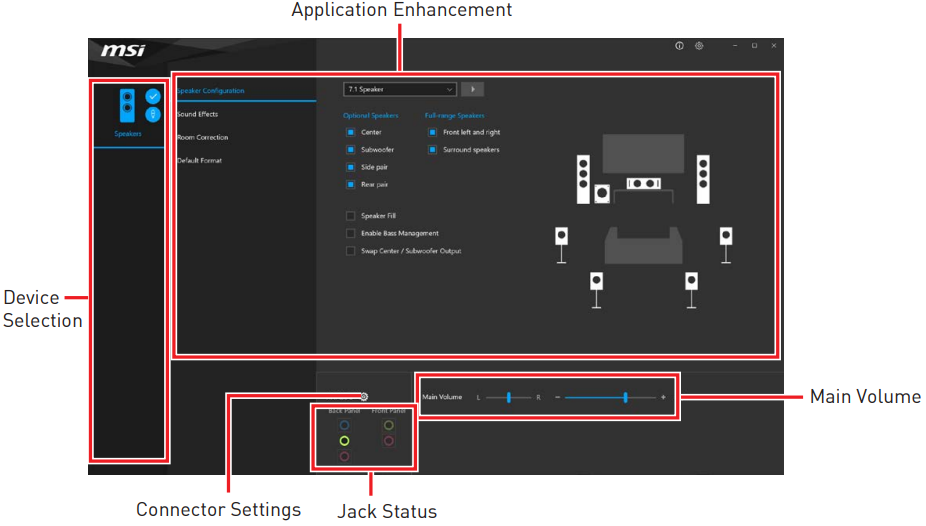
- Device Selection - allows you to select a audio output source to change the related options. The check sign indicates the devices as default.
- Application Enhancement - the array of options will provide you a complete guidance of anticipated sound effect for both output and input device.
- Main Volume - controls the volume or balance the right/left side of the speakers that you plugged in front or rear panel by adjust the bar.
- Jack Status - depicts all render and capture devices currently connected with your computer.
- Connector Settings - configures the connection settings.
Audio 7.1-channel Configuration
To configure 7.1-channel audio, you have to connect front audio I/O module to JAUD1 connector and follow the below steps.
Click on the Realtek Audio Console > Device advanced settings to open the dialog below.
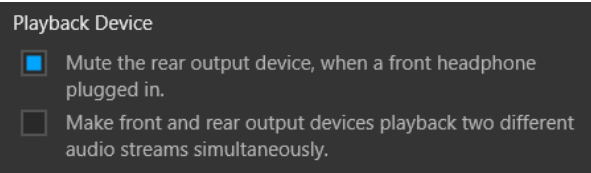
- Select Mute the rear output device, when a front headphone plugged in.
Plug your speakers to audio jacks on rear and front I/O panel. When you plug a device into an audio jack, a dialogue window will pop up asking you which device is current connected.
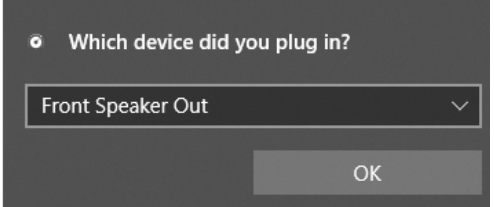
Important
The pictures above for reference only and may vary from the product you purchased.
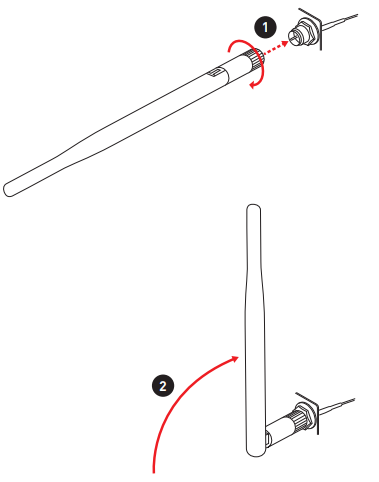
Installing antennas
- Screw the antennas tight to the antenna connectors as shown below.
- Orient the antennas.
Overview of Components
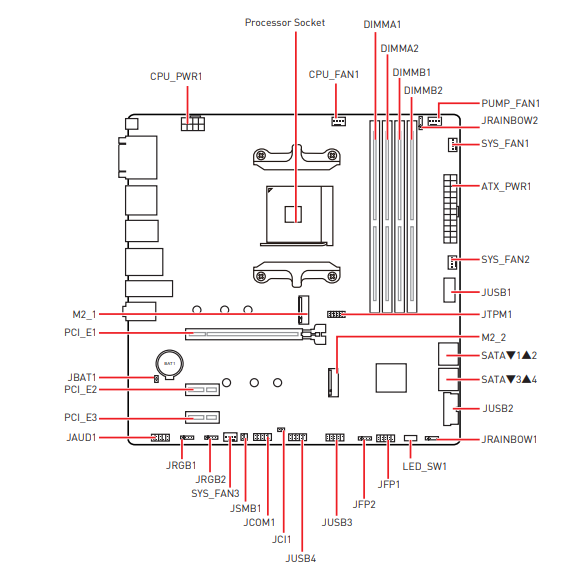
Component Contents
Port Name | Port Type | Page |
CPU_FAN1, PUMP_FAN1, SYS_FAN1~3 | Fan Connectors | 36 |
CPU_PWR1, ATX_PWR1 | Power Connectors | 33 |
DIMMA1, DIMMA2, DIMMB1, DIMMB2 | DIMM Slots | 28 |
JAUD1 | Front Audio Connector | 32 |
JBAT1 | Clear CMOS(Reset BIOS) Jumper | 38 |
JCI1 | Chassis Intrusion Connector | 37 |
JCOM1 | Serial Port Connector | 38 |
JFP1, JFP2 | Front Panel Connectors | 32 |
JRAINBOW1~2 | Addressable RGB LED connectors | 40 |
JRGB1~2 | RGB LED connector | 39 |
JTPM1 | TPM Module Connector | 35 |
JUSB1 | USB 3.2 Gen1 5Gbps Type-C Connector | 34 |
JUSB2 | USB 3.2 Gen 1 5Gbps Connector | 34 |
JUSB3~4 | USB 2.0 Connectors | 35 |
LED_SW1 | EZ LED Control | 41 |
M2_1~2 | M.2 Slots (Key M) | 30 |
PCI_E1~3 | PCIe Expansion Slots | 29 |
Processor Socket | Socket AM4 | 27 |
SATA1~4 | SATA 6Gb/s Connectors | 29 |
Description
The MSI PRO-VDH WIFI ProSeries Motherboard B550M boasts a sleek and durable design, with a black PCB and silver accents. It features a robust power delivery system, ensuring stable power to the CPU and other components. The motherboard also includes multiple fan headers for comprehensive cooling options.
The audio is enhanced with Audio Boost technology, providing clear and immersive sound. The Wi-Fi 6 and Bluetooth 5.2 ensure fast and reliable wireless connectivity. With its rich set of features and high-quality components, this motherboard is well-suited for both gamers and content creators.
AMD RAID Configuration
The following are the RAID levels supported by RAIDXpert2.
- RAID 0 (Striping) breaks the data into blocks which are written to separate hard drives. Spreading the hard drive I/O load across independent channels greatly improves I/O performance.
- RAID 1 (Mirroring) provides data redundancy by mirroring data between the hard drives and provides enhanced read performance.
- RAID 10 (Striped RAID1 Sets) uses four hard drives to create a combination of RAID 0 and 1 by forming a RAID 0 array from two RAID 1 arrays.
- Volume (JBOD) provides the ability to link-together storage from one or several disks, regardless of the size of the space on those disks. Useful in scavenging space on disks unused by other disks in the array. Does not provide performance benefits or data redundancy.
- RAIDABLE (also known as RAID Ready) allows the user to add more storage space or create a redundant array after a system is installed.
RAID level comparison
| RAID 0 | RAID 1 | RAID 10 |
Minimum # drives | 2 | 2 | 4 |
Data protection | None | Excellent | Excellent |
Read performance | Excellent | OK | OK |
Write performance | Excellent | Good | Good |
Capacity utilization | 100% | 50% | 50% |
Important: All the information/ volumes/ pictures listed in your system might differ from the illustrations in this appendix.
Enabling RAIDXpert2 Configuration Utility
To enter the RAIDXpert2 Configuration Utility menu
- Power on and press Delete key to enter BIOS Setup menu.
- Press F7 to switch to Advanced mode from EZ mode.
- Go to BIOS > SETTINGS > Advanced > Integrated Peripherals > SATA Mode and change setting to RAID Mode.
- Go to BIOS > SETTINGS > Advanced > Windows OS Configuration > BIOS UEFI/CSM Mode and change setting to UEFI.
- Press F10 to save configuration and exit, and then reboot and press Delete key to enter BIOS Setup menu.
- Go to BIOS > SETTINGS > Advanced > RAIDXpert2 Configuration Utility sub-menu.
Initializing Disks
New disks and legacy disks must be initialized before they can be used to create an AMD-RAID array. Initialization writes AMD-RAID configuration information (metadata) to a disk.
Important
- If a disk is part of an AMD-RAID array, the disk cannot be selected for initialization. To initial the disk anyway, delete the AMD-RAID array. Data on the disk is deleted during initialization so ensure the correct disks are chosen to initialize.
- A legacy disk can contain valid data. When a legacy disk is initialized, all data on the disk is lost.
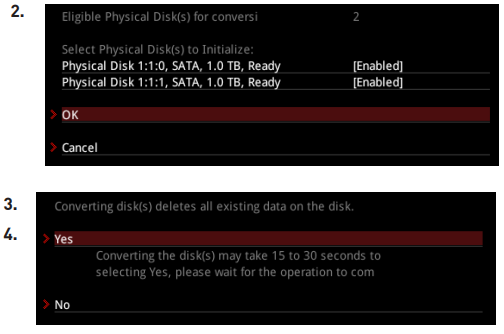
To initialize disks
- As previously mentioned, enable RAIDXpert2 Configuration Utility.
- Go to BIOS > SETTINGS > Advanced > RAIDXpert2 Configuration Utility > Physical Disk Management > Select Physical Disk Operations > Initialize Disk sub-menu.
- Select desired disks by changing the Physical Disk setting to Enabled.
- Select OK, then press Enter.
- Review the warning message, if you want to proceed, select YES, then press Enter.
Initialization takes 10 to 15 seconds per disk. During initialization, a complete rescan of all channels is done automatically.
Creating Arrays
Arrays can be created after the disks are initialized.
Important
- For redundant arrays, the Create process is not started until after the operating system and AMD-RAID OS drivers have been installed and the system has booted to the operating system. However, the arrays are immediately available to use for either a bootable array or a data array.
- Array numbers are valid only for a given boot and might be different in the RAIDXpert2 Configuration Utility and RAIDXpert2. If a permanent label is required, use the RAIDXpert2 Web GUI Array Naming feature.
- At any point in the procedure, return to a prior window by pressing ESC.
- If the system is booted from an AMD-RAID bootable array, the first array in the Arrays section must be the bootable array. The system boots only from the first array in the Arrays section.
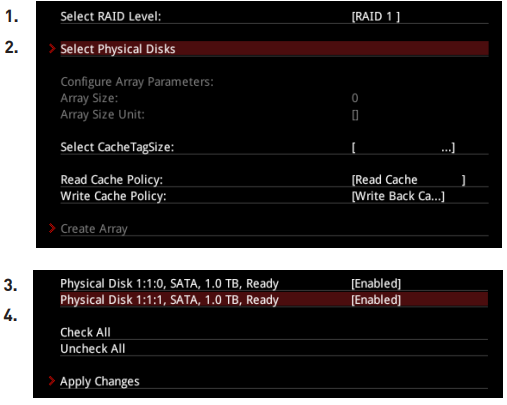
To create an array
- As previously mentioned, enable RAIDXpert2 Configuration Utility.
- Go to BIOS > SETTINGS > Advanced > RAIDXpert2 Configuration Utility > Array Management > Create Array sub-menu.
- Select the RAID level from the Select RAID Level drop down menu.
- Enter Select Physical Disks sub-menu, select member disks by changing the Physical Disk setting to Enabled.
- Select Apply Changes, then press Enter to apply and go back to previous sub-menu.
- Change the Select CacheTagSize, Read Cache Policy and Write Cache Policy settings according to your needs.
Select Create Array, then press Enter.
Deleting Arrays
Important
- Deleting an array permanently destroys all data that is on the array. This action cannot be undone and it is very unlikely that the data can be recovered.
- Do not delete the first array listed in the Arrays section, if it is the AMD-RAID bootable array. Doing this deletes the operating system and AMD-RAID files.
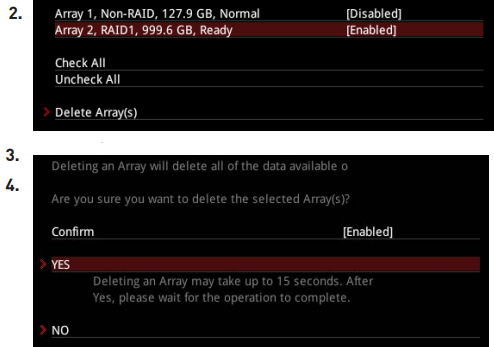
To delete an array
- As previously mentioned, enable RAIDXpert2 Configuration Utility.
- Go to BIOS > SETTINGS > Advanced > RAIDXpert2 Configuration Utility > Array Management > Delete Array sub-menu.
- Select the desired array and change the setting to Enabled.
- Enter Delete Array(s) sub-menu.
- Review the warning message, if you want to proceed, Select Confirm and change the setting to Enabled.
Select YES then press Enter.
Setup Guide
To set up the MSI PRO-VDH WIFI ProSeries Motherboard B550M,
- Start by unboxing and preparing all the components.
- Mount the motherboard onto the case stand-offs and secure it with screws.
- Connect the CPU, CPU cooler, and RAM to their respective slots.
- Install the storage devices (HDD/SSD) into the SATA ports or M.2 slots.
- Connect the power cables from the power supply unit to the motherboard.
- Install the graphics card into the PCIe x16 slot if necessary.
- Connect all front panel headers, USB ports, and other peripherals to their corresponding headers on the motherboard.
- Boot up the system and enter the BIOS to configure settings as needed.
Installing RAID Driver
New Operating System Installation
The following details the installation of the drivers while installing operating system.
- During the operating system installation, after selecting the location to install Windows click on Load driver button to install a third party RAID driver.
- When prompted, insert the USB flash drive with AMD RAID Drivers and then click Browse.
- To make an AMD RAID Drivers USB flash drive. Insert the MSI Driver Disc into the optical drive. Copy all the contents in \\Storage\AMD\
- Navigate to the directory containing the saved AMD RAID drivers, then click OK.
- Select the (rcbottom.inf) driver, click Next.
- When prompted, click OK.
- Click Browse and navigate to the directory containing the saved AMD RAID drivers again, then click OK.
- Select the (rcraid.inf) driver, click Next.
- You have successfully installed the RAID driver, and Windows setup should continue.
- Leave the disk/ USB drive in the computer until the system reboots itself. Windows setup will need to copy the files after the RAID volume is formatted, and Windows setup starts copying files.
AMD RAIDXpert2 Management Suite Installation
- Set the SATA Mode to RAID Mode in BIOS
- Insert the MSI Driver Disc into the optical drive.
- Click the Select to choose what happens with this disc pop-up notification, then select Run DVDSetup.exe to open the installer. If you turn off the AutoPlay feature from the Windows Control Panel, you can still manually execute the DVDSetup. exe from the root path of the MSI Driver Disc.
- Under the Drivers/Software tab, check the AMD RAID Drivers check-box.
- Click the Install button.
- When prompt you to restart, click OK button to finish.
- Restart your computer and enter the Windows operating system.
- Double-click the RAIDXpert2 icon to open the RAIDXpert2 Web GUI.
- Default credentials are:
- Username - admin
- Password - admin
- Default credentials are:
- Change the credentials:
- Create new username and password
- Re-log into the RAIDXpert2 Web GUI with the new credentials.
MSI PRO-VDH WIFI ProSeries Motherboard B550M Troubleshooting
Before sending the motherboard for RMA repair, try to go over troubleshooting guide first to see if your got similar symptoms as mentioned below.
The power is not on.
- Connect the AC power cord to an electrical outlet securely.
- Check if all ATX power connectors like ATX_PWR1, CPU_PWR1 are connected from the power supply to the motherboard?
- Some power supply units have a power button on the rear side, make sure the button is turned on.
- Check if the power switch cable is connected to JFP1 pin header properly.
- Verify the Clear CMOS jumper JBAT1 is set to Keep DATA.
- Test with another known working power supply of equal or greater wattage.
The power is on, but no signal to monitor
- Connect the monitor power cord to a electrical outlet securely.
- Make sure the monitor is turned on.
- Select different inputs on the monitor.
- If 3 long beeps are heard, remove all memory modules and try to install only one memory module in the DIMMA2 slot first and then restart the computer.
- If 1 long 2 short beeps are heard, remove and reinstall the graphics card and then restart the computer.
- Test with another known working graphics card.
The computer does not boot after updating the BIOS
- Clear the CMOS.
- Use the secondary BIOS to bootup the system (Only for motherboard with Dual BIOS)
Lost BIOS password
- Clear the CMOS, but that will cause you to lose all customized settings in the BIOS.
There is no audio
- Adjust the volume.
- Connect the speakers/headphones to audio ports on the motherboard rear IO panel.
- Remove secondary speakers/ headphones, HDMI cables, USB audio devices.
- Test with another known working speaker or headphone.
There is no network
- Make sure the network chipset driver has been installed.
- Verify if the network cable is properly connected and make sure the LAN port LEDs are properly illuminated.
- Verify your TCP/IP settings.
- Restart or reset your router.
- Test with another known working LAN cable.
The USB device is not working
- Make sure your USB drive driver has been installed.
- Verify if USB device is listed in Windows Device Manager.
- Connect the USB device to other USB port on the motherboard rear IO panel.
Pros & Cons
Pros:
- Robust power delivery system for stable CPU performance
- High-quality audio with Audio Boost technology
- Fast Wi-Fi 6 and Bluetooth 5.2 connectivity
- Multiple USB ports including USB 3.2 Gen 2
- Support for high-speed DDR4 memory up to 4600MHz+
- RGB lighting support with Mystic Light
Cons:
- No built-in USB 3.2 Gen 2x2 port
- Limited number of SATA ports compared to some other models
- No onboard display outputs (requires separate graphics card)
- BIOS can be complex for novice users
Customer Reviews
Customers have generally praised the MSI PRO-VDH WIFI ProSeries Motherboard B550M for its stability and performance. Many have noted that it handles demanding tasks such as gaming and video editing with ease. However, some users have mentioned that the BIOS interface could be more user-friendly.
Common complaints include the lack of onboard display outputs and the limited number of SATA ports. Despite these minor drawbacks, the motherboard has received positive reviews for its overall quality and feature set.
Faqs
What chipset does the WIFI use?
What type of processors does this MSI support?
Does the B550M have Wi-Fi?
How many DDR4 memory slots does this motherboard have?
What kind of PCIe slots are available on this motherboard?
Does the MSI PRO-VDH support NVMe?
What is the quality of the audio on this motherboard?
How do I set up the Wi-Fi on this ProSeries Motherboard B550M?
Can I use RGB lighting with this motherboard?
What are some common issues with this motherboard and how can I troubleshoot them?
Leave a Comment