Netgear AC1200 WiFi Router External Antennas R6220 User Guide
Content
Netgear AC1200 WiFi Router External Antennas R6220
Hardware Setup
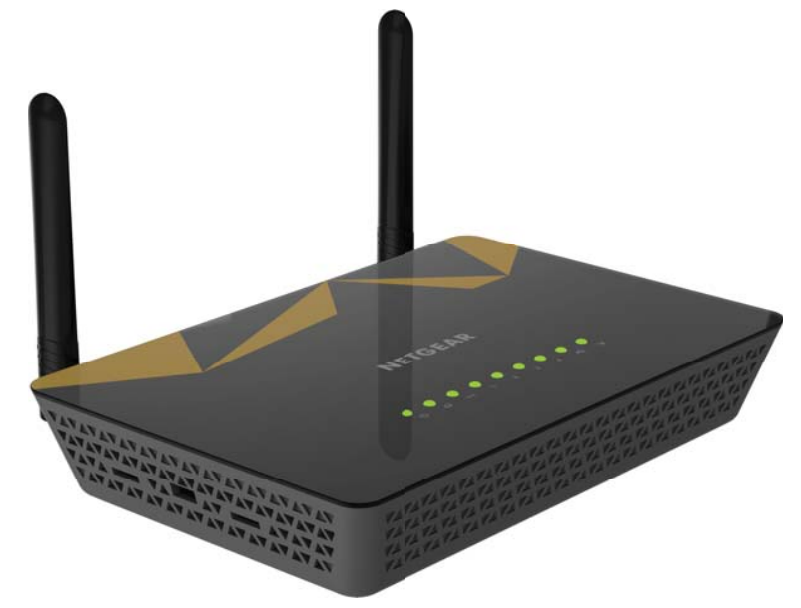
The AC1200 Smart WiFi Router with External Antennas is compatible with the latest WiFi devices and is backward compatible with 802.11 a/b/g and n devices. With simultaneous dual-band WiFi technology, the router offers speeds up to 300 Mbps at 2.4 GHz and 833 Mbps at 5 GHz and avoids interference, ensuring top WiFi speeds and reliable connections. You can also use the Gigabit Ethernet ports and USB port to connect local devices.
Unpack Your Router
Your package contains the following items.
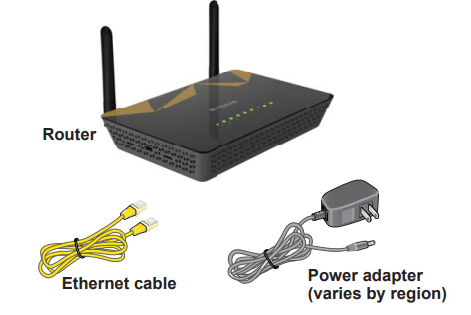
Figure 1. Package contents
LEDs
The status LEDs are located on the top of the router.
Table 1. LED descriptions
LED | Description |
Power |
|
Internet |
|
2.4 GHz WiFi |
|
5 GHz WiFi |
|
Ethernet ports 1–4 |
|
USB |
|
WPS/FastLane |
|
Rear Panel
The rear panel connections and buttons are shown in the following figure.
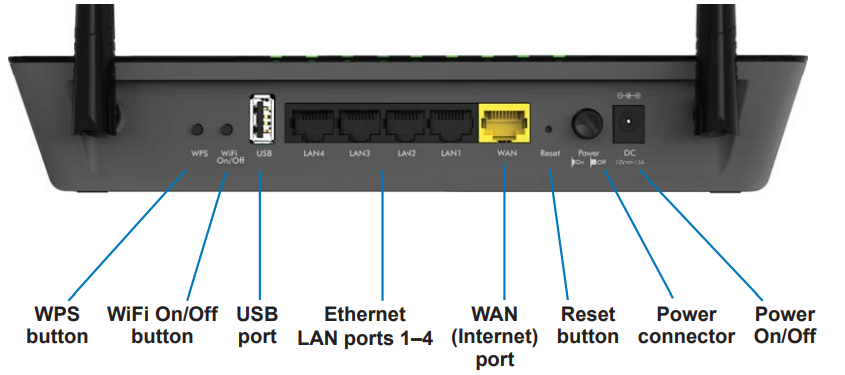
Figure 2. Router rear panel
The WPS button lets you use WPS to join the WiFi network without typing the WiFi password. Pressing the WiFi On/Off button for two seconds turns the WiFi radios on and off. Pressing the Reset button restores the factory settings.
Description
The Netgear AC1200 WiFi Router R6220 boasts a sleek and compact design, making it easy to place in any home or office setting. The dual-band technology ensures that you can connect a variety of devices without compromising on speed or performance. The external antennas are adjustable, allowing you to fine-tune the signal to reach every corner of your space.
The router also features a built-in USB port, enabling you to share files and connect printers across your network. With its robust security features, including WPA/WPA2 encryption, you can rest assured that your data is protected.
Position Your Router
The router lets you access your network anywhere within the operating range of your wireless network. However, the operating distance or range of your wireless connection can vary significantly depending on the physical placement of your router. For example, the thickness and number of walls the wireless signal passes through can limit the range.
Additionally, other wireless access points in and around your home might affect your router’s signal. Wireless access points are routers, repeaters, WiFi range extenders, and any other device that emits a wireless signal for network access.
Position your router according to the following guidelines:
- Place your router near the center of the area where your computers and other devices operate, and within line of sight to your wireless devices.
- Make sure that the router is within reach of an AC power outlet and near Ethernet cables for wired computers.
- Place the router in an elevated location, minimizing the number walls and ceilings between the router and your other devices.
- Place the router away from electrical devices such as these:
- Ceiling fans
- Home security systems
- Microwaves
- Computers
- Base of a cordless phone
- 2.4 GHz cordless phone
- Place the router away from large metal surfaces, large glass surfaces, insulated walls, and items such as these:
- Solid metal doors
- Aluminum studs
- Fish tanks
- Mirrors
- Brick
- Concrete
Cable Your Netgear AC1200 WiFi Router R6220
The following image shows how to cable your router:

Figure 3. Router cabling
To cable your router:
- Unplug your modem’s power, leaving the modem connected to the wall jack for your Internet service.
If your modem uses a battery backup, remove the battery. - Plug in and turn on your modem.
If your modem uses a battery backup, put the battery back in. - Connect your modem to the Internet port of your router with the yellow Ethernet cable that came with your router.
- Connect the power adapter to your router and plug the power adapter into an outlet.
- Press the Power On/Off button on the rear panel of the router.
Use VPN to Access Your Network
You can use OpenVPN software to remotely access your router using virtual private networking (VPN). This chapter explains how to set up and use VPN access.
Set Up a VPN Connection
A virtual private network (VPN) lets you use the Internet to securely access your network when you aren’t home.
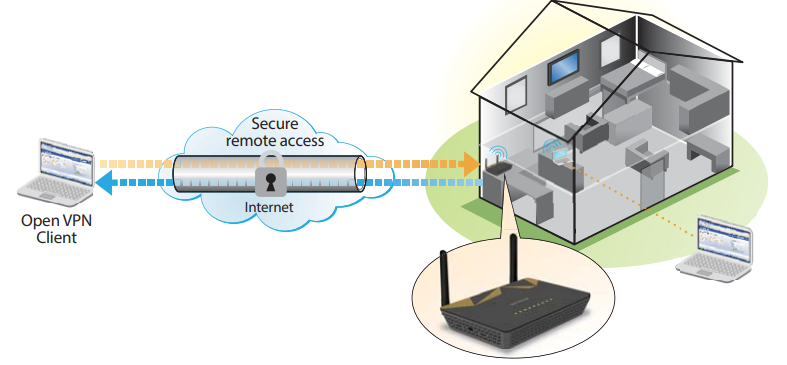
Figure 8. VPN provides a secure tunnel between your home network and a remote computer
This type of VPN access is called a client-to-gateway tunnel. The computer is the client, and the router is the gateway. To use the VPN feature, you must log in to the router and enable VPN, and you must install and run VPN client software on the computer.
Note: The router currently does not support iOS or Android VPN client software.
- VPN uses DDNS or a static IP address to connect with your router.
- To use a DDNS service, register for an account with a host name (sometimes called a domain name). You use the host name to access your network. The router supports these accounts: NETGEAR, No-IP, and Dyn. See Dynamic DNS on page 77.
- If your Internet service provider (ISP) assigned a static WAN IP address (such as 50.196.x.x or 10.x.x.x) that never changes to your Internet account, the VPN can use that IP address to connect to your home network.
Specify VPN Service in the Router
You must specify the VPN service settings in the router before you can use a VPN connection.
To specify the VPN service:
- Launch a web browser from a computer or wireless device that is connected to the network.
- Type http://www.routerlogin.net or http://www.routerlogin.com.
A login screen displays. - Enter the router user name and password.
The user name is admin. The default password is password. The user name and password are case-sensitive.
The BASIC Home screen displays. - Select ADVANCED > Advanced Setup > VPN Service.
The VPN Service screen displays. - Select the Enable VPN Service check box.
By default, the VPN uses the UDP service type and uses port 12974. If you want to customize the service type and port, NETGEAR recommends that you change these settings before you install the OpenVPN software. - To change the service type, scroll down and select the TCP radio button.
- To change the port, scroll down to the Service Port field, and type the port number that you want to use.
- Click the Apply button.
Your changes are saved. VPN is enabled in the router, but you must install and set up OpenVPN software on your computer before you can use a VPN connection.
Install OpenVPN Software on Your Computer
You must install this software on each computer that you plan to use for VPN connections to your router.
To install VPN client software:
- Visit http://openvpn.net/index.php/download/community-downloads.html.
- In the Windows Installer section of the screen, double-click the openVPN-install-xxx.exe link.
- Download the file.
- To install the Open VPN software on your computer, click the openVPN-install-xxx.exe file.
- Click the Next button.
Read the License Agreement and click the I Agree button.
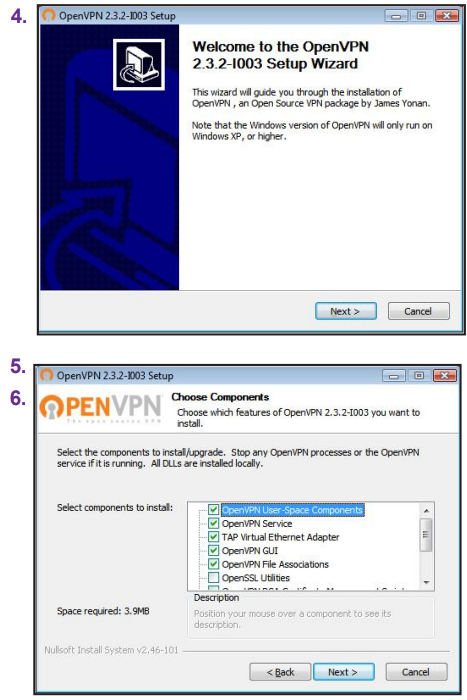
- Leave the check boxes selected as shown, and click the Next button.
To specify the destination folder, click the Browse button, select a destination folder, and click the Next button.
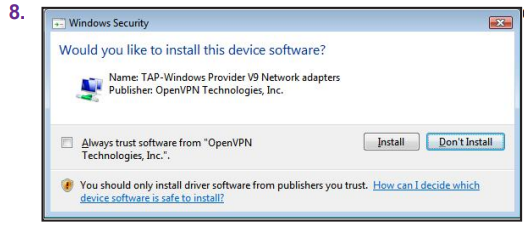
Click the Install button.
The screen displays the progress of the installation and then displays the final installation screen.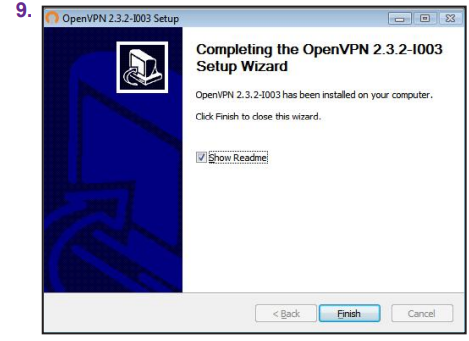
- Click the Finish button.
- Unzip the configuration files that you downloaded and copy them to the folder where the VPN client is installed on your device.
For a client device with Windows 64-bit system, the VPN client is installed at C:\Program files\OpenVPN\config\ by default. - For a client device with Windows, modify the VPN interface name to NETGEAR-VPN:
- In Windows, select Start > Control Panel > Network and Internet > Network Connections.
- In the local area connection list, find the local area connection with the device name TAP-Windows Adapter.
- Select the local area connection and change its name (not its device name) to NETGEAR-VPN.
If you do not change the VPN interface name, the VPN tunnel connection will fail.
Use a VPN Tunnel
After you set up the router to use VPN and install the OpenVPN application on your computer, you can open a VPN tunnel from your computer to your router over the Internet.
For the VPN tunnel to work, the local LAN IP address of the remote R6220 router must use a different LAN IP scheme from that of the local LAN where your VPN client computer is connected. If both networks use the same LAN IP scheme, when the VPN tunnel is established, you cannot access your home router or your home network with the OpenVPN software.
The default LAN IP address scheme for the R6220 router is 192.x.x.x. The most common IP schemes are 192.x.x.x, 172.x.x.x, and 10.x.x.x. If you experience a conflict, change the IP scheme either for your home network or for the network with the client VPN computer.
To open a VPN tunnel:
- Launch the OpenVPN application with administrator privileges.
The OpenVPN icon displays in the Windows taskbar.
Tip: You can create a shortcut to the VPN program, then use the shortcut to access the settings and select the run as administrator check box. Then every time you use this shortcut, OpenVPN automatically runs with administrator privileges. Right-click the OpenVPN icon.
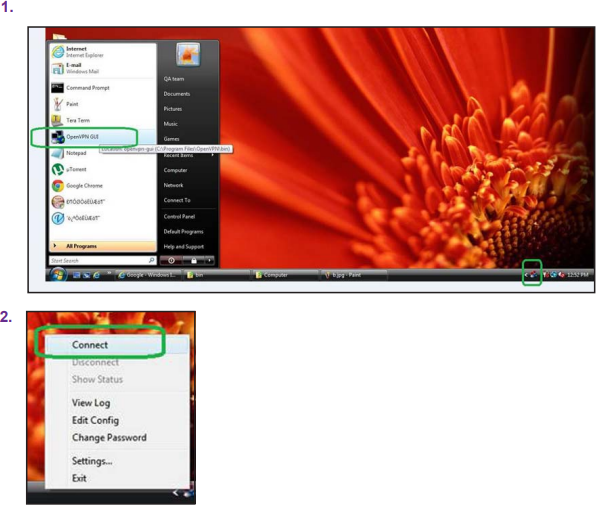
- Select Connect.
The VPN connection is established. You can do the following:- Launch a web browser and log in to your router.
- Use Windows file manager to access the router’s USB device and download files.
Use VPN to Access the Router’s USB Device and Media
To access a USB device and download files:
In Windows file manager, select the Network folder.

The network resources display. The ReadySHARE icon is in the Computer section and the remote R6220 icon is in the Media Devices section (if DLNA is enabled in the router).
- If the icons do not display, click the Refresh button to update the screen.
If the local LAN and the remote LAN are using the same IP scheme, the remote R6220 icon does not display in the Media Devices and Network Infrastructure sections. - To access the USB device, click the ReadySHARE icon.
- To access media on the router’s network, click the R6220 icon.
Use VPN to Access Your Internet Service at Home
When you’re away from home and you access the Internet, you usually use a local Internet service provider. For example, at a coffee shop you might be given a code that lets you use the coffee shop’s Internet service account to surf the web.
The router lets you use a VPN connection to access your own Internet service when you’re away from home. You might want to do this if you travel to a geographic location that doesn’t support all the Internet services that you use at home.
For example, your Netflix account might work at home but not in a different country.
Set Up VPN Client Internet Access in the Router
By default, the router is set up to allow VPN connections only to your home network but you can change the setting to allow Internet access. Accessing the Internet remotely through a VPN might be slower than accessing the Internet directly.
To allow VPN clients to use your home Internet service:
- Launch a web browser from a computer or wireless device that is connected to the network.
- Type http://www.routerlogin.net or http://www.routerlogin.com.
A login screen displays. - Enter the router user name and password.
The user name is admin. The default password is password. The user name and password are case-sensitive.
The BASIC Home screen displays. - Select ADVANCED > Advanced Setup > VPN Service.
The VPN screen displays. - Select the Enable VPN Service radio button.
- Scroll down to the Clients will use this VPN connection to access section, and select the All sites on the Internet & Home Network radio button.
When you access the Internet with the VPN connection, instead of using a local Internet service, you use the Internet service from your home network. - Click the Apply button.
Your settings are saved. - Click the For Windows or For Non Windows button and download the configuration files for your VPN clients.
- Unzip the configuration files and copy them to the folder where the VPN client is installed on your device.
For a client device with Windows 64-bit system, the VPN client is installed at C:\Program files\OpenVPN\config\ by default.
Block VPN Client Internet Access in the Router
By default, the router is set up to allow VPN connections only to your home network, not to the Internet service for your home network. If you changed this setting to allow Internet access, you can change it back.
To allow VPN clients to access only your home network:
- Launch a web browser from a computer or wireless device that is connected to the network.
- Type http://www.routerlogin.net or http://www.routerlogin.com.
A login screen displays. - Enter the router user name and password.
The user name is admin. The default password is password. The user name and password are case-sensitive.
The BASIC Home screen displays. - Select ADVANCED > Advanced Setup > VPN Service.
The VNP screen displays. - Select the Enable VPN Service radio button.
- Scroll down to the Clients will use this VPN connection to access section, and select the Home Network only radio button.
This is the default setting. The VPN connection is only to your home network, not to the Internet service for your home network. - Click the Apply button.
Your settings are saved. - Click For Windows or For Non Windows button and download the configuration files for your VPN clients.
- Unzip the configuration files and copy them to the folder where the VPN client is installed on your device.
For a client device with Windows 64-bit system, the VPN client is installed at C:\Program files\OpenVPN\config\ by default.
Use a VPN Tunnel to Access Your Internet Service at Home
To access your Internet service:
- Set up the router to allow VPN access to your Internet service. See Set Up VPN Client Internet Access in the Router on page 134.
- On your computer, launch the OpenVPN application.
The OpenVPN icon displays in the Windows taskbar. - Right-click the icon and select Connect.
- When the VPN connection is established, launch your Internet browser.
Troubleshooting
Quick Tips
Sequence to Restart Your Network
When you need to restart your network, follow this sequence:
- Turn off and unplug the modem.
- Turn off the router.
- Plug in the modem and turn it on. Wait two minutes.
- Turn on the router and wait two minutes.
Check Ethernet Cable Connections
If your device does not power on, make sure that the Ethernet cables are securely plugged in. The Internet LED on the router is lit if the Ethernet cable connecting the router and the modem is plugged in securely and both devices are turned on. If one or more powered-on computers are connected to the router by an Ethernet cable, the corresponding numbered router LAN port LED lights.
Wireless Settings
Ensure that the wireless settings in both the computer and router match exactly. The wireless network name (SSID) and wireless security settings of the router and wireless computer must match precisely. If you set up an access list in the Advanced Wireless Settings screen, add each wireless computer’s MAC address to the router’s access list.
Network Settings
Verify that the network settings of the computer are correct. Wired and wirelessly connected computers must use network (IP) addresses on the same network as the router. The simplest way to do this is to configure each computer to obtain an IP address automatically using DHCP. Some cable modem service providers require you to use the MAC address of the computer initially registered on the account; you can view this in the Attached Devices screen.
Troubleshoot with the LEDs
You can use the LEDs to identify setup or performance problems in the router and isolate their cause.
Standard LED Behavior When the Router Is Powered On
After you turn on power to the router, ensure that:
- When power is first applied, verify that the Power LED is lit.
- After about two minutes, verify:
- The Power LED is solid green.
- The WAN LED is lit.
- The WiFi LED is lit unless you turned off the wireless radio.
Power LED Is Off or Blinking
- Ensure that the power adapter is securely connected to your router and a working power outlet.
- Check that you are using the power adapter supplied by NETGEAR.
- If the Power LED blinks slowly and continuously, it indicates corrupted firmware, possibly due to an interrupted upgrade or a hardware problem. For recovery instructions or hardware issues, contact technical support at www.netgear.com/support.
Power LED Stays Amber
When turned on, if the Power LED remains amber for more than two minutes:
- Turn off power and then turn it back on.
- Press and hold the Reset button to return to factory settings.
LEDs Never Turn Off
If all LEDs stay lit one minute after power-up:
- Cycle power to see if recovery occurs.
- Press and hold the Reset button to return to factory settings.
Internet or Ethernet Port LEDs Are Off
If either Ethernet port LEDs or Internet LED does not light:
- Ensure secure Ethernet cable connections at both ends.
- Ensure power is turned on for connected devices.
- Use the correct cable for connecting your modem (standard straight-through or crossover cable).
WiFi LED Is Off
If WiFi LED stays off, check if someone pressed the WiFi On/Off button on the router, which turns wireless radios on and off.
Cannot Log In to the Router
If unable to log in from a local network computer:
- Check Ethernet connection if using a wired connection.
- Ensure your computer’s IP address matches that of the router’s subnet (192.168.1.2 to 192.168.1.254).
- If your IP address shows as 169.254.x.x, check connections from computer to router and reboot your computer.
- Clear router configuration to factory defaults if IP was changed; this resets IP address to 192.168.1.1.
- Ensure Java, JavaScript, or ActiveX is enabled in your browser; refresh if using Internet Explorer.
- Verify correct login information: username is admin, default password is password (case-sensitive).
Cannot Access the Internet
If you can access your router but not the Internet:
- Check if your router can obtain an IP address from your ISP using its ADVANCED Home screen.
- To check WAN IP address:
- Launch a web browser connected to your network.
- Visit external sites like www.netgear.com or type http://www.routerlogin.net or http://www.routerlogin.com.
- Enter username (admin) and password (password).
- Click ADVANCED tab; check for an IP address at Internet port.
If 0.0.0.0 appears, restart your network devices (modem/router). If still unable to obtain an IP address:
- Confirm with ISP if a login program is required (e.g., PPPoE).
- Verify login credentials are correctly set up in Internet Setup screen.
- If ISP checks for MAC address, inform them of new device or clone your computer’s MAC address in settings.
If an IP address is obtained but web pages do not load:
- Check DNS server addresses; ensure they are recognized by your computer.
- Verify TCP/IP gateway settings; reboot if necessary.
- Disable any unnecessary login software provided by ISP.
Troubleshoot PPPoE
If you are using PPPoE, try troubleshooting your Internet connection.
To troubleshoot a PPPoE connection:
- Launch a web browser from a computer or wireless device that is connected to the network.
- Type http://www.routerlogin.net or http://www.routerlogin.com.
A login screen displays. - Enter the router user name and password.
The user name is admin. The default password is password. The user name and password are case-sensitive.
The BASIC Home screen displays. - Click the ADVANCED tab.
The ADVANCED Home screen displays. - In the Internet Port pane, click the Connection Status button.
The Connection Status screen displays. - Check the Connection Status screen to see if your PPPoE connection is working.
If the router is not connected, click the Connect button.
The router continues to attempt to connect indefinitely. - If you cannot connect after several minutes, the router might be set up with an incorrect service name, user name, or password, or your ISP might be experiencing a provisioning problem.
Unless you connect manually, the router does not authenticate using PPPoE until data is transmitted to the network.
Troubleshooting Internet Browsing Issues
If your router can obtain an IP address but your computer is unable to load any web pages from the Internet, check the following:
- DNS Server Addresses: Your computer might not recognize any DNS server addresses. A DNS server translates Internet names (like www addresses) to numeric IP addresses. Typically, your ISP provides one or two DNS server addresses for your use. If you entered a DNS address during the router’s configuration, restart your computer. Alternatively, you can manually configure your computer with a DNS address as explained in your documentation.
- Default Gateway: Ensure that the router is configured as the default gateway on your computer. Reboot the computer and verify that the router address (www.routerlogin.net) is listed as the default gateway address.
- Unnecessary Login Software: You might be running login software that is no longer needed. If your ISP provided a program to log you in to the Internet (like WinPoET), you no longer need to run that software after installing your router. Go to Internet Explorer and select Tools > Internet Options, click the Connections tab, and select "Never dial a connection." Other browsers provide similar options.
Changes Not Saved
If the router does not save changes made in the router interface:
- Always click the Apply button when entering configuration settings before moving to another screen or tab, or your changes will be lost.
- Click the Refresh or Reload button in the web browser; old settings might be cached.
Wireless Connectivity
If you are experiencing trouble connecting wirelessly to the router:
- Wireless Network Detection: Does your device find your wireless network? If not, check the WiFi LED on the front of the router. If it is off, press the WiFi On/Off button on the router to turn the wireless radios back on. If SSID broadcast is disabled, your network will be hidden and not appear in scanning lists.
- Security Compatibility: Ensure that your wireless device supports the security type used by your network (WPA or WPA2).
- View Wireless Settings: Use an Ethernet cable to connect a computer to a LAN port on the router. Log in and select BASIC > Wireless to view settings. Remember to click Apply if you change any settings.
If your wireless device finds your network but has weak signal strength:
- Distance and Obstructions: Is your router too far from your computer or too close? Place your computer near the router but at least 6 feet (1.8 meters) away and see if signal strength improves. Check for objects blocking the signal.
Troubleshoot Your Network Using the Ping Utility
Most network devices have a ping utility that sends an echo request packet to a designated device, which responds with an echo reply.
Test the LAN Path to Your Router
To ping the router from a Windows computer:
- Click the Start button and select Run.
- Type ping followed by the IP address of the router (e.g., ping www.routerlogin.net).
- Click OK.
You should see:
- Reply from <IP address>: indicates that the path is working.
- Request timed out: indicates that there may be issues.
If not functioning correctly, check for:
- Wrong Physical Connections: Ensure that LAN port LEDs are lit for connected ports.
- Wrong Network Configuration: Verify that Ethernet card driver software and TCP/IP software are installed and configured correctly.
Test Path from Your Computer to a Remote Device
After verifying LAN path functionality:
- Click Start and select Run.
- Type ping -n 10 <IP address> (where <IP address> is for a remote device like your ISP's DNS server).
If no replies are received:
- Check that IP address of your router is listed as default gateway for your computer.
- Ensure network address of your computer differs from that of remote devices.
- Verify that your cable or DSL modem is connected and functioning properly.
- If assigned a host name by ISP, enter it as account name in Internet Setup screen.
- If ISP restricts access based on MAC addresses, configure your router to clone or spoof authorized MAC addresses.
Factory Settings
You can return the router to its factory settings. Use the end of a paper clip or a similar object to press and hold the Reset button on the back of the router for at least seven seconds. The router resets and returns to the factory configuration settings shown in the following table.
Table 3. Factory default settings
| Feature | Default Behavior | |
| Router login | User login URL | www.routerlogin.com orwww.routerlogin.net |
| User name (case-sensitive) | admin | |
| Login password (case-sensitive) | password | |
| Internet connection | WAN MAC address | Use default hardware address |
| WAN MTU size | 1500 | |
| Port speed | AutoSensing | |
| Local network (LAN) | LAN IP | 192.168.1.1 |
| Subnet mask | 255.255.255.0 | |
| DHCP server | Enabled | |
| DHCP range | 192.168.1.2 to 192.168.1.254 | |
Time zone | Pacific time | |
| DHCP starting IP address | 192.168.1.2 | |
| DHCP ending IP address | 192.168.1.254 | |
| DMZ | Disabled | |
Time zone | GMT forWW except NA and GR,GMT+1 for GR,GMT-8 for NA | |
| Time adjusted for daylight saving time | Disabled | |
| SNMP | Disabled |
| Firewall | Inbound (communications coming in from the Internet) | Disabled (except traffic on port 80, the HTTPport) |
| Outbound (communications going out to the Internet) | Enabled (all) | |
| Source MAC filtering | Disabled | |
| Wireless | Wireless communication | Enabled |
| SSID name | See router label | |
| Security | WPA2-PSK (AES) | |
| Broadcast SSID | Enabled | |
Transmission speed | Auto1 | |
| Country/region | United States in the US; otherwise, variesby region | |
| RF channel | Auto for2.4 GHz, CH 44 forWW SKU and CH 153for North America SKU | |
| Operating mode | Up to 300Mbps at 2.4 GHz, 867Mbps at 5 GHz |
- Maximum wireless signal rate derived from IEEE Standard 802.11 specifications. Actual throughput can vary. Network conditions and environmental factors, including volume of network traffic, building materials and construction, and network overhead, lower actual data throughput rate
Technical Specifications
Table 4. R6220 router specifications
| Feature | Description |
| Data and routing protocols | TCP/IP, RIP-1, RIP-2, DHCP,PPPoE, PPTP, Bigpond, Dynamic DNS, UPnP, andSMB |
| Power adapter |
|
| Dimensions | 239.65 x 159.45x 40.6 mm (9.4 x 6.3 x 1.6 in.) |
| Weight | 385.17 g (0.85lb) |
| Operating temperature | 0° to 40°C(32º to 104ºF) |
| Operating humidity | 90% maximum relative humidity, noncondensing |
| Electromagnetic emissions | FCC Part 15 ClassB VCCI Class B EN 55 022 (CISPR22), Class B C-Tick N10947 |
| LAN | 10BASE-T or 100BASE-TX or 1000BASE-T, RJ-45 |
| WAN | 10BASE-T or 100BASE-TX or 1000BASE-T, RJ-45 |
| Wireless | Maximum wireless signal ratecomplies with the IEEE 802.11standard.1 |
| Radio data rates | Auto Rate Sensing |
| Data encoding standards |
|
| Maximum computers per wireless network | Limited by the amountof wireless network traffic generated by each node (typically 50–70 nodes). |
| Operating frequency range | AC23502 WiFi
|
| 802.11 security | WPA2-PSK and WPA/WPA2 |
- Maximum wireless signal rate derived from IEEE Standard 802.11 specifications. Actual throughput can vary. Network conditions and environmental factors, including volume of network traffic, building materials and construction, and network overhead, lower actual data throughput rate.
- NETGEAR makes no express or implied representations or warranties about this product’s compatibility with any future standards. 802.11ac 1733 Mbps is approximately 4x faster than 802.11n 450 Mbps. 2.4 GHz Performance Mode requires 256 QAM support on the WiFi client. Up to 1733 Mbps wireless speeds achieved when connecting to other 802.11ac 1733 Mbps devices.
Setup Guide
To set up the Netgear AC1200 WiFi Router R6220,
- Start by connecting the power cord and turning on the device. Next, connect an Ethernet cable from your modem to the router's yellow Internet port.
- Open a web browser on your computer and navigate to the router's default IP address (usually 192.168.1.1) to access the web interface.
- Follow the on-screen instructions to set up your WiFi network, including choosing a network name (SSID) and setting a secure password.
- You can also configure additional settings such as guest network access and Quality of Service (QoS) settings through the web interface.
Pros & Cons
Pros:
- Cost-effective with a competitive price point
- Dual-band WiFi for better performance and less interference
- Adjustable external antennas for improved signal strength
- Multiple Gigabit Ethernet ports for wired connections
- USB port for file sharing and printer connectivity
Cons:
- Limited range compared to more expensive models
- No MU-MIMO technology for simultaneous device streaming
- Only one USB port available
- No built-in VPN server
Customer Reviews
Customers generally praise the Netgear AC1200 WiFi Router R6220 for its ease of setup, reliable performance, and good value for money. However, some users have noted that the range could be better, especially in larger homes or those with many obstructions.
Common complaints include occasional drops in connectivity and the lack of advanced features like MU-MIMO technology. Despite these, the router remains a popular choice for those seeking a reliable and affordable WiFi solution.
Faqs
What is the maximum WiFi speed of the Netgear AC1200?
How many external antennas does the Router R6220 have?
Does the Netgear support USB file sharing?
How do I set up the Netgear Router?
What security protocols does the Netgear AC1200 support?
Can I use the Netgear for online gaming?
How many devices can I connect to the Netgear AC1200?
Is the Netgear AC1200 compatible with all types of internet services?
How do I update the firmware of the Netgear WiFi Router?
What should I do if my WiFi connection is slow or intermittent?
Leave a Comment
