Netgear AC750 Wireless Gigabit Router R6050 User Manual
Content
Introduction
The Netgear AC750 Wireless Gigabit Router R6050 is a versatile and high-performance router designed to provide reliable internet connectivity for homes and small offices. With dual-band technology, it supports speeds of up to 750 Mbps, ensuring seamless streaming, gaming, and browsing experiences. The router features multiple Ethernet ports for wired connections and an easy setup process through the Nighthawk app. Priced at approximately $50, it offers excellent value for users seeking enhanced wireless performance and coverage.
Hardware Setup
Unpack Your Router
Open the box and remove the router, power adapter, cable, and installation guide.
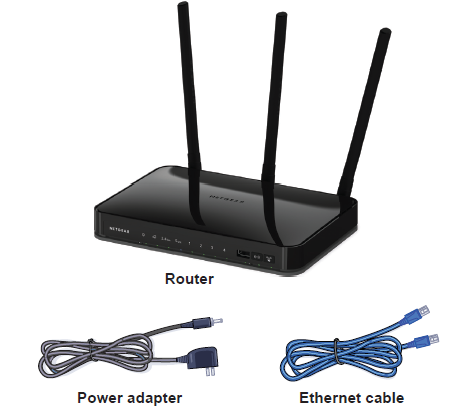
Figure 1. Package contents
Your box contains the following items:
- AC750 Wireless Dual Band Gigabit Router R6050
- AC power adapter (plug varies by region)
- Category 5 (Cat 5) Ethernet cable
- Installation guide with cabling and router setup instructions
Hardware Features
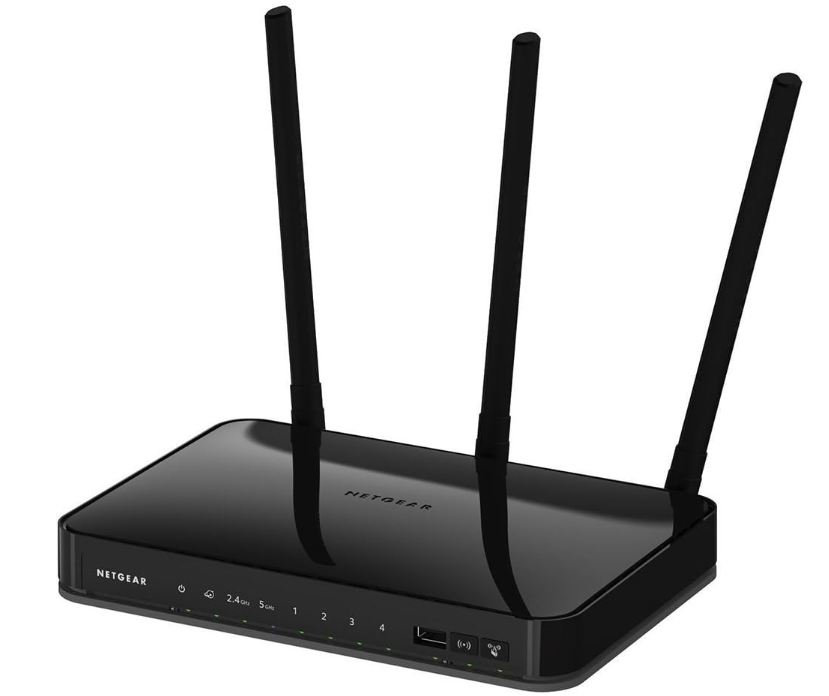
Before you cable your router, take a moment to become familiar with the label and the front and back panels. Pay particular attention to the LEDs on the front panel.
Front Panel
The router front panel has the status LEDs, buttons, and ports shown in the following figure.
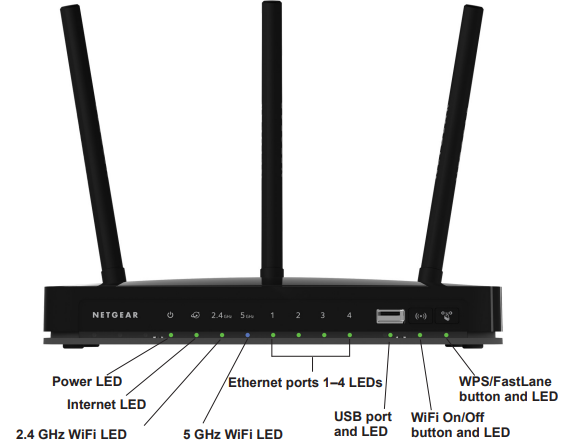
Figure 2. Front panel
Table 1. Front panel LED descriptions
LED | Description |
Power |
|
Internet |
|
2.4 GHz WiFi |
|
5 GHz WiFi |
|
Ethernet ports 1–4 |
|
USB |
|
WPS/FastLane |
|
The WiFi On/Off and WPS/FastLane buttons toggle the WiFi and WPS functions on and off, as follows:
- WiFi On/Off button
Pressing and holding this button for two seconds turns the 2.4 GHz and 5 GHz WiFi radios on and off. If the WiFi LEDs are lit, the WiFi radios are on. If the LEDs are off, the WiFi radios are turned off and you cannot connect wirelessly to the router. - WPS/FastLane button
You can use this button to use WPS or FastLane to add a WiFi device or computer to your WiFi network. The LED below the WPS/FastLane button blinks green when the router is trying to add the WiFi device or computer. The LED stays solid green when WiFi security is enabled in the router.
Rear Panel
The rear panel has the buttons and connections shown in the following figure.

Figure 3. Rear panel
Product Label
The label on the router shows the network name (SSID), network key (password), login information, MAC address, and serial number.
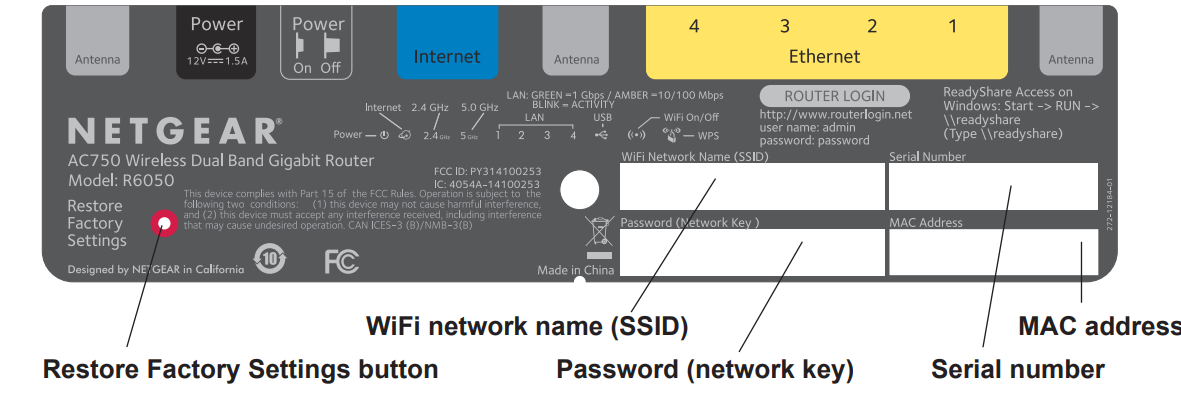
Figure 4. The label shows unique information about your router
Position Your Router
The router lets you access your network anywhere within the operating range of your WiFi network. However, the operating distance or range of your WiFi connection can vary significantly depending on the physical placement of your router. For example, the thickness and number of walls the WiFi signal passes through can limit the range.
Additionally, other WiFi access points in and around your home might affect your router’s signal. WiFi access points are routers, repeaters, WiFi range extenders, or any other device that emits a WiFi signal for network access.
To position your router:
- Carefully peel off the protective film covering your router.
- Position your router according to the following guidelines:
- Place your router near the center of the area where your computers and other devices operate, and within line of sight to your WiFi devices.
- Make sure that the router is within reach of an AC power outlet and near Ethernet cables for wired computers.
- Place the router in an elevated location, minimizing the number walls and ceilings between the router and your other devices.
- Place the router away from electrical devices such as these:
- Ceiling fans
- Home security systems
- Microwaves
- Computers
- Base of a cordless phone
- 2.4 GHz cordless phone
- Place the router away from large metal surfaces, large glass surfaces, and insulated walls such as these:
- Solid metal doors
- Aluminum studs
- Fish tanks
- Mirrors
- Brick
- Concrete
Cable Your Netgear AC750 Wireless Gigabit Router R6050
The installation guide that came in the box has more details about installation. The following illustration shows typical cable connections for a router.

Figure 5. Router cable connections
To cable your router:
- Prepare your modem.
Unplug your modem’s power. If it has a battery backup, remove the battery. - Connect the modem.
Plug in your modem. Put the battery back in. Then cable the modem to the router’s Internet port. - Connect the power adapter cord that came in the package to the power input on the rear panel of the router and plug it in to an electrical outlet.
The Power LED lights. - Connect a computer or WiFi device.
You have two options:- Connect with WiFi. To connect with WiFi, use the WiFi network name and password on the product label.
- Connect with an Ethernet cable. Use an Ethernet cable to connect a computer to one of the Ethernet LAN ports on the rear panel of the router.
Technical Specifications
Table 4. Router technical specifications
| Feature | Specification |
|---|---|
| Data and Routing Protocols | TCP/IP, RIP-1, RIP-2, DHCP, PPPoE, PPTP, Bigpond, Dynamic DNS, UPnP |
| Power Adapter | North America: 110V, 60 Hz input UK, Australia: 240V, 50 Hz input Europe: 230V, 50 Hz input China: 220V, 60 Hz input All regions: 12 VDC @ 1.5A output |
| Dimensions | 217.74 x 147.73 x 34.92 mm 8.57 x 5.81 x 1.37 in |
| Weight | 392.6 g 0.87 lb |
| Operating Temperature | 0° to 40°C (32º to 104ºF) |
| Operating Humidity | 90% maximum relative humidity, non-condensing |
| Designed to Conform to Standards | FCC |
| LAN | 10BASE-T, 1000BASE-T, or 100BASE-Tx, RJ-45 |
| WAN | 10BASE-T, 1000BASE-T, or 100BASE-Tx, RJ-45 |
Description
The Netgear AC750 Wireless Gigabit Router R6050 is designed with a sleek and compact design, making it easy to place in any home environment. The router features LED indicators for power, Internet, and Wi-Fi status, providing a quick glance at the network's health. The USB 2.0 port allows users to share files and connect printers across the network. With its robust security features, including WPA2 encryption and parental controls, the R6050 ensures a safe and secure browsing experience.
The router also includes advanced features like Quality of Service (QoS) which helps in prioritizing traffic for critical applications such as video streaming and online gaming. This ensures that your internet connection remains stable and fast even when multiple devices are connected.
Specify Your Internet and WiFi Settings
Use the Internet Setup Wizard
You can use the Setup Wizard to detect your Internet settings and automatically set up your router. The Setup Wizard is not the same as the genie screens that display the first time you connect to your router to set it up.
To use the Setup Wizard:
- Launch a web browser from a computer or WiFi device that is connected to the network.
A login screen displays. - Enter the router user name and password.
The user name is admin. The default password is password. The user name and password are case-sensitive.
The BASIC Home screen displays. Select ADVANCED > Setup Wizard.
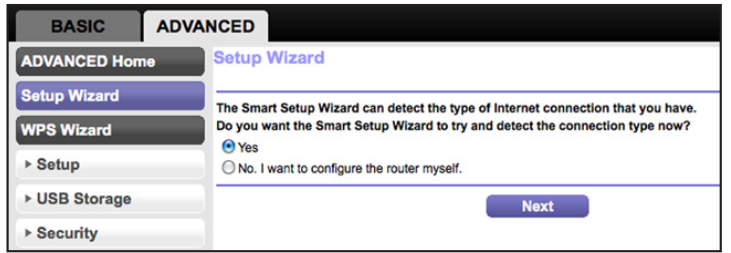
- Select the Yes radio button.
If you select the No, I want to configure the router myself radio button, you are taken to the Internet Setup screen (see Manually Set Up the Internet Connection on page 22). - Click the Next button.
The Setup Wizard searches your Internet connection for servers and protocols to determine your ISP configuration.

Manually Set Up the Internet Connection
You can view or change the router’s Internet connection settings.
Specify an Internet Connection Without a Login
To specify the Internet connection settings:
- Launch a web browser from a computer or WiFi device that is connected to the network.
A login screen displays. - Enter the router user name and password.
The user name is admin. The default password is password. The user name and password are case-sensitive.
The BASIC Home screen displays. Select Internet.
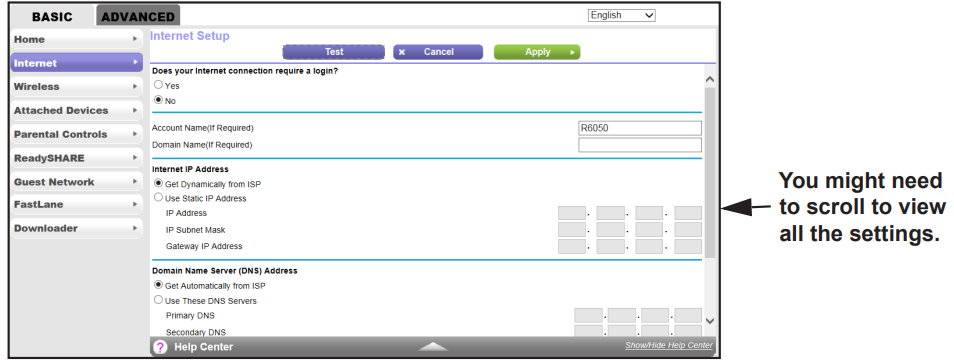
- For the Does your Internet connection require a login setting, leave the No radio button selected.
- If your Internet connection requires an account name or host name, type it in the Account Name (If Required) field.
- If your Internet connection requires a domain name, type it in the Domain Name (If Required) field.
For the other sections in this screen, the default settings usually work, but you can change them. - Select an Internet IP Address radio button:
- Get Dynamically from ISP. Your ISP uses DHCP to assign your IP address. Your ISP automatically assigns these addresses.
- Use Static IP Address. Enter the IP address, IP subnet mask, and the gateway IP address that your ISP assigned. The gateway is the ISP router to which your router connects.
- Select a Domain Name Server (DNS) Address radio buttons:
- Get Automatically from ISP. Your ISP uses DHCP to assign your DNS servers. Your ISP automatically assigns this address.
- Use These DNS Servers. If you know that your ISP requires specific servers, select this option. Enter the IP address of your ISP’s primary DNS server. If a secondary DNS server address is available, enter it also.
- Select a Router MAC Address radio button:
- Use Default Address. Use the default MAC address.
- Use Computer MAC Address. The router captures and uses the MAC address of the computer that you are now using. You must use the one computer that the ISP allows.
- Use This MAC Address. Enter the MAC address that you want to use.
- Click the Apply button.
Your settings are saved. - Click the Test button to test your Internet connection.
Specify an Internet Connection That Uses a Login
To view or change the basic Internet setup:
- Launch a web browser from a computer or WiFi device that is connected to the network.
A login screen displays. - Enter the router user name and password.
The user name is admin. The default password is password. The user name and password are case-sensitive.
The BASIC Home screen displays. Select Internet.

- In the Does your Internet connection require a login section of the screen, select the Yes radio button.
The screen adjusts. - In the Internet Service Provider list, select the encapsulation method: PPPoE, L2TP, or PPTP.
- In the Login field, enter the login name your ISP gave you. This login name is often an email address.
- In the Password field, type the password that you use to log in to your Internet service.
- If your ISP requires a service name, type it in the Service Name (if Required) field.
- In the Connection Mode list, select Always On, Dial on Demand, or Manually Connect.
- To change the number of minutes until the Internet login times out, in the Idle Timeout (In minutes) field, type the number of minutes.
This is how long the router keeps the Internet connection active when no one on the network is using the Internet connection. A value of 0 (zero) means never log out. - Select an Internet IP Address radio button:
- Get Dynamically from ISP. Your ISP uses DHCP to assign your IP address. Your ISP automatically assigns these addresses.
- Use Static IP Address. Enter the IP address, IP subnet mask, and the gateway IP address that your ISP assigned. The gateway is the ISP router to which your router connects.
- Select a Domain Name Server (DNS) Address radio button:
- Get Automatically from ISP. Your ISP uses DHCP to assign your DNS servers. Your ISP automatically assigns this address.
- Use These DNS Servers. If you know that your ISP requires specific servers, select this option. Enter the IP address of your ISP’s primary DNS server. If a secondary DNS server address is available, enter it also.
- Select a Router MAC Address radio button:
- Use Default Address. Use the default MAC address.
- Use Computer MAC Address. The router captures and uses the MAC address of the computer that you are now using. You must use the one computer that the ISP allows.
- Use This MAC Address. Enter the MAC address that you want to use.
- Click the Apply button.
Your settings are saved. - Click the Test button to test your Internet connection.
If the NETGEAR website does not display within one minute, see Chapter 10, Troubleshooting.
Specify Basic WiFi Settings
The router comes with preset security. This means that the WiFi network name (SSID), network key (password), and security option (encryption protocol) are preset in the factory. You can find the preset SSID and password on the product label.
Note: The preset SSID and password are uniquely generated for every device to protect and maximize your WiFi security.
NETGEAR recommends that you do not change your preset security settings. If you change your preset security settings, make a note of the new settings and store it in a safe place where you can easily find it.
If you use a WiFi device to change the wireless network name (SSID) or other wireless security settings, you are disconnected when you click the Apply button. To avoid this problem, use a computer with a wired connection to access the router.
To specify basic WiFi settings:
- Launch a web browser from a computer or WiFi device that is connected to the network.
A login screen displays. - Enter the router user name and password.
The user name is admin. The default password is password. The user name and password are case-sensitive.
The BASIC Home screen displays. Select Wireless.
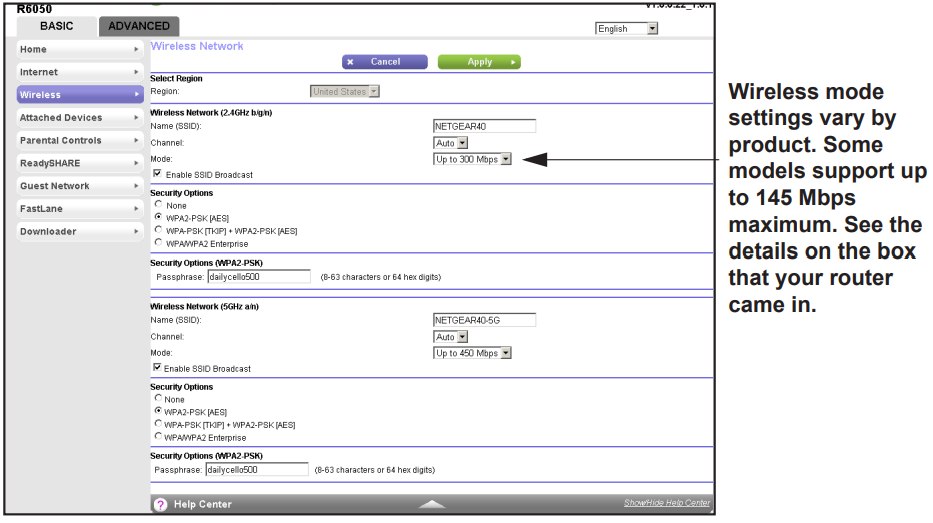
- In the Region list, select your region.
In some locations, you cannot change this setting. - To change the network name (SSID), type a new name in the Name (SSID) field.
The name can be up to 32 characters long and it is case-sensitive. The default SSID is randomly generated and is on the product label. If you change the name, make sure to write down the new name and keep it in a safe place. - To change the wireless channel, select a number in the Channel list.
In some regions, not all channels are available. Do not change the channel unless you experience interference (shown by lost connections or slow data transfers). If this happens, experiment with different channels to see which is the best.
When you use multiple access points, it is better if adjacent access points use different channels to reduce interference. The recommended channel spacing between adjacent access points is four channels (for example, use Channels 1 and 5, or 6 and 10). - To change the mode, select it from the Mode list.
- To control the SSID broadcast, select or clear the Enable SSID Broadcast check box. When this check box is selected, the router broadcasts its network name (SSID) so that it displays when you scan for local WiFi networks on your computer or WiFi device.
- Click the Apply button.
Your settings are saved.
If you connected wirelessly to the network and you changed the SSID, you are disconnected from the network.
Make sure that you can connect wirelessly to the network with its new settings. If you cannot connect wirelessly, check the following:
- • Is your computer or WiFi device connected to another wireless network in your area?Some wireless devices automatically connect to the first open network without wireless security that they discover.
- Is your computer or WiFi device trying to connect to your network with its old settings (before you changed the settings)? If so, update the WiFi network selection in your computer or WiFi device to match the current settings for your network.
Change the WiFi Password or Security Level
Your router comes with preset WPA2 or WPA security. The WiFi password that you enter to connect to your network is unique to your router and is on the product label. NETGEAR recommends that you use the preset security, but you can change the settings. NETGEAR recommends that you do not disable security.
To change the WiFi password or security level:
- Launch a web browser from a computer or WiFi device that is connected to the network.
A login screen displays. - Enter the router user name and password.
The user name is admin. The default password is password. The user name and password are case-sensitive.
The BASIC Home screen displays. Select Wireless.
- Under Security Options, select a WPA option:
- WPA2-PSK [AES]
- WPA-PSK [TKIP] + WPA2-PSK [AES]
- WPA/WPA2 Enterprise
The WPA2 options use the newest standard for the strongest security, but some older computers and wireless devices cannot use WPA2. By default, the WPA-PSK [TKIP] + WPA2-PSK [AES] radio button is selected so that new or old computers and WiFi devices can connect to the WiFi network by using either WPA2 or WPA security.
The Passphrase field displays.
- In the Passphrase field, enter the network key (password) that you want to use.
It is a text string from 8 to 63 characters. This is the WiFi password that you will enter in your computer or WiFi devices to connect to the network. - Write down the new password and keep it in a secure place for future reference.
- Click the Apply button.
Control the Wireless Radio
The router has an internal wireless radio that broadcasts signals in the 2.4 GHz range. By default, it is enabled so that you can connect wirelessly to the router. When the wireless radio is disabled, you can still use an Ethernet cable for a LAN connection to the router.
Enable or Disable the Wireless Radio
To enable or disable the wireless radio:
- Launch a web browser from a computer or WiFi device that is connected to the network.
A login screen displays. - Enter the router user name and password.
The user name is admin. The default password is password. The user name and password are case-sensitive.
The BASIC Home screen displays. Select ADVANCED > Advanced Setup > Wireless Settings.
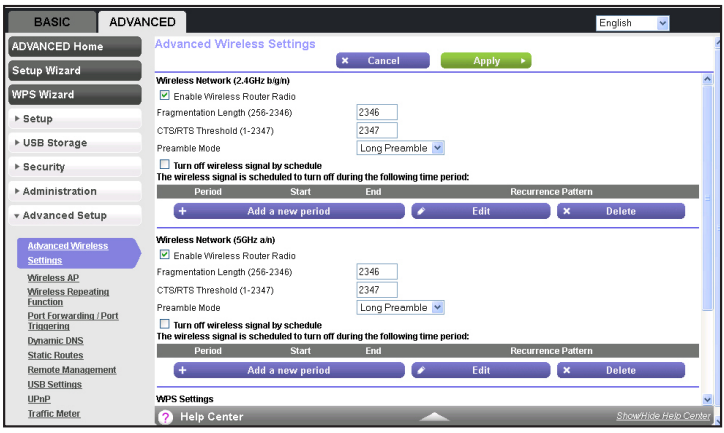
- Select or clear the Enable Wireless Router Radio check box. Clearing this check box turns off the WiFi feature of the router.
- Click the Apply button.
Set Up a Wireless Schedule
You can use this feature to turn off the wireless signal from your router at times when you do not need a wireless connection. For example, you might turn it off for the weekend if you leave town.
To set up the wireless schedule:
- Launch a web browser from a computer or WiFi device that is connected to the network.
A login screen displays. - Enter the router user name and password.
The user name is admin. The default password is password. The user name and password are case-sensitive.
The BASIC Home screen displays. - Select ADVANCED > Advanced Setup > Wireless Settings.
The Advanced Wireless Settings screen displays. Click the Add a new period button.
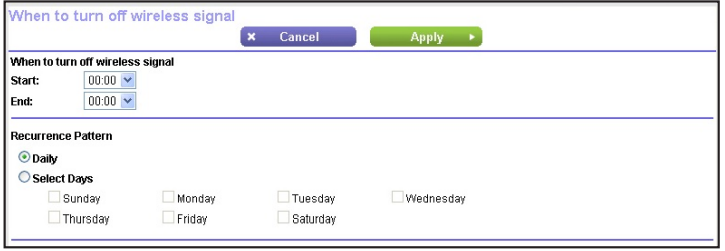
- Use the lists, radio buttons, and check boxes to set up a period during which you want to turn off the wireless signal.
- Click the Apply button.
The Advanced Wireless Settings screen displays. - Select the Turn off wireless signal by schedule check box to activate the schedule.
- Click the Apply button.
Troubleshooting
Forgotten Passwords
The router user name admin lets you use a web browser to log in to the router to view or change its settings. The router’s WiFi network name lets you connect to its WiFi network. Both admin and the WiFi network have passwords by default.
The default password for the router user name admin is password. If you changed it and enabled password recovery, you can recover the password.
If you changed the password and did not enable password recovery, you can use the Restore Factory Settings button to return the router to its factory settings. This erases all the router’s current settings including its Internet connection settings. For more information, see Factory Default Settings on page 156.
To recover your password when password recovery is enabled:
- In the address field of your browser, type www.routerlogin.net.
A login screen displays. - Click the Cancel button.
If password recovery is enabled, you are prompted to enter the serial number of the router.
The serial number is on the product label. - Enter the serial number of the router.
- Click the Continue button.
A screen displays requesting the answers to your security questions. - Enter the saved answers to your security questions.
- Click the Continue button.
A screen displays your recovered password. - Click the Login again button.
A login screen displays. - With your recovered password, log in to the router.
WiFi Passwords
The router comes preset with a unique WiFi network name and WiFi password. This information is on the product label. You can also set up a guest network to allow visitors to access your Internet connection.
If you changed the WiFi settings and do not remember what they are, you can use a wired Ethernet connection to log in to the router to view the WiFi settings.
To use a wired connection to view WiFi settings:
- Use an Ethernet cable to connect your computer to an Ethernet LAN port on the router. An Ethernet LED lights for the port where you connected the computer.
- Launch a web browser from the connected computer.
A login screen displays. - Enter the router user name and password.
The user name is admin. The default password is password. The user name and password are case-sensitive.
The BASIC Home screen displays. - To view the WiFi settings, select Wireless.
The Wireless Network screen displays. - To view guest network settings, select Guest.
The Guest Network Settings screen displays.
WiFi Connections
If you are having trouble connecting wirelessly to the router, try to isolate the problem.
Consider the following possibilities:
- The WiFi signal strength is weak.
Check these conditions:- Is your router too far from your computer, or too close?
Move your computer near the router, but at least 6 feet (2 meters) away, and see if the signal strength improves. - Is your WiFi signal blocked by objects between the router and your computer?
Your computer or WiFi devices does not find your WiFi network.
- Is your router too far from your computer, or too close?
- Check the following:
- Is the WiFi LED on the router lit?
If this LED is off, someone might have disabled the wireless radio or set up a wireless schedule. For more information about these settings, see Use the Router as a Wireless Access Point on page 45. - Did you disable the router’s SSID broadcast?
If you cleared the Enable SSID Broadcast check box in the Wireless Network screen, your wireless network is hidden and does not display in your wireless client’s scanning list. To connect to a hidden network, you must type the network name and the WiFi password.
- Is the WiFi LED on the router lit?
- Does your computer or WiFi device support the security that you are using for your WiFi network (WEP, WPA, or WPA2)?
- Did you set up a wireless access list in the router?
If you set up an access list, you must add the MAC address for each computer and WiFi device to the list.
Changes Not Saved
If the router does not save the changes you make through the NETGEAR genie screens, do the following:
- When you log in to the router and change the settings on a screen, always click the Apply button before you move to another screen or tab, or your changes are lost.
- Click the Refresh or Reload button in the web browser. The changes might have occurred, but the old settings might be in the web browser’s cache.
Troubleshoot with the LEDs
The LEDs on the front panel of the router indicate its status.
Apply Power to the Router and Check the LEDs
To apply power to the router and check the LEDs:
- Connect the power adapter cord that came with the router and plug it in to a power outlet.
The Power LED lights and turns amber within a few seconds. This indicates that the self-test is running. - After approximately 30 seconds, verify that the LEDS are lit as follows:
The Power LED is lit solid green.
- The WiFi LED
 is lit solid green.
 - The Internet LED
 is lit solid green.
 - The Ethernet LEDs
 (1 through 4) are lit solid green or solid amber for any computers cabled to the router by an Ethernet cable.
- The WiFi LED
- If the LEDs do not light as expected, use the LED behavior to troubleshoot the problem.
All LEDs Remain Lit
When the router is turned on, the LEDs light for about 10 seconds and then turn off. If all the LEDs stay lit, a fault exists within the router.
If all LEDs are still lit one minute after power-up, try the following:
- Unplug the router’s power adapter cord. Plug it in again and see if the router recovers.
- To return the router to its factory settings, press and hold the Restore Factory Settings button.
If the error persists, you might have a hardware problem. Contact technical support at www.netgear.com/support.
Power LED Is Off or Blinking
If the Power LED![]() is off or blinking, try the following:
is off or blinking, try the following:
- Make sure that the power adapter cord is securely connected to your router and securely connected to a functioning power outlet.
- Make sure that you are using the power adapter cord that NETGEAR supplied for this product.
- If the Power LED blinks slowly and continuously, the router firmware is corrupted. This situation can happen if a firmware upgrade is interrupted, or if the router detects a problem with the firmware. If the error persists, you have a hardware problem.
Power LED Stays Amber
When the router is turned on, the Power LED turns![]() amber for about 20 seconds and then turns green. If the LED does not turn green, the router has a problem.
amber for about 20 seconds and then turns green. If the LED does not turn green, the router has a problem.
If the Power LED is still amber one minute after you turn on power to the router, try the following:
- Unplug the router’s power adapter cord. Plug it in again and see if the router recovers.
- To return the router to its factory settings, press and hold the Restore Factory Settings button.
If the error persists, you might have a hardware problem. Contact technical support at https://www.netgear.com/support
Internet LEDs Is Off
If the Internet LED ![]() does not light, check the following:
does not light, check the following:
- Make sure that the Ethernet cable is securely connected to the router Internet port and the modem.
- Make sure that power is turned on to the connected modem.
- Be sure that you are using the correct cable.
- When you connect the router’s Internet port to a cable or DSL broadband modem, use the cable that was supplied with the cable or DSL broadband modem. This cable can be a standard straight-through Ethernet cable or an Ethernet crossover cable.
Cannot Log In to the Router
If you cannot log in to the router from a computer or WiFi device on your local network, check the following:
- Make sure that your computer or WiFi device is connected to the router’s network.
- For a WiFi connection, select the network and entered its WiFi password.
- For a wired connection, use an Ethernet cable to connect your computer to an Ethernet LAN port on the router (not the Ethernet Internet port).
- Launch a web browser and enter www.routerlogin.net.
- If a login prompt does not display, try the following:
- Close the browser and launch it again.
- Make sure that your browser has Java, JavaScript, or ActiveX enabled. If you are using Internet Explorer, click the Refresh button to be sure that the Java applet is loaded.
- If you are using a wired connection, check the Ethernet connection between the computer and the router. One of the router Ethernet LEDs lights to show that your computer is connected.
- If the login prompt displays, but you cannot log in, try the following:
- Make sure that you are using the correct login information.
The user name is admin and the default password is password. Make sure that Caps Lock is off when you enter this information. - If you customized the IP address scheme that the router uses, see Troubleshoot IP Addresses on page 154.
- Make sure that you are using the correct login information.
The Router Cannot Access the Internet
If you can log in to your router, but it cannot access the Internet, see if the router can obtain an IP address from your Internet service provider (ISP). Unless your Internet provider assigned you a fixed IP address, your router requests an IP address from the Internet service. You can see if the request was successful using the Router Status screen.
Note: The Setup Wizard can detect your Internet connection during installation, but if the router cannot get a WAN IP address, the Setup Wizard cannot automatically resolve this issue.
If you are attempting to set up your NETGEAR router as a replacement for an ADSL gateway in your network, the router cannot perform many gateway services. For example, the router cannot convert ADSL or cable data into Ethernet networking information. NETGEAR does not support such a configuration.
To check the WAN IP address:
- Launch a web browser from a computer or wireless device that is connected to the network.
A login screen displays. - Enter the router user name and password.
The user name is admin. The default password is password. The user name and password are case-sensitive.
The BASIC Home screen displays. - Click the ADVANCED tab.
The Router Status screen displays. - In the Internet Port pane, check that an IP address is shown for the Internet port.
If 0.0.0.0 is shown, your router has not obtained an IP address from your ISP. - If your router cannot obtain an IP address from the ISP, try to force your cable or DSL broadband modem to recognize your new router by restarting your network in this order:
- Unplug and turn off the cable or DSL broadband modem.
- Unplug the router.
- Plug in the cable or DSL broadband modem and turn it on.
- Wait two minutes.
- Plug in the router and wait two minutes.
If your router is still unable to obtain an IP address from the ISP, the problem might be one of the following:
- Your Internet service provider (ISP) might require a login program.
Ask your ISP if it requires PPP over Ethernet (PPPoE) or some other type of login. If your ISP requires a login, the login name and password might be set incorrectly. - Your ISP might check for your computer’s host name.
Assign the computer host name of your ISP account as the account name in the Internet Setup screen. - Your ISP allows only one Ethernet MAC address to connect to Internet and might check for your computer’s MAC address. In this case, do one of the following:
- Inform your ISP that you have bought a new network device, and ask them to use the router’s MAC address.
- Configure your router to clone your computer’s MAC address.
Troubleshoot Internet Browsing
If your router can obtain an IP address, but your computer is unable to load any web pages from the Internet, it might be for the following reasons:
- Your computer might not recognize any DNS server addresses.
A DNS server is a host on the Internet that translates Internet names (such as www addresses) to numeric IP addresses. Typically, your ISP provides the addresses of one or two DNS servers for your use. If you entered a DNS address during the router’s configuration, reboot your computer, and verify the DNS address. You can configure your computer manually with DNS addresses, as explained in your operating system documentation. - Your computer might not have the router configured as its TCP/IP gateway.
If your computer obtains its information from the router by DHCP, reboot the computer, and verify the gateway address. - You might be running login software that is no longer needed.
If your ISP provided a program to log you in to the Internet (such as WinPoET), you no longer need to run that software after installing your router. If you use Internet Explorer as your browser, you might need to select Tools > Internet Options, click the Connections tab, and select the Never dial a connection check box. Other browsers have similar options.
Troubleshoot a PPPoE Internet Connection
To troubleshoot a PPPoE Internet connection:
- Launch a web browser from a computer or wireless device that is connected to the network.
- Enter http://www.routerlogin.net or http://www.routerlogin.com
A login screen displays. - Enter the router user name and password.
The user name is admin. The default password is password. The user name and password are case-sensitive.
The BASIC Home screen displays. - Click the ADVANCED tab.
The Router Status screen displays. - On the Internet Port pane, click the Connection Status button.
For more information, see View the Internet Connection Status on page 81. If the fields show valid information, including valid IP addresses, your PPPoE connection is up and working.
If any of the fields show incomplete information or no valid IP address, you can attempt to reconnect by clicking the Connect button. The router continues to attempt to connect indefinitely. If you cannot connect after several minutes, you might be using an incorrect service name, user name, or password. There might also be a provisioning problem with your ISP.
Note: Unless you connect manually, the router does not authenticate using PPPoE until data is transmitted to the network.
Troubleshoot Your Network Using the Ping Utility
Most network devices and routers contain a ping utility that sends an echo request packet to the designated device. The device then responds with an echo reply. You can troubleshoot a network by using the ping utility on your computer or workstation.
Test the LAN Path to Your Router
You can ping the router from your computer to verify that the LAN path to your router is set up correctly.
To ping the router from a computer running Windows:
- From the Windows toolbar, click the Start button and select Run.
- In the field provided, type ping followed by the IP address of the router, as in this example: ping www.routerlogin.net
- Click the OK button.
- You see a message like this one:
Pinging <IP address > with 32 bytes of data - If the path is working, you see this message:
Reply from < IP address >: bytes=32 time=NN ms TTL=xxx
- You see a message like this one:
If the path is not working, you see this message:
Request timed out
If the path is not functioning correctly, you might have one of the following problems:
- Wrong physical connections
For a wired connection, make sure that the numbered Ethernet port LED is lit for the port to which you are connected.
Check that the appropriate LEDs are on for your network devices. If your router and computer are connected to a separate Ethernet switch, make sure that the link LEDs are lit for the switch ports that are connected to your computer and router. - Wrong network configuration
Verify that the Ethernet card driver software and TCP/IP software are both installed and configured on your computer.
Verify that the IP address for your router and your computer are correct and that the addresses are on the same subnet.
Test the Path from Your Computer to a Remote Device
After verifying that the LAN path works correctly, test the path from your computer to a remote device.
- From the Windows toolbar, click the Start button and select Run.
- In the field provided, type:
- ping -n 10 <IP address>
- where <IP address> is the IP address of a remote device such as your ISP DNS server.
If the path is functioning correctly, replies like those examples shown in Test the LAN Path to Your Router on page 152 are displayed.
If you do not receive replies, try the following:
- Check that your computer has the IP address of your router listed as the default gateway. If a DHCP server assigns the IP configuration of your computer, this information is not visible on your computer’s Network Control Panel. Verify that the IP address of the router is listed as the default gateway.
- Check to see that the network address of your computer (the portion of the IP address specified by the subnet mask) is different from the network address of the remote device.
- Check that your cable or DSL broadband modem is connected and functioning.
- If your ISP assigned a host name to your computer, enter that host name as the account name in the Internet Setup screen.
- Your ISP might be rejecting the Ethernet MAC addresses of all but one of your computers.
Many broadband ISPs restrict access by allowing traffic only from the MAC address of your broadband modem, but some ISPs additionally restrict access to the MAC address of a single computer connected to that modem. If this is the case, configure your router to clone or spoof the MAC address from the authorized computer.
Troubleshoot IP Addresses
By default, the router is set up to automatically assign IP addresses to network clients. The router’s IP address is 192.168.1.1 unless you changed it. Wired and wirelessly connected computers must have network IP addresses on the same network as the router. The simplest way to meet this requirement is to configure each computer to obtain an IP address automatically using DHCP.
- If you customized the IP address settings of your router and you’re having trouble with network connections, check the following:
- Make sure that your computer’s IP address is on the same subnet as the router. If you are using the recommended addressing scheme, your computer’s address is in the range of 192.168.1.2 to 192.168.1.254.
- If your computer’s IP address is shown as 169.254.x.x, recent versions of Windows and Mac OS generate and assign an IP address if the computer cannot reach a DHCP server. These autogenerated addresses are in the range of 169.254.x.x. If your IP address is in this range, check the connection from the computer to the router, and reboot your computer.
- If your router’s IP address was changed and you do not know the current IP address, clear the router’s configuration to factory defaults. This sets the router’s IP address to 192.168.1.1. This procedure is explained in Factory Default Settings on page 156.
Pros & Cons
Pros
- Affordable price point
- Dual-band Wi-Fi for better performance
- Four Gigabit Ethernet ports for wired connections
- Easy setup using Netgear Genie app
- Robust security features including WPA2 encryption
Cons
- Limited range compared to higher-end models
- No USB 3.0 port for faster file transfer
- Some users report occasional firmware issues
Customer Reviews
Customers generally praise the Netgear AC750 Wireless Gigabit Router R6050 for its ease of setup, reliable performance, and affordable price. However, some users have reported issues with range and occasional firmware updates causing temporary disruptions.
Common complaints include the lack of a USB 3.0 port and occasional drops in connection speed when multiple devices are connected.
Faqs
What is the maximum Wi-Fi speed supported by the Netgear AC750 Wireless Gigabit Router R6050?
How many Gigabit Ethernet ports does the Netgear AC750 Wireless Gigabit Router R6050 have?
Does the Netgear AC750 Wireless Gigabit Router R6050 support WPA2 security protocol?
What is Beamforming technology in the context of this router?
How do I set up my Netgear AC750 Wireless Gigabit Router R6050?
Can I use the Netgear Genie app to manage my router?
Why is my Wi-Fi signal weak with the Netgear AC750 Wireless Gigabit Router R6050?
Does the Netgear AC750 Wireless Gigabit Router R6050 support file sharing?
Can I connect multiple devices to the Netgear AC750 Wireless Gigabit Router R6050?
What should I do if my device cannot connect to the Wi-Fi network?
Leave a Comment