Netgear Nighthawk AC1900 WiFi VDSL Router D7000 User Guide
Content
Introduction
The Netgear Nighthawk AC1900 WiFi VDSL Router D7000 is a high-performance modem router that combines advanced technology with user-friendly features, ideal for homes needing robust internet connectivity. With dual-band WiFi speeds of up to 1900 Mbps, it supports various DSL connections, including VDSL and ADSL. The powerful dual-core processor enhances streaming and gaming experiences, while Beamforming+ technology ensures strong, reliable connections throughout your home. Priced at $149.99, the D7000 is perfect for demanding network environments.
Technical Specifications
| Feature | Description |
| Data and routing protocols | TCP/IP, RIP-1,RIP-2, DHCP, PPPoE, Dynamic DNS, UPnP, and SMB |
| Power adapter |
|
| Dimensions | Dimensions: 285 x 185 x 50 mm (11.22 x 7.26 x 1.97 in.) |
| Weight | Weight: 750 g (1.65 lb) |
| Operating temperature | 0° to 40°C (32ºto 104ºF) |
| Operating humidity | 90% maximum relative humidity, noncondensing |
| Electromagnetic emissions |
|
| LAN | Four RJ-45 portssupporting 10BASE-T, 100BASE-TX, and 1000BASE-T |
| WAN | One RJ-45 portsupporting 10BASE-T, 100BASE-TX, and 1000BASE-T |
| DSL | One RJ-11 asynchronous DSL (ADSL/VDSL) port |
| WiFi | Maximum WiFi signalrate complies withthe IEEE 802.11 standard. Note Throughput can vary. Network conditions and environmental factors, including volume of network traffic, building materials and construction, and network overhead, affect the data throughput rate. |
| Radio data rates | Auto-rate sensing |
| Data encoding standards |
|
| Maximum computers per WiFi network | Limited by the amountof WiFi network traffic generated by each node (typically 50–70 nodes). |
| Operating frequency range |
|
| 802.11 security | WPA2-PSK, WPA-PSK, WPA/WPA2 (mixed mode), WPA/WPA2 Enterprise, and WEP |
| xDSL data rate |
|
Hardware Overview of the Modem Router
The NETGEAR Nighthawk AC1900 WiFi VDSL/ADSL Modem Router Model D7000, in this manual referred to as the modem router, delivers combined WiFi connection speeds of up to AC1900 WiFi (600 Mbps1 on 2.4 GHz2 802.11n and 1300 Mbps3 on 5 GHz 802.11ac). Both 2.4 GHz and 5 GHz radios can be active simultaneously.
The modem router provides fast central storage, backup, and streaming to every device in your home with the USB 3.0 port (10 times faster than USB 2.0). Sharing content across your network is easy, from accessing stored photos and music to wireless printing. Stream your stored media files anywhere on the network to DLNA screens. Share your music to Airplay-compatible devices from the USB hard-drive connected to the router. Use the free NETGEAR ReadySHARE Vault app to back up your Windows computers to a USB hard drive connected to Nighthawk.
The modem router is compatible with most major DSL Internet service providers and also supports cable or fiber Internet service.
Unpack Your Modem Router
Your package contains the following items.
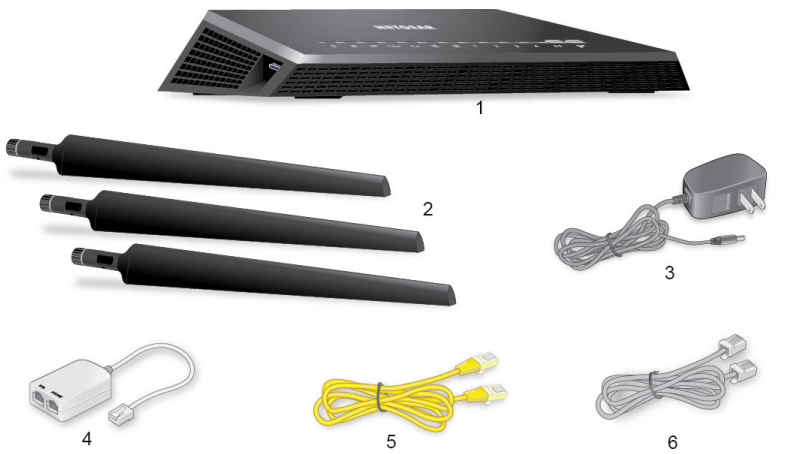
Figure 1. Package contents for the modem router
Table 1. Legend
1. | Modem router |
2. | Antennas (3) |
3. | Power supply (varies by region) |
4. | DSL microfilter (varies by region) |
5. | Ethernet cable |
6. | Phone cable |
Your package might contain more items. The filter or phone cable provided depends on the region. In some regions, a CD is included in the package.
Attach the Antennas
The router comes with three antennas.
To attach the antennas:
- Align the antennas with the antenna posts on the back panel of the modem router.
- Attach the antennas on the threaded antenna posts.
Position the antennas for the best WiFi performance.
NETGEAR recommends that the center antenna be vertical and that you aim the others outward at 45- degree angles, as shown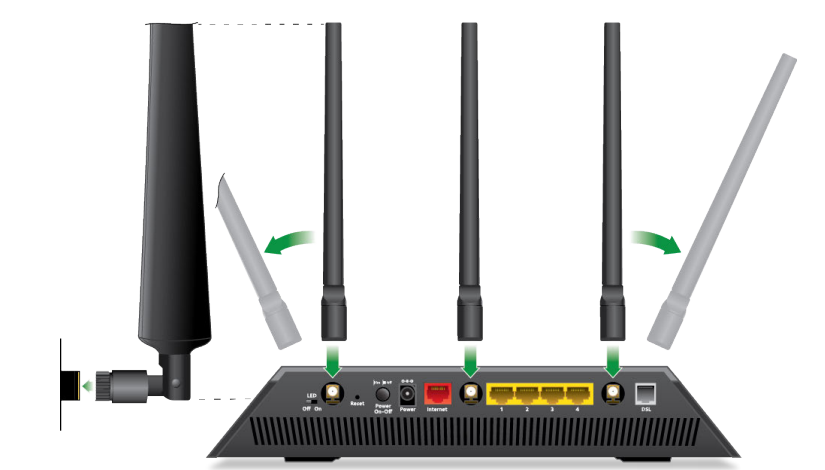
Top Panel with LEDs
The status LEDs and buttons are located on the top panel of the modem router.
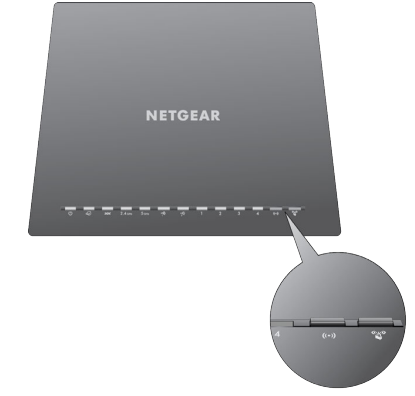
Figure 2. LEDs and buttons of the modem router
Table 2. LED and button descriptions
| LED | Description |
Power 
|
If thePower LED lightssolid amber duringany other time,a power-on self-test (POST) failure or device malfunction occurred.
|
Internet 
|
|
DSL 
|
|
2.4 GHz WiFi 
|
2.4 GHz radio.
|
5 GHz WiFi 
|
|
USB 3.0 port 1 and USB 3.0 port 2 
|
|
Ethernet ports1–4  | The LED color indicates the speed: whitefor Gigabit Ethernet connections and amber for 100 Mbps or 10 Mbps Ethernet connections. |
|
|
WiFi On/Offbutton with WiFi LED 
| Pressing thisbutton for two seconds turnsthe 2.4 GHz and 5 GHz WiFiradios on and off. If thisLED is lit,the WiFi radiosare on. If this LEDis off, the WiFi radiosare turned off and you cannot use WiFi to connect to the modem router.
|
WPS button with WPS LED 
| This button lets you use WPS to join the WiFi network without typing the WiFi password. The WPS LED blinkswhite during this process and then lights solid white. |
Description
The Netgear Nighthawk AC1900 WiFi VDSL Router D7000 is designed with a sleek and modern aesthetic, featuring a compact design that fits easily into any home or office setup. The router's dual-band WiFi capability ensures that users can enjoy uninterrupted streaming, gaming, and browsing experiences. The integrated VDSL modem eliminates the need for a separate modem, simplifying the setup process and reducing clutter.
The router also includes advanced features such as Quality of Service (QoS) settings to prioritize traffic, ensuring critical applications receive the necessary bandwidth. Additionally, the Netgear Genie app allows users to manage their network settings, monitor activity, and update firmware from their mobile devices.
Back Panel with Ports, Buttons, Connectors, and Switch
The back panel of the modem router provides ports, buttons, antenna connectors, a DC power connector, and an LED switch.

Figure 3. Modem router back panel
In addition to the three antennas, viewed from left to right, the back panel contains the following components:
- LED Off/On switch. Move the LED Off/On switch to to the Off position to turn off all LEDs, except for the Power LED.
- Reset button.
- Power On/Off button. Press the Power On/Off button to provide power to the modem router.
- DC power connector. Connect the power adapter that came in the product package to the DC power connector.
- Internet port. One Gigabit Ethernet RJ-45 WAN port to connect the modem router to a fiber or cable modem. This port is colored red.
- Ethernet LAN ports. Four Gigabit Ethernet RJ-45 LAN ports to connect the modem router to LAN devices. These ports are colored yellow.
- DSL port. One RJ-11 DSL port for connecting the modem router to an ADSL or VDSL line. This port is colored gray.
Note You can use either the DSL port or the Internet port for WAN connectivity.
Side Panels with USB Ports
Each side panel provides one USB 3.0 port. The left side panel contains USB port number 1. The right side panel contains USB port number 2.

Figure 4. Right side panel of the modem router
Bottom Panel Product Label

Figure 5. Modem router product label
Diagnostics and Troubleshooting
Perform Diagnostics
The modem router lets you perform various diagnostic tasks. For normal operation, these tasks are not required.
Perform a DNS Lookup
Use this test to find the IP address of a web, FTP, mail, or other server on the Internet.
To look up an IP address:
- Launch an Internet browser from a computer or WiFi device that is connected to the network.
A login window opens. - Enter the user name and password for the modem router.
The user name is admin. The default password is password. The user name and password are case-sensitive. - Click the OK button.
The BASIC Home page displays. - Select ADVANCED > Administration > Diagnostics.
The Diagnostics page displays. - In the Internet Name field, enter the server’s host name such as www.netgear.com.
- Click the Lookup button.
The results of the lookup display in the IP address and DNS Server fields.
Ping an IP Address
Use this test to send a ping packet request to an IP address to test the connection. If the request times out because no reply is received, the destination might be unreachable. However, some network devices can be configured not to respond to a ping.
To ping an IP address:
- Launch an Internet browser from a computer or WiFi device that is connected to the network.
A login window opens. - Enter the user name and password for the modem router.
The user name is admin. The default password is password. The user name and password are case-sensitive. - Click the OK button.
The BASIC Home page displays. - Select ADVANCED > Administration > Diagnostics.
The Diagnostics page displays. - In the IP address field, enter an IP address.
- Click the Ping button.
The Diagnostics - Ping page displays the results of the ping test. To return to the Diagnostics page, click the Back button.
Display the Routing Table
Displaying the modem router’s internal routing table can assist you or NETGEAR technical support in diagnosing routing problems.
To display the routing table:
- Launch an Internet browser from a computer or WiFi device that is connected to the network.
A login window opens. - Enter the user name and password for the modem router.
The user name is admin. The default password is password. The user name and password are case-sensitive. - Click the OK button.
The BASIC Home page displays. - Select ADVANCED > Administration > Diagnostics.
The Diagnostics page displays. - Click the Display button.
The Diagnostics - Routing Table page displays the routing table.
Reboot the Modem Router from the Web Management Interface
You or NETGEAR technical support can reboot the modem router from the web management interface, either locally or remotely, for example, when the modem router seems to be unstable or is not operating normally.
To reboot the modem router from the web management interface:
- Launch an Internet browser from a computer or WiFi device that is connected to the network.
- Type http://www.routerlogin.net
A login window opens. - Enter the user name and password for the modem router.
The user name is admin. The default password is password. The user name and password are case-sensitive. - Click the OK button.
The BASIC Home page displays. - Select ADVANCED > Administration > Diagnostics.
The Diagnostics page displays. - Click the Reboot button.
A confirmation pop-up window displays. - Click the OK button.
The modem router reboots.
Quick Tips for Troubleshooting
The following table includes tips for troubleshooting some common problems.
| Problem | Possible Solution |
Your network is unresponsive or does not function normally. | Restart your network: |
|
If network problems still occur, make sure that your ISP does not require you to use the MAC address of the computer that was used to initially register the ISP account. If your ISP does require that you do this, you must change the modem router MAC addressthat the modem routeruses. |
| You cannotconnect over an Ethernet cable to the modem router. |
|
| You cannotconnect over WiFi to the modem router. |
For a device thatis connected overWiFi, the WiFinetwork name (SSID)and WiFi security settings of the modem routerand WiFi computer must match exactly.
and your WiFi device.
If thisLED is off,both WiFi radiosmight be disabled. For more information about the WiFi radios,
If the modem router’s SSID broadcast is disabled, the WiFi network name is hidden and does not display in your WiFi device’s scanning list. To connect to a hidden network, you must enter the network name and the WiFi password. For more information about the SSID broadcast, see Manage the Basic WiFi Settings and WiFi Security of the Main Network. • Make sure that your WiFi device does not use a static IP address but is configured to receive an IP address automatically with DHCP. (For most devices, DHCP is the default setting.) |
Troubleshoot with the LEDs
When you turn on the power, the LEDs light as described here:
- Two seconds after the power is first applied, the Power LED lights solid amber for about 10 seconds, turns off for about 20 seconds, and then lights solid amber again.
- About two minutes after the power is first applied, the Power LED lights solid white, indicating that the startup procedure is complete and the modem router is ready.
Verify the following:- The Internet LED is blinking white or solid white.
- The DSL LED is solid white.
- The 2.4 GHz WiFi LED and 5 GHz WiFi LED are blinking white or solid white (unless you turned off the wireless radios).
- A USB 3.0 port LED is blinking white or solid white for any connected USB device.
- An Ethernet port LED is blinking white or solid white for any connected and powered-on Ethernet device.
- The WiFi LED is solid white (unless you turned off the wireless radios).
- The WPS LED is solid white.
- The Internet LED
Power LED Is Off
If the Power LED![]() and other LEDs are off when your modem router is turned on, do the following:
and other LEDs are off when your modem router is turned on, do the following:
- Make sure that the Power On/Off button on the back is in the on position, that is, it is pushed in.
- Make sure that the power cord is correctly connected to your modem router and that the power supply adapter is correctly connected to a functioning power outlet.
- Make sure that you are using the 12 VDC 3.5A power adapter that NETGEAR supplied for this product.
Power LED Remains Solid Amber
- Two seconds after the power is first applied, the Power LED lights solid amber for about 10 seconds, turns off for about 20 seconds, and then lights solid amber again. About two minutes after the power is first applied, the Power LED lights solid white, indicating that the startup procedure is complete and the modem router is ready.
- If the Power LED remains solid amber and does not turn solid white, a failure occurred or the modem router is malfunctioning.
If the Power LED does not turn solid white, do the following:
- Turn the power off and back on and wait several minutes to see if the modem router recovers.
- If the modem router does not recover, ptress and hold the Reset button to return the modem router to its factory settings.
WiFi LED Is Off
If the WiFi LED ![]() remains off, check to see if both radios on the modem router are disabled. By default, both radios are enabled and the WiFi LED lights solid white.
remains off, check to see if both radios on the modem router are disabled. By default, both radios are enabled and the WiFi LED lights solid white.
You Cannot Log In to the Modem Router
If you are unable to log in to the modem router from a computer on your local network and use the web management interface, check the following:
- If you are using an Ethernet-connected computer, check the Ethernet connection between the computer and the modem router.
- Make sure that the IP address of your computer is on the same subnet as the modem router. If you are using the recommended addressing scheme, your computer’s address is in the range of 192.168.0.2 to 192.168.0.254.
- Make sure that your computer can reach the modem router’s DHCP server. Recent versions of Windows and Mac OS generate and assign an IP address if the computer cannot reach a DHCP server. These autogenerated addresses are in the range of 169.254.x.x. If your IP address is in this range, check the connection from the computer to the modem router and reboot your computer.
- If your modem router’s IP address was changed and you do not know the current IP address, use an IP scanner application to detect the IP address. If you still cannot find the IP address, clear the modem router’s configuration to factory defaults. This sets the modem router’s IP address to 192.168.0.1. For more information, see Return the Modem Router to Its Factory Default Settings on page 238 and Factory Settings on page 309.
- Make sure that Java, JavaScript, or ActiveX is enabled in your browser. If you are using Internet Explorer, click the Refresh button to be sure that the Java applet is loaded.
- Try quitting the browser and launching it again.
- Make sure that you are using the correct login information. The user name is admin, and the default password is password. Make sure that Caps Lock is off when you enter this information.
- If you are attempting to set up your modem router behind an existing router in your network, set up the modem router as a WiFi access point
- If you are attempting to set up your modem router as a replacement for an ADSL gateway in your network, the modem router cannot perform many gateway services. For example, the modem router cannot convert DSL or cable data into Ethernet networking information. NETGEAR does not support such a configuration.
Troubleshoot the Internet Connection
If your modem router cannot access the Internet, check the DSL connection, then the WAN TCP/IP connection.
Troubleshoot the DSL Link
If your modem router is unable to access the Internet, first determine whether the DSL link with the service provider is working. The DSL LED indicates the state of this connection.
DSL LED Is Solid White
If the DSL link LED lights solid white![]() , the DSL connection is good.You can be confident that the service provider connected your line correctly and that your wiring is correct.
, the DSL connection is good.You can be confident that the service provider connected your line correctly and that your wiring is correct.
DSL LED Is Blinking White
If the DSL LED is blinking white , your modem router is attempting to make a DSL connection with the service provider. If the modem router establishes a DSL connection, the DSL LED turns solid white. This connection process generally lasts several minutes.
If the DSL LED does not turn solid white, disconnect all telephones on the line. If this solves the problem, reconnect the telephones one at a time, being sure to use a microfilter on each telephone. If the microfilters are connected correctly, you can connect all your telephones.
If disconnecting telephones does not result in a solid white DSL LED, a problem with your wiring might exist. If the telephone company tested the DSL signal at your network interface device (NID), then wiring in your house might be of poor quality.
DSL LED Is Off or Internet LED Is Off
If the DSL LED ![]() is off , the Internet LED
is off , the Internet LED![]() is off , or both are off, disconnect all telephones on the line. If this solves the problem, reconnect the telephones one at a time, being sure to use a microfilter on each telephone. If the microfilters are connected correctly, you can connect all your telephones.
is off , or both are off, disconnect all telephones on the line. If this solves the problem, reconnect the telephones one at a time, being sure to use a microfilter on each telephone. If the microfilters are connected correctly, you can connect all your telephones.
If disconnecting telephones does not result in a blinking white or solid white DSL LED, check the following:
- Check to see that the telephone company made the connection to your line and tested it.
- Verify that you are connected to the correct telephone line. If more than one phone line is installed, be sure that you are connected to the line with the DSL service. It might be necessary to use a swapper if your DSL signal is on pins 1 and 4 or the RJ-11 jack. The modem router uses pins 2 and 3.
Internet LED Is Off
If the Internet LED![]() is off , the modem router cannot connect to the Internet. Verify the following:
is off , the modem router cannot connect to the Internet. Verify the following:
Obtain an Internet IP Address
If the modem router cannot access the Internet but the Internet LED![]() lights solid white, see if the modem router can obtain an Internet IP address from the ISP. Unless the modem router is assigned a static IP address, the modem router requests an IP address from the ISP.You can determine whether the request was successful using the web management interface.
lights solid white, see if the modem router can obtain an Internet IP address from the ISP. Unless the modem router is assigned a static IP address, the modem router requests an IP address from the ISP.You can determine whether the request was successful using the web management interface.
To check the Internet IP address:
- Launch an Internet browser from a computer or WiFi device that is connected to the network.
A login window opens. - Enter the user name and password for the modem router.
The user name is admin. The default password is password. The user name and password are case-sensitive. - Click the OK button.
The BASIC Home page displays. - Select ADVANCED > ADVANCED Home.
The ADVANCED Home page displays. - In the Internet Port pane, check to see that the IP Address field shows a valid IP address.
If the field shows 0.0.0.0, your modem router did not obtain an IP address from your ISP.
If your modem router cannot obtain an IP address from the ISP, the problem might be one of the following:
- Your Internet service provider (ISP) might require a login program. Ask your ISP whether they require PPP over Ethernet (PPPoE) or some other type of login.
- If you selected a login program, the service name, user name, or password could be incorrectly set. Before you make any changes, verify that the modem router can get a PPPoE or PPPoA connection
- Your ISP might check for your computer’s host name. Assign the computer host name of your ISP account as the account name.
- If your ISP allows only one Ethernet MAC address to connect to Internet and checks for your computer’s MAC address, inform your ISP that you bought a new network device and ask them to use the modem router’s MAC address.
- Configure your modem router to clone your computer’s MAC address.
Verify the PPPoE or PPPoA Connection
If you use a PPPoE or PPPoA connection to your ISP, make sure that the connection works. To verify that your PPPoE or PPPoA connection is working:
- Launch an Internet browser from a computer or WiFi device that is connected to the network.
A login window opens. - Enter the user name and password for the modem router.
The user name is admin. The default password is password. The user name and password are case-sensitive. - Click the OK button.
The BASIC Home screen displays. - Select ADVANCED > ADVANCED Home.
The ADVANCED Home page displays. - In the Internet Port pane, check to see that the IP Address field shows a valid IP address and that the Connection field shows PPPoE or PPPoA.
- In the Internet Port pane, click the Connection Status button.
The Connection Status page displays. - Check the following:
- The Connection Status field shows Connected.
- The Connection Time field does not show 00:00:00.
Reestablish the PPPoE or PPPoA Connection
If your PPPoE or PPPoA configuration information is correct (see Verify the PPPoE or PPPoA Connection on page 302), your PPPoE or PPPoA connection is working.
To reconnect if your PPPoE or PPPoA connection does not function:
- Launch an Internet browser from a computer or WiFi device that is connected to the network.
A login window opens. - Enter the user name and password for the modem router.
The user name is admin. The default password is password. The user name and password are case-sensitive. - Click the OK button.
The BASIC Home page displays. - Select ADVANCED > ADVANCED Home.
The ADVANCED Home page displays. - In the Internet Port pane, click the Connection Status button.
The Connection Status page displays. - Click the Connect button.
The modem router attempts to reconnect.
If you cannot connect after several minutes, you might be using an incorrect service name, user name, or password. Or your ISP might not be able to provide an Internet connection.
Troubleshoot Internet Browsing
If your modem router can obtain an IP address but your computer is unable to load any web pages from the Internet, it might be for one of the following reasons:
- The traffic meter is enabled, and the limit was reached.
By configuring the traffic meter not to block Internet access when the traffic limit is reached, you can resume Internet access. If your ISP sets a usage limit, they might charge you for the overage. - Your computer might not recognize any DNS server addresses.
A DNS server is a host on the Internet that translates Internet names (such as www addresses) to numeric IP addresses. Typically your ISP provides the addresses of one or two DNS servers for your use. If you entered a DNS address when you set up the modem router, reboot your - computer and verify the DNS address. Alternatively, you can configure your computer manually with DNS addresses, as explained in your operating system documentation.
The modem router might not be configured as the TCP/IP router on your computer. - If your computer obtains its information from the modem router by DHCP, reboot the computer and verify the modem router address.
Changes Are Not Saved
If the modem router does not save the changes that you make in the web management interface, do the following:
- When entering configuration settings, always click the Apply button before moving to another page or tab or your changes are lost.
- Click the Refresh or Reload button in the web browser. It is possible that the changes occurred but that the old settings remain in the web browser’s cache.
Factory Settings
You can reset the modem router to the factory default settings that are shown in the following table.
| Feature | Default Behavior |
| Router login | |
| User login URL | - |
| User name (case-sensitive) | admin |
| Login password (case-sensitive) | password |
| Internet connection | |
| WAN MAC address | Use default hardware address |
| WAN MTU size | Determined by the protocol that is usedfor the Internet connection |
| Port speed | Autosensing |
| Local network (LAN) | |
| LAN IP address | 192.168.0.1 |
| Subnet mask | 255.255.255.0 |
| DHCP server | Enabled |
| DHCP range | 192.168.0.2 to 192.168.0.254 |
| DHCP starting IP address | 192.168.0.2 |
| DHCP ending IP address | 192.168.0.254 |
| DMZ | Disabled |
| Time zone |
|
| Time adjusted for daylight savingtime | Enabled |
| Main WiFi network | |
| WiFi communication | Enabled |
| SSID name | See product label |
| Security | WPA2-PSK (AES) |
| WiFi passphrase | See product label |
| Country/region |
|
| RF channel | Auto. Theavailable channels dependon the region. |
| Transmission speed | Auto Note Throughput can vary. Network conditions and environmental factors, including volume of network traffic, building materials and construction, and network overhead, affect the data throughput rate. |
| Operating mode |
|
| Transmit power | 100% |
| Guest WiFi network | |
| WiFi communication | Disabled |
| SSID name |
|
| Security | None (opennetwork) |
| Allow guests to access main network | Disabled |
| General WiFi settings |
|
| Radio transmission power | 100 percent, nonconfigurable |
| 20/40 MHz coexistence | Enabled |
| Fragmentation length | 2346 |
| CTS/RTS threshold | 2347 |
| Preamble mode | Long Preamble |
| WPS |
|
| WPS capability | Enabled |
| Modem router’s PIN | Enabled; seethe web management interface (select ADVANCED> Advanced Setup> Wireless Settings) |
| Keep Existing Wireless Settings | Enabled |
Setup Guide
Setting up the Netgear Nighthawk AC1900 WiFi VDSL Router D7000 is relatively straightforward:
- Connect the VDSL cable to the router's DSL port.
- Connect your devices to the Ethernet ports or via WiFi.
- Open a web browser and go to the default IP address (usually 192.168.0.1) to access the web interface.
- Follow the on-screen instructions to configure your network settings, including setting up your WiFi network name and password.
- Use the Netgear Genie app for additional configuration options and network management.
Pros & Cons
Pros:
- High-speed dual-band WiFi for reliable connectivity.
- Built-in VDSL modem for seamless integration with DSL services.
- Gigabit Ethernet ports for fast wired connections.
- Advanced security features including WPA/WPA2 encryption and parental controls.
- User-friendly setup and management via Netgear Genie app.
Cons:
- May require occasional firmware updates to maintain optimal performance.
- Some users report issues with range and signal strength in larger homes.
- No built-in mesh networking capability.
- Slightly larger than some other routers due to VDSL modem integration.
Customer Reviews
Customers generally praise the Netgear Nighthawk AC1900 WiFi VDSL Router D7000 for its strong WiFi signal, easy setup process, and comprehensive feature set. However, some users have reported issues with signal strength in larger homes and the occasional need for firmware updates.
Common complaints
- Signal strength issues in large homes or areas with many obstacles.
- Occasional drops in internet connection requiring restarts.
Faqs
How do I set up my Netgear AC1900?
What is the maximum WiFi speed of the Netgear Nighthawk?
Does the Netgear Nighthawk AC1900 WiFi VDSL Router D7000 support guest networks?
Can I use the Netgear Nighthawk with my current DSL service?
How many Gigabit Ethernet ports does the WiFi VDSL Router have?
Is the Netgear Router D7000 easy to set up?
Does the Nighthawk WiFi have built-in USB ports?
What security features does the Router D7000 offer?
Can I update the firmware of my Netgear AC1900 WiFi?
Is there a mobile app available for managing my Router D7000?
Leave a Comment