Netgear Powerline AV500 WiFi | Installation
Content

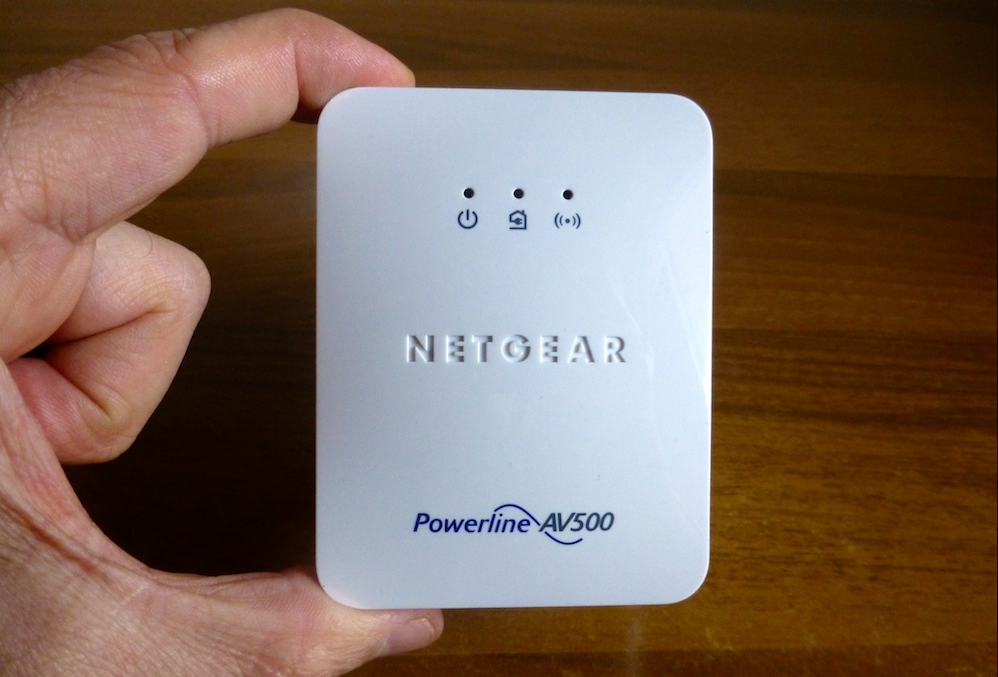
Introduction of Netgear Powerline AV500 WiFi
The Netgear Powerline AV500 WiFi is a high-performance networking solution that utilizes your home's electrical wiring to extend your internet connection. This device is ideal for improving WiFi coverage in hard-to-reach areas, streaming HD videos, and online gaming. With an estimated price range of $70 to $90 and a launch date of 2014, the Powerline AV500 WiFi offers an affordable and efficient way to enhance your home network.
Detailed Specifications
Key features of the Powerline AV500 WiFi include
- Data transfer rates of up to 500 Mbps over electrical wiring
- Integrated 802.11n WiFi access point for extending wireless coverage
- Compact design with no external power adapters required
- Advanced security features with 128-bit AES encryption
- Easy setup with no need for new wiring or complicated configurations
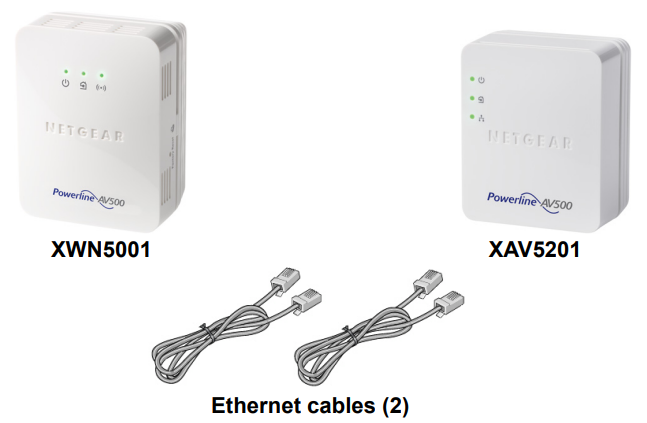
Package Contents
Hardware Features
Description of Netgear Powerline WiFi
The Netgear Powerline WiFi is a versatile and powerful networking solution that utilizes your home's electrical wiring to extend your internet connection. With data transfer rates of up to 500 Mbps, this device is perfect for streaming HD videos, online gaming, and improving WiFi coverage in hard-to-reach areas. The integrated 802.11n WiFi access point allows you to easily extend your wireless network, while the compact design eliminates the need for external power adapters. Advanced security features and easy setup make the Powerline AV500 WiFi a convenient and secure choice for enhancing your home network.
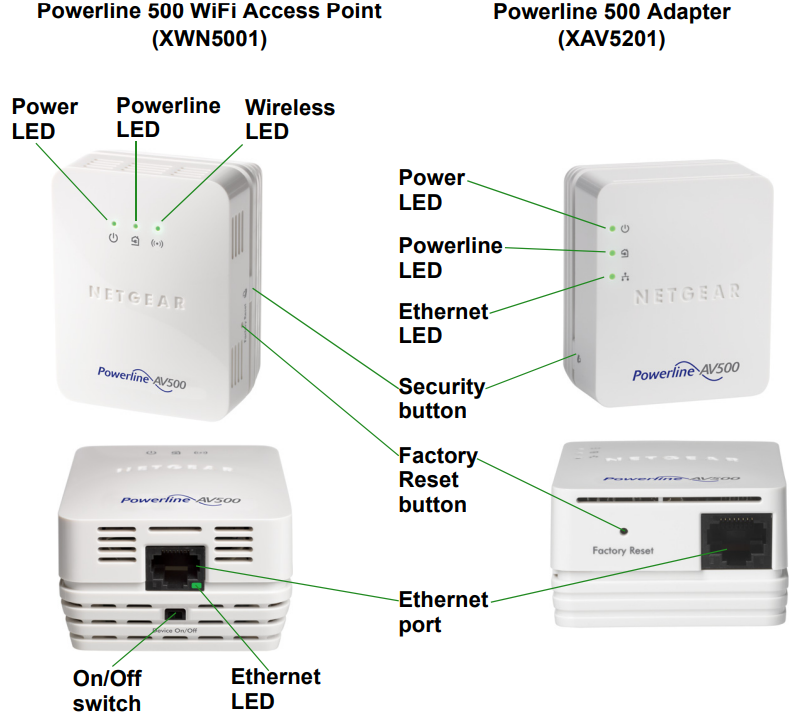
- When you plug in the Powerline device, the Power LED
 lights and turns green.
 - The Ethernet LED
 lights and turns green when you connect a powered-on Ethernet device to at least one Ethernet port. If the LED is off, there is no Ethernet connection.
 - The Wireless LED
 lights and turns green when the wireless radio is on.
 - The Powerline LED lights when the Powerline device detects at least one other compatible Powerline device.
- The Pick A Plug feature lets you pick the electrical outlet with the fastest link rate.
- Green: Link rate > 80 Mbps (Fast)
- Amber: Link rate > 50 and < 80 Mbps (Medium)
Red: Link rate < 50 Mbps (Slow)

Button Descriptions
The buttons on your Powerline devices let you do the following
- Factory Reset button: Use the Factory Reset button to return your Powerline device to its default factory settings. Press the Factory Reset button for 2 seconds, and then release it.
- Power On/Off switch: Use the On/Off switch to turn the device on and off.
- Security button: The Security button has two functions:
- Secure the Powerline network.
- Automatically connect your wireless client to the XWN5001 WiFi access point.
Setup Powerline WiFi
Setting up the Netgear Powerline WiFi is quick and easy. Simply plug one unit into a power outlet near your router and connect it to your router using an Ethernet cable. Then, plug the second unit into a power outlet in the desired location and press the Pair button on both units to sync them. Once synced, you can connect your devices to the Powerline AV500 WiFi using Ethernet cables or the integrated WiFi access point. For detailed instructions, refer to the user manual or Netgear's website.
Install the Adapters and Surf the Web with WiFi
- Secure your Powerline network.
- Make sure that the Power LED is solid green on each Powerline device.
- On the XAV5201 adapter, press the Security button for 2 seconds, and then release the button. The Power LED blinks green while the adapter is setting up security.
Within 2 minutes, press the Security button on the XWN5001 access point for 2 seconds, and then release the button.
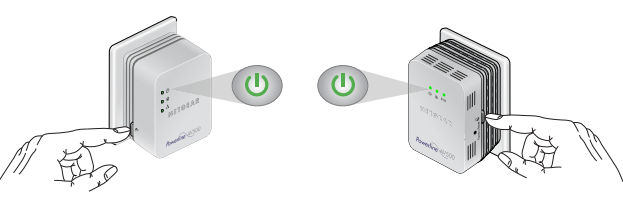
After a few seconds, the security is set and the Power LED turns solid green.
The Powerline devices can communicate over the Powerline network in a secure way.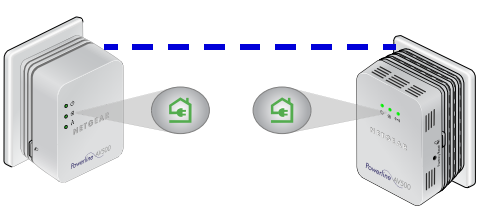
- Plug the XAV5201 into a wall outlet near your router or gateway.
Connect the XAV5201 through the LAN port with an Ethernet cable.
If you want to share Internet access across your home, make sure to connect the XAV5201 to your Internet gateway with an Ethernet cable.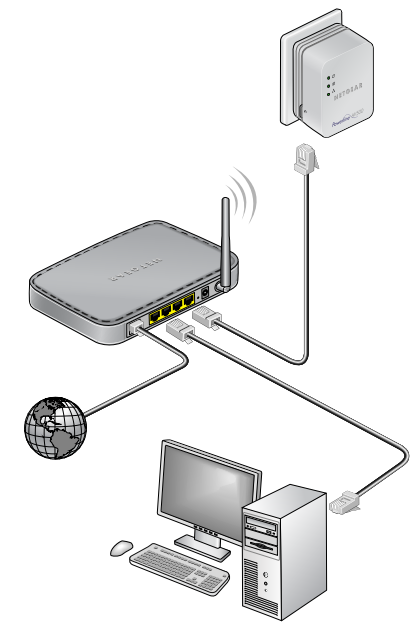
Plug the XWN5001 access point into a wall outlet where you need WiFi coverage.
Note: You can connect an Ethernet-based device (like a game console, set-top box, or Blu-ray player) to the Internet and the home network with the additional Ethernet port on the XWN5001.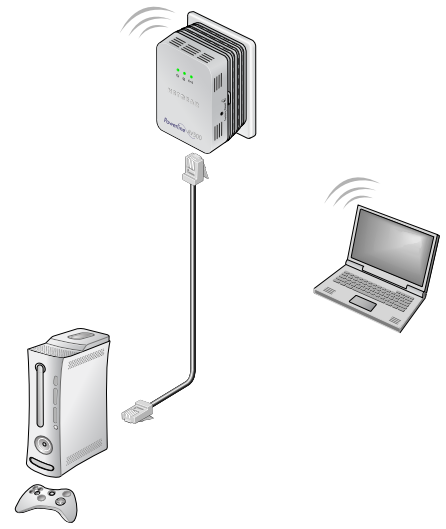
- Set up WiFi access on your XWN5001 access point.
You can set up WiFi access on your XWN5001 access point in one of two ways- Use NETGEAR genie to manually configure the wireless settings of your XWN5001 access point.
- Install NETGEAR genie. (See Install NETGEAR genie on page 18.)
- Temporarily connect your computer directly to the XWN5001 through the Ethernet port.
Launch NETGEAR genie on your computer and click Network Map or select it from the menu.
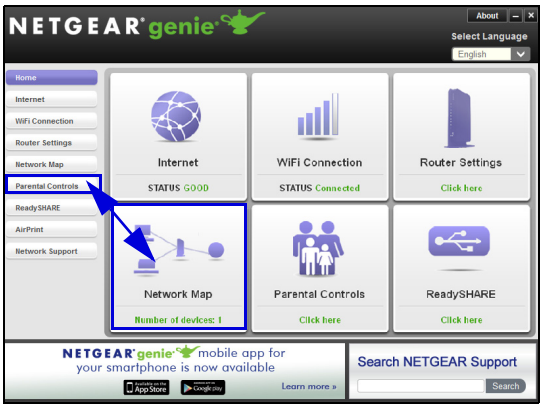
Click the Powerline icon on the Network Map screen. The Powerline Utility screen displays
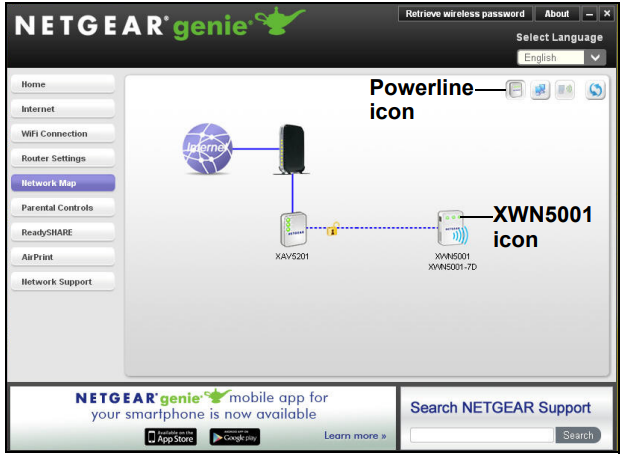
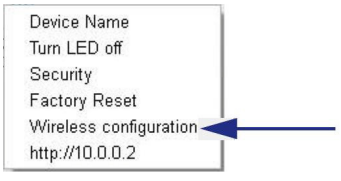
- On the Powerline Utility screen, right-click the XWN5001 icon.
From the pop-up menu that displays, select Wireless Configuration.
- Enter the following wireless settings:
- Wireless Network Name (SSID)
- Wireless Security Type
- Passphrase
If you want to clone your existing wireless network, enter the same wireless settings that your router or gateway uses. When you are roaming in your house, your wireless client (laptop, tablet, or smartphone) switches from one network (router or gateway) to the other (XWN5001), depending on the signal quality. If you want to create a new wireless network, enter new wireless settings. Creating a new wireless network lets you have a second network in another zone of your house.
- Click Apply to save your changes.
- When you are finished with the wireless settings, disconnect the Ethernet cable from the XWN5001.
Note: You can access advanced wireless settings by right-clicking the device icon and selecting the IP address on the pop-up menu. The login and password are admin and password.
- Use the web browser setup guide to manually configure the wireless settings of your XWN5001 access point.
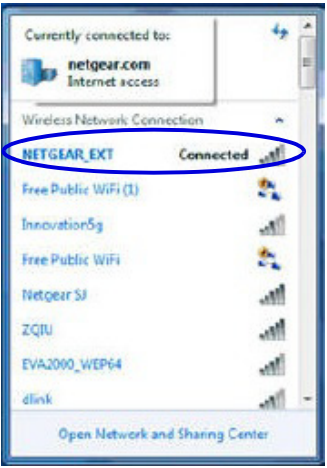
On your computer or wireless device (tablet, smartphone)Open the software that manages your wireless network connections and connect to the XWN5001 network.
- On the same computer or wireless device, open a web browser window.
- When prompted to log in, enter:
- User name: admin
- Password: password
The web browser setup guide helps you configure the wireless settings of the XWN5001.
If you want to clone your existing wireless network, enter the same wireless settings that your router or gateway uses. If you want to create a new wireless network, enter new wireless settings. Creating a new wireless network lets you have a second network in another zone of your house.
Record the new wireless settings here: Wireless network name (SSID) Network key (Passphrase)
- Use NETGEAR genie to manually configure the wireless settings of your XWN5001 access point.
- Connect your wireless client (laptop, tablet, or smartphone) to the XWN5001 for Internet access.
- Use the WPS button on your wireless client to automatically connect to the XWN5001 access point.
- Press and hold the Security button on the XWN5001 for 2 seconds and release it. The Wireless LED starts to blink.
- Press the WPS button on your wireless client for 2 seconds and release it.
- When the Wireless LED stops blinking, your wireless client is automatically connected to the XWN5001 access point and you can surf the web.
- Manually connect to the XWN5001 access point. On your computer or wireless client (tablet, smartphone)
- Open the software that manages your wireless network connections.
- Connect to the XWN5001 wireless network (SSID).
- Enter the network key (passphrase).
- Your wireless device is now connected to the XWN5001 access point and you can surf the web.
- Use the WPS button on your wireless client to automatically connect to the XWN5001 access point.
Tip: The default wireless network name (SSID) of the XWN5001 is NETGEAR_EXT.The default network key (wireless security password) is printed on the back of the XWN5001.
Install NETGEAR genie
Follow these instructions to download and install NETGEAR genie on your computer.
- Click the For Home button.
- In the search box, type xwn5001.
- Download the NETGEAR genie that corresponds to your OS environment (Windows or Mac).
- Run the file that you downloaded and follow the onscreen instructions to install NETGEAR Genie.
Compatible NETGEAR Powerline Devices
Your Powerline devices can share a Powerline network with these compatible NETGEAR devices:
XAVB1301, XAVB1401, XAVB2101, XAVB2602, XAVNB2001, XAVB5601, XAVB5101, XAVB5201, XAVB5602, XAUB2511, XAVB5004, XAVB1004, XWNB5602, and XWNB1601.
Troubleshooting
Common problems with the Netgear Powerline WiFi may include connection issues, slow data transfer speeds, and interference from other devices. To troubleshoot these issues, try the following steps
- Check that both units are properly plugged in and synced
- Ensure that the Powerline AV500 WiFi is not too far from your router or the desired location
- Try using different electrical outlets to avoid interference from other devices
- Reset the Powerline AV500 WiFi to its factory settings and reconnect the units
Pros & Cons of Powerline WiFi
Pros
- High-performance data transfer rates of up to 500 Mbps
- Integrated WiFi access point for extending wireless coverage
- Compact design with no external power adapters required
- Easy setup with no need for new wiring or complicated configurations
- Advanced security features with 128-bit AES encryption
Cons
- May be affected by electrical interference from other devices
- Not as fast as some high-end networking solutions
Customer Reviews of Netgear Powerline AV500 WiFi
Customers have praised the Netgear Powerline AV500 WiFi for its easy setup, high-performance data transfer rates, and integrated WiFi access point. However, some have reported issues with electrical interference and slower-than-expected data transfer speeds. Overall, the Powerline AV500 WiFi is a popular and highly rated choice for improving home network performance.
Faqs
Can you tell me about the range of the Netgear Powerline AV500 WiFi, as well as how well it works when trying to overcome obstacles?
Is there a mobile application that can be used to manage the settings of the Netgear Powerline AV500 WiFi while it is in use?
In order to upgrade the firmware of my Netgear Powerline AV500 WiFi, what steps should I take?
In order to execute a factory reset on my Netgear Powerline AV500 WiFi, what are the steps that I need to take?
Safety When it comes to the Netgear Powerline AV500 WiFi, what are the safety standards that should be followed?
What are the characteristics that make the Netgear Powerline AV500 WiFi an indispensable device for uninterrupted internet connectivity?
How to Get the Most Out of Your Netgear Powerline AV500 WiFi: Is it possible for it to increase the range of my current network?
Will the Netgear Powerline AV500 WiFi be compatible with the router that I am now using?
To what extent does the Netgear Powerline AV500 WiFi improve the speed of the internet connection?
Warranty on the Netgear Powerline AV500 WiFi: What kind of coverage can I anticipate receiving?
Leave a Comment
