Otc LeakTamer UltraTrace UV Solution 6522-1 User Guide
Content

Introduction
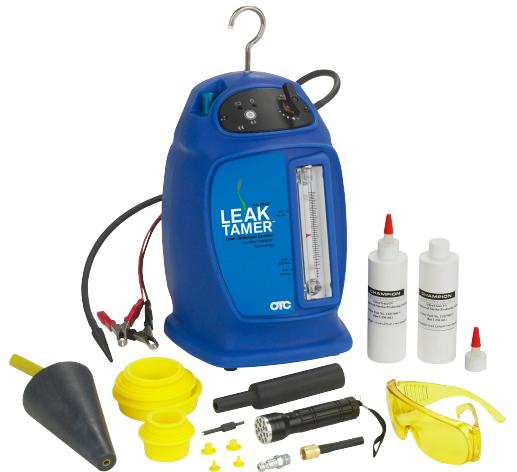
The OTC LeakTamer UltraTrace UV Solution 6522-1 is an innovative leak detection fluid designed to identify leaks in air conditioning and refrigeration systems. This UV-reactive solution makes it easy to spot leaks by illuminating under UV light, ensuring quick and accurate detection. Compatible with all refrigerants, it helps technicians save time and reduce costs during maintenance. Priced at $19.99, the LeakTamer UltraTrace is an essential tool for HVAC professionals and DIY enthusiasts alike.
Parts List
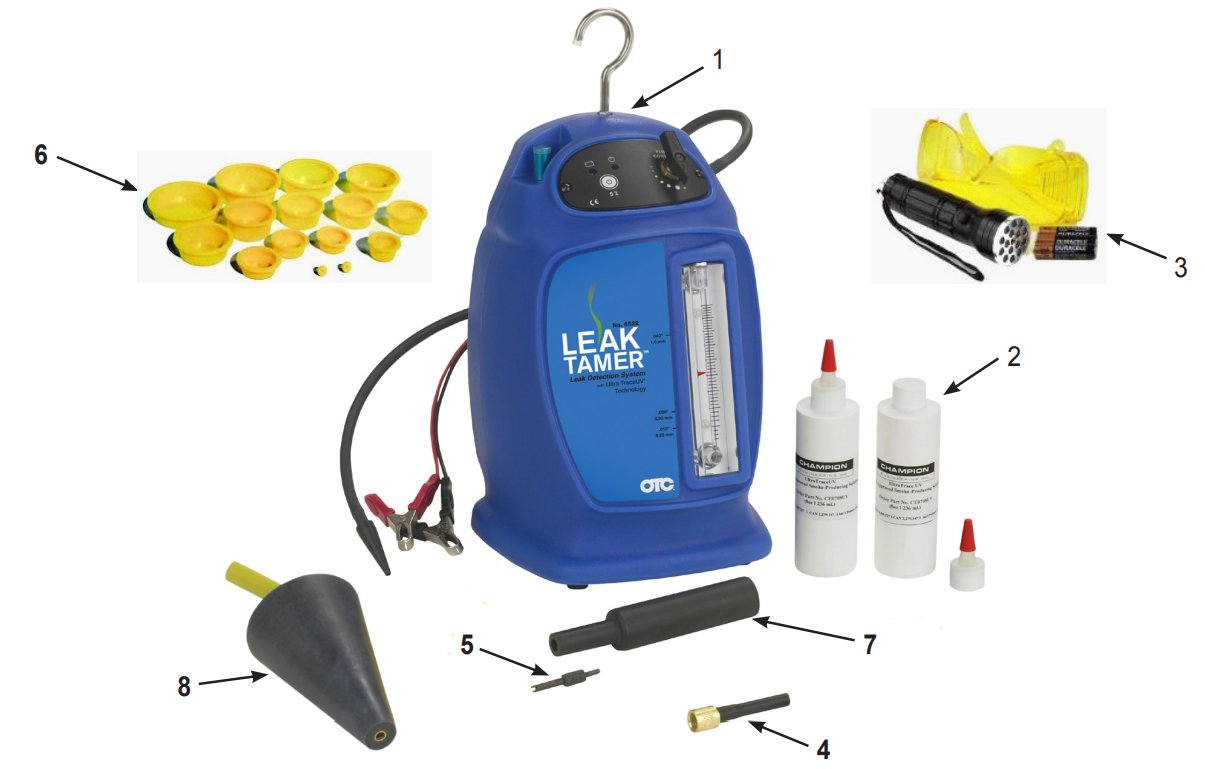
Item No. | Part No. | Qty. | Description |
1 | 6522 | 1 | LeakTamer™ |
2 | 6522-1 | 2 | UltraTraceUV® Solution |
3 | 6522-3 | 1 | Combination White/Laser/UV Light, Batteries, and Glasses |
4 | 6522-4 | 1 | Standard Service Port Adapter |
5 | 6522-5 | 1 | Schrader Valve Removal/Installation Tool |
6 | 6522-6 | 1 | Cap Plug Kit |
7 | 6522-9 | 1 | Smoke Diffuser |
8 | 6522-10 | 1 | Exhaust Adapter Cone |
Parts Included but Not Shown
- 1 Operator’s Manual
Optional Parts — Not Included
6522-2 | 1 | Inert Gas Pack Kit |
6522-7 | 1 | Universal Fuel Neck Adapter |
6522-8 | 1 | BMW & MINI Fuel Neck Adapter |
6522-11 | 1 | Large Cone Adapter |
6522-12 | 1 | Replacement Dipstick |
6522-13 | 1 | Replacement Delrin® Nozzle with 8-ft. Hose |
6522-14 | 1 | Replacement Delrin® Nozzle |
6522-15 | 1 | Replacement Flow Meter Red Pointer Flag |
Technical Specifications
Height | 14 in. (35.5 cm) | Supply Pressure | 13.0 in. H2O |
Width | 9 in. (22.9 cm) | Supply Volume | 12 liters per minute |
Depth | 7 in. (17.8 cm) | Operating Temperature Range | 45°F to 140°F (7.2°C to 60°C) |
Weight | 9.5 lb. (4.3 kg) | Supply Line | 10 ft (3.0 m) |
Ship Weight | 15 lb. (6.8 kg) | Power Supply Line | 10 ft (3.0 m) |
Power Supply | 12V DC | Remote Starter Cable | 10 ft (3.0 m) |
Amperage Usage | 15 amps | ||
LeakTamer UltraTrace UV Solution Tester Overview
Component Descriptions
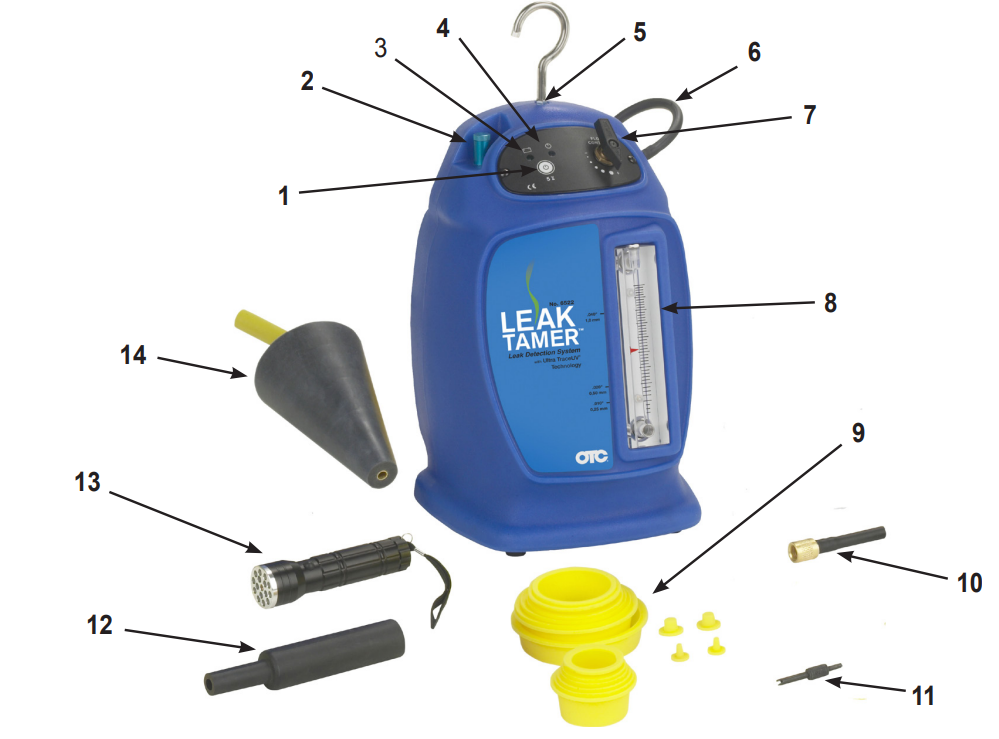
- <ON> <OFF> Switch turns ON vapor production, for five (5) minutes.
- Dipstick used to maintain smoke solution level. Top off regularly to FULL mark by adding solution from dipstick tube.
- Power Indicator Lamp turns ON when connecting the power leads to a battery.
- Smoke Indicator Lamp turns ON after pressing the <ON> button, indicating the tester is producing vapor.
- Hook Insert for hanging LeakTamer. Use hood rod support when hanging on hood.
- Supply Hose to introduce vapor into system for leak test.
- Flow Control Valve controls vapor flow volume.
- Flow Meter establishes a quick PASS / FAIL when determining if the vehicle being tested has a leak.
- Cap Plug Kit is used to seal the intake ducting of the engine being tested.
- EVAP Service Port Adapter (standard size) connects directly to vehicles with factory service access port for fuel vapor recovery system.
- Schrader Valve Removal / Installation Tool removes Schrader valve inside EVAP Service Port. NOTE: Left-handed thread.
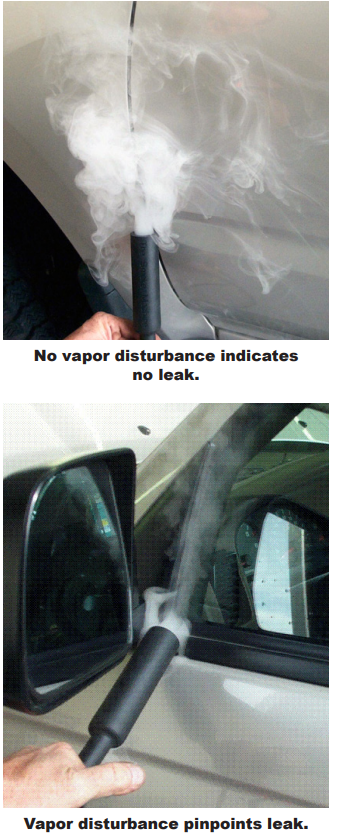
- Diffuser helps locate wind and water leaks.
- Combination White/UV Light locates vapor with white light and fluorescent dye with UV light.
- Adaptor Cone is used to introduce vapor into any system that accommodates the cone's size, such as intake/induction and exhaust systems.
Features Included But Not Shown
- Vapor-Producing Solution: LeakTamer is shipped with two UltraTraceUV bottles—enough to perform approximately 600 tests.
- Water Separator / Filter (inside tester with drain port at bottom of tester) ensures a clean supply of air. It is normal to occasionally see drainage of fluid from this port. Excessive drainage indicates compressor in use requires draining and/or filter system.
Description
One specialized fluid that helps personnel find and fix leaks fast and precisely is the OTC LeakTamer UltraTrace UV Solution 6522-1. When added to the system, the highly fluorescent UV dye in the solution will seep out and shine brilliantly when exposed to UV light. This eliminates the need for significant disassembly or guessing and enables personnel to locate the leak precisely.
The solution works with the majority of the materials used in automotive systems and is safe to use in a variety of automotive systems. Any mechanic or technician who wants to expedite their diagnostic procedure and guarantee precise repairs must have this indispensable instrument.
Initial Setup
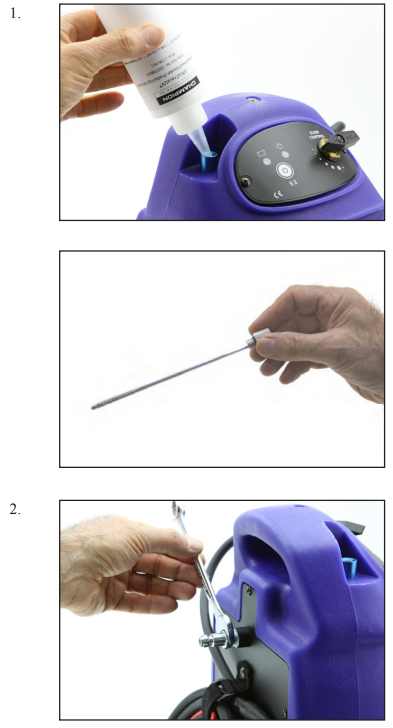
- Pour entire contents of one (1) 8-oz. UltraTraceUV solution bottle into the vapor chamber.
CAUTION: Use only UltraTraceUV solution in the LeakTamer. Using solutions not recommended by the manufacturer may (1) damage the vehicle being tested, (2) damage the unit, and (3) cause operator injury.
NOTE: Use second bottle of UltraTraceUV solution to regularly maintain at or near the FULL mark on the dipstick. Install correct air fitting onto the LeakTamer, if not supplied.
Test Setup
- Connect the LeakTamer red power cable to a 12V DC power supply. If a battery is used, verify it is in good condition and fully charged.
Connect the LeakTamer black ground cable to the vehicle’s chassis ground.
WARNING: To prevent personal injury, do NOT connect the black cable to a battery ground. A spark in the vicinity of the battery can cause an explosion.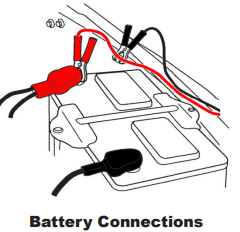
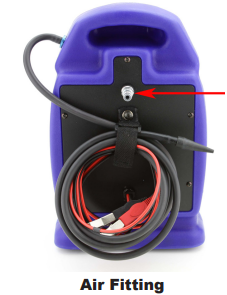
- Depending on the tests you are performing, connect an inert gas such as nitrogen or CO2 or shop air supply line to the fitting located on the back of the unit.
When testing EVAP systems: Connect nitrogen or CO2 to the fitting on the back of the unit.
WARNING: To prevent personal injury, do NOT introduce air, which contains oxygen, into the fuel tank. Gasoline fumes inside the fuel tank can cause an explosion. Always connect the LeakTamer to nitrogen or CO2 when testing the vehicle's EVAP system.
When testing systems other than EVAP: Connect air to the fitting on the back of the unit. Verify shop air or gas pressure is 50 psi to 175 psi/ 3.4 to 12 bar. (100 psi/7 bar is recommended.)
WARNING: Perform all LeakTamer tests with the vehicle engine OFF.
Basic Leak Testing
LeakTamer can be used in virtually any low-pressure vehicle system suspected of having a leak, including EVAP, intake/induction, intercooler and turbocharger, vacuum, exhaust, and wind/water leaks. LeakTamer can also be used to verify air solenoid functions and test components before assembly. These basic steps can apply for testing most systems.
- Locate the system port.
- Install appropriate port adapter.
- Insert vapor supply hose into adapter.
- Turn the unit on by pressing the <ON> button.
- Close system vent(s).
- Continue to fill the system until the flow meter indicates the system is full (ball drops in indicator).
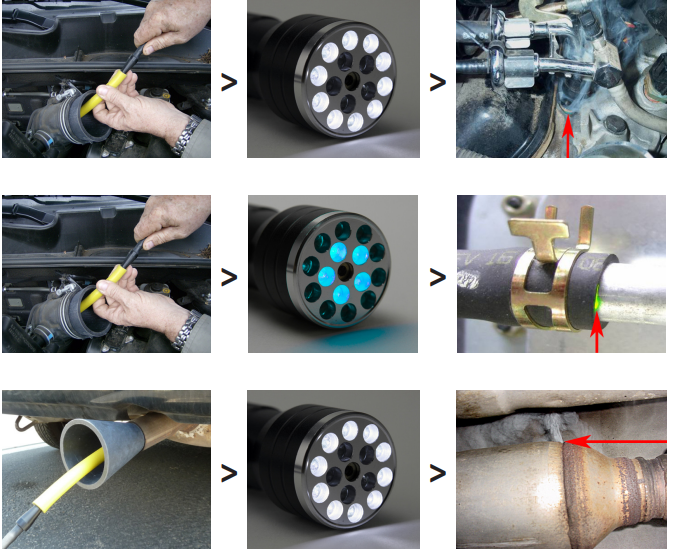
- Use the LED lamp to check for leaking vapor or the UV lamp to check for dye deposited at the exact location of the leak.
Flow Meter Measurements
The flow meter measures flow through the system being leak-tested. This is normal while the system is being filled. If flow meter indicates flow after the system is filled, this indicates a leak. The higher the ball is in the flow meter, the larger the leak size. No flow indicates no flow through the system, or no leak.
The position of the ball indicates the size of the leak.
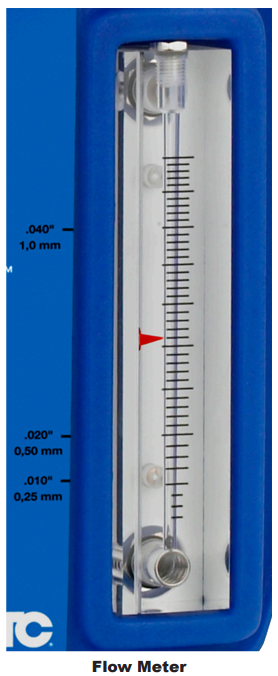
Note: For accurate .010"/.020"/.040" measurements, the flow control valve must be in the fully open position.
Wind and Water Leaks
- Set vehicle's climate control to "fresh air" (not recirculate). Set blower on full speed. This creates positive cabin pressure.
- Connect supply hose nozzle to diffuser.
- Direct vapor path along seals.
- Look for vapor disturbance indicating a leak.
Safety Precautions
If the operator cannot read these instructions, operating instructions and safety precautions must be read and discussed in the operator’s native language.
WARNING: To prevent personal injury and / or damage to equipment:
- Read, understand, and follow all safety precautions and operating procedures.
- Do not use this equipment in a manner not specified by the manufacturer.
- Wear eye protection that meets OSHA standards. If using an ultraviolet light to search for leaks, wear yellow UV goggles that meet OSHA standards. Never stare directly into a UV light or shine UV light on skin.
- Because of an evaporative system’s volatile fumes, use an inert gas, such as nitrogen, when testing an EVAP system.
- Do not perform tests near a source of spark or ignition.
- Correctly connect the power supply to the battery and chassis ground.
OTC LeakTamer UltraTrace UV Solution 6522-1 Troubleshooting
Diagnostic Lights
The LeakTamer has two diagnostic lights on the control panel that indicate whether the tester is working correctly. The following table describes the tester’s trouble codes.
Diagnostic Lights |
Interval Probable Cause | ||
Green | Red | ||
√ | Constant ON | Sufficient battery power | |
√ | Blinks every one (1) second | Insufficient battery power | |
√ | √ | Blink simultaneously every one (1) second | Bad ground or bad power connection at vapor canister |
√ | √ | Blink simultaneously @ four (4)blinks per second | Bad ground at vapor canister or open heating circuit |
√ | √ | Blink alternately @ one (1) blink per second | Bad ground or circuit board failure j |
j If circuit boardfailure occurs, firsttry disconnecting powerto the unitfor 10 seconds, then reconnect power. If this failure code occursa second timeduring operation, disconnect the tester andcontact Tech Support. | |||
Problem | Cause | Solution |
Green power indicator lamp on the tester does not come ON. |
|
|
Tester is ON, but there is no vapor or air coming out of the hose. |
nitrogen, or CO2.
|
|
Pros & Cons
Pros
- Perfect Detection of Leaks: The UV dye technique guarantees this.
- Simple setup and simple application technique define its easy to use quality.
- Applied in several automobile systems, multipurpose
- Reasonably priced for compared to other diagnostic instruments.
Cons
- Requirement for UV Light: Needs a UV light source, maybe costing extra.
- Should the dye leak or spill onto surfaces, cleanup difficulties may arise.
- May not be compatible with all system components; always verify compatibility before usage.
Customer Reviews
The OTC LeakTamer UltraTrace UV Solution 6522-1's efficacy and simplicity of use have typically drawn compliments from customers. These are some typical comments:
- For my garage, this item has changed everything. Finding leaks today is so much simpler! John D
- "The directions were simple, and on my first try it worked flawlessly." Sarah K
Some users have pointed out, nevertheless, that if not handled correctly the dye may be messy and challenging to clean up.
Warranty
Champion Engineering, Inc. warrants only to the original Purchaser that under normal use, care and service, the Equipment (except as otherwise provided herein) shall be free from defects in material and workmanship for ONE YEAR from the date of the original invoice.
Faqs
What is the primary purpose of the OTC LeakTamer UltraTrace UV?
How does the OTC LeakTamer work?
Is the OTC safe to use in all automotive systems?
What are some common problems encountered when using this solution?
Do I need any special equipment to use this solution?
Can I use this OTC LeakTamer UltraTrace UV Solution 6522-1 multiple times?
How do I clean up spills or leaks of the UV dye?
Is this product suitable for all types of automotive systems?
What are some pros and cons of using this product?
Leave a Comment
