
Usage: Pacific Laser Systems PLS5 and PLS3 Laser Levels Owner Manual
Content
Pacific Laser Systems PLS5 and PLS3 Laser Levels
Introduction
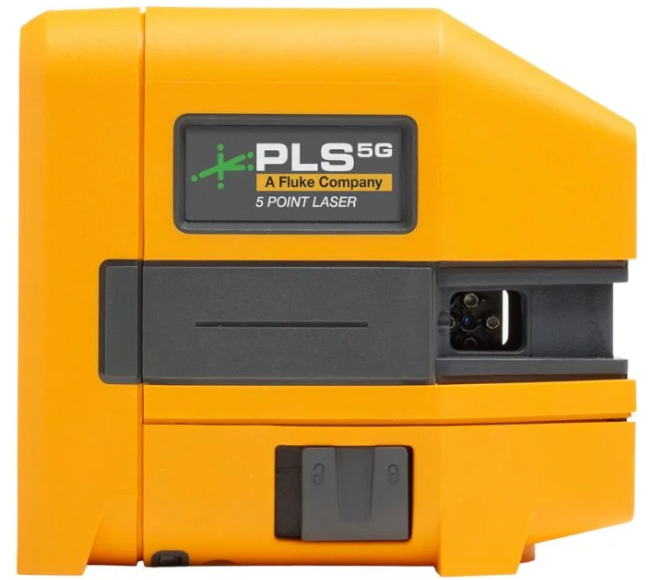
Pacific Laser Systems has long been recognized for manufacturing some of the most reliable and accurate laser levels for professional contractors. The PLS5 and PLS3 Laser Levels are standout tools in this lineup, designed to deliver fast, precise layout and alignment for a wide range of construction and installation tasks. Both models are engineered in the USA, offering rugged durability, intuitive operation, and industry-leading accuracy—key advantages for professionals who demand efficiency and reliability on the job site.
The PLS5 is a five-point laser level, projecting bright, visible laser dots for plumb, level, and square applications, ideal for framing, cabinetry, drop ceilings, and more. The PLS3, with its three-point system, excels at basic leveling, plumbing, and squaring tasks, making it a favorite for steel stud framing, HVAC, electrical, and residential construction. Both tools feature fast, automatic self-leveling, long battery life, and robust water and dust resistance (IP54 rating), ensuring consistent performance even in demanding environments.
The target audience for these laser levels includes contractors, carpenters, electricians, HVAC technicians, and DIY enthusiasts seeking professional-grade results. With an estimated price range of $200–$400,, depending on the model and kit configuration, the PLS5 and PLS3 Laser Levels are competitively priced for their accuracy and durability. They are widely available through major tool retailers and online distributors.
Pacific Laser Systems PLS5 and PLS3 Laser Levels are trusted for their ease of use, rapid setup, and precision—qualities that save time, reduce errors, and boost productivity on any project. Whether you need comprehensive five-point alignment or straightforward three-point leveling, these tools deliver the performance professionals rely on every day.
Specifications
Performance Metrics
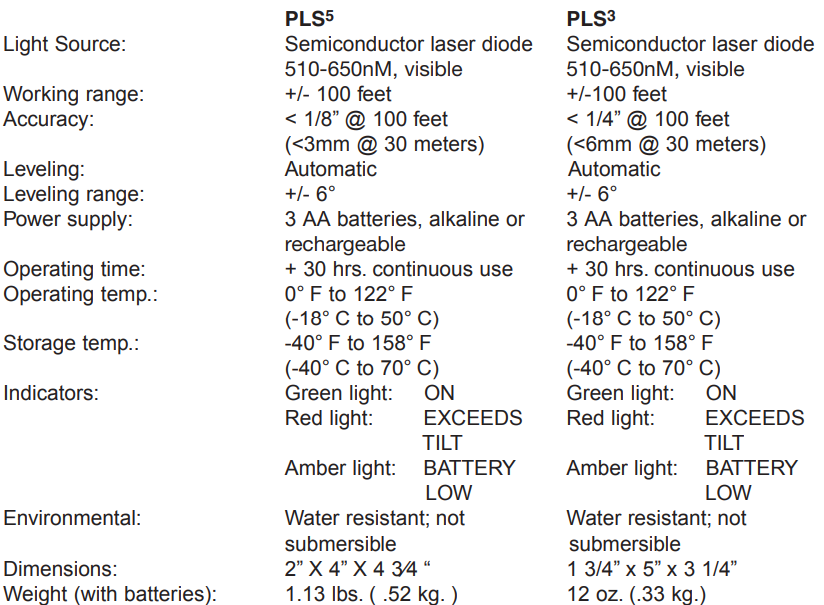
- Accuracy: Both models deliver high precision, with the PLS5 slightly edging out the PLS3 at closer ranges, though the PLS3 maintains its accuracy over longer distances
- Battery Life: Exceptional for both, with up to 30 hours of continuous use on standard batteries.
- Durability: Drop-tested (1 m), water- and dust-resistant, and built for rugged job site conditions.
Comparison with Similar Products
Compared to other point lasers in their class, the Pacific Laser Systems PLS5 and PLS3 Laser Levels offer superior accuracy, faster self-leveling, and more robust construction. While some competitors may offer similar features, the PLS models stand out for their US-based design, long battery life, and comprehensive warranty coverage. The five-point PLS5 is particularly unique for complex layout tasks, while the PLS3 remains a top choice for straightforward leveling and plumbing needs.
Features
Safety Labeling & Instructions
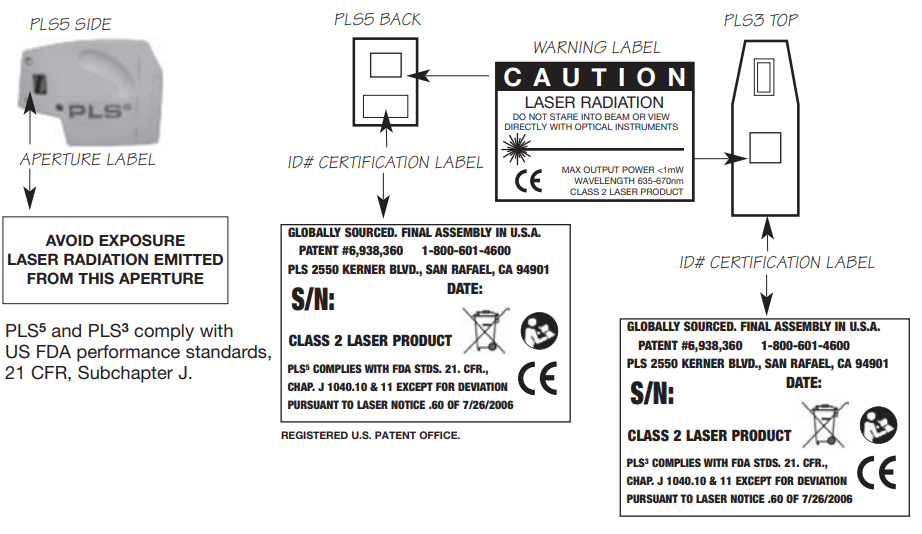
The PLS5 and PLS3 contain a semiconductor laser diode with a wavelength of 635 nanometers.
The continuous output of any single beam never exceeds 1.0 milliwatts. Never stare directly into the laser beam or view the beam with optical instruments. Turn the laser off when not in use.
CAUTION: USE OF CONTROLS, ADJUSTMENTS, OR PROCEDURES OTHER THAN THOSE SPECIFIED HEREIN MAY RESULT IN HAZARDOUS RADIATION EXPOSURE.
These labels are attached to every PLS laser. These are not to be removed or defaced.
Beams
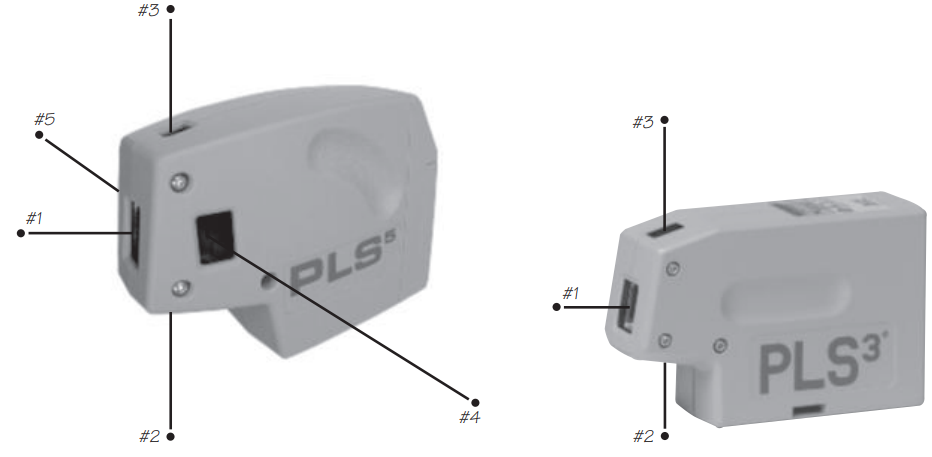
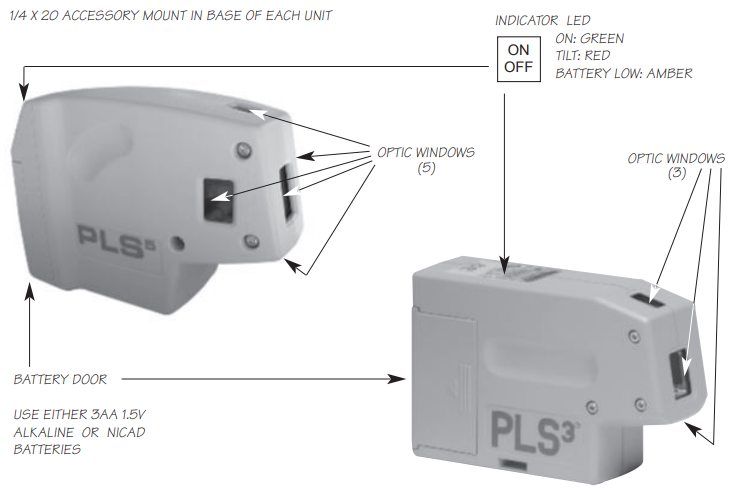
PLS5 The five beams of the PLS5 are: #1 Forward Beam, #2 Down Beam, #3 Up Beam, #4 Left Beam, #5 Right Beam. All PLS5 beams have the same brightness and are square to each other.
PLS3 The three beams of the PLS3 are: #1 Forward Beam, #2 Down Beam, #3 Up Beam.
Plumb
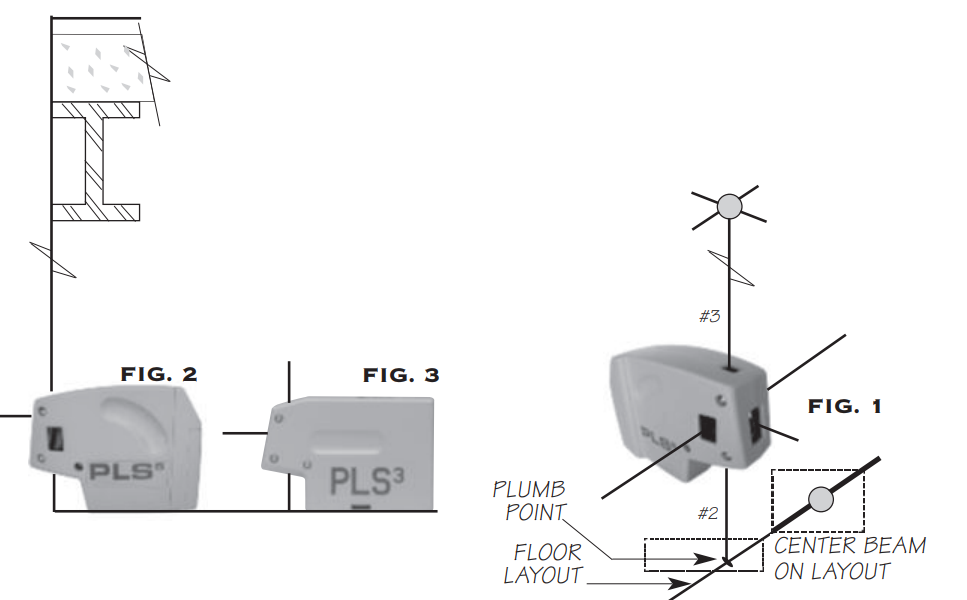
To establish plumb with the PLS5 and PLS3, place the #2 down beam over the mark to be transposed. See Fig.1. The #3 up beam is exactly plumb within specification. You can shoot plumb marks down and up, or cantilevered over the edge of a building/shaft opening or floor track, etc. See Fig.2. Use the floor stand with your PLS5 or PLS3 to increase the sight angle of the #2 down beam.
The PLS3 and PLS5 can quickly survey existing conditions for plumbing. Use a tape
and #3 up beam. Position the laser near the structure.
Check any distance up or down the structure. It is also possible to transpose marks from a roof or ceiling down to the floor. Move the laser until the #3 up beam hits the edge or center of the ceiling component to be transposed. Mark the floor at the #2 down beam. See Figs. 2 and 3.
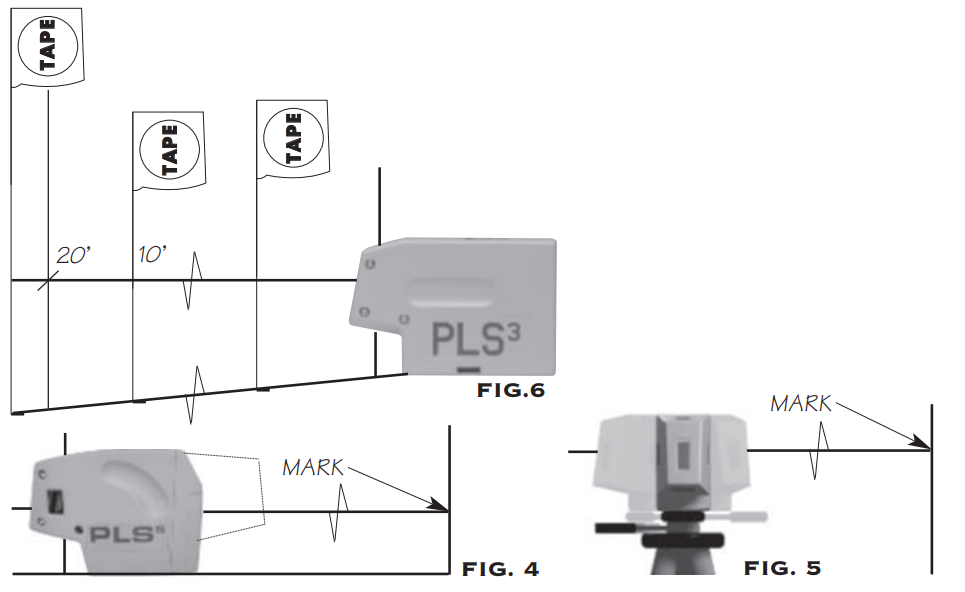
Precise level and grade marks are easily established with the PLS5 and PLS3. Swivel the unit about its center, stopping to mark the desired level or grade points. See Fig. 4. Any stable surface can be used. When mounted on a tripod or wall mount, swivel and mark.
See Fig. 5. When turning your PLS5 or PLS3 on a tripod,, be sure the tripod head is perfectly level. An error in marks can result in the tripod being out of level.
To survey existing conditions for the level, point in the direction to survey. Using a tape or rod with a benchmark, the variations in level or grade can be noted quickly at various distances. See Fig. 6.
Square
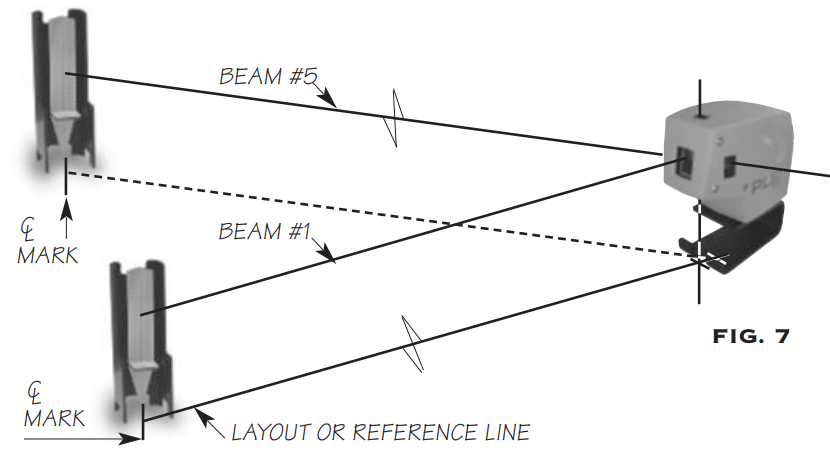
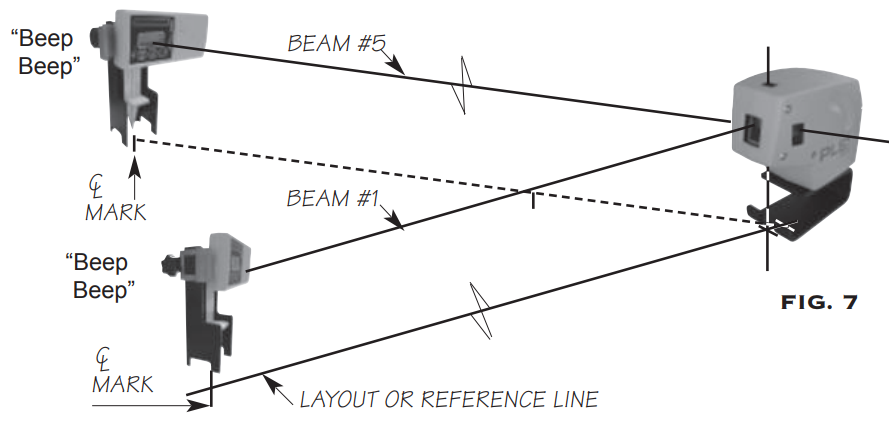
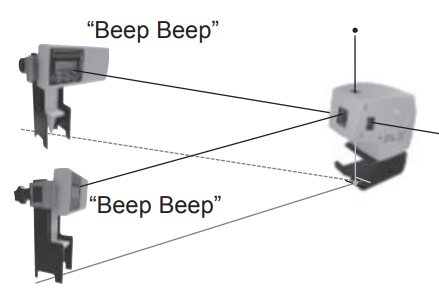
To establish the square, place the PLS5 with the #2 down beam over the layout reference line. See Fig. 7. Place the pendulum target on that line, and center #1 forward beam on the center of the target. Once centered, move the pendulum target to square on #4 left beam or #5 right beam. Make a mark on the floor or surface near the laser,, and the second mark at the desired distance from the laser. See Fig. 7.
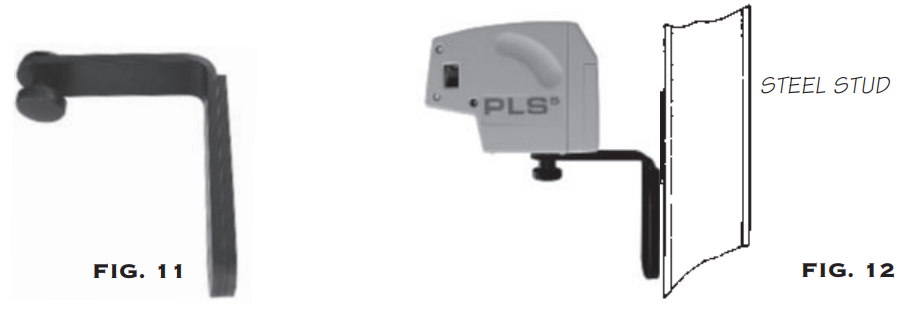
Magnetic Bracket Instructions
To use the magnetic bracket with the PLS laser:
- Screw the 1/4 x 20 threaded knob to the mount on the base of the PLS laser.
- Mount the PLS laser and bracket to steel studs, steel door frame, I-beams, carpenter’s square, etc.
- Rotate the PLS laser tthe o the desired point and make your mark.
Combine the PLS laser, the magnetic bracket, a standard steel carpenter’s framing square, and one or more clamps,s and can mount the laser in unlimited ways. Clamp carpenter’s square to concrete forms, ladders, wood studs, etc. Attach the PLS laser with the magnetic mount as described above. If you drill two small holes centered on the long section of the carpenter’s square, the square can be attached to unfinished drywall partitions with screws or removable nails. Slide the PLS laser up and down the mounted carpenter’s square to the precise desired height.
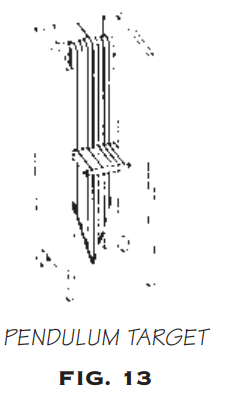
Pendulum Target
Use the PLS5 pendulum target for a variety of time-saving alignment tasks. For square: For consistent accuracy in establishing or checking the square, use the PLS5 target to transfer the laser beam to the floor surface. To establish a square, see page 8 of this manual. Always mount the PLS5 laser on the floor stand when establishing a square. The pendulum target is designed so the beams are best seen at this height.
For transfer of vertical lines:
To transfer vertical marks quickly and accurately to a wall:
- Place the front of the PLS5 laser against the wall with the #1 forward beam on the mark to be transferred. (If the mark is on the floor, place the #2 down beam over the mark.)
- Place the target with its back flat against the wall at the desired height and move the target until the #3 up beam is centered on the plastic-lined target.
- Mark the top or bottom of the target arrow pins.
PLS5 System Interior - Exterior System
The PLS5 is the only point-to-point layout tool for use on both indoor and outdoor job sites. Bright sunshine has traditionally limited the use of visible beam lasers to interior projects. The PLS5 partnered with our laser receiver gives the contractor the ability to accurately lay out a job site up to 250 + feet, even in the brightest outdoor conditions.
The PLS5 can also be used inside, without the receiver, for all point-to-point alignment tasks.
CONCRETE CONSTRUCTION
- Layout of batter boards
- Layout & alignment for masonry projects
- Layout for saw cutting (control joints)
- Alignment of anchor & J bolts
- Layout & alignment of piers and column footings
- Layout of form boards for concrete flatwork
ELECTRICAL AND MECHANICAL CONSTRUCTION
- Rough-in of conduit
- Rough-in of waste and supply lines
- Rough-in of natural gas supply lines
FRAMING CONSTRUCTION
- Layout of control lines on concrete slabs, decking,, and sub-floors
- Alignment of exterior heavy-gauge steel framing
- Layout & alignment for commercial & residential wood framing
GLAZING CONSTRUCTION
- Layout & installation of curtain walls & storefront projects.
Maintenance
Good care of the PLS3 or PLS5 is primarily common-sense care. Remove the batteries from the unit if the laser is to be stored for a considerable period of time. Keep the optic windows clean using a soft cloth or photographic-grade cleaning tissue. Avoid storage conditions of prolonged heat or cold.
Pacific Laser Systems PLS5 and PLS3 Laser Levels Troubleshooting
Even the most reliable tools can encounter issues. Here are common problems, solutions, and preventive measures for your PLS5 and PLS3 Laser Levels.
Common Problems & Solutions
- Laser Not Turning On: Check battery installation and charge. Clean contacts if necessary.
- Inaccurate Leveling: Ensure the unit is on a stable surface. Check for obstructions in the pendulum mechanism. Recalibrate if needed (see manual).
- Dim or Flickering Laser: Replace batteries. Clean laser windows. Avoid direct sunlight when possible.
- Error Lights (Red/Amber): Red indicates an out-of-level condition; reposition the unit. Amber signals low battery; replace batteries.
- Water Resistance Issues: While IP54 rated, avoid submersion. Dry thoroughly if exposed to moisture.
Preventive Measures
- Store in a protective case when not in use.
- Regularly clean laser apertures and housing.
- Use fresh, high-quality batteries.
- Avoid dropping or exposing to extreme temperatures beyond specified limits.
Warranty & Support
Pacific Laser Systems offers a three-year warranty on the PLS5 and PLS3 Laser Levels, covering defects in materials and workmanship[4]. For technical support, replacement parts, or service, contact Pacific Laser Systems directly through their official website or authorized dealers. Always retain your proof of purchase for warranty claims.
This product is warranted by PLS Pacific Laser Systems to the original purchaser to be free from defects in material and workmanship under normal use for a period of three years from the date of purchase. During the warranty period, and upon proof of purchase, the product will be repaired or replaced (with the same or similar model at our option), without charge for either parts or labor through PLS. The purchaser shall bear all shipping, packing,, and insurance costs. Upon completion of the repair or replacement, the unit will be returned to the customer, freight prepaid. The warranty will not apply to this product if it has been misused, abused or,, altered. Without limiting the foregoing, battery leakage, dents or gouges to the plastic housing, broken optic windows, and damage to the switch/LED membrane are presumed to result from misuse or abuse. Tampering with or removal of the caution or certification labels voids this warranty.
Neither this warranty nor any other warranty, express or implied, including implied warranties of merchantability, shall extend beyond the warranty period. No responsibility is assumed for any incidental or consequential damages. This warranty gives you specific legal rights, and you may have other rights which vary from state to state.
There is nothing an owner can do in the way of service or maintenance on PLS tools. Contact PLS or your local service center for repairs.
Pacific Laser Systems PLS5 and PLS3 Laser Levels – Pros & Cons
Pros
- Superior Accuracy: Delivers ≤1/8" precision at 30–100 ft, depending on model.
- Fast Self-Leveling: Automatic pendulum system allows for rapid setup and reliable results.
- Long Battery Life: Up to 30 hours of continuous operation on standard batteries.
- Durable Construction: Drop-tested, water- and dust-resistant, built for tough job sites.
- Versatile Applications: PLS5’s five-point system is ideal for complex layouts; PLS3 excels at basic leveling and plumbing.
- Three-Year Warranty: Industry-leading coverage for peace of mind.
Cons
- Price: Higher initial cost compared to basic bubble levels, but justified by performance and durability.
- Limited Outdoor Visibility: Red lasers may be harder to see in bright sunlight; green laser versions are available for improved visibility.
- Battery Access: Some users find battery compartment access less convenient than competitors.
Value for Money
The PLS5 and PLS3 Laser Levels represent excellent value for professionals who require precise, reliable layout tools. Their accuracy, durability, and warranty support make them a smart long-term investment compared to cheaper alternatives.
Pacific Laser Systems PLS5 and PLS3 Laser Levels – Customer Reviews
User feedback for the Pacific Laser Systems PLS5 and PLS3 Laser Levels is overwhelmingly positive, with many professionals praising their accuracy, ease of use, and rugged build quality. Common compliments include the fast self-leveling feature, bright laser dots, and the confidence these tools provide for critical layout tasks.
Some users note that the red laser can be difficult to see in very bright conditions, though this is a common limitation for red lasers. A few reviewers mention minor inconveniences with battery access, but these are outweighed by the overall performance and reliability. Star ratings consistently average 4.5 out of 5 across major retailers, with particular emphasis on the three-year warranty and responsive customer service.
For those in construction, carpentry, or installation trades, the PLS5 and PLS3 are frequently recommended as essential tools that save time and reduce errors on the job site. Purchase recommendations highlight the PLS5 for complex layouts and the PLS3 for straightforward leveling needs—both delivering professional results that justify their price.
Faqs
How do I set up pacific laser systems PLS5 and PLS3 Laser Levels for accurate leveling on a job site?
What should I do if my pacific laser systems PLS5 and PLS3 Laser Levels is not self-leveling correctly?
Can I use pacific laser systems PLS5 and PLS3 Laser Levels for establishing square layouts?
Are pacific laser systems PLS5 and PLS3 Laser Levels compatible with standard tripods?
How do I check the accuracy of my pacific laser systems PLS5 and PLS3 Laser Levels?
What are the best practices for maintaining pacific laser systems PLS5 and PLS3 Laser Levels?
Can pacific laser systems PLS5 and PLS3 Laser Levels be used outdoors?
What should I do if the laser beam from my pacific laser systems PLS5 and PLS3 Laser Levels appears dim or weak?
Tags
Leave a Comment