Panasonic Inverter Microwave NN-ST696S Guide
Content
Introduction of Panasonic Inverter Microwave NN-ST696S Guide
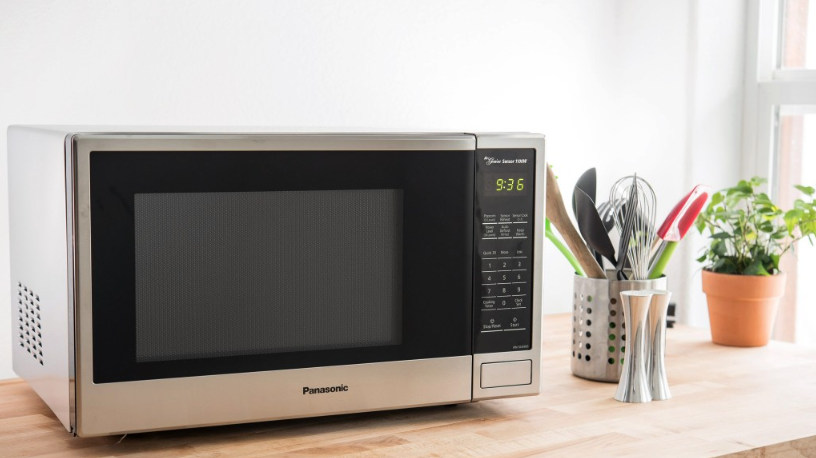
The Panasonic Inverter Microwave NN-ST696S is a versatile and powerful kitchen appliance that combines the convenience of a microwave with the precision of an inverter. This 1.5 cubic foot microwave features a sleek stainless steel design, a 1000-watt inverter, and numerous cooking options to help you prepare your favorite dishes with ease. With an estimated price of $250 and a launching date of January 2021, the NN-ST696S is a great investment for any home cook looking to upgrade their microwave game.
Specifications
| Specification | Details |
|---|---|
| Model Number | NN-ST696S / ST676S |
| Power Source | 120 V, 60 Hz |
| Power Consumption | Microwave: 12.4 A, 1,480 W |
| Cooking Power | Microwave: 1,200 W |
| Outside Dimensions (W x H x D) | 525 mm x 310 mm x 401 mm (20 11/16” x 12 ¼” x 15 ¾”) |
| Oven Cavity Dimensions (W x H x D) | 355 mm x 251 mm x 365 mm (14” x 9 7/8” x 14 3/8”) |
| Operating Frequency | 2,450 MHz |
| Net Weight | Approx. 11.5 kg (25.4 lbs.) |
Trim Kit
| Specification | Details |
|---|---|
| Model Number | NN-TK621S (Stainless) |
| Outside Dimensions (W x H) | 684 mm x 419 mm (27” x 16 ½”) |
| Cabinet Opening (W x H x D) | 648 mm x 389 mm x 533 mm (25 1/2” x 15 5/16” x 21”) |
Oven Components Diagram
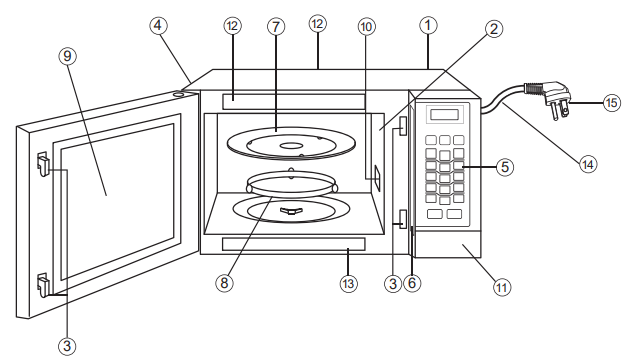
- External Air Vent
- Internal Air Vent
- Door Safety Lock System 4 Exhaust Air Vent
- Control Panel
- Identification Plate
- Glass Tray
- Roller Ring
- Heat/Vapor Barrier Film (do not remove)
- Waveguide Cover (do not remove)
- Door Release Button
- Warning Label
- Menu Label
- Power Supply Cord
- Power Supply Plug
Note: The illustration is for reference only.
Control Panel
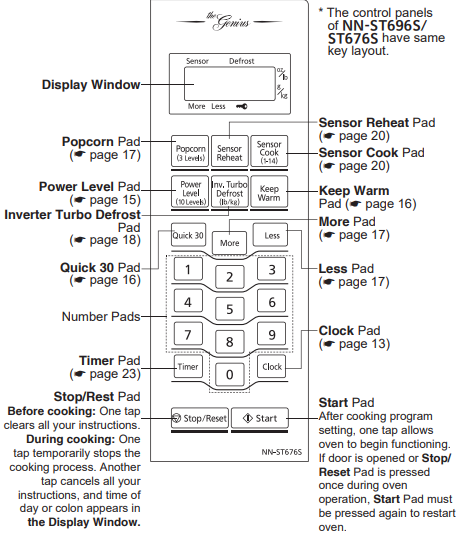
Beep Sound: When a pad is pressed correctly, a beep will be heard. If a pad is pressed and no beep is heard, the unit did not or cannot accept the instruction. When operating, the oven will beep twice between programmed stages. At the end of any complete program, the oven will beep 5 times.
Note
- If there is no operation for 6 minutes after setting cooking program, the oven will automatically cancel the cooking program. The display will return to clock or colon display.
- If no beep sound is heard, check "beep ON/OFF" function feature (see page 14).
Starting to Use Your Oven
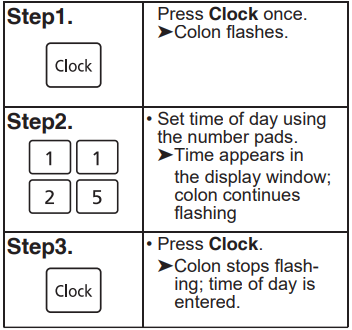
Setting the Clock
Example: To set 11:25 a.m. or p.m.
Child Safety Lock
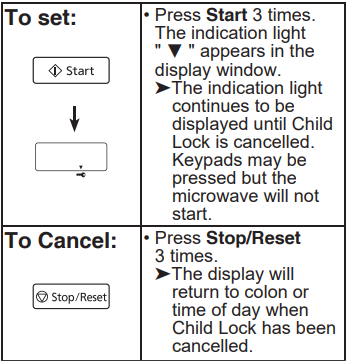
This feature prevents the electronic oper-ation of the oven until cancelled. It does not lock the door.
NOTES
- To reset the clock, repeat step 1-3.
- The clock will retain the time of day as long as the oven is plugged in and electricity is supplied.
- Clock is a 12-hour display.
- Oven will not operate while colon is flashing.
NOTES
- You can set the Child Lock feature when the display shows a colon or time of day.
- To set or cancel child safety lock, Start or Stop/Reset button must be pressed 3 times within 10 seconds.
Description
The Panasonic Inverter Microwave NN-ST696S boasts a spacious 1.5 cubic foot interior that can accommodate a wide variety of dishes and containers. Its 1000-watt inverter provides consistent and precise heating, ensuring that your food is cooked evenly and thoroughly every time. Additionally, the NN-ST696S features a sleek stainless steel exterior that is both stylish and durable, making it a great addition to any kitchen.
Quick Guide to Operation
| Feature | How to Operate |
|---|---|
| To set Clock | - Press Clock once. |
| - Enter time of day using 0 Thru 9. | |
| - Press Clock to confirm. | |
| To use Child Safety Lock | - To set, press Start three times. |
| - To cancel, press Stop/Reset three times. | |
| To use Power and Time | - Press Power Level once to set the power. |
| - Enter power level using 0 Thru 9. | |
| - Press Start. | |
| To cook using Quick 30 | - Press Quick 30 once to set time up to 5 minutes. |
| - During manual cooking, press to add time up to 5 minutes. | |
| To use Keep Warm | - Press Keep Warm. |
| - Set keep warm time up to 30 minutes using 0 Thru 9. | |
| - Press Start. | |
| To cook using Popcorn | - Press Popcorn once. |
| - Set weight using More or Less. | |
| - Press Start. | |
| To defrost using Inverter Turbo Defrost | - Press Turbo Defrost. |
| - Enter weight using 0 Thru 9. | |
| - Press Start. | |
| To reheat using Sensor Reheat | - Press Sensor Reheat once. |
| - Press More or Less for optional adjustments. | |
| To cook using Sensor Cook | - Press Sensor Cook. |
| - Enter food number using 0 Thru 9. | |
| - Press Start. | |
| To use as a Kitchen Timer | - Press Timer. |
| - Enter time using 0 Thru 9. | |
| - Press Start. | |
| To set Stand Time | - Press Timer. |
| - Enter time using 0 Thru 9. | |
| - Press Start. | |
| To set Delay Start | - Press Timer. |
| - Enter start time using 0 Thru 9. | |
| - Set cooking program, then press Start. |
Function Features
This unique function of your Panasonic microwave oven allows you to establish the initial non-cooking features of your Oven.
This microwave oven has the functions below:
LB/KG CHOICE: The oven has both imperial and metric weight measurements.
BEEP CHOICE: The oven has both Beep On and Beep Off mode.
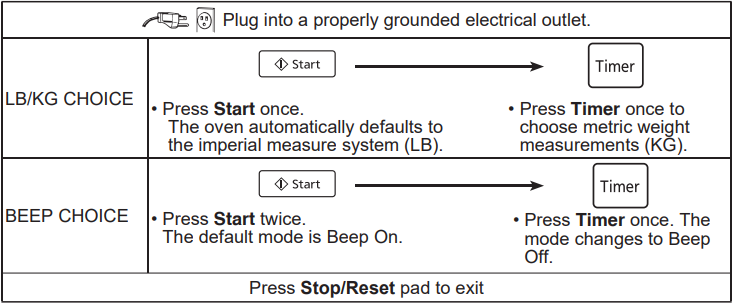
NOTES: These choices can be selected only when you plug-in the oven.
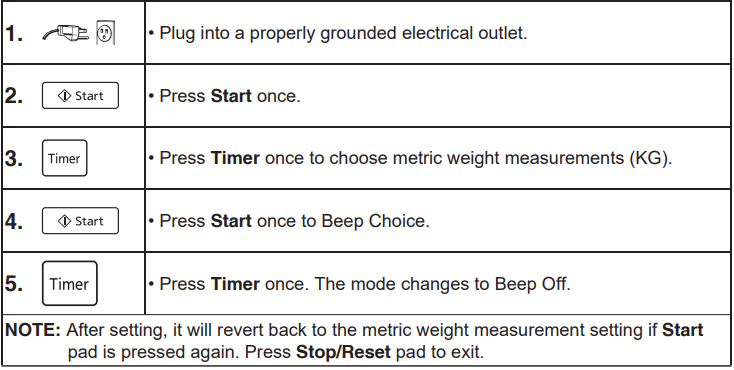
Set LB/KG and BEEP by following the steps below:
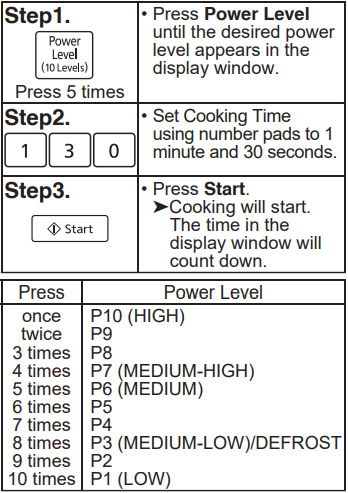
Selecting Microwave Power & Cook Time
Example: To cook at P 6 (MEDIUM) power for 1 minute 30 seconds
NOTES
- For more than one stage cooking, repeat steps 1 and 2 for each stage of cooking before pressing Start Pad (see right side for reference).
- When using P10 (HIGH) power for the first stage, you may skip step1.
- When selecting P10 (HIGH) power, the maximum programmable time is 30 minutes. For other power levels, the maximum time is 99 minutes and 99 seconds.
- For reheating, use P10 (HIGH) for liquids, P7 (MEDIUM-HIGH) for most foods and P6 (MEDIUM) for dense foods.
- For defrosting, use P3 (MEDIUM-LOW). DO NOT OVERCOOK. This oven requires less time to cook than an older unit. Overcooking will cause food to dry out and may cause a fire. A microwave oven's cooking power tells you the amount of microwave power available for cooking.
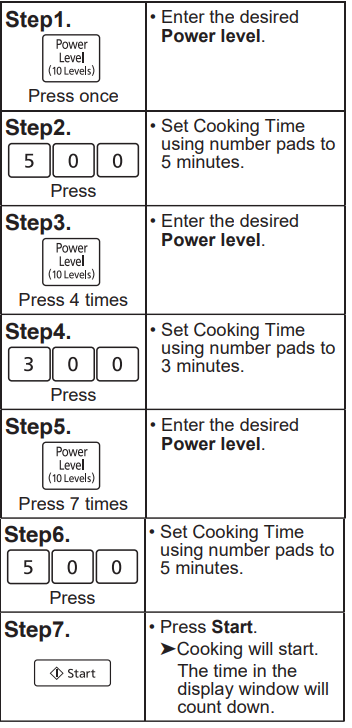
3-Stage Cooking
This feature allows you to program 2-3 Stages of cooking continuously.
NOTES
- The maximum number of stages for cooking is 3.
- When selecting P10 (HIGH) power for the first stage, you may skip step1.
- When operating, two beeps will sound between each stage. Five beeps will sound at the end of the entire sequence.
- Inverter turbo defrost, sensor or other auto features can not be used with 3 stage cooking.
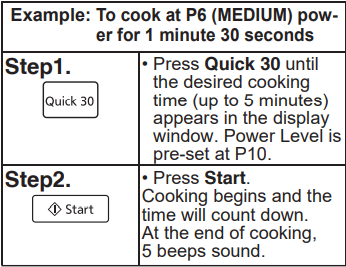
Quick 30 Feature
This feature allows you to set or add cooking time in 30 seconds increments up to 5 minutes.
To Set Cooking Time
NOTES
- If desired, you can use other power levels. Select desired power level before setting cooking time.
- After setting the time by Quick 30 Pad, you cannot use Number Pads.
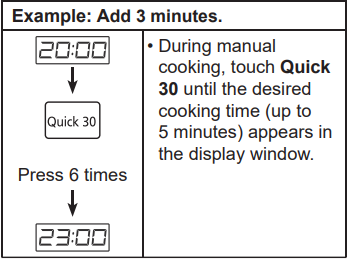
- Quick 30 Pad can be used to add more time during manual cooking.
To Add Time using Quick 30
Keep Warm Feature
This feature will keep food warm for up to 30 minutes after cooking.
Example: To keep 2 cups of gravy warm
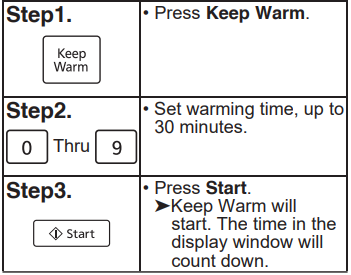
NOTE: Keep Warm can be programmed as the final stage after cook times have been manually entered. It cannot be used in combination with inverter turbo defrost sensor or auto features.
Inverter Turbo Defrost Feature
Example: To Defrost 1.5 pounds of meat
Place food on microwave safe dish.
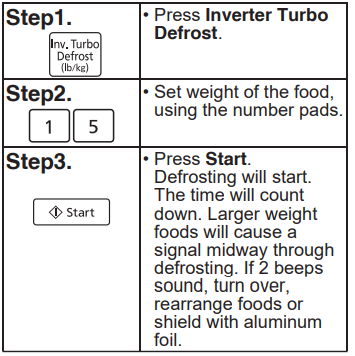
Note: The maximum weight for Inverter Turbo Defrost is 3 kg (6 lb).
Conversion Chart: Follow the chart to convert ounces or hundredths of a pound into tenths of a pound. To use Inverter Turbo Defrost, enter the weight of the food in lbs. (1.0) and tenths of a lb. (0.1). If a piece of meat weighs 1.95 lbs. or 1 lb. 14 oz., enter 1.9 lbs.
| Ounces | Hundredths of a Pound | Tenths of a Pound |
|---|---|---|
| 0 | .01 - .05 | 0.0 |
| 1 - 2 | .06 - .15 | 0.1 |
| 3 - 4 | .16 - .25 | 0.2 |
| 5 | .26 - .35 | 0.3 |
| 6 - 7 | .36 - .45 | 0.4 |
| 8 | .46 - .55 | 0.5 |
| 9 - 10 | .56 - .65 | 0.6 |
| 11 - 12 | .66 - .75 | 0.7 |
| 13 | .76 - .85 | 0.8 |
| 14 - 15 | .86 - .95 | 0.9 |
Defrosting Tips & Techniques
Preparation for freezing
- Freeze meats, poultry, and fish in packages with only 1 or 2 layers of food. Place wax paper between layers.
- Package in heavy-duty plastic wraps, bags (labeled “For Freezer”), or freezer paper.
- Remove as much air as possible.
- Seal securely, date, and label.
To Defrost
- Remove wrapper. This helps moisture to evaporate. Juices from food can get hot and cook the food.
- Set food in microwave-safe dish.
- Place roasts fat-side down. Place whole poultry breast-side down.
- Select power and minimum time so that items will be under-defrosted.
- Drain liquids during defrosting.
- Turn over (invert) items during defrosting.
- Shield edges and ends if needed. (See "Cooking Techniques").
After Defrosting
- Large items may be icy in the centre. Defrosting will complete during STANDING TIME.
- Let stand, covered, following stand time directions on page 19.
- Rinse foods as indicated in the chart.
- Items which have been layered should be rinsed separately or have a longer tand time.
| Food | Manual Defrost Time at P3 (min/kg) | Manual Defrost Time at P3 (min/lb) | During Defrosting | After Defrosting |
|---|---|---|---|---|
| Fish and Seafood | ||||
| Crabmeat | 12 | 6 | Break apart / Rearrange | Stand Time: 5 min, Rinse: YES |
| Fish Steaks | 8 to 12 | 4 to 6 | Turn over | |
| Fish Fillets | 8 to 12 | 4 to 6 | Turn over / Rearrange / Shield ends | |
| Sea Scallops | 8 to 12 | 4 to 6 | Break apart / Remove defrosted pieces | |
| Whole fish | 8 to 12 | 4 to 6 | Turn over | |
| Meat | ||||
| Ground Meat | 8 to 10 | 4 to 5 | Turn over / Remove defrosted portion / Shield edges | Stand Time: 10 min, Rinse: NO |
| Roasts (1.1-1.8 kg) | 8 to 16 | 4 to 8 | Turn over / Shield ends and defrosted surface | Stand Time: 30 min in fridge |
| Chops/Steak | 12 to 16 | 6 to 8 | Turn over / Rearrange / Shield ends and defrosted surface | Stand Time: 5 min |
| Ribs/T-bone | 12 to 16 | 6 to 8 | Turn over / Rearrange / Shield ends and defrosted surface | |
| Stew Meat | 8 to 16 | 4 to 8 | Break apart / Rearrange / Remove defrosted pieces | |
| Liver (thinly sliced) | 8 to 12 | 4 to 6 | Drain liquid / Turn over / Separate pieces | |
| Bacon (sliced) | 8 | 4 | Turn over | |
| Poultry | ||||
| Chicken, Whole (up to 1.4 kg) | 8 to 12 | 4 to 6 | Turn over / Shield | Stand Time: 20 min in fridge |
| Cutlets | 8 to 12 | 4 to 6 | Break apart / Turn over / Remove defrosted pieces | Stand Time: 5 min |
| Pieces | 8 to 12 | 4 to 6 | Break apart / Turn over / Shield | Stand Time: 10 min |
| Cornish hens | 12 to 16 | 6 to 8 | Turn over / Shield | |
| Turkey Breast (2.3-2.7 kg) | 12 | 6 | Turn over / Shield | Stand Time: 20 min in fridge |
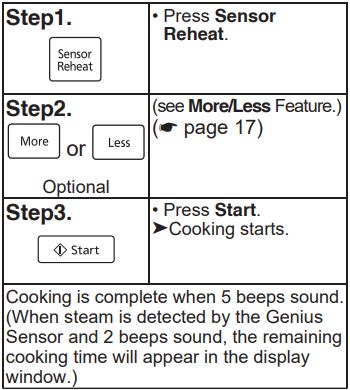
Sensor Reheat Feature
This sensor feature allows you to reheat food without setting time. The oven simplifies programming.
Example: To reheat a plate of food
NOTE
- Casseroles
Add 3 to 4 tablespoons of liquid, cover with lid or vented plastic wrap. Stir when time appears in the display window. - Canned foods
Empty contents into casserole dish or serving bowl, cover dish with lid or vented plastic wrap. After reheating, let stand for a few minutes. - Plate of food
Arrange food on plate; top with butter, gravy, etc. Cover with lid or vented plastic wrap. After reheating, let stand for a few minutes.
DO NOT USE SENSOR REHEAT
- To reheat bread, meat pie and pastry products. Use manual power and time for these foods.
- For raw or uncooked foods.
- If oven cavity is warm.
- For beverages.
- For frozen foods.
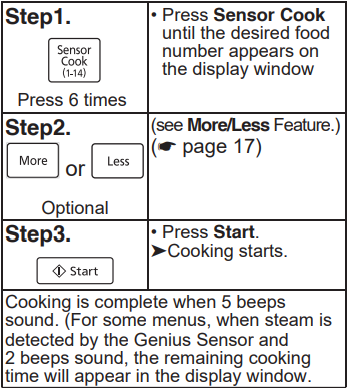
Sensor Cook Feature
This sensor feature allows you to cook food without setting time. The oven simplifies programming.
Example: To cook Frozen Entrées
For the best results with the GENIUS SENSOR, follow these recommendations.
BEFORE Reheating/Cooking
- The room temperature surrounding the oven should be below 35 °C (95 °F).
- Food weight should exceed 110 g (4 oz.).
- Be sure the glass tray, the outside of the cooking containers and the inside of the microwave oven are dry before placing food in the oven. Residual beads of moisture turning into steam can mislead the sensor.
- Cover food with lid, or with vented plastic wrap. Never use tightly sealed plastic containers—they can prevent steam from escaping and cause food to overcook.
DURING Reheating/Cooking: DO NOT open the oven door until 2 beeps sound and cooking time appears on the Display Window. Doing so will cause inaccurate cooking since the steam from food is no longer contained within the oven cavity. Once the cooking time begins to count down, the oven door may be opened to stir, turn or rearrange foods for some menus.
AFTER Reheating/Cooking: All foods should have a stand time.
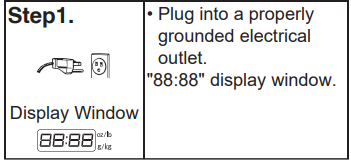
Setup Guide
To operate the Panasonic Inverter Microwave NN-ST696S, follow these steps:
- Plug in the microwave and turn it on.
- Choose the desired cooking option (e.g., defrost, reheat, cook).
- Enter the cooking time and select the power level (if applicable).
- Press the start button to begin cooking.
To assemble and configure the microwave, follow these steps:
- Place the microwave on a stable, level surface.
- Insert the turntable and close the door.
- Connect the microwave to a power outlet.
- Set the clock and other preferences.
Cookware Guide
CONTAINER TEST
TO TEST A CONTAINER FOR SAFE MICROWAVE OVEN USE: Fill a microwave safe cup with cool water and place it in the microwave oven alongside the empty container to be tested; heat one (1) minute at P10 (HIGH). If the container is microwave oven safe (transparent to microwave energy), the empty container should remain comfortably cool and the water should be hot. If the container is hot, it has absorbed some microwave energy and should NOT be used. This test cannot be used for plastic containers.
Care and Cleaning of Your Microwave Oven
Caution: After cooking, the oven should be cleaned with a soft cloth moistened with soapy water. If the oven is not cleaned occasionally to eliminate grease, it can accumulate and cause the oven to "Smoke and fire" during use.
BEFORE CLEANING: Unplug oven at wall outlet. If outlet is inacces-sible, leave oven door open while cleaning.
AFTER CLEANING: Be sure to place the Roller Ring and the Glass Tray in the proper position and press Stop/Reset Pad to clear the Display.
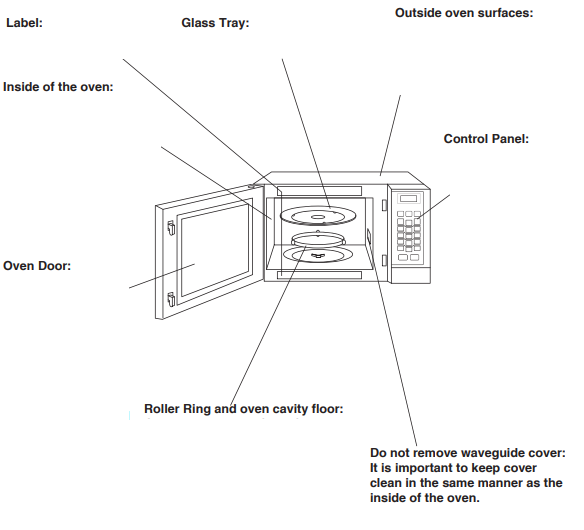
- Label: Do not remove, wipe with a damp cloth.
Inside of the oven: Wipe with a damp cloth after using, mild detergent may be used if needed. The use of harsh detergents or abrasives. - Glass Tray: Remove and wash in warm soapy water or in a dishwasher.
- Outside oven surfaces: Clean with a damp cloth. To prevent damage to the operating parts inside the oven, water should not be allowed to seep into ventilation openings.
- Oven Door: Wipe with a soft, dry cloth when steam accumulates inside or around the outside of the oven door. During cooking, especially under high humidity conditions, steam is given off from the food. (Some steam will condense on cooler surfaces, such as the oven door. This is normal.) Inside surface is covered with a heat and vapor barrier film. Do not remove.
- Outside oven surfaces: Clean with a damp cloth. To prevent damage to the operating parts inside the oven, water should not be allowed to seep into ventilation openings.
- Do not remove waveguide cover: It is important to keep cover clean in the same manner as the inside of the oven.
- Control Panel: Covered with a removable protective film to prevent scratches during shipping. Small bubbles may appear under this film. (Hint -To remove film, apply masking or clear tape to an exposed corner and pull gently.) If the Control Panel becomes wet, clean it with a soft, dry cloth. Do not use harsh detergents or abrasives.
IT IS IMPORTANT TO KEEP THE OVEN CLEAN AND DRY. FOOD RESIDUE AND CONDENSATION MAY CAUSE RUSTING OR ARCING AND DAMAGE TO THE OVEN. AFTER USE, WIPE DRY ALL SURFACES-INCLUDING VENT OPENINGS, OVEN SEAMS, AND UNDER GLASS TRAY.
Sensor Cook Chart
| Recipe | Serving/Weight | Hints |
|---|---|---|
| 1. Oatmeal | 0.5 - 1 cup (40 - 80 g) | Place in a microwave-safe serving bowl. Follow manufacturer’s instructions for preparation. |
| 2. Breakfast Sausage | 2 - 8 links | Follow instructions for pre-cooked sausage. Arrange in a radial pattern. |
| 3. Omelet | 2 - 4 eggs | Follow the basic omelet recipe. |
| 4. Quinoa | ¼ - 1 cups (45 - 180 g) | Place in a 3 qt microwave-safe casserole dish. Use 2 parts water to 1 part quinoa. Cover and stir after 2 beeps. |
| 5. Soup | 1 - 2 cups (250 - 500 ml) | Pour into a microwave-safe serving bowl. Do not cover. Stir after cooking. |
| 6. Frozen Entrées | 8 - 28 oz (220 - 800 g) | Follow instructions. Stir or rearrange after 2 beeps. Remove film cover away from your face to avoid steam burns. |
| 7. Frozen Pizza (Single) | 8 oz (220 g) | Follow manufacturer’s instructions for preparation. Add more cooking time if needed. |
| 8. Potatoes (Pierce skin) | 1 - 4 potatoes (170 - 220 g each) | Pierce with a fork 6 times. Place around the edge of a paper towel-lined glass tray. Turn over after 2 beeps. Let stand 5 minutes. |
| 9. Fresh Vegetables | 4 - 16 oz (110 - 450 g) | Wash thoroughly. Add 1 tbsp of water per ½ cup and cover. Don't add salt/butter until after cooking. |
| 10. Frozen Vegetables | 6 - 16 oz (170 - 450 g) | Wash thoroughly. Add 1 tbsp of water per ½ cup and cover. Avoid vegetables with butter or sauce. |
| 11. Rice | ½ - 1½ cups (110 - 335 g) | Place rice and hot tap water in a microwave-safe casserole. Cover and let stand for 5-10 minutes before serving. |
| 12. Frozen Dinners | 11 - 16 oz (300 - 450 g) | Follow instructions for covering/removing covers. Do not use frozen foods in foil trays. Stir after 2 beeps. |
| 13. Pasta | 2 - 8 oz (55 - 220 g) | Use 2 qt casserole for 2 oz pasta with 3 cups water. For 4 oz, use 4 cups water; for 8 oz, use 7 cups. |
| 14. Fish Fillets | 4 - 16 oz (110 - 450 g) | Arrange in a single layer. Cover with a lid or vented plastic wrap. |
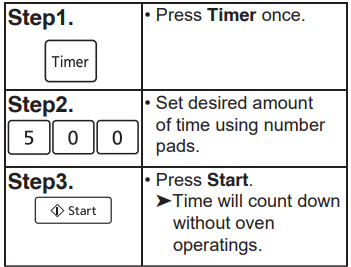
Timer Feature
This feature allows you to program the oven as a kitchen timer. It can also be used to program a standing time after cooking is completed and/or to program a delay start.
CAUTION: If oven lamp is lit while using the timer feature with door closed, the oven is incorrectly programed. Stop oven im-mediately and re-read instructions.
To Use as a Kitchen Timer
Example: To count down 5 minutes.
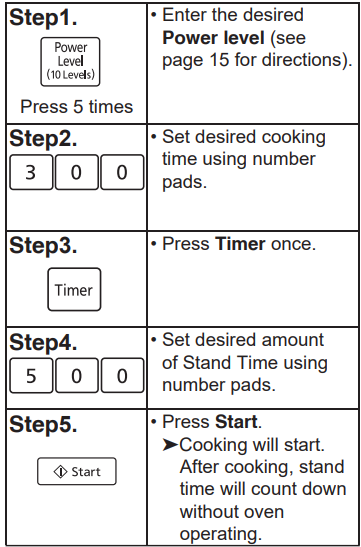
To Set Stand Time
Example: To cook at P6 power for 3 minutes, with stand time of 5 minutes.
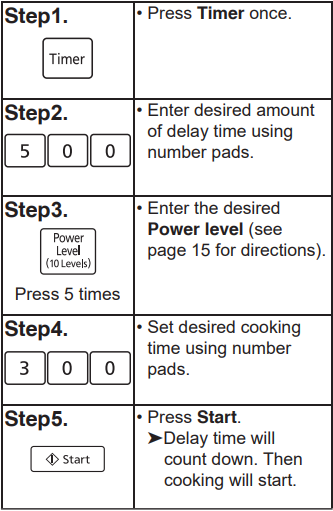
To Set Delay Start
Example: To delay the start of cooing for 5 minutes, and cook at P6 power for 3 minutes.
NOTES
- When each stage finishes, a two-beep signal sounds. At the end of the pro-gram, the oven will beep five times.
- If the oven door is opened during Stand Time, Kitchen Timer or Delay Time, the time on the display will con-tinue to count down.
- Stand time and Delay start cannot be programmed before inverter turbo defrost, sensor or other auto features. This is to prevent the starting temper-ature of food from rising before de-frosting or cooking begins. A change in starting temperature could cause inaccurate results.
- The maximum programmable time of Standing Time, Kitchen Time or Delay Time is up to 99 minutes and 99 sec-onds.
- The Standing time or Delay start feature can only be added to a 2-cycle cooking sequence.
Microwave shortcuts
| Food | Power | Time (mins.) | Directions |
|---|---|---|---|
| To separate refrigerated Bacon (450 g / 1 lb) | P10 (HIGH) | 30 sec. | Remove wrapper, place in a microwave-safe dish. After heating, use a plastic spatula to separate slices. |
| To soften Brown Sugar (250 ml / 1 cup) | P10 (HIGH) | 20 - 30 sec. | Place in a microwave-safe dish with a slice of bread. Cover with lid or plastic wrap. |
| To soften refrigerated Butter (1 stick, 110 g / ¼ lb) | P3 (MED-LOW) | 1 | Remove wrapper, place in a microwave-safe dish. |
| To melt refrigerated Butter (1 stick, 110 g / ¼ lb) | P6 (MEDIUM) | 1½ - 2 | Remove wrapper, place in a microwave-safe dish with lid or vented plastic wrap. |
| To melt Chocolate (1 square, 28 g / 1 oz.) | P6 (MEDIUM) | 1 - 1½ | Remove wrapper, place in a microwave-safe dish. Stir until melted. |
| To melt Chocolate (125 ml / ½ cup chips) | P6 (MEDIUM) | 1 - 1½ | Remove wrapper, place in a microwave-safe dish. Stir until melted. |
| To toast Coconut (125 ml / ½ cup) | P10 (HIGH) | 1 | Place in a microwave-safe dish. Stir every 30 seconds. |
| To soften Cream Cheese (225 g / 8 oz.) | P3 (MED-LOW) | 1 - 2 | Remove wrapper, place in a microwave-safe bowl. |
| To brown Ground Beef (450 g / 1 lb) | P10 (HIGH) | 4 - 5 | Crumble into a microwave-safe colander set into another dish. Cover with plastic wrap and stir twice. |
| To cook Vegetables, Fresh (225 g / ½ lb) | P8 | 3½ - 4 | Wash, add 1 tbsp water per ½ cup, cover with lid or vented plastic wrap. Don't salt until after cooking. |
| To cook Vegetables, Frozen (280 g / 10 oz.) | P8 | 3½ - 4 | Add 1 tbsp water per ½ cup, cover with lid or vented plastic wrap. Not suitable for vegetables in butter/sauce. |
| To cook Vegetables, Canned (430 g / 15 oz.) | P8 | 3½ - 4 | Empty contents into a microwave-safe bowl. Cover with lid or vented plastic wrap. |
| To cook baked Potato (170 - 220 g / 6 - 8 oz. each) | P8 | 3½ - 4 | Pierce each potato with a fork 6 times. Place around paper towel-lined tray. Let stand 5 min. |
| To steam Hand Towels (4) | P10 (HIGH) | 20 - 30 sec. | Soak in water, wring out excess, place on microwave-safe dish. Heat and present immediately. |
| To soften Ice Cream (2 qt. / ½ gallon) | P3 (MED-LOW) | 1 - 1½ | Check frequently to prevent melting. |
| Cup of liquid (To boil water, broth, etc.) | P10 (HIGH) | 1½ - 2 | Stir before heating to prevent eruptions. |
| Cup of liquid (To warm beverage) | P7 (MED-HIGH) | 1½ - 2 | Stir before heating to prevent eruptions. |
| To roast Nuts (375 ml / 1½ cups) | P10 (HIGH) | 3 - 4 | Spread into a 9-inch microwave-safe pie plate. Stir occasionally. |
| To toast Sesame Seeds (60 ml / ¼ cup) | P10 (HIGH) | 2 - 2½ | Place in a small microwave-safe bowl. Stir twice. |
| To skin Tomatoes (one at a time) | P10 (HIGH) | 30 sec. | Place tomato in a microwave-safe bowl with boiling water. Rinse and peel. |
| To remove Cooking Odours | P10 (HIGH) | 5 | Combine 1½ cups water, lemon juice, and peel in a microwave-safe bowl. Wipe oven interior afterward. |
Panasonic Inverter Microwave NN-ST696S Troubleshooting
| Problem | Possible Cause | Remedy |
|---|---|---|
| Oven will not turn on. | - The oven is not plugged in securely. | - Remove plug from outlet, wait 10 seconds, and re-insert. |
| - Main circuit breaker or main fuse is tripped or blown. | - Reset main circuit breaker or replace main fuse. | |
| - Problem with the outlet. | - Plug another appliance into the outlet to check if it's working or replace fuse. | |
| Oven will not start cooking. | - The door is not closed completely. | - Close the oven door securely. |
| - Start was not pressed after programming. | - Press Start pad. | |
| - Another program is already entered into the oven. | - Press Stop/Reset to cancel previous program and enter a new program. | |
| - Program is incorrect. | - Program again according to operating instructions. | |
| - Stop/Reset was pressed accidentally. | - Program oven again. | |
| The Glass Tray wobbles. | - The Glass Tray is not positioned correctly on the Roller Ring, or there is food under the Roller Ring. | - Remove Glass Tray and Roller Ring. Wipe clean and reposition correctly. |
| Noise coming from the Glass Tray. | - The Roller Ring and oven bottom are dirty. | - Clean according to care and cleaning instructions. |
| The indication light " "** appears in the Display Window.** | - The child lock was activated. | - Deactivate by pressing Stop/Reset three times. |
| The oven stops cooking, nothing appears in the Display Window. | - Problem with microwave generator system. | - Contact an authorized Service Center. |
Warranty
| Category | Service Type | Parts | Labour | Magnetron |
|---|---|---|---|---|
| Countertop Microwave Oven (except Prestige models) | Carry-in | 1 Year | 1 Year | Additional 4 Years (Part only) |
| Countertop Microwave Oven - Prestige models (Genius Prestige, Genius Prestige Plus, and Genius Prestige Grill) | In-home | 2 Years | 2 Years | Additional 3 Years (Part only) |
| Microwave Convection Oven | In-home | 2 Years | 2 Years | Additional 3 Years (Part only) |
| Over The Range (OTR) Microwave Oven | In-home | 2 Years | 2 Years | Additional 3 Years (Part only) |
Pros & Cons
Pros
- Spacious 1.5 cubic foot interior
- 1000-watt inverter for precise heating
- Sleek stainless steel design
- Numerous cooking options and presets
- Easy to use and clean
Cons
- May be more expensive than other microwaves
- May not fit in some smaller kitchens or spaces
- Some users may find the touch controls difficult to use
- May not have as many advanced features as some high-end microwaves
Customer Reviews about Panasonic Inverter Microwave NN-ST696S
Customers have praised the Panasonic Inverter Microwave NN-ST696S for its spacious interior, precise heating, and easy-to-use controls. However, some have noted that the microwave can be loud compared to other models, and that the exterior can become hot during use. Additionally, some users have reported issues with the touch controls and the turntable.
Faqs
What is the size of the Panasonic Inverter Microwave NN-ST696S?
How powerful is the inverter?
What cooking options are available on the NN-ST696S?
How do I clean the Panasonic Inverter Microwave NN-ST696S?
What is the warranty on the NN-ST696S?
Can I use the NN-ST696S with a 120V outlet?
Can I use metal dishes in the Panasonic Inverter Microwave NN-ST696S ?
Does the Panasonic Inverter Microwave NN-ST696S have a child lock feature?
Can I use the Panasonic Inverter Microwave NN-ST696S to cook raw meat?
What should I do if the Panasonic Inverter Microwave NN-ST696S stops working?
Leave a Comment