
Setup: Pelsee Smart Wifi Dash Cam P1DUO User Manual
Content
Pelsee Smart Wifi Dash Cam P1DUO
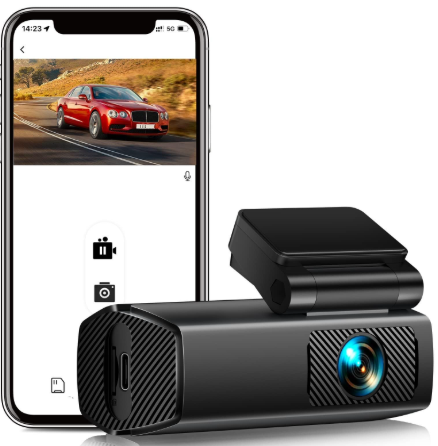
Introduction
The Pelsee Smart Wifi Dash Cam P1DUO is a cutting-edge automotive camera designed to enhance your driving experience and provide comprehensive safety features. This dual-camera system is equipped with advanced Wi-Fi connectivity, allowing for seamless video transfer and real-time monitoring. The P1DUO is intended for drivers who seek high-quality video evidence in the event of an accident, as well as those who want to monitor their vehicle remotely.
The estimated price for the Pelsee Smart Wifi Dash Cam P1DUO is around $150, making it an affordable option for those looking to invest in a reliable dash cam. The product is expected to launch in the first quarter of 2024, with pre-orders available shortly before its release.
This dash cam is not just a safety device; it also serves as a convenient tool for capturing memorable road trips and everyday commutes. With its user-friendly interface and robust features, the P1DUO is set to become a popular choice among drivers of all types.
Specifications
- Sensor: GC4653
- Memory Card: Supports up to 256GB (not included)
- Resolution(Front Camera): 4K, 2Kand 1080P
- Resolution(Rear Camera): 1080P
- Video Format: TS
- Storage Temperature: -22°F(30°C)~ + 185°F(85°C)
- Working Temperature: -14"F(1 0'C)~ + 140°F(60°C)
Saftey Precaution
To prevent injury or damage, please read and follow these safety precautions:
- Read and understand the user manual before using the product and keep it safe for future reference.
- Only use the original accessories provided by the manufacturer.
- Remove the protective film on the LCD and lenses before using the product.
- DO NOT try to disassemble, alter, or repair the product yourself. Please ask for the help from the manufacturer or a similarly qualified person in order to avoid a hazard. After repairing, please do a safety check to ensure that the product is working properly.
- This product must not be placed in a location that may affect the deployment of airbags, and must not obstruct the driver's view.
- If there is a malfunction or abnormality, such as smoke or a strange odor, please stop using the product immediately, then cut off the power supply, and contact us.
- NEVER install the unit in a place that is exposed to the direct sunlight or extremely high temperatures. The operating temperature of this product ranges from -1 0 °C (14°F) to 60'C(140°F).
- Drive safe! NEVER operate the App and the product when you are driving to avoid a traffic accident caused by distraction. Be sure to park the car in a safe place before operating.
- This product must be securely mounted before driving.
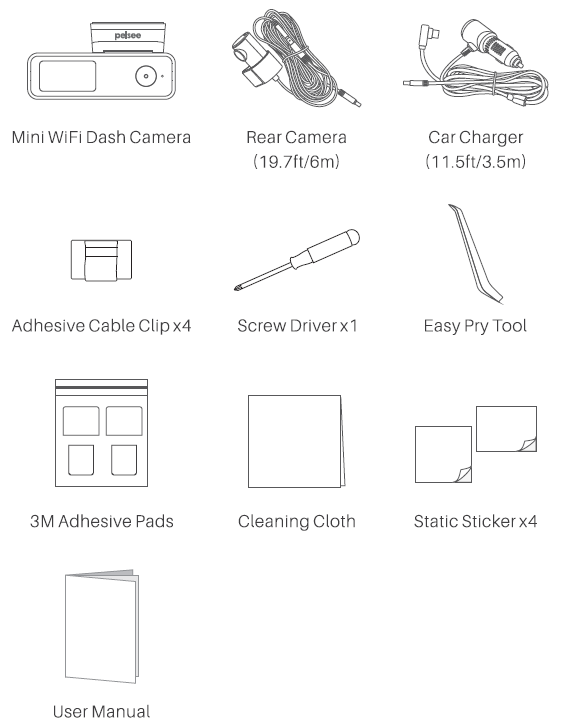
What's Included
Know Your Dash Cam
Dash Cam
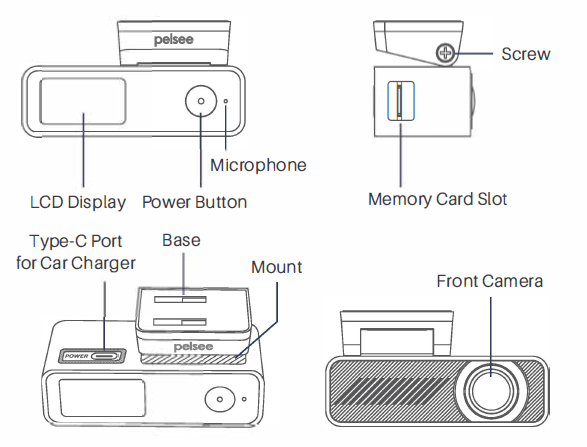
Function of the Power Button
- Press this button once to check the live view from the rear camera if you have installed it.
- Press this button twice to see the date and time.
- Press this button three times to turn on the WiFi of the camera.
- Press this button the fourth time to go back to the recording interface. ® Press and hold this button for 3 seconds to manually power off/on the camera.
- Press and hold this button for 8 seconds to restore the camera to factory settings.
LCD Display
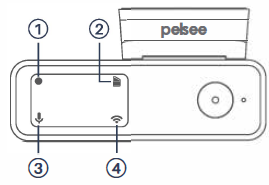
- Recording Status:
- Flash Red: Recording Standard Videos
- Flash Yellow: Lock the Current Video
- Memory Card Status
- Microphone On/Off
WiFi Connection Status:- WiFi Not Connected: Gray
- WiFi Connected: Green
Installation Instructions
Step 1:
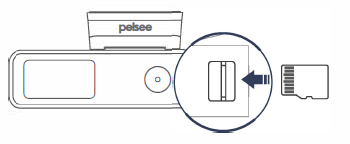
To start, insert a formatted memory card (not included) into the dash cam. This dash cam can take a card with a capacity of up to 256GB.
Tips:
- Before first use, please format the memory card.
Option 1:
Install the memory card into a card reader, then connect it to the computer to format it to FAT32.
Option 2:
After connecting your mobile device to the camera, install the memory card into the dash cam and go to the Pelsee Cam App> Camera Settings> Format SD Card to format the card. - To ensure smooth video recording, use a reputable Class 10 or higher speed memory card.
- Never remove the memory card while the camera is on, as this can cause the camera to shut down immediately and potentially damage the video.
Step 2:
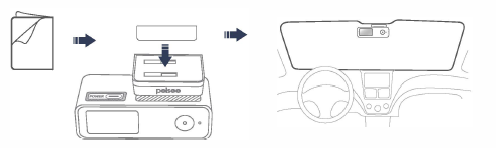
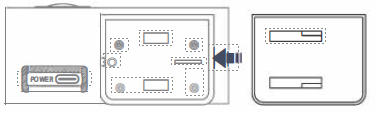
Turn off your vehicle's engine, and find a suitable location on the front windshield to attach the dash cam. Use the cleaning cloth provided to clean the spot and affix the larger static sticker on it.
Step 3:
Peel off one side of the 3M Adhesive Pad and stick it to the base of the camera. Then, attach the base of the camera to the static sticker using the other side of the 3M Adhesive Pad.
Step 4:
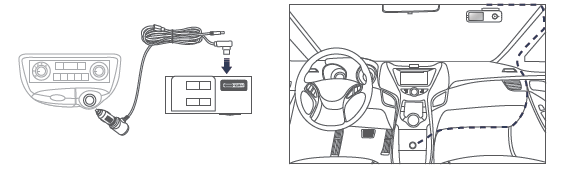
Connect the Type-C connector of the Car Charger to the Type-C Port on the camera, and plug the other end into the Cigarette Lighter Receptacle in your vehicle.
Tips:
- After installation, start your vehicle's engine to ensure the dash cam powers on and records automatically. If it does, stop the engine and proceed to install the rear camera.
You can adjust the angle of the base to adjust the lens view.
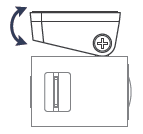
To remove the dash cam from the base, first disconnect the Type-C cable, then firmly press and hold the base while slowly sliding the dash cam leftward with force.
Step 5:
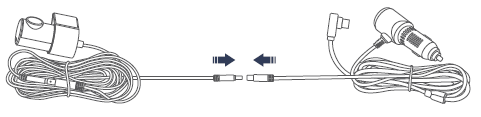
Connect the 4-pin male connector of the rear camera to the 4-pin female connector of the car charger cable. Snake the cable of the rear camera through the vehicle to the rear part.
Tip:
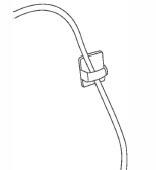
To keep your vehicle tidy, we recommend using the Adhesive Cable Clips provided to fix the cables of the car charger or rear camera over the edge of your vehicle.
Step 6:
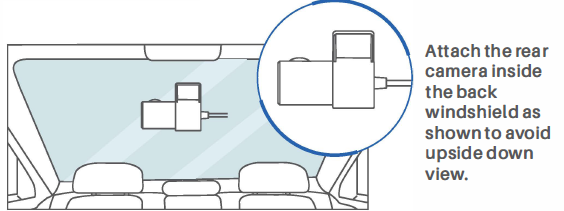
Select an appropriate location on the upper part of your vehicle's rear windshield, clean it thoroughly, and affix the smaller static sticker onto it. Next, remove the 3M Adhesive Pad from the rear camera and securely attach it to the static sticker. The camera lens can be adjusted by rotating it to alter the viewing angle.
Step 7:
Finally, start your vehicle's engine to verify that the rear camera is installed correctly and working well.
Overview of the App
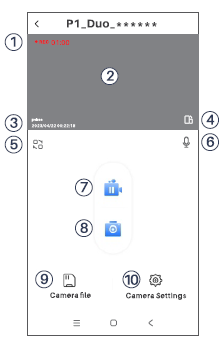
Homepage
- Recording Status
- LiveView
- Date and Time
- Orientation(Portrait or Landscape)
- Switch Front and Rear Cameras' Views
- Audio On/Off
- Start/Stop Recording
- Take Photo
- Recorded Videos and Captured Images
- Camera's Detailed Settings
Camera File
To view and manage your camera files, tap on Camera Files on the homepage. From here, you can see all your videos and photos, and select a Ii le to delete or download.
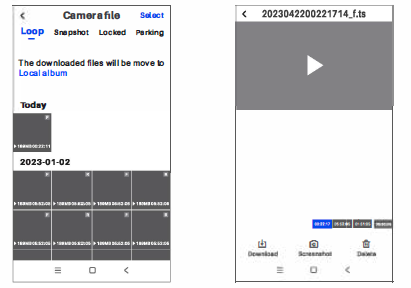
- Loop: Standard Videos from the front and rear cameras
Snapshot: Captured Photos from the front and rear cameras
Locked: Locked Videos from the front and rear cameras
Parking: Videos Recorded when Parking (An extra hardwire kit is needed)
F: Videos or Photos from the front camera
R: Videos or Photos from the rear camera - Tap Select on the upper right corner to select the file(s) to download it/them into your mobile device or delete the file(s).
After downloading the file(s), you can edit or directly share it them. On social media.
Settings
Tap Camera Settings on the homepage to check and change the settings of your dash cam.
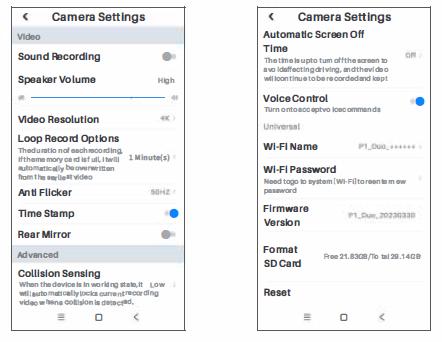
- Sound Recording
Turn on or turn off the audio when recording videos. - SpeakerVolume
Set the volume of the speaker for the camera. - Video Resolution
If you have only installed the front camera, you will be given the option to choose from three different resolutions: 4K, 2K, and 1080P. You can adjust the resolution of the front camera based on these options. However, if you install both the front and rear cameras simultaneously, you will only have the choice between 2K and 1080P. The front camera will be set to 2K resolution, while the rear camera will be set to 1080P resolution. - Loop Record Options
Change the recording time of each video. The recording time is set to be 1 minute by default. You can choose from 1 Minute(s), 2 Minute(s), and 3 Minute(s). - Anti Flicker
Change the refresh rate of your video between 50Hz and 60Hz. - Time Stamp
Show or hide the date and time watermark on the recorded videos and captured photos. - Rear Mirror
Flip the rear camera view horizontally to change the orientation between leftward and rightward. - Collision Sensing
Set the G-sensor sensitivity for collision detection while driving. You can select from Low, Middle, High, and Off as needed. If you select High(low), the camera would automatically lock the current video when your car encounters a minor(severe) collision. A flashing yellow dot on the upper left corner of the LCD will be displayed, indicating the camera is locking the current video. This video will not be overwritten. - Automatic Screen Off Time
Set a designated time for the screen to turn off automatically. - Voice Control
Turn on or turn off the voice control function. This camera can be controlled via four voice commands, including Turn on Audio, Turn off Audio, Lock the video,, and Take Photo.
NOTE:
If you installed a hardwire kit (sold separately) for the dash cam, the Parking Mode option will be available for you to use. This mode can be turned on when your vehicle is parked, and you can adjust the sensitivity level for collision detection. Additionally, time-lapse video may also be available. Contact the customer service team for more information. - Wi-FiName
Check and change the camera's WiFi name. - Wi-Fi Password
Check and change the camera's WiFi password. - Firmware Version
Check the firmware version of the dash camera. - Format SD Card
Format the memory card.
IMPORTANT NOTE
This equipment has been tested and found to comply with the limits for a Class B digital device, pursuant to part 15 of the FCC Rules. These limits are designed to provide reasonable protection against harmful interference in a residential installation. This equipment generates, uses, and can radiate radio frequency energy and, if not installed and used in accordance with the instructions, may cause harmful interference to radio communications. However, there is no guarantee that interference will not occur in a particular installation.
If this equipment does cause harmful interference to radio or television reception, which can be determined by turning the equipment off and on, the user is encouraged to try to correct the interference by one or more of the following measures:
- Reorient or relocate the receiving antenna.
- Increase the separation between the equipment and receiver.
- Connect the equipment into an outlet on a circuit different from that to which the receiver is connected.
- Consult the dealer or an experienced radio/TV technician for help.
FCC Radiation Exposure Statement:
This equipment complies with FCC radiation exposure limits set forth for an uncontrolled environment. This equipment should be installed and operated with a minimum distance of 20cm between the radiator and your body.
Troubleshooting
If you encounter issues with video quality, ensure that the microSD card is properly inserted and that the cameras are clean and free from obstructions. For connectivity problems, restart the dash cam and your smartphone, then try reconnecting to the Wi-Fi network.
In case of battery drain, check that the device is properly connected to the car's power outlet or recharge the battery regularly. Always refer to the user manual for specific troubleshooting steps and warnings.
Pros & Cons
Pros
- High-quality dual-camera setup with 1080p resolution
- Wi-Fi connectivity for easy video transfer and live streaming
- Advanced night vision and GPS capabilities
- Compact design with easy installation
- Affordable price point compared to similar products
Cons
- Limited battery life without a continuous power supply
- Some users may find the app interface slightly complex
- No built-in screen for immediate playback
Customer Reviews
Customers have praised the Pelsee Smart Wifi Dash Cam P1DUO for its exceptional video quality and user-friendly setup. Many users have appreciated the dual-camera feature, which provides comprehensive coverage of both the front and rear of their vehicles. However, some have noted that the battery life could be improved and that the app could be more intuitive.
Common complaints include occasional connectivity issues with the Wi-Fi and the need for a more robust battery solution. Despite these minor drawbacks, the overall feedback has been positive, with many recommending this dash cam to others.
Faqs
How do I set up the Pelsee Smart Wifi Dash Cam P1DUO?
What is the resolution of the cameras on the Pelsee Smart Wifi Dash Cam P1DUO?
Does the Pelsee Smart Wifi Dash Cam P1DUO have night vision?
How do I transfer videos from the Pelsee Smart Wifi Dash Cam P1DUO to my smartphone?
What is the estimated battery life of the Pelsee Smart Wifi Dash Cam P1DUO?
Can I use the Pelsee Smart Wifi Dash Cam P1DUO without a microSD card?
How do I troubleshoot connectivity issues with my Pelsee Smart Wifi Dash Cam P1DUO?
Is the Pelsee Smart Wifi Dash Cam P1DUO compatible with all types of vehicles?
Can I use the Pelsee Smart Wifi Dash Cam P1DUO in extreme weather conditions?
Does the Pelsee Smart Wifi Dash Cam P1DUO have loop recording?
Leave a Comment