Petsafe Automatic Clean ZAL00-16408 Litter Box Guide
Content
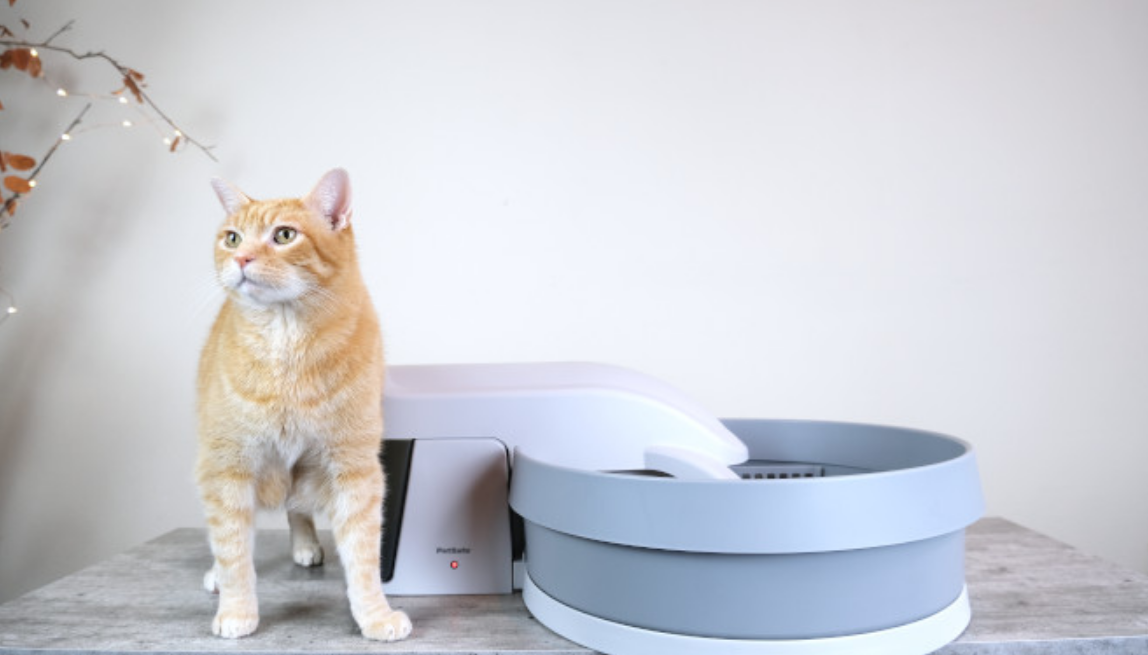
PetSafe Automatic Clean ZAL00-16408 Litter Box
The PetSafe Automatic Clean Litter Box is the perfect solution for keeping your home clean and odor-free, even with multiple cats. This self-cleaning litter box features a unique design that automatically scoops waste into a carbon-filtered bin, keeping the main litter area clean and fresh. The estimated price of this product is $199.99 and it was launched on August 1, 2021.
Detailed Specifications
The Automatic Clean litter box has several key features, including
- Automatic scooping system that scoops waste into a carbon-filtered bin
- Adjustable timer for scooping frequency
- Large entryway and rake system for easy access and exit
- Compact, space-saving design
- Durable plastic construction with an odor-blocking seal
- Powered by a high-quality rechargeable battery
- Comes with a disposable plastic liner for easy cleaning
- Suitable for cats weighing up to 15 pounds
In the Box
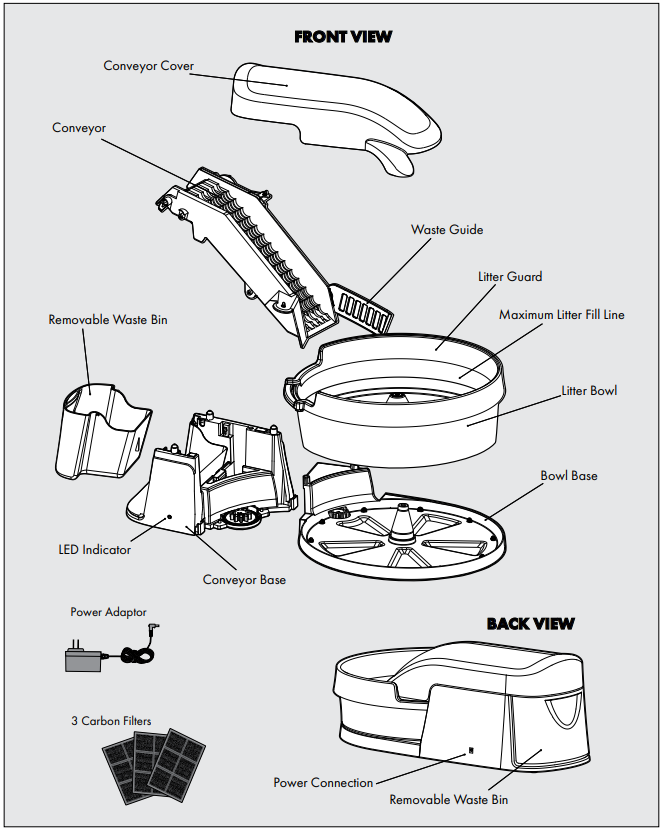
Setup of Automatic Clean Litter Box
Setting up the PetSafe Automatic Clean litter box is easy.
- Insert the rechargeable battery into the litter box
- Place the carbon-filtered bin in the designated area
- Add clumping litter to the main litter area
- Set the adjustable timer for scooping frequency
- Place the litter box in a location that is easily accessible for your cat.
Start Here
Note: The litter guard and conveyor cover must be installed correctly for the unit to operate properly. If not installed correctly, the litter guard can lift up the conveyor cover and cause a power outage. Safety features require that these pieces are installed correctly so the moving conveyor is not exposed
- Remove the Simply Clean® and components from the packaging. Place the litter box on a firm, flat surface. Attach the bowl base with the bowl (litter guard attached) on it to the conveyor base by lowering the bowl base onto the open end of the conveyor base.
Press down firmly on the bowl base to ensure that it is snapped into place.
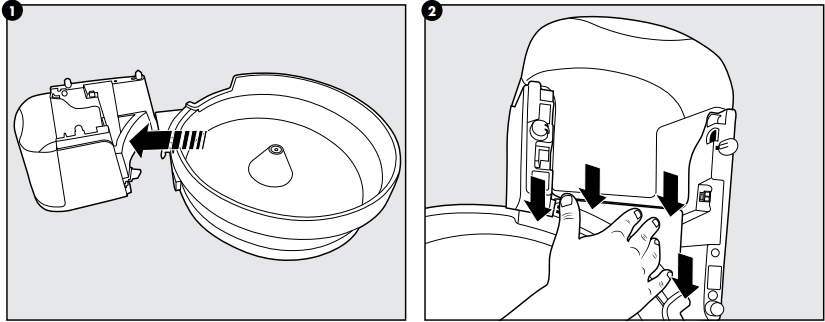
- Next, install the conveyor by sliding the long post at the top (A) into the hole on the conveyor base. Then insert the short post (B) on the opposite side into the hole in the base by pressing it down into the hole with the flange pointing down.
Leave the conveyor in the upright position, and plug in the motor. The motor plug is at the end of the red wire, and it clips into the conveyor base.
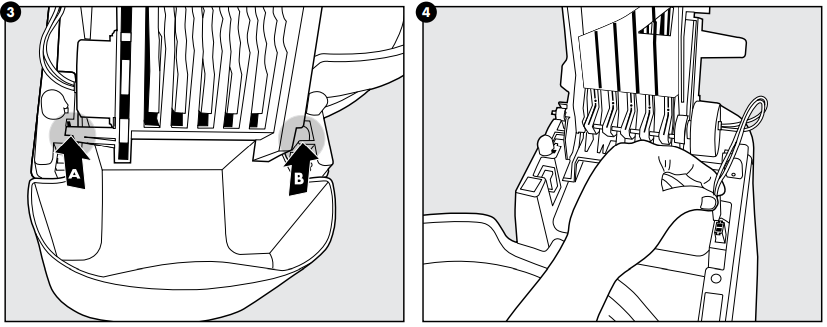
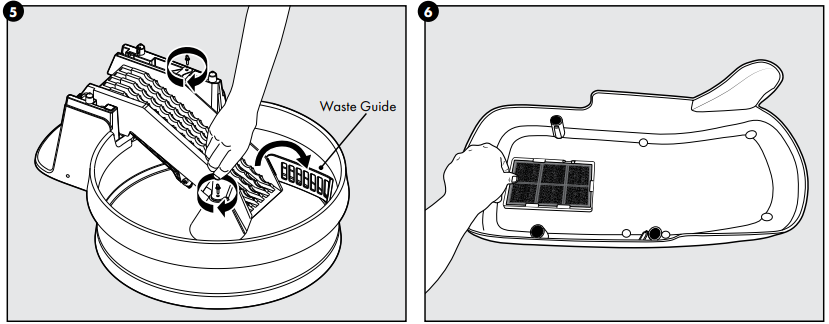
- Lower the conveyor and tighten the thumb screws, then flip the waste guide down into place.
Place one carbon filter into the brackets on the inside of the conveyor cover. The black side of the filter should face outward. The carbon filter will help reduce odors from the waste bin area. Place the conveyor cover over the conveyor, making sure it is fully in place.
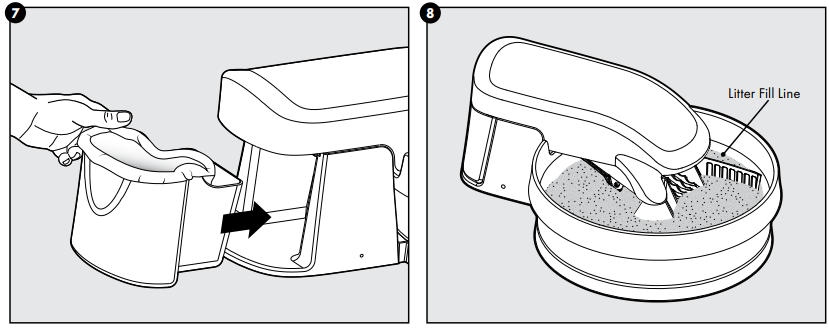
- Use a plastic bag to line the waste bin. Insert the waste bin into the back of the litter box, making sure it is aligned and fully inserted into the unit. For additional help to minimize odors, add a small layer of clean litter and baking soda to the plastic waste bag or waste bin before placing it in the litter box.
Fill the litter bowl only with clumping, scoopable, clay cat litter to the maximum litter fill line. Be sure to fill the bowl to the fill line, as leaving the box too empty or too full can cause issues.
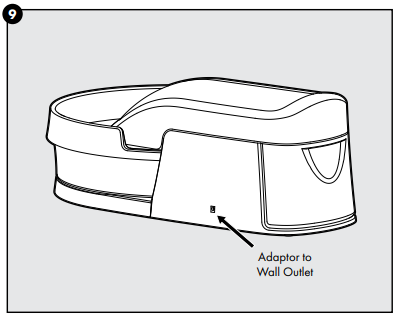
Insert the end of the power adaptor into the power connection on the back of the litter box. Plug it into a standard wall outlet. The green light on the litter box should illuminate. Your litter box is ready for use.
Note
- The conveyor cover and waste bin must be aligned correctly and fully inserted in the unit to turn on the green indicator light. The green light must be on to supply power for the litter box to operate properly. If the light is blinking blue, then either the waste bin or conveyor cover are not in place.
- Only use premium clumping, clay cat litter. Using a different type can cause the litter box to malfunction. Maintain the litter level at the fill line or the litter box may not operate properly.
- Do not allow anything to rest on the power cord. Do not plug in a power adaptor in an area where people or animals may walk or trip on the cord.
| LED Indicator | Light Color and Function | What It Means |
|---|---|---|
| Solid Green | The unit is fully operational. | |
| Blinking Blue | The waste trap or conveyor cover are not fully in place. | |
| Solid Red | There is an issue with the conveyor motor. Unplug the unit and plug it back in. If the light turns red again after 10 minutes, please call our Customer Care Center at +1 (800) 732-2677. | |
| Blinking Red | There is an issue with the bowl motor. Unplug the unit and plug it back in. If the light blinks red again after 10 minutes, please call our Customer Care Center at +1 (800) 732-2677. | |
| Alternating Red and Blue | There is an issue with both the conveyor and bowl motors. Please unplug the unit, and call our Customer Care Center at +1 (800) 732-2677. |
Description of PetSafe Automatic Clean Litter Box
The Automatic Clean litter box is a self-cleaning litter box that is perfect for keeping your home clean and odor-free. This litter box features a unique design that automatically scoops waste into a carbon-filtered bin, keeping the main litter area clean and fresh. The adjustable timer allows you to set the scooping frequency, while the large entryway and rake system make it easy for your cat to access and exit the litter box. The durable plastic construction with an odor-blocking seal ensures that this litter box will stand up to even the toughest use. The PetSafe Automatic Clean litter box is powered by a high-quality rechargeable battery and comes with a disposable plastic liner for easy cleaning. Suitable for cats weighing up to 15 pounds.
Acclimating Your Cat to the Litter Box
Most cats easily adapt to the Simply Clean Automatic Litter Box. Some cats may require an adjustment period to get used to their new litter box. Here are a few tips to help with the transition
- Place the new Simply Clean Automatic Litter Box next to your cat’s current litter box. Allow your cat to have access to both the old and new litter boxes for at least a week. This time may vary depending on the temperament of your cat.
Stop cleaning your cat’s old litter box, allowing it to remain dirty. Cats prefer a clean litter box, and this will make the new litter box more appealing. Your cat should start using their new Simply Clean Automatic Litter Box.
Note: Although the Simply Clean Automatic Litter Box is quiet while running, you may want to leave it unplugged for a few days so your cat can get used to the new box without any distractions. If you leave it unplugged, you need to manually scoop waste from the litter box until your cat is fully transitioned.
- Once your cat has transitioned to the new litter box, just plug it in and remove the old litter box from the area.
Waste Removal
We recommend disposing of any waste at least every other day, or more if you have more than one cat.
- Remove the waste bin from the litter box. If using a plastic waste bag, tie the bag closed. Discard the waste material in the trash.
- If desired, place a clean plastic waste bag in the bin. Replace the waste bin into the back of the litter box, ensuring it is aligned correctly and fully inserted in the unit.
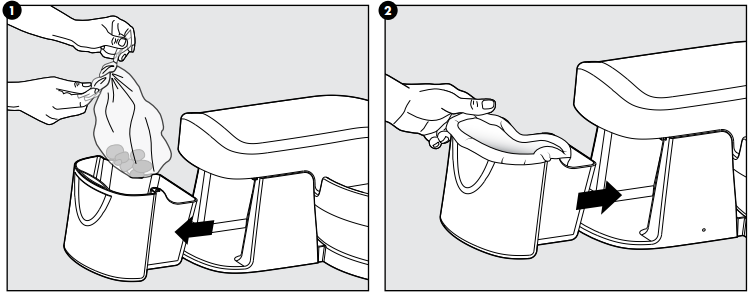
Pregnant women, babies, small children and immune-deficient individuals should avoid contact with cat litter waste. Cat’s waste may contain toxoplasmosis bacteria that can be harmful to these individuals. Wash your hands after handling used cat litter and waste bins.
Cleaning
Routine general cleaning is recommended and necessary to keep the Simply Clean® Automatic Litter Box operating at a high level of performance. We recommend cleaning the system every two weeks for a single-cat household.
- Unplug the power adaptor from the wall outlet, and disconnect it from the litter box.
- Remove the waste bin and dispose of any waste.
- Remove the conveyor cover by lifting up on the sides, and dispose of the carbon filter (if needed).
Remove the thumb screws from the center of the litter bowl and top of the conveyor. Lift the conveyor to its upright position.
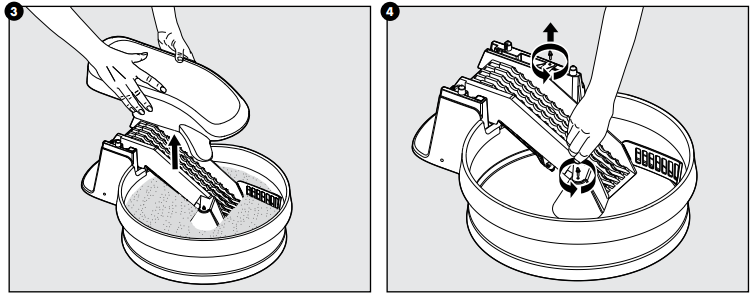
- Lift up the litter bowl to remove it, and dispose of the used litter.
If further cleaning is needed, remove the litter guard. The litter bowl, litter guard and waste bin can be submerged in water and washed with mild soap.
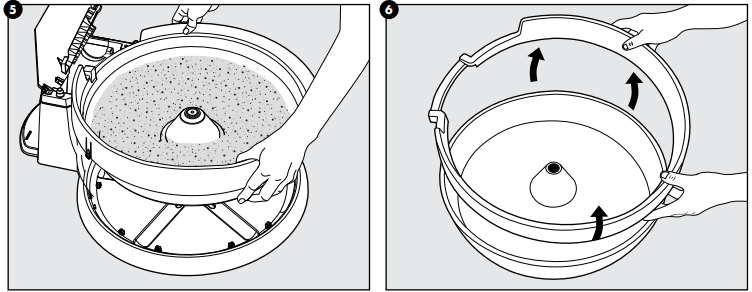
- Rinse and thoroughly dry all parts before reassembling the unit. If needed, carefully clean the conveyor using only a damp cloth or sponge.
Warning: Do not submerge or expose the electrical components to water or cleaning solutions. DO NOT submerge or expose the base unit, conveyor or any electrical components to water or cleaning solutions. DO NOT use bleach or chemicals to clean as they can act as a repellent to your cat.
Reassembly
- Replace the litter bowl with litter guard on the base unit.
- Follow steps 5 - 9 in the “Start Here” section (pages 6 – 7).
Note: The conveyor cover and waste bin must be aligned correctly and fully inserted in the unit to turn on the green indicator light. The green light must be on for the litter box to operate properly. If the light is blinking blue, then either the waste bin or conveyor cover are not in place.
Only use premium clumping, clay cat litter. Using a different type can cause the litter box to malfunction. Maintain the litter level at the fill line or the litter box may not operate properly.
Testing the Litter Box
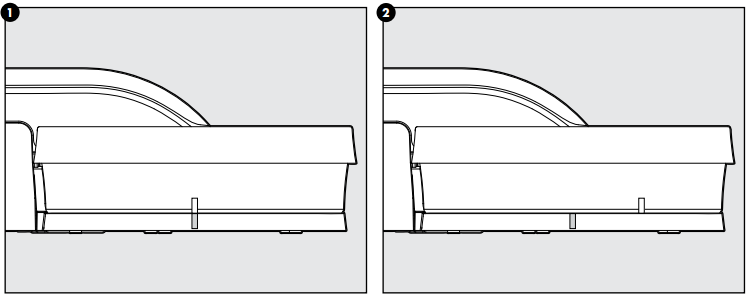
The Simply Clean Automatic Litter Box cleans for 30 minutes then stops for 30 minutes, making one full rotation every 1½ hours. The bowl moves very slowly and is whisper-quiet, so your cat will not notice the movement.
- To test if the litter box is rotating properly, place one piece of adhesive tape on the base of the unit and one piece of tape on the bowl of the unit.
- After several minutes, the two pieces of tape should be several inches apart. Remove the tape when finished testing.
TROUBLESHOOTING
| Problem | Solution |
|---|---|
| Waste is breaking into small pieces and falling through the spaces in conveyor | - Make sure you are only using clumping, scoopable, clay cat litter. - Make sure to keep bowl filled at or below the maximum litter level fill line for best results. Occasional manual scooping may be needed. |
| Litter is gathering at base of conveyor or behind conveyor | - The bowl may be filled with too much litter. Make sure the bowl is not filled above the maximum litter fill level line. Use a scoop to redistribute litter or remove excess litter from the bowl. - Make sure the waste guide is in the lowered position to help move waste up the conveyor. |
| Unit makes a grinding noise when bowl rotates | The unit may need cleaning (see "Cleaning" section). Make sure there is no stray litter between the litter bowl and the base of the litter box. |
| The conveyor is not moving waste into waste bin or is running backwards | - Test the bowl to make sure it is rotating (see "Testing the Litter Box" section). - Unplug the power adaptor from the wall and disconnect from the litter |
Pros & Cons
Pros
- Automatically scoops waste into a carbon-filtered bin, keeping the main litter area clean and fresh
- Adjustable timer for scooping frequency
- Large entryway and rake system for easy access and exit
- Compact, space-saving design
- Durable plastic construction with an odor-blocking seal
- Powered by a high-quality rechargeable battery
- Comes with a disposable plastic liner for easy cleaning
- Suitable for cats weighing up to 15 pounds
Cons
- Rechargeable battery may need to be replaced frequently
- Some users have reported that the rake system may not always work properly
- The litter box may be too small for larger cats
- The carbon-filtered bin may need to be emptied frequently
Customer Reviews of PetSafe Automatic Clean ZAL00-16408 Litter Box
Customers have given the Automatic Clean litter box positive reviews, with many praising its automatic scooping system and odor-blocking features. However, some users have reported issues with the rake system and the frequency of battery replacement. Overall, customers have given this product a rating of 4.2 out of 5 stars on average.
Faqs
What are the primary characteristics of the ZAL00-16408 PetSafe Automatic Clean Litter Box?
How do I initially configure my PetSafe ZAL00-16408?
How can I fix my PetSafe ZAL00-16408 rake that isn't moving?
Does the PetSafe Automatic Clean Litter Box ZAL00-16408 require a certain kind of litter to be used with it?
How should I maintain and clean my PetSafe ZAL00-16408?
What features protect the PetSafe Automatic Clean Litter Box ZAL00-16408 from harm?
How often should the PetSafe ZAL00-16408's litter be changed?
Is the PetSafe ZAL00-16408 suitable for a household with more than one cat?
Exists a power backup option for the PetSafe Automatic Clean Litter Box ZAL00-16408?
What kind of guarantee is available from PetSafe for the ZAL00-16408 Automatic Clean Litter Box?
Leave a Comment
