Petsafe In-Ground Fence Receiver PIG00-13737 Guide
Content
Introduction of PetSafe In-Ground Fence Receiver PIG00-13737
The PetSafe In-Ground Fence Receiver PIG00-13737 is a reliable and efficient way to keep your furry friend safe in your yard. This wireless fence system includes a receiver collar and transmitter that work together to create a customizable boundary for your pet. The estimated price of this product is $200, and it was launched in 2021.
Detailed Specifications
The PetSafe In-Ground Fence Receiver PIG00-13737 has several key features that make it an excellent choice for pet owners:
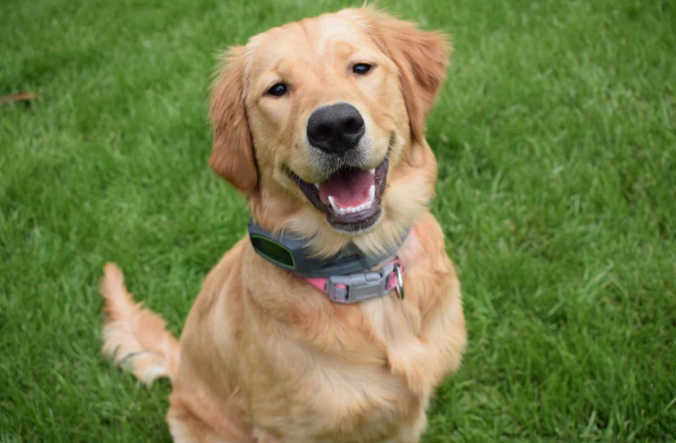
- Waterproof receiver collar with adjustable strap to fit dogs 8 pounds and up
- Collar fits neck sizes 6-28 inches
- Transmitter covers up to 1/3 acre with additional wire available for larger yards
- Five adjustable levels of static correction plus a tone-only mode
- Low battery indicator light on the collar
- Collar uses a PetSafe RFA-67 battery (not included)
Description
The PetSafe In-Ground Fence Receiver PIG00-13737 is a wireless containment system that allows your pet to roam freely within a designated area in your yard. The system includes a transmitter and a receiver collar that work together to create a customizable boundary for your pet. The collar emits a warning tone when your pet approaches the boundary, followed by a static correction if they continue to approach. The collar is waterproof and adjustable to fit dogs 8 pounds and up with neck sizes between 6-28 inches. The transmitter covers up to 1/3 acre but can be expanded with additional wire for larger yards. The system includes five adjustable levels of static correction, as well as a tone-only mode for training.
How the System Works
A radio signal travels from the Fence Transmitter through a buried wire, marking the boundaries you wish to set for your dog. Your dog wears a Receiver Collar that detects the signal at the boundary. As your dog approaches the boundary, the receiver issues a warning tone. If he proceeds further, he receives a safe but startling Static Correction. While harmless, the correction will persuade him to stay in the containment area you’ve established. Boundary flags are a temporary visual aid for your pet; remove them after training. This Receiver Collar has been proven safe, comfortable, and effective for pets over 5 pounds.
Key Definitions of PetSafe In-Ground Fence Receiver PIG00-13737
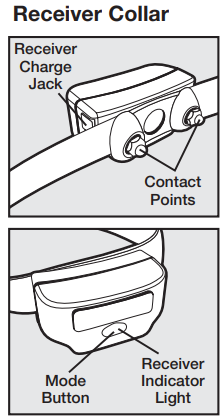
- Receiver Collar: Receives the radio signal from the Transmitter.
- Mode Button: Turns Receiver on/off and adjusts the level of Static Correction your pet receives outside the Pet Area.
- Receiver Indicator Light: Indicates the level of correction at which the Receiver Collar is set. This light also indicates battery status.
- Contact Points: Deliver the safe Static Correction when your pet moves into the Static Correction Zone.
- Receiver Charger: Charges the batteries inside the Receiver Collar.
Receiver Charge Jack: Connection point for charging Receiver battery.
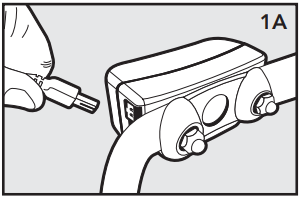
Charge the Receiver Collar
- The Receiver Collar Charger is designed to plug into a standard AC wall outlet. The Receiver Collar light will glow red when the Receiver Charger is properly seated into the Receiver Charge Jack. The light will turn green when charging is complete. A built-in safety circuit prevents the Receiver Collar from overcharging.
The Receiver Collar will achieve a full charge in 2-3 hours. Each charge can last up to 2 months depending upon the frequency of use.
NOTICE: Do not charge your Receiver Collar every night. Frequent charging can have a negative effect on the battery. We recommend that the Receiver Collar be used until the Receiver Indicator Light blinks yellow or red.
To charge the Receiver Collar, lift the rubber plug to allow access to the Receiver Charge Jack. The rubber plug needs to remain attached to the Receiver Collar. Plug the Receiver Charger into the Receiver Charge Jack on the Receiver Collar. The Receiver Charge Jack and Receiver Charger are keyed to fit one way. Do not force it in backwards.
Prepare the Receiver Collar
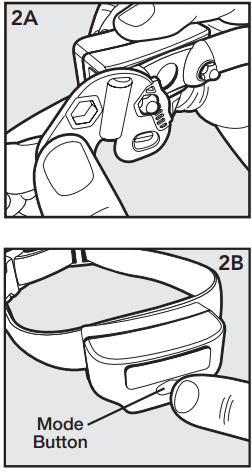
Your Receiver Collar comes with Short Contact Points. Use the Long Contact Points for pets with long or thick hair. Tighten the Contact Points using the Test Light Tool one-half turn beyond finger tight. Check tightness weekly.
Turning the Receiver Collar ON
Press and hold the Mode Button continuously for 5 seconds. The Green, Yellow, or Red Receiver Indicator Light will turn ON for 5 seconds to indicate battery status, followed by the Red Receiver Indicator Light flashing the Static Correction Level Settings.
Turning the Receiver Collar OFF
Press and hold the Mode Button continuously for 5 seconds. The Red Receiver Indicator Light will be ON during this time. The Red Receiver Indicator Light will then turn OFF and all Receiver Indicator Lights will stay OFF indicating that the unit is turned OFF. To extend the time between charging the Receiver Collar, consider turning OFF the Receiver Collar when it is not in use.
Receiver Collar Status Indicators
The Receiver Collar Status Indicator Light along with the Receiver Collar Alarm Tone are used to determine the battery status and the correction type. Refer to the Receiver Collar Status Indicator Table below to understand the status lights and tones for the Receiver Collar. During normal operation, the Receiver Collar Indicator Light will flash every 4-5 seconds to indicate the battery status as shown in the table below.
Receiver Collar StatusIndicator Table | ||
Status Light | AlarmTone | Condition |
While Plugged intoReceiver Charger | ||
Solidred | No tone | Charge in progress |
Solidgreen | No tone | Charge complete |
No light |
| Chargefailure, contact Customer Care Center |
After Removing fromReceiver Charger | ||
Continuous green or yellow or red (5 seconds duration) |
No tone | Battery ChargeIndication. Occurs immediately after unplugging the charger from the Receiver Collar |
Operating Battery Status | ||
Slow blinking green (every 4-5 seconds) |
No tone | Collar batterycharge 100%-60% |
Slow blinking yellow (every 4-5 seconds) |
No tone | Collar batterycharge 60%-20% |
Slow blinking red (every 4-5 seconds) |
No tone | Collar batterycharge 20% or less, charge immediately |
Receiver Activation Status | ||
Fast pulsating green (3 flashes per second) |
Warning tone |
Warning tone |
Fast pulsating red (3 flashes per second) | Tone for duration of Static Correction | Static Correction being delivered up to 15 seconds |
Continuous green (10 seconds) |
No tone | Over Correction Protection; collar locked for 10 seconds |
To Set the Static Correction Level
Read all steps before attempting to set the Static Correction Level.
- Press the Mode Button and release when the Receiver Indicator Light illuminates Red.
- The Receiver Indicator Light will emit a series of Red flashes representing the Static Correction Level.
- Increase the Static Correction Level by pressing and releasing the Mode Button within 5 seconds of the previous series of flashes. The Static Correction levels increase in strength from 1 to 5. Pushing the Correction Level Button while the Receiver Collar is on level 5 will cause the Receiver Collar to revert to level 1. Refer to the Function and Response Table to choose the Static Correction level that best fits your pet.
Function and Response Table | |||
Indicator Light Response | Static Correction Level | Receiver Collar Function |
Temperament of Pet |
1 Red Flash | 1 | No Static Correction, Tone Only | Initial Training Mode |
2 Red Flashes | 2 | Low Static Correction | Timid |
3 Red Flashes | 3 | Medium Static Correction | Timid or Average |
4 Red Flashes | 4 | Medium- High Static Correction | Average or High Energy |
5 Red Flashes | 5 | High Static Correction | High Energy |
Over Correction Protection
In the unlikely event that your pet “freezes” in the Static Correction Zone, this feature limits the Static Correction duration to a maximum of 15 seconds. After 15 seconds, the Static Correction will stop and the Green Indicator Light will stay on for 10 seconds. The Receiver Collar must be removed from the Static Correction Zone to reactivate the Receiver Collar.
Fit the Receiver Collar
Important: The proper fit and placement of your Receiver Collar is important for effective training. The Contact Points must have direct contact with your pet’s skin on the underside of his neck. See important safety information on pages 5-7.
To assure a proper fit, please follow these steps:
- Make sure the receiver is turned off.
- Start with your pet standing comfortably.
Place the Receiver Collar on your pet where you can read the PetSafe logo correctly as you face your pet.
- Center the Contact Points underneath your pet’s neck, touching the skin.
- Check the tightness of the Receiver Collar by inserting one finger between the end of a Contact Point and your pet’s neck. The fit should be snug but not constricting.
Allow your pet to wear the collar for several minutes then recheck the fit. Check the fit again as your pet becomes more comfortable with the Receiver Collar.

Trim the collar as follows:
Mark the desired length of the Receiver Collar with a pen. Allow for growth if your pet is young or grows a thick winter coat.
Remove the Receiver Collar from your pet and cut off the excess.
Before placing the Receiver Collar back onto your pet, seal the edge of the cut collar by applying a flame along the frayed edge.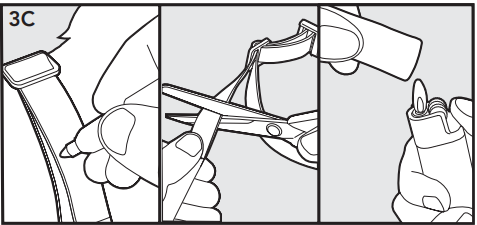
To Re-Thread the Collar
The slide buckle prevents the collar from becoming loose around your pet’s neck. The ridges must be facing up; the collar will slip if it is not properly threaded.
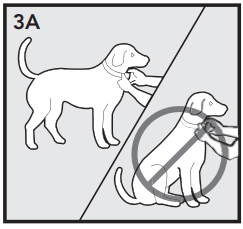
Taking Your Pet Out of the Pet Area
Important: Remove the Receiver Collar and leave it in the Pet Area. Once your pet learns the Boundary Zone, he will be reluctant to cross it for walks or car rides.
- Option 1: Replace the Receiver Collar with a regular collar. Put your pet in a car that is within the Pet Area and drive him out of the Pet Area.
Option 2: Replace the Receiver Collar with a regular collar and leash. Walk your pet out of the Pet Area while giving a command such as “OK” at a specific place of the Boundary Zone (the end of your driveway, sidewalk, etc.). Always leave the Pet Area with a leash at this place and your pet will associate leaving the Pet Area only on a leash, only at this place, and only with a person. You may initially need to convince your pet to leave the Pet Area with a food treat and lots of praise.
Note: You may also carry your pet out of the Pet Area.
Additional Information
- The system should only be used with healthy pets. Contact your veterinarian if you have any concerns about the medical condition of your pet (medication, pregnant, heart conditions, etc...).
- The PetSafe In-Ground Fence is for residential use only.
- The Static Correction will get your pet’s attention, but will not cause harm. It is designed to startle, not punish.
- Test the Receiver Collar at least once a month to verify that it is functioning properly. Check that it activates at the Boundary Wire. Battery life depends upon how often the Receiver Collar is activated.
- Remove the Receiver Collar from your pet when indoors for the comfort of your pet.
- Never leave the Receiver Collar on your pet for more than 12 consecutive hours.
Test Light Instructions
- Make sure the Receiver Collar battery is properly charged. Set the Correction Level to 2 or above.
- Hold the Test Light Contacts to the Contact Points (4A).
Walk toward the Boundary Wire with Contact Points pointing up and holding the Receiver Collar at your pet’s neck level (4B) until the Receiver Collar tones and the Test Light flashes (4C).
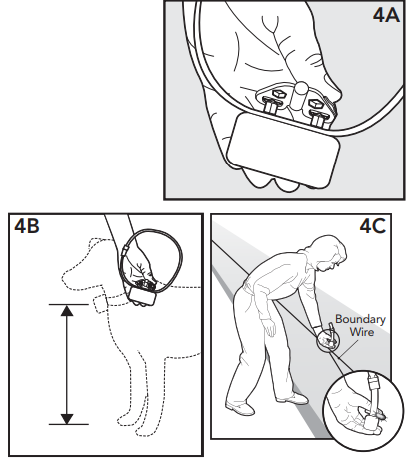
Note: The Receiver Collar is waterproof, which can make the tone hard to hear.
Save Test Light for future testing.
Setup Guide
Setting up the PetSafe In-Ground Fence Receiver PIG00-13737 is relatively simple. Here are the steps to follow:
- Install the transmitter in a dry, indoor location near an outlet.
- Lay the boundary wire around the perimeter of the area where you want to contain your pet.
- Connect the wire to the transmitter and set the boundary width.
- Charge the receiver collar and fit it to your pet's neck.
- Test the system by walking your pet near the boundary and observing their reaction to the warning tone and static correction.
Important Safety Information
Explanation of Attention Words and Symbols Used in This Guide
This is the safety alert symbol. It is used to alert you to potential personal injury hazards. Obey all safety messages that follow this symbol to avoid possible injury or death.
- WARNING indicates a hazardous situation which, if not avoided, could result in death or serious injury.
- CAUTION, used without the safety alert symbol, indicates a hazardous situation which, if not avoided, could result in harm to your pet.
- NOTICE is used to address safe use practices not related to personal injury.
Not for Use with Aggressive Dogs
Do not use this product if your dog is prone to aggressive behavior. Aggressive dogs can cause severe injury or death to their owners and others. If you are not sure that this product is right for your dog, please talk to your veterinarian or a certified trainer.
- This PetSafe® In-Ground Fence™ is NOT a solid barrier. The system is designed to act as a deterrent to remind pets by Static Correction to remain in the boundary established. It is important that you reinforce training with your pet on a regular basis. Since the tolerance level to Static Correction varies from pet to pet, Radio Systems® Corporation CANNOT guarantee that the system will, in all cases, keep a pet within the established boundary. Not all pets can be trained to avoid crossing the boundary! Therefore, if you have reason to believe that your pet may pose a danger to others or harm himself if he is not kept from crossing the boundaries, you should NOT rely solely upon the PetSafe® In-Ground Fence™ to confine your pet. Radio Systems® Corporation shall NOT be liable for any property damage, economic loss or any consequential damages, sustained as a result of any animal crossing the boundary.
Proper Fit of the Collar Is Important
A collar worn for too long or made too tight on the pet’s neck may cause skin damage, ranging from redness to pressure ulcers; this condition is commonly known as bed sores.
- Avoid leaving the collar on the dog for more than 12 hours per day.
- When possible, reposition the collar on the pet’s neck every 1 to 2 hours.
- Check the fit to prevent excessive pressure; follow the instructions in this manual.
- Never connect a lead to the electronic collar; it will cause excessive pressure on the contacts.
- When using a separate collar for a lead, don’t put pressure on the electronic collar.
- Wash the dog’s neck area and the contacts of the collar weekly with a damp cloth.
- Examine the contact area daily for signs of a rash or a sore.
- If a rash or sore is found, discontinue use of the collar until the skin has healed.
- If the condition persists beyond 48 hours, see your veterinarian.
- For additional information on bed sores and pressure necrosis, please visit our website.
These steps will help keep your pet safe and comfortable. Millions of pets are comfortable while they wear stainless steel contacts. Some pets are sensitive to contact pressure. You may find after some time that your pet is very tolerant of the collar. If so, you may relax some of these precautions. It is important to continue daily checks of the contact area. If redness or sores are found, discontinue use until the skin has fully healed.
- You may need to trim the hair in the area of the Contact Points. Never shave the dog’s neck; this may lead to a rash or infection.
- Always remove your dog’s Receiver Collar before performing any Transmitter testing.
- The Receiver Collar should not be on your dog when the system is tested. Your pet may receive an unintended correction.
- The Boundary Width of the system must be tested whenever an adjustment is made to the containment field to prevent unintended corrections to your pet.
- If you use a collar and leash for training, be sure the extra collar does not put pressure on the contact points.
- If possible, DO NOT use an AC circuit protected with a Ground Fault Circuit Interrupter (GFCI) or Residual Current Device (RCD). In rare cases, nearby lightning strikes may cause the GFCI or RCD to trip. Without power, your dog may be vulnerable to escape. You will have to reset the GFCI or RCD to restore power to the system.
- To prevent an unintended correction, after the Boundary Flags have been placed, be sure to set the static correction on the Receiver Collar back to level 1 tone only.
- Do not charge your Receiver Collar every night. Charging too often can reduce battery life. Charge your Receiver Collar when the Receiver Indicator Light blinks yellow or when the light blinks red.
PetSafe In-Ground Fence Receiver PIG00-13737 Troubleshooting
Troubleshooting | |
The Receiver Collar has to be held on top of the Boundary Wire to activate. |
activates. Verify the Boundary Control Switch is placed at the proper setting according to the amount of Boundary Wire used.
|
The Receiver Collar is not beeping or administering a Static Correction. |
|
The Receiver Collar activates inside the house. |
|
The Receiver Collar is beeping but my pet is not responding to the Static Correction. |
the Test Light flashes, check the fit of the Receiver Collar.
|
The Receiver Collar has injuredmy pet’s neck. |
that you may feel when getting out of your car. In some cases, pressure ulcers are described as chemical burns. The battery in your Receiver Collar is sealed, in addition, your collar’s housing is alsosealed. This redundant sealing makes it virtually impossible, withoutmisuse or abuse,for your ReceiverCollar battery to leak onto your pet’s neck. Please reviewand follow theimportant safety information on pages 2-8, and the instructions in Step 3 under the heading “Fit the Receiver Collar” on pages 22-25. |
Pros & Cons
Pros
- Customizable boundary
- Waterproof collar
- Adjustable levels of static correction
- Can be expanded for larger yards
Cons
- Initial setup can be time-consuming
- Static correction can be uncomfortable for some pets
Faqs
What is the PetSafe In-Ground Fence Receiver PIG00-13737?
Is the PetSafe In-Ground Fence Receiver PIG00-13737 waterproof?
What type of batteries does the PetSafe In-Ground Fence Receiver PIG00-13737 use?
How do I know if the PetSafe In-Ground Fence Receiver PIG00-13737 is working correctly?
Is the static correction safe for my PetSafe In-Ground Fence Receiver PIG00-13737?
How many levels of static correction does the PetSafe In-Ground Fence Receiver PIG00-13737 have?
How do I adjust the static correction level on the PetSafe In-Ground Fence Receiver PIG00-13737?
What is the range of the in-ground fence PetSafe In-Ground Fence Receiver PIG00-13737?
How do I train my pet to use the in-ground fence PetSafe In-Ground Fence Receiver PIG00-13737?
How do I maintain the PetSafe In-Ground Fence Receiver PIG00-13737?
Leave a Comment