How to Clean: Philips Air Purifier AC1215 Instructions
Content
Introduction of Philips Air Purifier AC1215
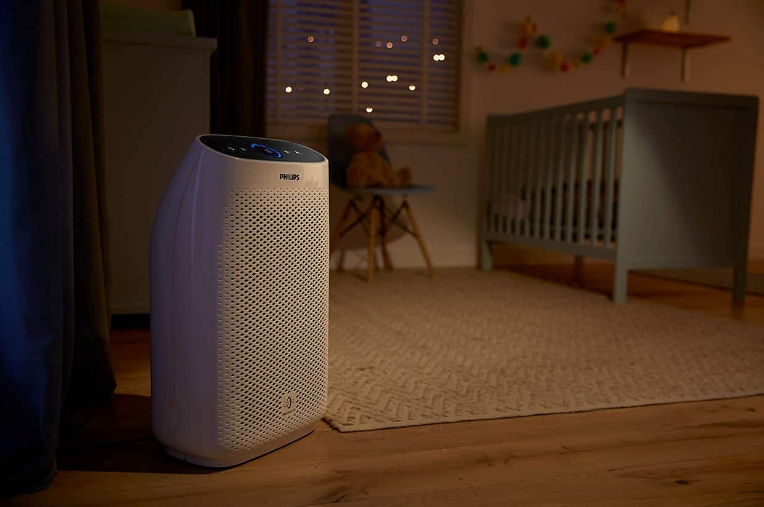
Philips, a renowned technology brand, has launched the Philips Air Purifier AC1215 to help you breathe fresh and pure air. This air purifier is designed for small-sized rooms and comes with a clean air delivery rate (CADR) of 180 m³/h. The estimated price of the Philips Air Purifier AC1215 is around $150, and it was launched in June 2021.
Detailed Specifications
The Philips Air Purifier AC1215 includes the following key features:
- CADR of 180 m³/h for pollen, dust, and smoke
- Covers an area of up to 18 m²
- 3-stage filtration (pre-filter, True HEPA filter, and activated carbon filter)
- NightSense auto mode for automatic purification and light control
- Sleep mode with a dimmed display for minimal disturbance
- Child lock for added safety
- Real-time air quality feedback with color ring
- Filter replacement indicator
- QuietMark certification for low noise levels
Product overview
For AC1215
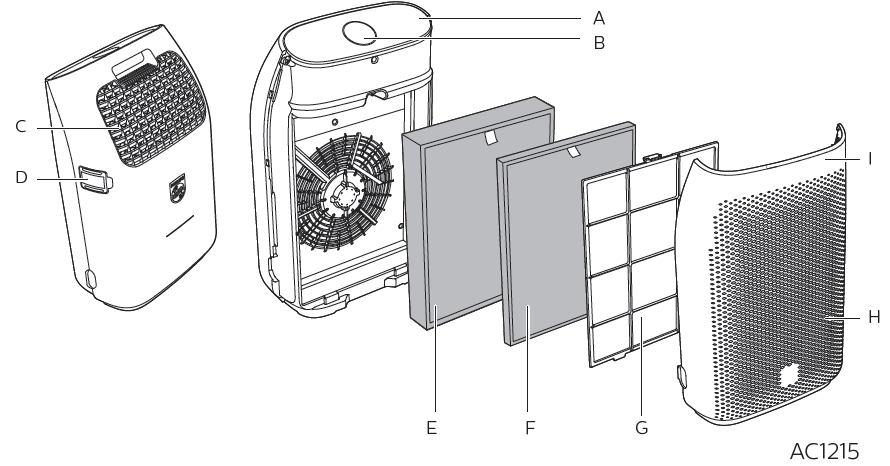
- A Control panel
- B Air quality light
- C Air outlet
- D Air quality sensor
- E NanoProtect filter HEPA Series 3 (FY1410)
- F Nano Protect filter AC (FY1413)
- G Pre-filter
- H Air inlet
- I Front panel
For AC1211
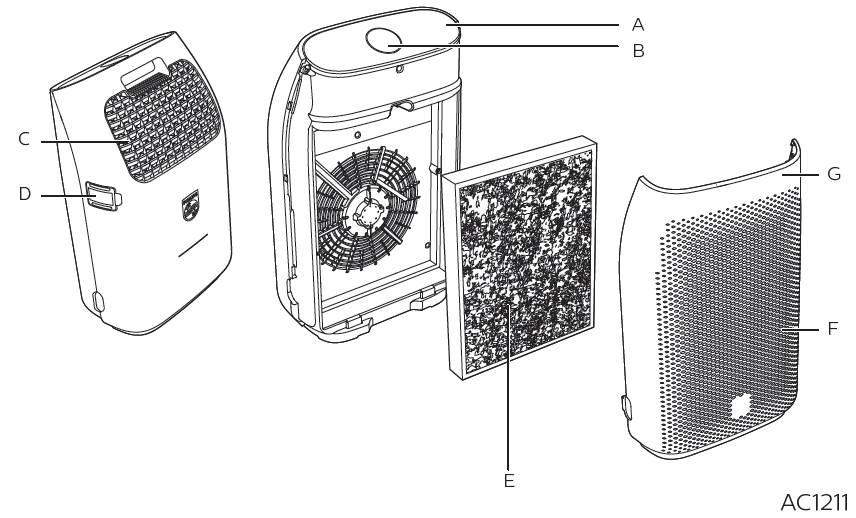
- A Control panel
- B Air quality light
- C Air outlet
- D Air quality sensor
- E NanoProtect filter HEPA Series 1 (FY1400)
- F Air inlet
- G Front panel
Controls overview

- A On/Off button
- B Night sensing mode button
- C Display screen
- D Fan speed button
- E Child lock button
Philips Air Purifier AC1215 Installing the filter
Note
Make sure the air purifier is unplugged from the electrical outlet before installing the filter.
Make sure the side of the filter with the tag is pointing towards you.
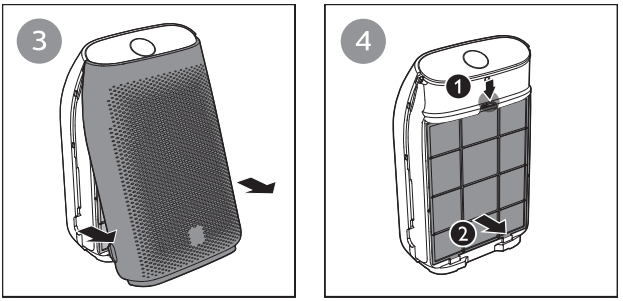
Pull the bottom part of the front panel and then gently lift to remove it from the air purifier
Press the clip down (1) and pull the pre-filter towards you (2)
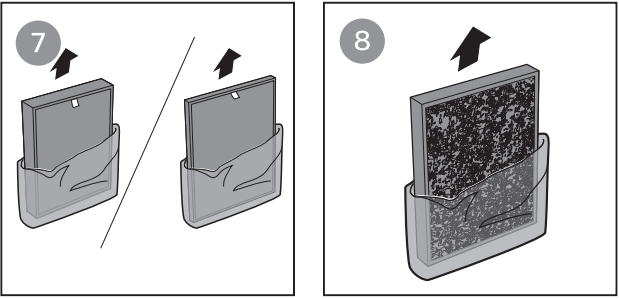
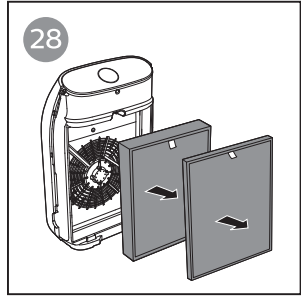
Take out all filters ( for AC1215, for AC1211).
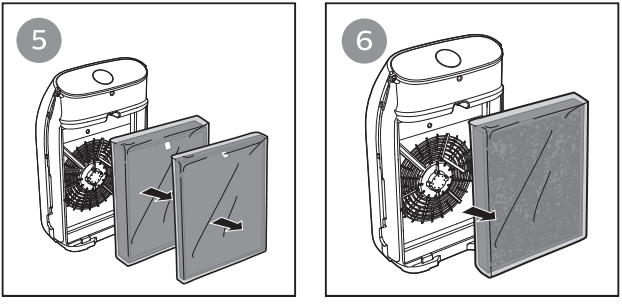
Remove all packaging materials from the filter
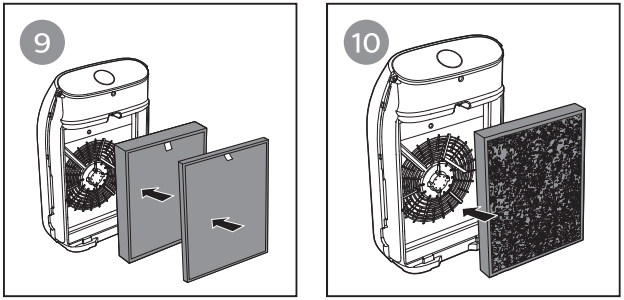
Place the thick filter (FY1410) in to the air purifier and then the thin AC filter (FY1413). The model numbers are shown on each filter.
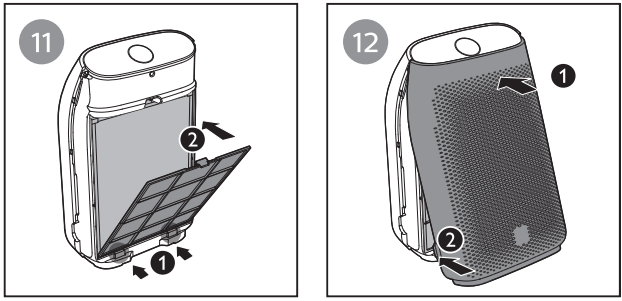
Attach the pre-filter back into the air purifier
Note: Make sure the side with the clip is pointing towards you, and that all hooks of the pre-filter are properly attached to the purifier.
Reattach the front panel by pressing the top part of the panel onto the top of the air purifier (1). Then, gently push the panel against the body of the air purifier (2)
Wash your hands thoroughly after installing filters.
Description
The Philips Air Purifier AC1215 is designed for small-sized rooms and provides clean and fresh air, removing up to 99.97% of airborne particles as small as 0.3 microns. It features a 3-stage filtration process with a pre-filter, True HEPA filter, and activated carbon filter. The NightSense auto mode automatically adjusts the fan speed and light settings based on the room's air quality, while the sleep mode ensures minimal disturbance during the night with a dimmed display. The child lock feature provides added safety, and the filter replacement indicator reminds you when it's time to replace the filter. The Philips Air Purifier AC1215 is certified by QuietMark for low noise levels
Using the air purifier
Understanding the air quality light
| Air quality light color | Air quality level |
| Blue | Good |
| Blue-violet | Fair |
| Red-purple | Poor |
| Red | Very poor |
The air quality light automatically goes on when the air purifier is switched on, and lights up all colors in sequence. After approximately 30 seconds, the air quality sensors select the color that corresponds to the surrounding air quality of airborne particles.
Turning on and off
Note
Always place the air purifier on a stable, horizontal, and level surface with the front of the unit facing away from walls or furniture.
For optimum purification performance, close doors and windows.
Keep curtains away from the air inlet or air outlet.
Put the plug of the air purifier in the wall outlet.
Touch
 to switch on the air purifier
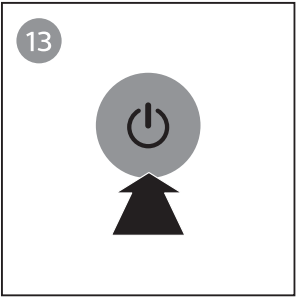
The air purifier beeps.
The air purifier operates under the auto mode by default.
When the air purifier is warming up, “” displays on the screen.
After measuring the air quality for approximately 30 seconds, the air quality sensor automatically selects the appropriate air quality light color.
Touch
and hold for 3 seconds to switch off the air purifier.
Note
If the air purifier stays connected to the electrical outlet after turning OFF, the air purifier will operate under the previous settings when turned ON again.
If the air purifier accidentally shuts off during running, it restarts automatically and operates under previous settings when the power supply is resumed.
Changing the fan speed
There are several fan speeds available. You can choose the auto mode, speed 1, 2, 3 or turbo mode (t).
Auto(A)
Touch the fan speed button repeatedly to select the auto mode
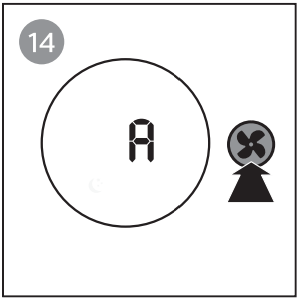
Allergen mode
The specially designed allergen mode can effectively reduce common allergens such as pollen and pet dander. Touch the fan speed button to select the Allergen mode. Auto (A)  and display on the screen.
Manual
Touch fan speed button repeatedly to select the fan speed you need 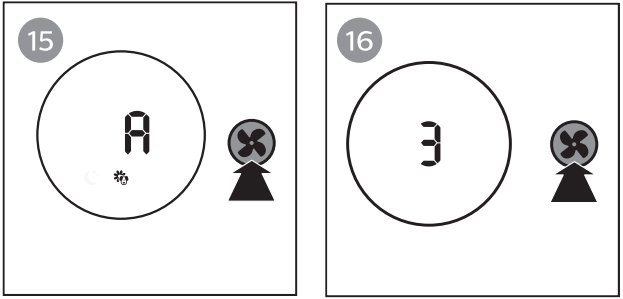
Turbo (t)
In turbo mode, the air purifier operates on the highest speed. Touchfan speed button to select the turbo mode (t)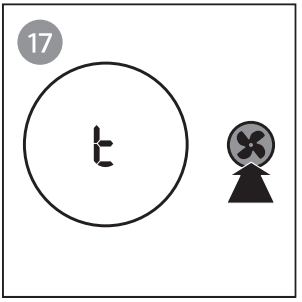
Light sensor
With the light sensor, the air purifier can work according to the ambient light. When the ambient light dims for 10 seconds, all the lights on the control panel will be off slowly. During this period, you can touch any of the buttons, all lights will be on again. If you don’t perform other operations within 10 seconds, all lights will be off. After the ambient light becomes bright and lasts at least for 10 seconds, all lights will be on again.
Night sensing mode
You can activate the night sensing mode in two ways.
Activating the night sensing mode manually
Before you go to sleep, touch manually to activate the night sensing mode
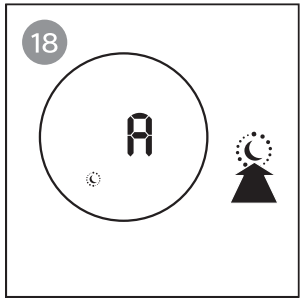
If the air quality light is blue, the air purifier directly goes to the night sensing mode. The air purifier operates quietly and the air quality light will be dimmed.
If the air quality light is not blue, the air purifier operates under turbo mode for a maximum of 10 minutes, the air quality light blinks slow during this time, and then goes to the night sensing mode.
Auto activating the night sensing mode
When the air purifier operates in auto mode or allergen mode, if the light sensor detects the lights in your room are turned off, the air purifier goes to the night sensing mode automatically. The air purifier will adjust the fan speed in real-time to make sure the air in your room is clean. The air quality light will be dimmed.
Note
The light sensor detects the lights in your room after 11 hours in the night sensing mode.
If the lights in your room are turned on, the air purifier will quit the night sensing mode and operate under the previous mode. The air quality light and the display will be on again.
To exit the night sensing mode manually, touch or button.
Setup Guide
- Unbox the air purifier and remove all packaging materials.
- Place the air purifier in the desired location, ensuring it's at least 50 cm away from walls, furniture, and other objects.
- Plug in the air purifier and turn it on using the power button.
- Press the mode button to select the desired mode (auto, sleep, or manual).
- Use the up and down arrow buttons to adjust the fan speed (in manual mode).
- Wait for the air purifier to clean the air in the room and monitor the air quality feedback with the color ring.
- Replace the filters when the filter replacement indicator is lit.
Set the child lock
Touch and hold the child lock button
 for 3 seconds to activate child lock
The child lock icon
displays on the screen.When the child lock is on, all the other buttons are not responsive, only the child lock icon
blinks.
Touch and hold the child lock button
for 3 seconds again to deactivate child lockThe child lock icon
disappears.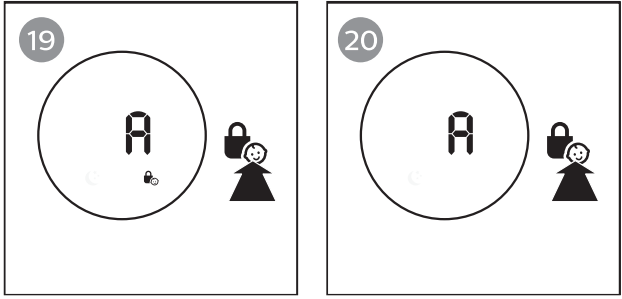
Note : The child lock function is automatically unlocked when the pre-filter cleaning code or the filter replacement code displays on the screen.
Cleaning
Note
Always turn the air purifier off and unplug the air purifier from the electrical outlet before cleaning.
Never immerse the air purifier in water or any other liquid.
Never use abrasive, aggressive, or flammable cleaning agents such as bleach or alcohol to clean any part of the air purifier.
Only the pre-filter is washable. The air filter is not washable.
Do not attempt to clean the filters or air quality sensor with a vacuum.
Cleaning the body of the air purifier
Regularly clean the inside and outside of the air purifier to prevent dust from collecting.
Use a soft, dry cloth to clean both the interior and exterior of the air purifier (Especially for the front cover).
The air outlet can also be cleaned with a dry, soft cloth.
Detach the front cover from the air purifier and wash it under running tap water.
Cleaning the air quality sensor
Clean the air quality sensor every 2 months for optimal functioning of the purifier.
Note
If the air purifier is used in a dusty environment, it may need to be cleaned more often.
If the humidity level in the room is very high, condensation may develop on the air quality sensor and the air quality light may indicate a more poor air quality even though the air quality is actually good. If this occurs, clean the air quality sensor or use the air purifier on a manual speed setting.
Switch off the air purifier and unplug from the wall outlet.
Clean the air quality sensor inlet and outlet with a soft brush
Remove the air quality sensor cover
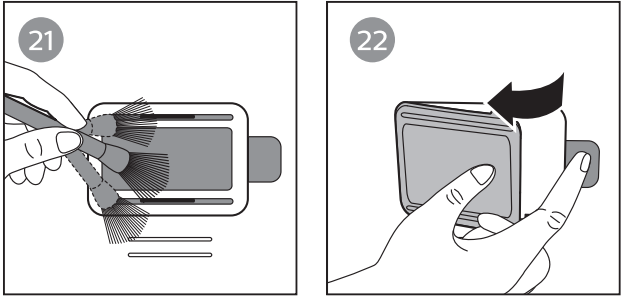
Clean the air quality sensor, the dust inlet and the dust outlet with a damp cotton swab
Dry all parts thoroughly with a dry cotton swab.
Reattach the air quality sensor cover

Note: Always keep air quality cover close during the air purifier is working.
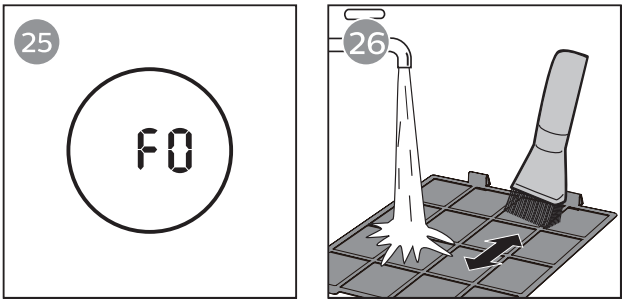
Cleaning the pre-filter
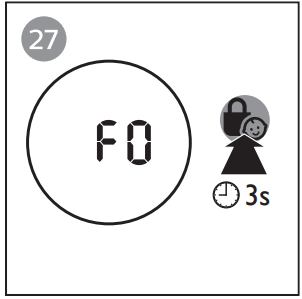
Clean the pre-filter when F0 is displayed on the screen
Switch off the air purifier and unplug from the wall outlet.
Pull the bottom part of the front panel and then gently lift to remove it from the air purifier
Press the clip down (1) and pull the pre-filter towards you (2)
If the pre-filter is very dirty, use a soft brush to brush away the dust. Then wash the pre-filter under running tap water
Allow the pre-filter to air dry thoroughly before placing back in the air purifier.
Note
To optimize the lifetime of the pre-filter, make sure it dries completely after cleaning.
Wash your hands after handling the filter.
Put the pre-filter back into the air purifier
NOTE: Make sure the side with the clip is pointing towards you, and that all hooks of the pre-filter are properly attached to the air purifier.To reattach the front panel, press the top part of the panel onto the top of the air purifier (1). Then, gently push the panel against the body of the air purifier (2)
Put the plug of the air purifier in the wall outlet.
Touch and
hold the for 3 seconds to reset the pre-filter cleaning time Wash your hands thoroughly after installing filters.
Replacing the filter
Filter replacement indicator
This air purifier is equipped with a filter replacement indicator to make sure that the air purification filter is in optimal condition when the air purifier is operating. When the filters need to be replaced, the filter code displays on the screen.
If the filters are not replaced in 14 days, the air purifier will stop operating and automatically lock.
Note
The air filters are not washable or reusable.
Always turn off the air purifier and unplug from the electrical outlet before replacing the filters.
Do not clean the filter with a vacuum.
| Filter alert light status | Action |
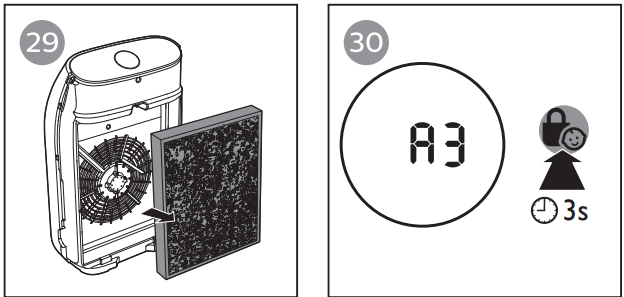
| A3 displays on the screen | Replace Nano Protect filter Series 3 (FY1410) |
| C7 displays on the screen | Replace the Nano Protect filter AC (FY1413) |
| A3 and C7 display on the screen alternately | Replace both filters |
Turn off the air purifier and unplug from the wall outlet.
Take out the used air filter according to the filter alert light status displayed on the screen. Discard used filter.
Remove all packaging material from the new filter
Place the new filters into the air purifier
Put the plug of the air purifier in the wall outlet.
Touch
and hold the for 3 seconds to reset the filter lifetime counterWash your hands after changing a filter.
Storage
Turn off the air purifier and unplug from the wall outlet.
Clean the air purifier, air quality sensor and pre-filter (see chapter “Cleaning”).
Let all parts dry thoroughly before storing.
Wrap the filter and pre-filter separately in air tight plastic bags.
Store the air purifier, the filter and pre-filter in a cool, dry location.
Always thoroughly wash hands after handling filters.
Important
Read this user manual carefully before you use the appliance, and save it for future reference.
Danger
Do not let water or any other liquid or flammable detergent enter the appliance to avoid electric shock and/or a fire hazard.
Do not clean the appliance with water, any other liquid, or a (flammable) detergent to avoid electric shock and/or a fire hazard.
Do not spray any flammable materials such as insecticides or fragrance around the appliance.
Warning
Check if the voltage indicated on the appliance corresponds to the local power voltage before you connect the appliance.
If the power cord is damaged, you must have it replaced by Philips, service center authorized by Philips, or similarly qualified persons in order to avoid a hazard.
Do not use the appliance if the plug, the power cord, or the appliance itself is damaged.
This appliance can be used by children aged from 8 years and above and persons with reduced physical, sensory or mental capabilities or lack of experience and knowledge if they have been given supervision or instruction concerning use of the appliance in a safe way and understand the hazards involved. Child shall not play with the appliance. Cleaning and maintenance shall not be made by children without supervision.
Do not block the air inlet and outlet, e.g. by placing items on the air outlet or in front of the air inlet.
Make sure that foreign objects do not fall into the appliance through the air outlet.
Caution
This appliance is not a substitute for proper ventilation, regular vacuum cleaning, or use of an extractor hood or fan while cooking.
If the power socket used to power the appliance has poor connections, the plug of the appliance becomes hot. Make sure that you plug the appliance into a properly connected power socket.
Always place and use the appliance on a dry, stable, level, and horizontal surface.
Leave at least 20cm free space behind and on both sides of the appliance and leave at least 30cm free space above the appliance.
Do not place anything on top of the appliance.
Do not sit or stand on the appliance. Sitting or standing on the appliance may lead to potential inquiry.
Do not place the appliance directly below
Make sure all filters are properly installed before you switch on the appliance.
Only use the original Philips filters specially intended for this appliance. Do not use any other filters.
Combustion of the filter may cause irreversible human hazard and/or jeopardize other lives. Do not use the filter as fuel or for similar purpose.
Avoid knocking against the appliance (the air inlet and outlet in particular) with hard objects.
Always lift or move the appliance by the handle on back side of the appliance.
Do not insert your fingers or objects into the air outlet or the air inlet to prevent physical injury or malfunctioning of the appliance.
Do not use this appliance when you have used indoor smoke-type insect repellents or in places with oily residues, burning incense, or chemical fumes.
Do not use the appliance near gas appliances, heating devices or fireplaces.
Always unplug the appliance after use and before cleaning, or carrying out other maintenance or replacing the filters.
Do not use the appliance in a room with major temperature changes, as this may cause condensation inside the appliance.
To prevent interference, place the appliance at least 2 meters away from electrical appliances that use airborne radio waves such as TVs, radios, and radio-controlled clocks.
The appliance is only intended for household use under normal operating conditions.
Do not use the appliance in wet surroundings or in surroundings with high ambient temperatures, such as the bathroom, toilet, or kitchen.
The appliance does not remove carbon monoxide (CO) or radon (Rn). It cannot be used as a safety device in case of accidents with combustion processes and hazardous chemicals.
If you need to move the appliance, disconnect the appliance from the power supply first.
Do not move the appliance by pulling its power cord.
Always wash your hands thoroughly after changing or cleaning a filter.
Philips Air Purifier AC1215 Troubleshooting
This chapter summarizes the most common problems you could encounter with the air purifier. If you are unable to solve the problem with the information below, visit https://www.philips.com.pk/c-w/support-home.html or contact the Consumer Care Center in your country.
| Problem | Possible Solution |
|---|---|
| The air purifier does not work even though it is plugged in and switched on. | - Try a different electrical outlet or check the wall switch.<br>- Replace the filter if the filter alert status displays the filter code and reset the filter lifetime counter.<br>- If the problem persists, contact the Consumer Care Center. |
| The air purifier does not work even though it is switched on. | - If the filter replacement indicator has been on and no filter has been replaced, replace the filter and reset the filter lifetime counter. |
| The air purifier accidentally powers off. | - The air purifier will restart automatically and return to the previous mode when power resumes. |
| Airflow from the air purifier is weaker than before. | - Clean the pre-filter (For model AC1215, refer to the "Cleaning" chapter). |
| The air quality does not improve despite long operation. | - Ensure all filters are properly installed in the correct order. Check if the air quality sensor is clean and dry. |
| The color of the air quality light always stays the same. | - Clean the air quality sensor. |
| The air purifier produces an unpleasant smell. | - If new, a plastic smell is normal. Replace or clean the filter if dirty. If a burnt smell persists, contact Philips service. |
| The air purifier is loud. | - Lower the fan speed or select a quieter mode like the night sensing mode. |
| The air purifier still indicates that a filter needs replacement after it has been replaced. | - Reset the filter lifetime counter after replacing the filter. |
| Error codes "E1", "E2", "E3", or "E4" display on the screen. | - Contact the Consumer Care Center for assistance due to a malfunction. |
Pros & Cons
Pros
- Effective 3-stage filtration process
- Automatic purification with NightSense auto mode
- QuietMark certification for low noise levels
- Filter replacement indicator
- Child lock feature
Cons
- Designed for small-sized rooms only
- No remote control or Wi-Fi connectivity
- May require frequent filter replacement
Customer Reviews about Philips Air Purifier AC1215
The Philips Air Purifier AC1215 has received positive feedback from customers, with many praising its quiet operation, effective filtration, and easy-to-use features. However, some customers have noted that the filters may need to be replaced frequently, which can be costly over time.
Faqs
What is the CADR of the Philips Air Purifier AC1215?
What is the maximum room size that the Philips Air Purifier AC1215 can handle?
How often do I need to replace the filters in the Philips Air Purifier AC1215?
Does the Philips Air Purifier AC1215 have Wi-Fi connectivity?
What is the noise level of the Philips Air Purifier AC1215 in sleep mode?
Can I wash the filters in the Philips Air Purifier AC1215?
What is the power consumption of the Philips Air Purifier AC1215?
Can I use the Philips Air Purifier AC1215 in a room with pets?
Does the Philips Air Purifier AC1215 come with a warranty?
How do I reset the filter replacement indicator in the Philips Air Purifier AC1215?
Leave a Comment