How to Charge: Philips Norelco Shaver AT810 User Manual
Content
Introduction of Philips Norelco Shaver AT810
The Norelco Shaver is a high-quality electric shaver designed for a comfortable and efficient shaving experience. This product is suitable for men who want a close and smooth shave, and it is available for an estimated price of $100 to $150. The Philips Norelco Shaver AT810was launched in 2017 and has since become a popular choice for its advanced features and reliable performance.
Detailed Specifications of Philips Norelco Shaver
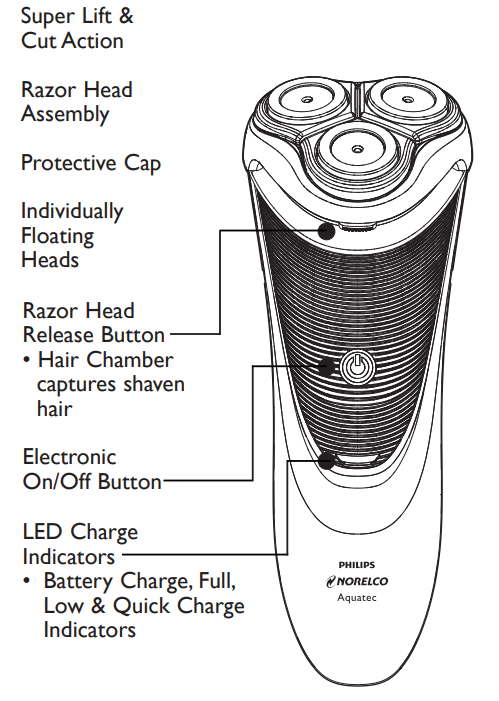
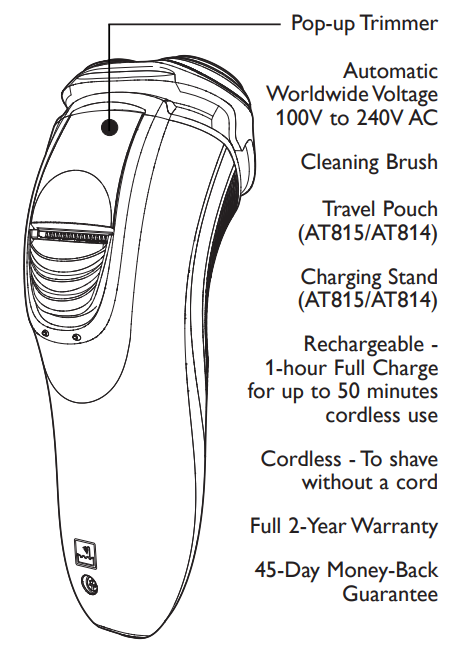
The Norelco Shaver AT810 features a GyroFlex 2D system that allows the shaver head to move in 8 directions, following the contours of your face for a closer shave. It also has Super Lift and Cut Action that raises and cuts hairs for a more efficient shave. The shaver has a battery life of up to 50 minutes and is fully washable for easy cleaning. It also comes with a precision trimmer for mustache and sideburns.
Description of Norelco Shaver
The Norelco Shaver AT810 is a cordless shaver that is easy to use and provides a comfortable shaving experience. Its GyroFlex 2D system allows for a close shave, even in hard-to-reach areas, and its Super Lift and Cut Action ensures that hairs are effectively cut. The shaver's battery life is impressive, providing up to 50 minutes of shaving time, and it is fully washable for easy cleaning. The precision trimmer is a useful addition, allowing for precise grooming of mustaches and sideburns. Overall, the Philips Norelco Shaver Philips Norelco Shaver AT810 is a reliable and efficient shaver that is sure to meet the needs of most men.
Features of Philips Norelco Shaver AT810
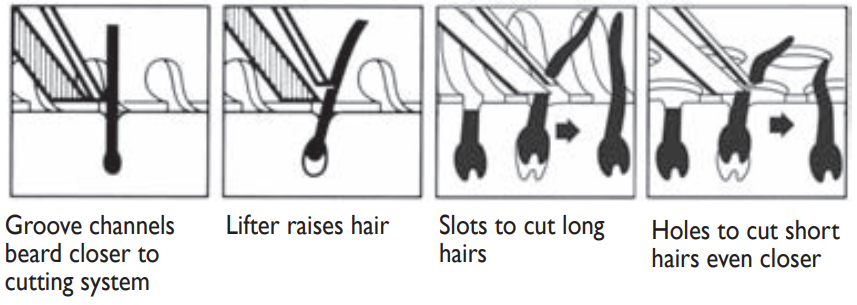
How the Unique Philips Norelco Lift and Cut Shaving System Makes Close Comfortable
Setup Guide of Philips Norelco Shaver
To use the Norelco Shaver AT810, first ensure that it is fully charged. To charge the shaver, plug it into a power outlet using the provided charger. When the shaver is fully charged, the battery indicator will turn off. To operate the shaver, press the power button. The shaver head can be moved in 8 directions, following the contours of your face. To clean the shaver, rinse it under running water. The precision trimmer can be used for mustache and sideburns by sliding it out from the shaver head.
LED Multi-Purpose Display
The display provides the following information
Charging Indicator
When the razor is charging, the charging light blinks green.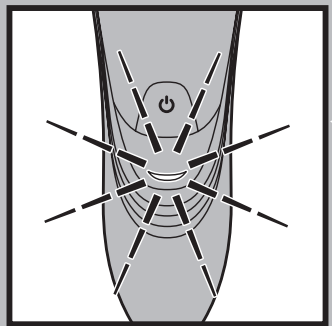
Full Charge Indicator
When the battery is fully charged, the charging light lights up green continuously. After approximately 30 minutes the charging light goes off to save energy.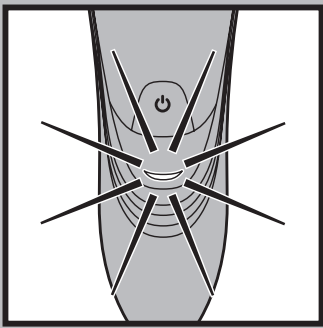
Low Battery Indicator
When the battery is almost empty (5 or less shaving minutes left), the charging light blinks orange. When you turn the razor OFF the charging light continues to blink orange for a few seconds.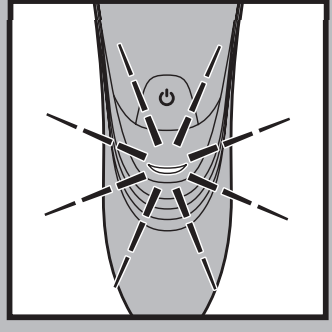
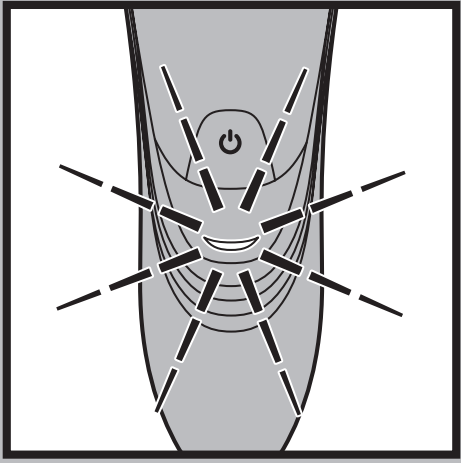
- Quick Charge Indicator
- When you charge the empty battery, the charging light alternately blinks orange and green. After approximately 3 minutes, the charging light continues to blink green.
The razor now contains enough energy for a 5-minute shave.
Before First Use
Charge the razor before you start using it (see ‘Charging’). Make sure the razor is switched off before you start charging it.
Important
Only use the power cord provided to charge the razor.
The power plug transforms 100-240V AC to less than 24V DC.
Charging of
- Charging or recharging at temperatures below 40ºF or higher than 95ºF adversely affects lifetime of batteries.
- If the razor is subjected to a major change in temperature, pressure or humidity, let it acclimatize for 30 minutes before using.
- Charging or recharging requires one full hour.
- A fully charged razor has a cordless shaving time of up to 50 minutes.
- When charging razor for the first time or after a long period of non-use, charge until the charging light lights up green continuously.
- The razor will not operate while power cord is connected to an electrical outlet.
- Do not charge razor in a pouch.
Charging with a Cord
- Connect cord directly to razor and connect the charging plug into any 100V to 240V AC outlet. Use only the power cord provided.
- An adaptor plug may be necessary for charging plug usage in some foreign countries. Use an attachment plug adaptor of the proper configuration for the power outlet.
The charging plug will automatically convert to work on 100V to 240V AC systems. The display on the razor will indicate razor is charging.
- An adaptor plug may be necessary for charging plug usage in some foreign countries. Use an attachment plug adaptor of the proper configuration for the power outlet.
Charging and recharging requires a full 1 hour. A fully charged razor has a cordless shaving time of up to 50 minutes.
When the battery is fully charged, the charging light lights up continuously.
After approximately 30 minutes, the charging light goes out to save energy.
Charging in Charging Stand (AT815/AT814)
- Always place razor in stand in an upright position making sure charging contacts in bottom of stand fit into recess in bottom of razor.
Always remove razor from stand by lifting straight up. Do not tilt razor.
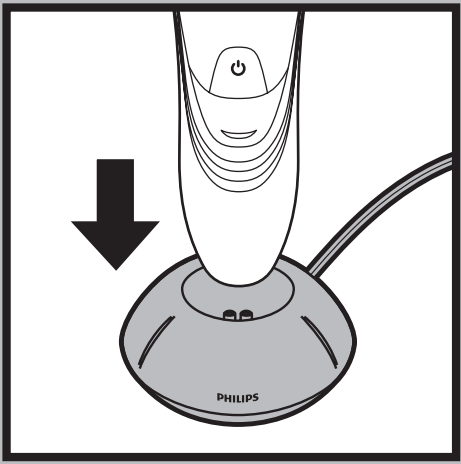
- Place razor in charging stand and connect the small plug of cord to charging stand. Connect the charging plug into any 100V to 240V AC outlet. Use only the power cord provided.
- An adaptor plug may be necessary for charging plug usage in some foreign countries.
Use an attachment plug adaptor of the proper configuration for the power outlet. The charging plug will automatically convert to work on 100V to 240V AC systems. The display on the razor will indicate razor is charging.
- An adaptor plug may be necessary for charging plug usage in some foreign countries.
Charging and recharging requires one full hour. A fully charged razor has a cordless shaving time of up to 50 minutes.
When the battery is fully charged, the charging light lights up continuously. After approximately 30 minutes, the battery symbol goes out to save energy.
Recharging
Recharging requires 1 hour. Recharge when the charging light on the razor display blinks orange
Quick Charge
When you charge the empty battery, the charging light alternately blinks orange and green. After approximately 3 minutes, the charging light continues to blink green. The razor now contains enough energy for a 5-minute shave.
How To Shave With An Electric Razor
- This symbol on the razor indicates that the razor can be used in both the bath and shower.
- The razor will not operate while power cord is connected to an electrical outlet. Use this razor for its intended household use as described in this manual.
Shaving with a clean face gives the best results.
- Clean the razor after each use (see chapter ‘Cleaning’).
- Put the Protective Cap on the razor to protect razor heads.
Shaving of Philips Norelco Shaver AT810
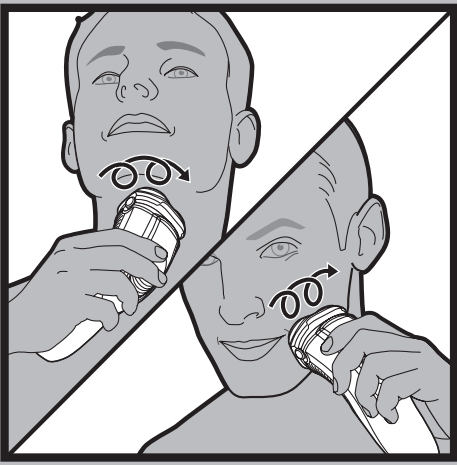
- Turn razor ON by pressing the on/off button once. Shave against the direction of beard growth using circular movements.
- Stretch your skin with your free hand so blades can lift and cut whiskers. Gently press razor to skin so the floating heads can follow the contours of your face. DO NOT press too hard. Too much pressure can pinch the skin into the combs.
- Turn razor OFF by pressing the on/off button once.
Wet Shaving
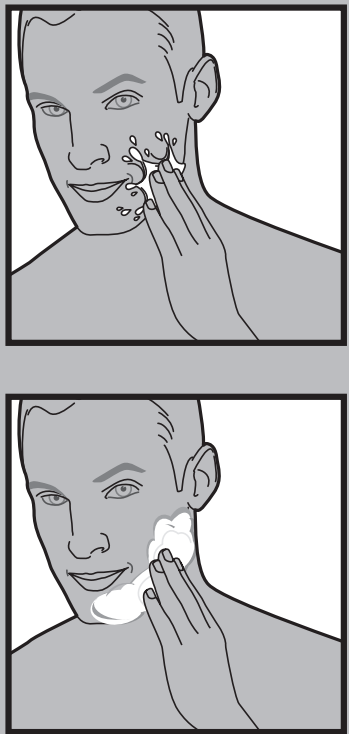
You can also use the razor on a wet face with shaving foam or gel.
- Apply some water to your skin.
- Apply shaving foam or gel to your skin.
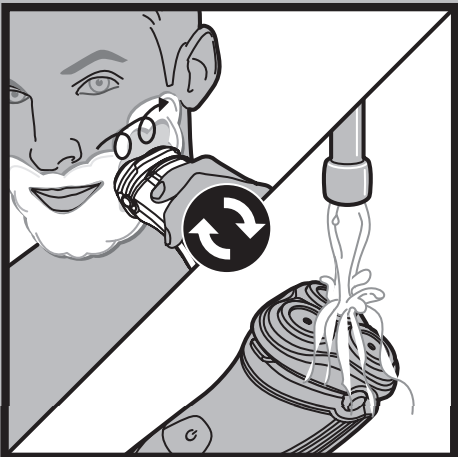
Rinse the shaving unit under the tap to ensure that the shaving unit glides smoothly over your skin.
- Press the on/off button once to switch on the razor.
Move the shaving heads in circular movements over your skin.
NOTE: Rinse the razor under the tap regularly to ensure that it continues to glide smoothly over your skin.- Dry your face and thoroughly clean the razor after each use (see chapter ‘Cleaning’).
NOTE: Make sure you rinse all foam or gel off the razor. When razor is thoroughly dry, put the Protective Cap on the razor to protect heads.
Trimming of Norelco Shaver AT810
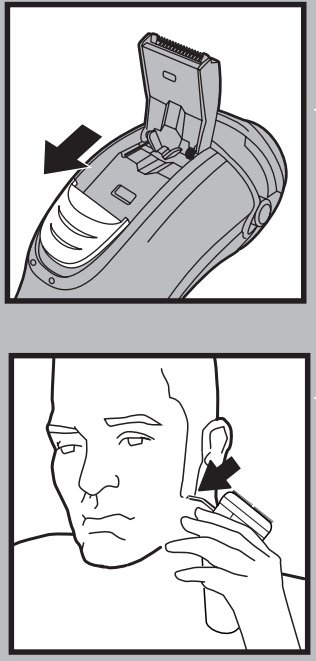
To groom sideburns and moustache
- Turn razor ON.
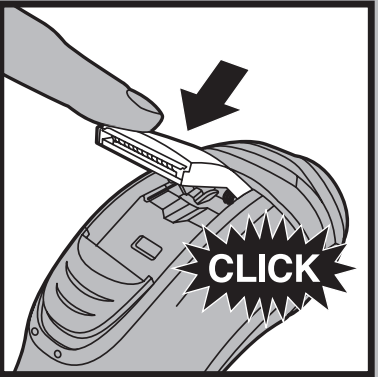
- Push down spring-release trimmer switch. The trimmer can be activated while the razor is running.
Hold trimmer as shown and move in downward strokes with gentle pressure.
- Close trimmer by pressing trimmer down.
Turn razor OFF
Cleaning of Philips Norelco Shaver AT810
- Always clean your razor after each use.
- Always switch razor OFF, unplug and remove power cord before cleaning.
- Never clean, remove or replace head assembly while motor is on.
- Do not apply pressure to combs. Do not touch razor heads with hard objects as this may dent or damage precision-made slotted combs.
- Do not use razor if combs are damaged or broken. Facial injury may occur.
- Do not use compressed air, abrasives, scourers or aggressive liquids such as gasoline or acetone to clean the razor.
Cleaning the Shaving Unit
The razor heads may be quickly cleaned after each use by rinsing with hot water: Water from the tap should be on a hot setting, BUT BE CAREFUL TO TEST WATER FIRST SO AS NOT TO BURN OR SCALD HANDS.
- Regular cleaning guarantees better shaving results.
- Do not immerse razor in water.
- While rinsing razor heads, water may drip out of the base of razor. This is a normal occurrence.
- Always turn razor OFF, unplug from outlet and remove power cord from razor.
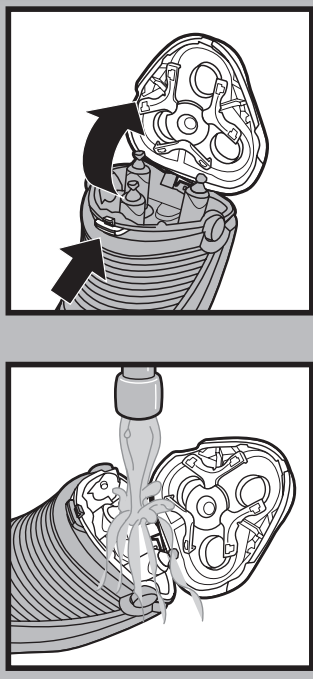
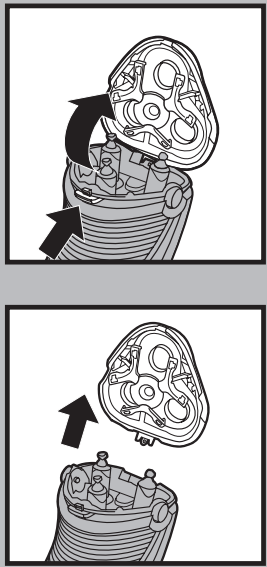
- Press the Razor Head Release Button to open the Razor Head Assembly.
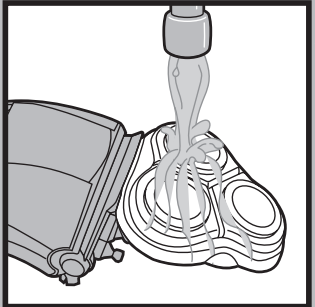
- Clean inside razor heads and hair chamber by running under hot water.
Clean outside of Razor Head Assembly by running under hot water.
Close the Razor Head Assembly and shake off excess water
- Open Razor Head Assembly again and leave open to air dry.
- If you used foam or gel to shave, make sure to rinse all of it off to prevent residue build-up from clogging shaving heads.
- If the shaving unit becomes detached from the razor, you can easily reattach it.
- You may also clean the hair chamber without water by using the supplied brush.
Extra-thorough Cleaning Method
Do not mix up the cutters and combs as the shaving performance may be adversely affected for several weeks before optimal shaving performance is restored.
- Turn razor OFF, remove the charging plug from the outlet and power cord from the razor.
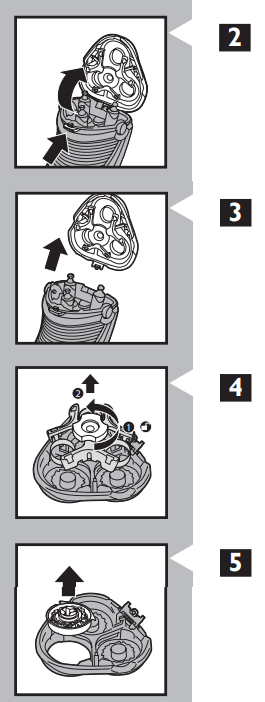
- Press the Razor Head Release Button to open the Razor Head Assembly.
- Pull the shaving unit off the razor.
- Turn the lock counterclockwise to unlock (1) and remove the retaining frame (2).
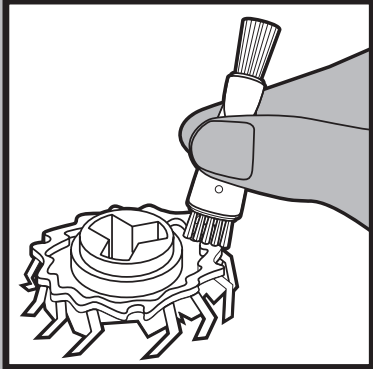
Remove and clean one set of cutters and combs at a time.
Separate the cutter from the comb and clean it with the brush supplied.
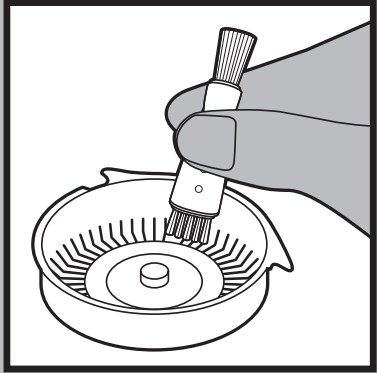
Clean the inside and outside of the comb with the brush supplied.
- Replace the set back into the Razor Head Assembly.
- Repeat the process for the other two sets of cutters and combs.
Replace the frame and turn the lock clockwise until it locks into place.
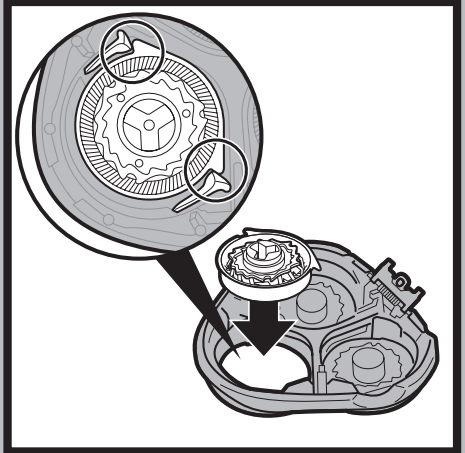
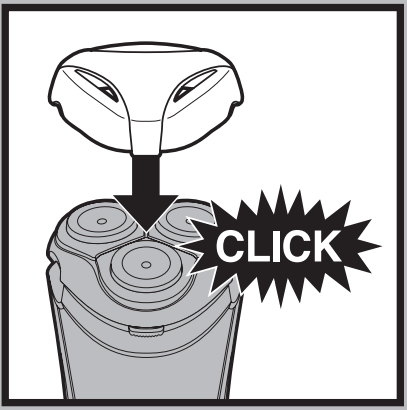
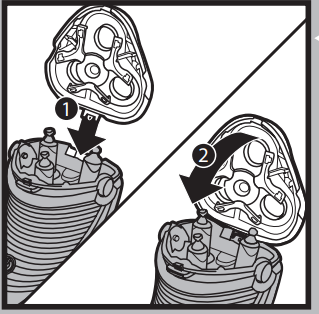
- Insert the notch of the shaving unit into the slot in the top of the razor (1) and then close the shaving unit (2)
After Each Use of the Trimmer
- Turn razor OFF.
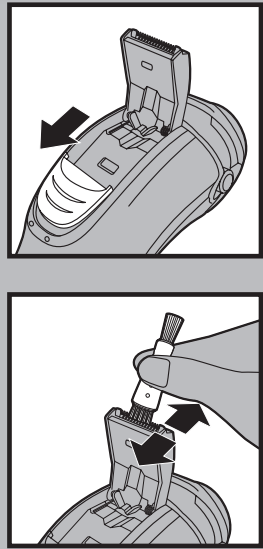
Push down spring-release trimmer switch.
- Clean trimmer with the short-bristled side of the brush every time you use it. Brush up and down along the trimmer teeth.
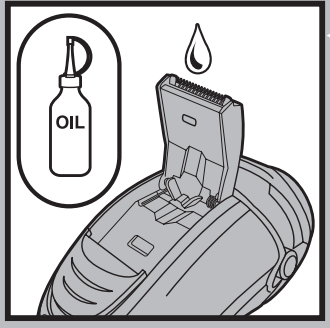
Lubricate the trimmer teeth with one drop of mineral oil every 6 months.
- Close trimmer by pressing trimmer down.
Replacing the Razor Heads
- Replace the razor heads once a year for optimal shaving results.
- Replace damaged or worn razor heads with model HQ8 Philips Norelco razor heads only.
- Turn razor OFF, remove the charging plug from the outlet and power cord from the razor.
- Press the Razor Head Release Button to open the Razor Head Assembly.
Pull the shaving unit off the razor.
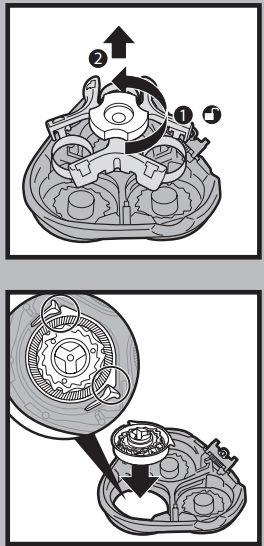
- Turn the lock counterclockwise to unlock (1) and remove the retaining frame (2).
Remove the razor heads and place the new razor heads in the shaving unit.
- Replace the frame and turn the lock clockwise until it locks into place.
Insert the notch of the shaving unit into the slot in the top of the razor (1) and then close the shaving unit (2).
Storage
- Be sure razor is turned off. Remove cord from outlet and razor before storing in a safe, dry location where it will not be crushed, banged, or subject to damage.
- Do not wrap power cord around razor when storing.
- Store cord in a safe location where it will not be cut or damaged.
- Do not place or store razor where it can fall or be pulled into a tub or sink, water or other liquid while plugged in. C w Put the Protective Cap on razor to protect heads.
Pros & Cons of Philips Norelco Shaver AT810
Pros
- GyroFlex 2D system for a close shave
- Super Lift and Cut Action for efficient shaving
- Impressive battery life
- Fully washable for easy cleaning
- Precision trimmer for mustache and sideburns
Cons
- Higher price point compared to some other electric shavers
- May not be as effective on longer hair
Customer Reviews of Philips Norelco Shaver AT810
Customers have generally praised the Philips Norelco Shaver for its close shave and efficient performance. Many have noted that the GyroFlex 2D system and Super Lift and Cut Action make shaving easier and more comfortable. However, some have criticized the higher price point and noted that it may not be as effective on longer hair. Common complaints include the shaver pulling on hairs and the precision trimmer being difficult to use.
Faqs
For a smooth shave, how should I use the Philips Norelco Shaver AT810?
Why is the Philips Norelco Shaver AT810 the best option for skin that is sensitive?
How can I make sure my Philips Norelco Shaver AT810 is operating at its best?
If the battery on my Philips Norelco Shaver AT810 is not holding, what should I do?
Is it possible to wet shave with the Philips Norelco Shaver AT810 in the shower?
What is the duration required for the Philips Norelco Shaver AT810 to reach full charge?
Is cutting longer facial hair appropriate for the Philips Norelco Shaver AT810?
If hairs are coming out of my Philips Norelco Shaver AT810 while I'm shaving, what should I do?
When it comes to traveling, is the Philips Norelco Shaver AT810 a good choice?
What is the Philips Norelco Shaver AT810's warranty?
Leave a Comment