How to Use: Presto 04633 Electric Egg Cooker Instruction Manual
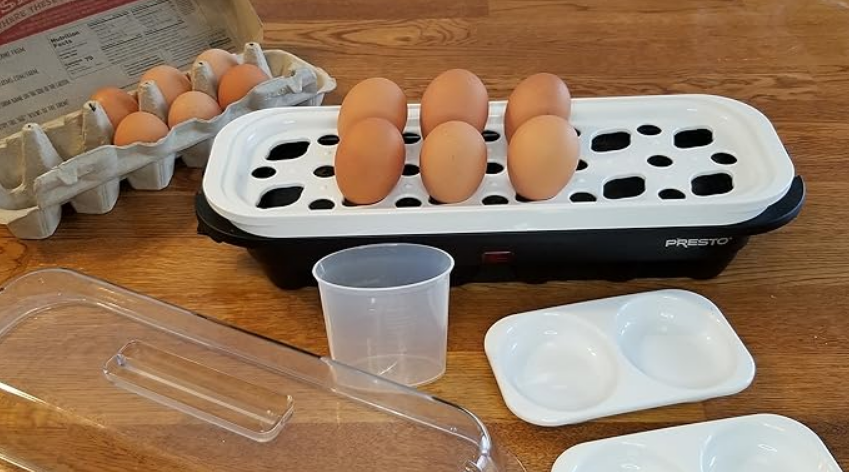
Content
Introduction
The Presto 04633 Electric Egg Cooker is a convenient kitchen appliance designed to simplify the egg cooking process. This versatile cooker can prepare up to 12 eggs at once, offering the flexibility to make hard-boiled, soft-boiled, or poached eggs with ease. Featuring a built-in timer and automatic shut-off, it ensures that eggs are cooked to perfection without the risk of overcooking. The included measuring cup with a piercing pin allows for precise water measurement, guaranteeing consistent results every time. Priced at $2,999.00, the Presto Electric Egg Cooker is an essential tool for egg lovers looking for efficiency and reliability in their cooking routine.
Detailed Specifications
The Presto 04633 Electric Egg Cooker comes with a variety of features that make it a must-have for any kitchen. These specifications include:
- Cooks up to 7 eggs at a time
- Poaching, boiling, and scrambled egg options
- Automatic shut-off feature
- Easy-to-clean brushed stainless steel exterior
- Clear viewing window to monitor cooking progress
- Includes a measuring cup and piercing pin for easy egg preparation
- cord wrap for easy storage
Presto 04633 Electric Egg Cooker Features
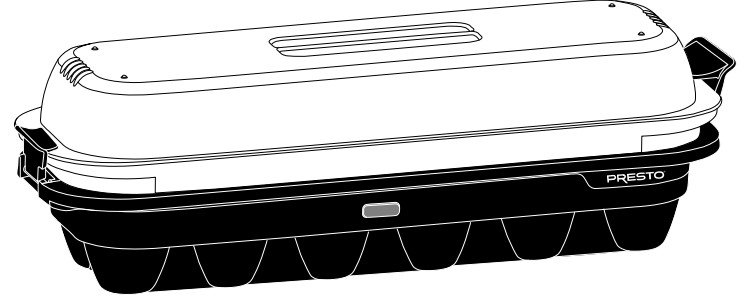
- Makes up to 12 hard-, medium-, and soft-cooked eggs in minutes.
- Cooks medium, large, extra-large, and jumbo eggs.
- Easy egg storage. Simply place covered tray with cooked eggs in fridge.
- Cord wraps and stores neatly in base of unit.
Description
The Presto 04633 Electric Egg Cooker is a compact and convenient appliance that is perfect for cooking breakfast, lunch, or dinner. With its poaching, boiling, and scrambled egg options, you can cook your eggs exactly how you like them. The automatic shut-off feature ensures that your eggs are never overcooked, and the easy-to-clean brushed stainless steel exterior makes cleanup a breeze. The clear viewing window allows you to monitor the cooking progress, so you can cook your eggs to perfection every time.
Getting Acquainted
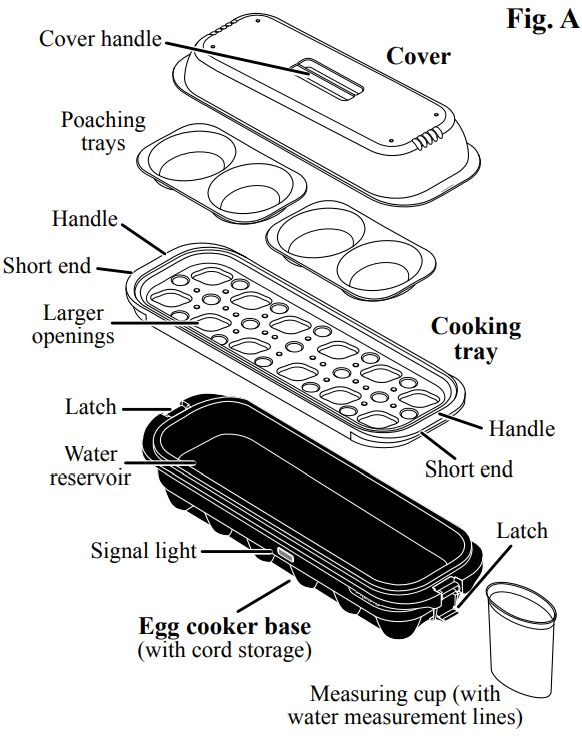
- Before first use, become familiar with the egg cooker parts (Fig. A) and read the instructions carefully.
- Turn the egg cooker base over and uncoil the cord.
Egg Cooker Tips
- Always wash hands, surfaces, and utensils that have come in contact with raw eggs.
- Before and after cooking, store eggs on the lower shelf in your refrigerator at a temperature at or below 40°F.
- Check eggs for cracks before cooking. If eggs have superficial cracks, they are best used for poaching or in baking rather than hard-, medium-, or soft-cooking. Cracks in eggs may allow some of the contents to leak out during cooking.
- Piercing eggs before cooking should be avoided. Bacteria can enter the egg if the piercer or needle is not sterile. Additionally, piercing causes superficial cracks in the shell through which bacteria can enter after cooking.
- The eggs are cooked by steam, and it is the amount of water used that determines the cooking time. It may be necessary to adjust the cooking time to achieve the degree of doneness you prefer. Use additional water to increase the cooking time and the doneness of the eggs; use less water to reduce the cooking time.
- If cooking less than 12 eggs, position the eggs in any of the larger openings. There is no need to arrange the eggs in a particular order.
- Eggs that are older are easier to peel than those that are fresh. As the egg ages, the air cell between the egg and the shell membrane increases in size and helps separate the egg from the shell.
- For easier peeling, crack the shell all over by gently tapping the egg on the countertop and then roll it between your hands to loosen the shell. Peel off the shell starting at the large end. Hold the egg under running water or dip it in water to make peeling easier.
- If not consumed immediately, cooked eggs should be refrigerated within two hours after cooking and used within one week.
How to Use
Place the egg cooker base on a dry, level surface. To avoid steam damage to cabinets, position the unit so it is not directly under cabinets.
CAUTION! It is normal for steam to escape from the cover during cooking. To prevent steam burns, keep well away from the vents.
How to Make Hard-, Medium-, and Soft-Cooked Eggs
- Determine the number of eggs you want and how you want them prepared. Using the markings on the measuring cup, fill the cup with the appropriate amount of water (based on the number of eggs you are cooking). Pour the water into the reservoir.
- Place the cooking tray on the egg cooker base.
Position up to 12 cold medium or large eggs upright in the larger openings in the cooking tray (Fig. B). If using extra-large or jumbo eggs, lay up to 12 eggs on their sides in these openings.
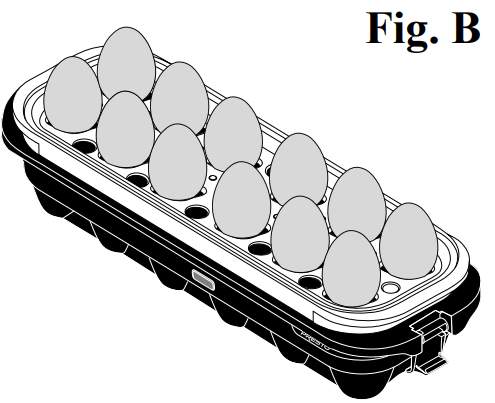
CAUTION! For food safety, do not use room-temperature eggs. Always keep eggs in the refrigerator until you are ready to cook them.- Place the cover over the eggs. Make sure the cover rests on the cooking tray. If it does not, angle the eggs slightly in the openings so the tops of the eggs do not come in contact with the cover. Lift the two base latches and snap them onto the cover edge.
- Plug in the unit and the signal light will come on. There is no need to set a timer as the egg cooker will shut off automatically when cooking is complete. The cooking time is determined by the amount of water in the reservoir and the number of eggs in the unit. See the cooking guide on page 4 for approximate cooking times.
- When the cooking time is up, the signal light will go out and you will hear a buzzing sound. Unplug the unit.
- Being careful to keep hands away from the vents, unlatch the cover from the base and remove the cover. Grasp the handles on the short ends of the cooking tray (Fig. A) and carefully lift it off the egg cooker base.
- Place the tray of eggs in a pan of cold water and cool eggs for 10 minutes. This will prevent the eggs from continuing to cook. If consuming the eggs right away, cool the eggs just until they are comfortable to peel.
- To store, leave cooked eggs in the tray, place cover on tray, and refrigerate.
How to Make Poached Eggs
- Fill the measuring cup with the appropriate amount of water, as marked on the measuring cup, and pour into the water reservoir.
- Place the cooking tray on the egg cooker base.
- Apply a thin coating of vegetable oil or no-stick cooking spray to the poaching tray(s). Add 1 or 2 cracked, cold eggs to the poaching tray(s).
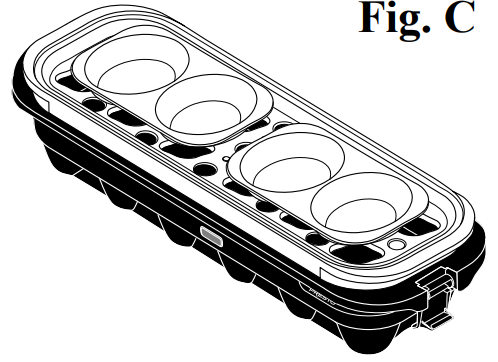
Set the poaching tray(s) on top of the cooking tray (Fig. C). Place the cover over the poaching tray(s). Lift the two base latches and snap them onto the cover edge. Then plug in unit.
- When cooking time is up, the signal light will go out and you will hear a buzzing sound. Unplug the unit.
- Being careful to keep hands away from the vents, unlatch the cover from the base and remove the cover. Grasp the handles on the short ends of the cooking tray (Fig. A), carefully lift it off the egg cooker base, and set it on the counter.
- Lift the poaching tray(s) off of the cooking tray. Tilt the tray(s) slightly and pour off any condensation on top of the eggs. Flip the egg(s) onto a plate for serving. If necessary, run a knife around the edge of the poached egg to loosen it from the tray.
Setup Guide
Setting up the Presto 04633 Electric Egg Cooker is easy.
- Simply plugin the appliance, fill the measuring cup with water, and add the water to the cooking plate. Place the eggs in the egg holder, and close the lid.
- Select your desired cooking option and let the appliance do the rest. When the eggs are cooked to your liking, the automatic shut-off feature will turn off the appliance.
- To clean, simply wipe down the exterior with a damp cloth and clean the cooking plate and egg holder with soap and water.
Care, Cleaning, and Storage
- Always unplug and allow egg cooker to cool before cleaning.
- Wash the cooking tray, poaching trays, measuring cup, and cover in warm, soapy water. Rinse and dry thoroughly. The cooking tray and poaching trays are dishwasher safe (top rack); however, the measuring cup and cover should NOT be washed in the dishwasher.
- When exposed to steam, some egg shells leave a residue on the surface of the water reservoir. To remove, wash the surface of the reservoir with a damp cloth. If necessary, gently scrub the surface with a nylon mesh pad, such as a Scotch-Brite* Multi-Purpose Scrub sponge. Do not use steel wool or abrasive cleaners. When needed, wipe the egg cooker base with a damp cloth. Never immerse the egg cooker base in water or any other liquid.
Mineral content in water varies from place to place. In some areas, this Fig. D Tabs Slots may result in the formation of mineral deposits on the surface of the water reservoir. To remove the deposits, pour 1 cup water and 1 cup vinegar into the reservoir. Plug in the unit and heat for 10 minutes. Unplug and allow solution to cool. Pour out solution. Wipe the surface with a damp cloth, then dry.
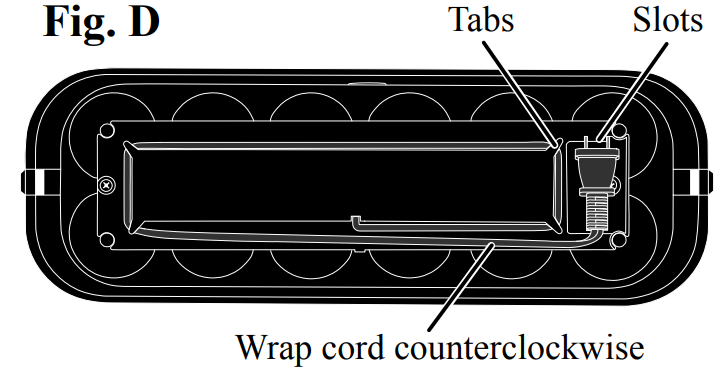
- For storage, turn the base over and wrap the cord counterclockwise under the four tabs on the bottom of the base (Fig. D). Then insert the plug prongs into t e slots to secure the cord. Wrap cord counterclockwise
Turn the base right side up and stack the parts onto the base as follows: poaching trays, cooking tray, measuring cup, and cover. Secure the cover to the base with the latches.
Cooking Guide
For convenience, use the included measuring cup when making eggs. The following guide is a reference for cooking times and water volume, should you need it. The amount of water and times in the cooking guide below are for medium to large eggs that have been removed from refrigeration just prior to cooking. Cooking times may vary depending on household voltage, altitude, and personal preference. If you prefer firmer eggs, allow the eggs to remain in the cooker 1–2 minutes after the buzzer sounds. If eggs are too firm, use slightly less water.
Style | Number of Eggs | Water Volume | Cooking Time |
1 | 130 ml | ||
2 | 125 ml | ||
3 | 120 ml | 17½ –19 minutes | |
4 –5 | 114 ml | ||
Hard | 6 | 108 ml | |
7 –8 | 102 ml | ||
9 10 –11 | 96 ml 90 ml | 19 –20½ minutes | |
12 | 85 ml | ||
1 | 85 ml | ||
2 | 82 ml | ||
3 | 80 ml | 11½ –14 minutes | |
4 –5 | 74 ml | ||
Medium | 6 | 70 ml | |
7 –8 | 66 ml | ||
9 10 –11 | 63 ml 58 ml | 14 –16½ minutes | |
12 | 55 ml | ||
1 | 70 ml | ||
2 | 68 ml | ||
3 | 66 ml | 10 –12 minutes | |
4 –5 | 63 ml | ||
Soft | 6 | 60 ml | |
7 –8 | 56 ml | ||
9 10 –11 | 53 ml 49 ml | 12 –14 minutes | |
12 | 45 ml | ||
Poached | 2–4 | 65 ml | 9 –10 minutes |
INSTRUCTIONS
This is a Listed appliance. The following important safeguards are recommended by most portable appliance manufacturers.
IMPORTANT SAFEGUARDS
To reduce the risk of personal injury or property damage when using electrical appliances, basic safety precautions should always be followed, including the following:
- Read all instructions before using this appliance.
- Do not touch hot surfaces. Use handles or knobs.
- To protect against the risk of electrical shock, do not immerse cord, plug, or egg cooker base in water or other liquids.
- Close supervision is necessary when any appliance is used near children.
- Unplug from the outlet when not in use and before cleaning. Allow to cool before putting on and taking off parts.
- Do not operate any appliance with a damaged cord or plug, or in the event the appliance malfunctions or is dropped or damaged in any manner. Return this appliance to the Presto Factory Service Department for examination, repair, or electrical or mechanical adjustment.
- The use of accessory attachments not recommended by the appliance manufacturer may cause injuries. Use only genuine Presto® accessory attachments and replacement parts.
- Do not use outdoors.
- Do not let cord hang over edge of table or counter or touch hot surfaces.
- Do not place on or near a hot gas or electric burner or in a heated oven.
- Extreme caution must be used when moving an appliance containing hot oil or other hot liquids.
- Do not use this appliance for other than intended use.
Important Cord Information
- This appliance has a polarized plug (one blade is wider than the other). To reduce the risk of electric shock, this plug is intended to fit into a polarized outlet only one way. If the plug does not fit fully into the outlet, reverse the plug. If it still does not fit, contact a qualified electrician. Do not attempt to modify the plug in any way.
- A short power supply cord is provided to reduce the risk of becoming entangled in or tripping over a longer cord. An extension cord may be used if care is properly exercised in its use.
- If an extension cord is used, the marked electrical rating of the extension cord should be at least as great as the electrical rating of the appliance. The extension cord should be arranged so that it will not drape over the countertop or tabletop where it can be pulled on by children or tripped over unintentionally.
- Connect the power supply cord to a 120VAC electrical outlet only.
Troubleshooting
Here are some common problems and solutions when using the Presto 04633 Electric Egg Cooker:
- Problem: Eggs are not cooking properly.
- Solution: Make sure that you are using the correct amount of water for the number of eggs you are cooking. Also, make sure that the eggs are at room temperature before cooking.
- Problem: The appliance is not turning on.
- Solution: Make sure that the appliance is plugged in correctly and that the power cord is not damaged. If the appliance still will not turn on, contact customer support for further assistance.
Presto Warranty
(Applies only in the United States)
This quality Presto appliance is designed and built to provide many years of satisfactory performance under normal household use. Presto pledges to the original owner that should there be any defects in material or workmanship during the first year after purchase, we will repair or replace it at our option. Our pledge does not apply to damage caused by shipping. Outside the United States, this limited warranty does not apply.
Product Registration
To register the product, visit https://www.GoPresto.com/registration or simply scan this QR code.
Pros & Cons
Pros
- Cooks up to 7 eggs at a time
- Poaching, boiling, and scrambled egg options
- Automatic shut-off feature
- Easy-to-clean brushed stainless steel exterior
- Clear viewing window to monitor cooking progress
Cons
- May take up counterspace
- May not cook eggs as quickly as some consumers would like
Customer Reviews
Customers love the Presto 04633 Electric Egg Cooker for its convenience, ease of use, and affordable price. Many customers have praised the appliance for its ability to cook eggs to perfection every time, and for its compact design that makes it easy to store in any kitchen. Some customers have noted that the appliance can take some time to cook eggs, but overall, customers are very pleased with their purchase.
Most Common Complaints
The most common complaint among customers is that the appliance can take some time to cook eggs. However, this is a minor issue, and most customers are willing to wait a little longer for perfectly cooked eggs. Another complaint is that the appliance may not be as durable as some consumers would like. However, with proper care and maintenance, the Presto Electric Egg Cooker can last for years.
Faqs
What is the maximum number of eggs the Presto can cook at once?
What cooking options does the Presto offer?
Does the Egg Cooker have an automatic shut-off feature?
How long does it take for the Presto Electric Egg Cooker to cook eggs?
What is the warranty on the Presto Electric Egg Cooker?
What is the size and weight of the Presto Egg Cooker?
Can the Presto Electric Egg Cooker be used in countries outside of the United States?
What is the return policy for the Presto Electric Egg Cooker?
Leave a Comment
