Qsee HD Camera & DVR Bundle QTH87 User Guide
Content
Introduction
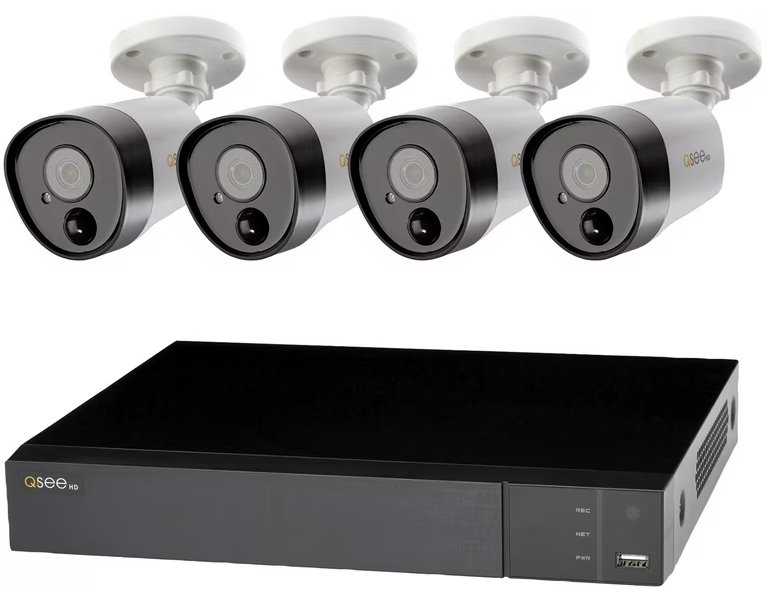
The Qsee HD Camera & DVR Bundle QTH87 is a comprehensive security solution designed to enhance surveillance for homes and businesses. This system features advanced 5MP cameras equipped with PIR human and vehicle detection, ensuring reliable monitoring day and night. With a robust 2TB DVR for continuous recording, it offers remote access via a mobile app, making it convenient to keep an eye on your property from anywhere. The bundle is priced at approximately $399.99, providing excellent value for high-quality security.
What’s Included

Understanding Your DVR
Rear Panel
NOTE: Connections on the back of your system may vary based on your model.

IMPORTANT: Go through all of the steps to setup and test your system before mounting any cameras or hardware.
Specifications
Qsee is packed with several key features that make it a standout in the security market:
- Resolution: 1080p HD resolution for clear video quality.
- Cameras: Multiple weather-resistant cameras with night vision.
- DVR: Digital video recorder with ample storage capacity.
- Connectivity: Supports both wired and wireless connections.
- Mobile App: Compatible with mobile apps for remote viewing.
- Motion Detection: Alerts for motion detection and scheduled recording.
Get Connected
Step 1: Registration
Before installing, please register your device on the Q-See Support Portal at https://www.q-see.com/register to receive critical updates and support for your system. Registering will also help us to assist you with any technical or warranty issues if ever necessary.
Please be sure to keep a record of your model number(s) and to save this guide, as you will need this information if you are ever in need of technical or warranty support.
NOTE: Your username and password used to register your device are not the same as those you use to log in to your system. Please write down your username, password, and model number(s) in the spaces provided below:
- Username:
- Password:
- Model #:
Step 2: Connect Your Cameras
Plug the (camera only) BNC connector and power cable into the camera. Twist and lock the end of the BNC cable to secure the connection.
NOTE: Please test cameras and connections prior to mounting.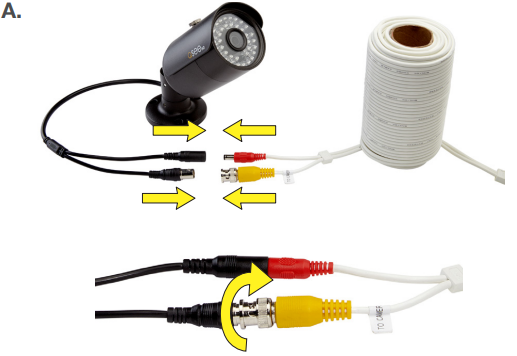
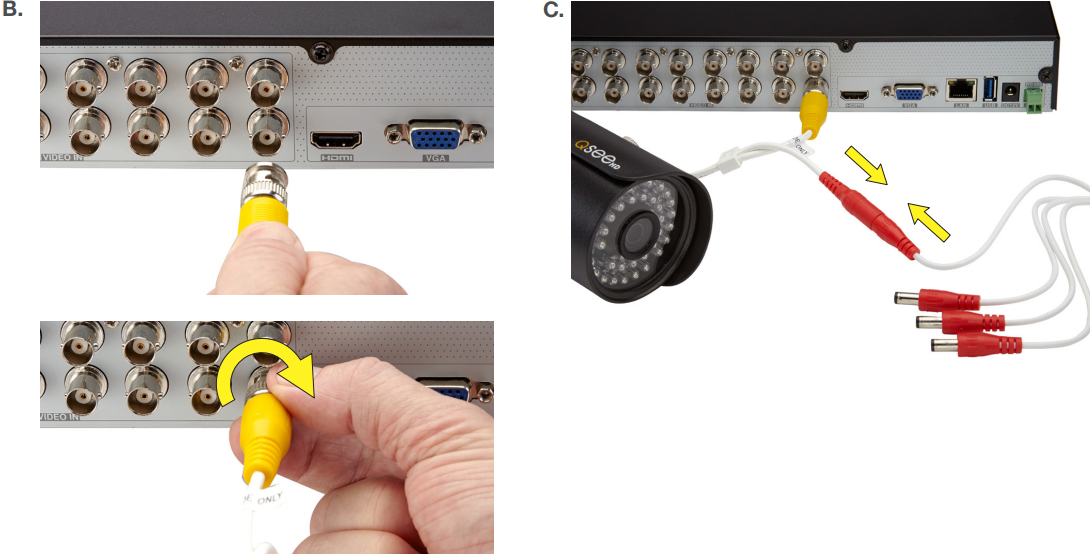
- Connect the (DVR only) BNC connector into the back of the DVR as shown in the image. Twist and lock each end of the BNC cable to secure the connections.
Connect the (DVR only) power cable into one of the available ends of the four way splitter as shown below.
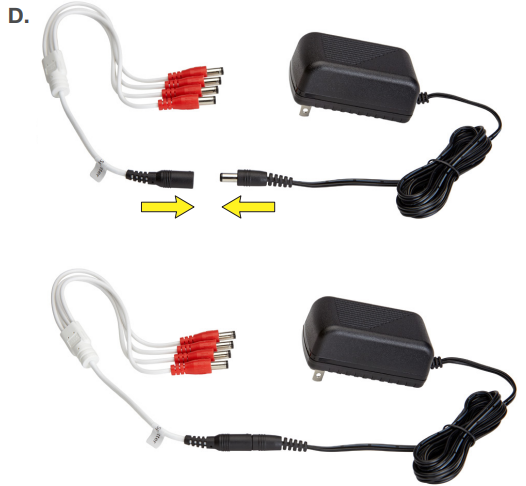
Connect the female end of the power splitter into the adapter as shown in the image below:
Step 3: Connect DVR to Display
There are two options to connect the DVR to a display.
Option A: HDMI
- A1. Plug the included HDMI cable into the DVR’s HDMI port.
- A2. Connect the other end of the HDMI cable to the monitor or TV.
A3. Plug the monitor or TV into a surge protector.
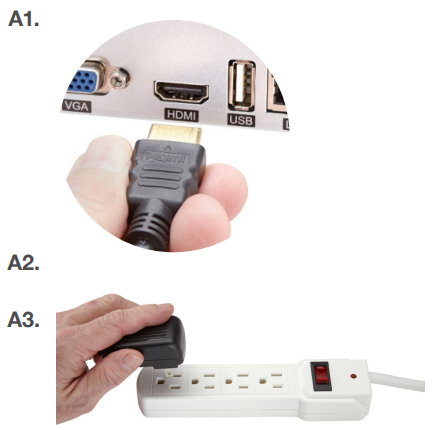
Option B: VGA Monitor
- B1. Plug a VGA cable (not included) into the DVR’s VGA port. VGA might not support full high definition output.
- B2. Connect the other end of the VGA cable to the monitor. A 19” monitor or larger with 1280 x 1024 resolution is highly recommended.
B3. Plug the monitor into a surge protector.
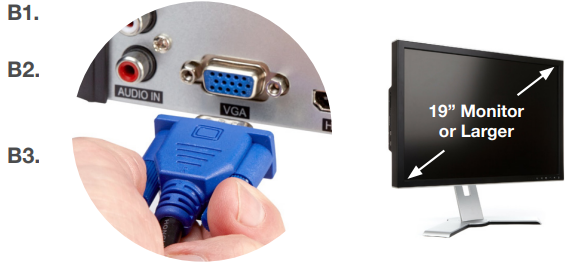
NOTE: If your display does not have HDMI or VGA ports, use the included CVBS/Spot out adapter (BNC to RCA). Using this adapter will not support an HD signal.
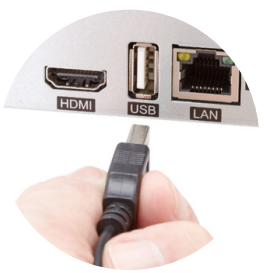
Step 4: Connect Mouse
Plug the included mouse into the USB port on the back of the DVR. If your model has two USB ports on the back, either one will work.
Step 5: Connect to the Router
Plug the included Network (Ethernet) cable into the Network (LAN) port on the back of the DVR.
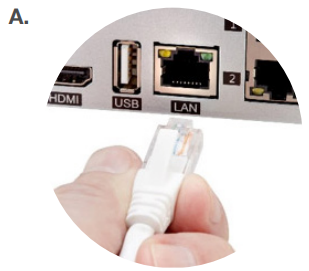
- Connect the other end of the cable to an open port on your router (not included). You will hear a click when the cable is properly connected.
Step 6: Powering Up the DVR & Cameras
- Plug the DVR power supply cord into the DC Port on the back of the DVR.
Plug the DVR power supply or power adapter into a surge protector (not included).
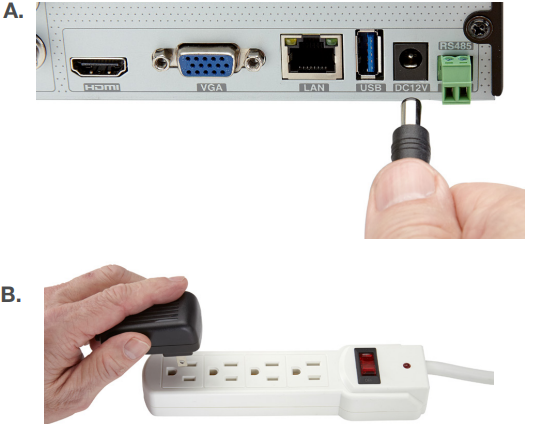
- Plug the camera power supply into a surge protector.
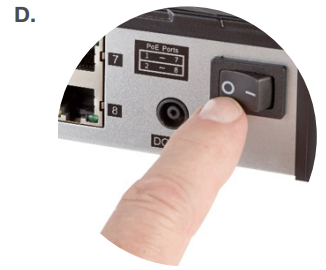
NOTE: The camera will make a faint clicking sound when the power is activated. Turn on the DVR’s power switch (if present). The DVR may beep as it powers up and the Startup Wizard will appear on-screen after a few minutes.
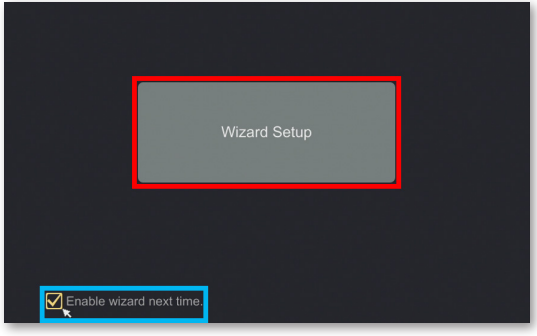
Step 7: Startup Wizard
In order to effectively use the search functions and maintain accurate recordings, you must complete the Startup Wizard. To prevent the wizard from appearing after each reboot, uncheck Enable wizard next time. Click on Wizard Setup to begin.
Set your desired language in the first window:
NOTE: If you change the language from English to any other, the system will restart.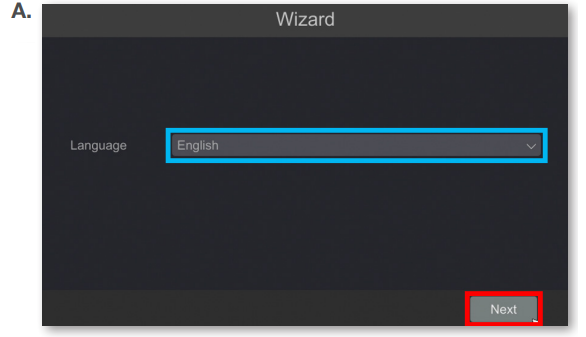
Create a security question in case you forget your password by clicking Edit Security Question in the window below. If the option to Edit Security Question is not visible, go to https://www.q-see.com/support and search for answer ID 2894.
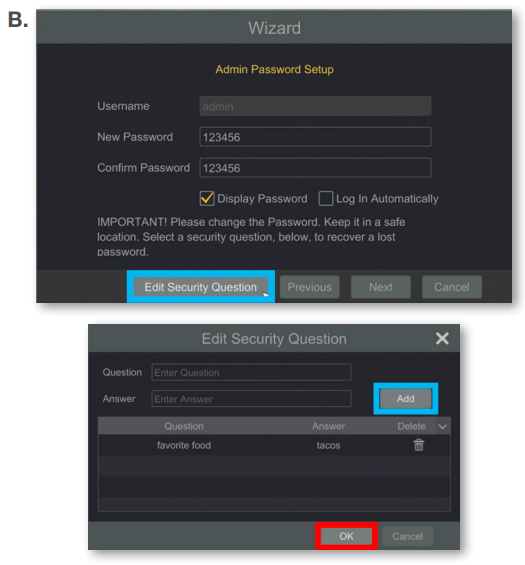
Create a new password for the Admin User account. Please write down your new password in the space provided below:
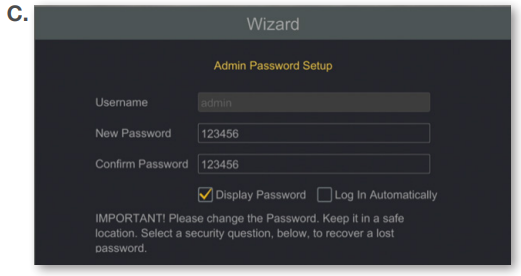
- Username: admin
- Password:
NOTE: Password is case sensitive.
Set the current Date and Time. Click Next to proceed to the Network Setup.
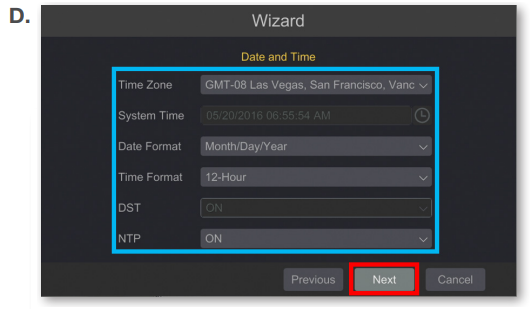
NOTE: If you will be connecting the DVR to the internet, enabling Time server allows the DVR to check a network server in order to maintain accurate time. Setting the start and end dates of Daylight Savings Time (DST) will allow your DVR to automatically adjust its internal clock.
If the connection is successful, it will display your LAN (Local Area Network) address. Click OK to continue.
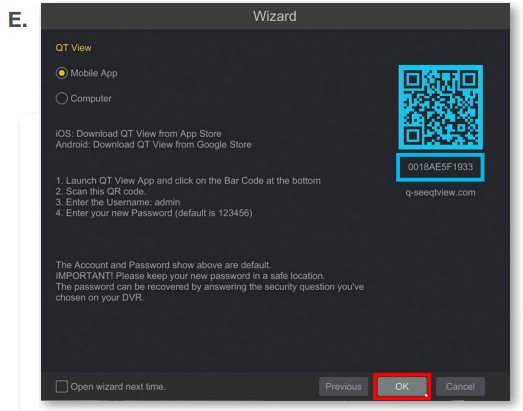
If the attempt is unsuccessful, your LAN address will not appear. Ensure that your DVR is properly connected to your network/router before clicking on Previous to try again. Please refer to the Troubleshooting section on page 30 if this problem persists.
Step 8: Setting Up the QT View Mobile App
Download our free QT View mobile app to your mobile device, available for both Android and iOS.
NOTE: Please do not log in to the app yet.
To view your cameras on your mobile device, you will need to add your DVR to the QT View Mobile App.

- Launch the QT View Mobile App, you may skip any tutorials. Select the QR Code Scanner.
Scan the QR code displayed on the label on top of your DVR with your mobile device.
NOTE: All screenshots shown are from Android. The app may show “Preview” in place of “Play” button on iOS devices.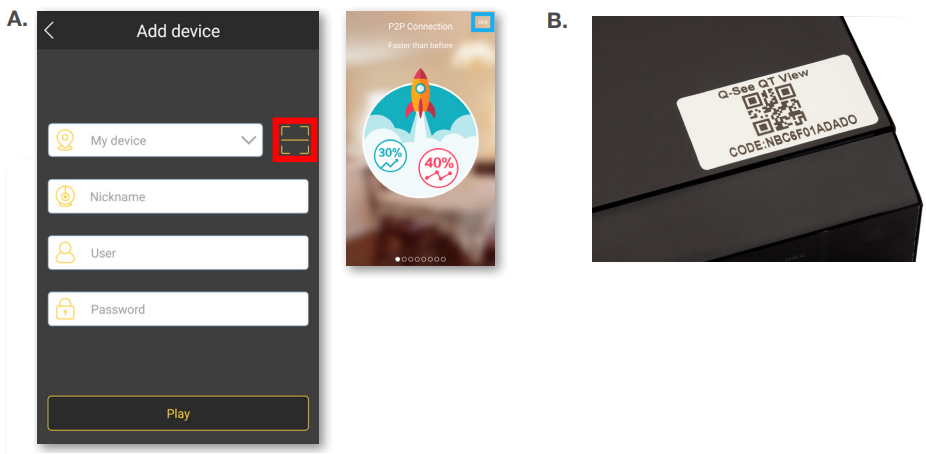
- Once scanned, the App will return to the Login screen. The DVR’s ID will appear in the SN (Serial Number) section. Enter the password for your DVR and select Play.
If you did not change the password in Step 8C, the default login credentials are:- Username: admin
- Password: 123456 Select OK to bypass the demo screens.
You have now successfully connected to your cameras.
NOTE: If this is your first time connecting to the DVR, you will be shown a brief demo. If you have any further questions, please refer to our support portal for additional information. If there is no image, or a dark screen when you first connect the cameras, please see the Troubleshooting section at the back of this guide.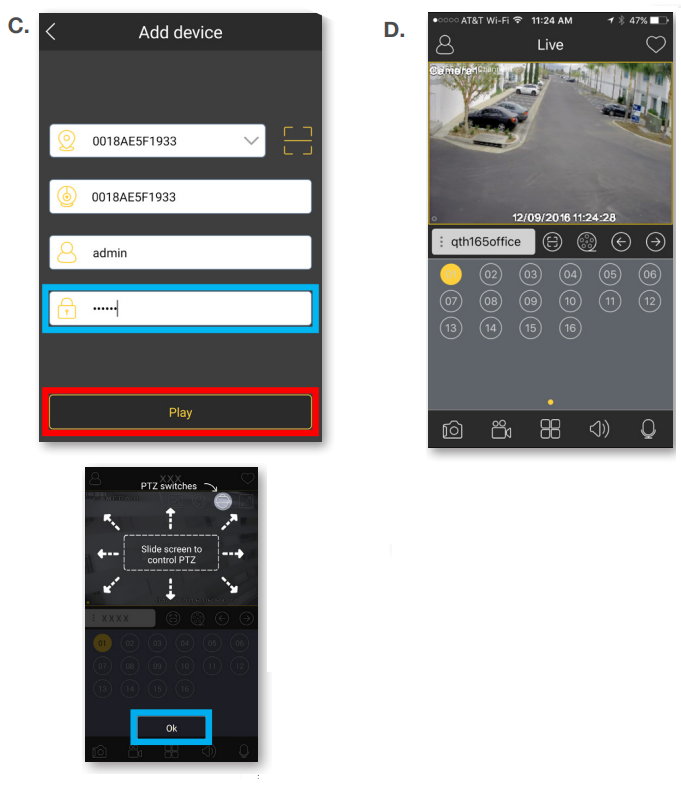
Step 9: Adding Additional Mobile Devices
After completing the process on your first mobile device, repeat Step 8 with a new mobile device if desired.
Description
The QTH87 bundle includes a set of high-definition cameras that are designed to capture crisp and clear video footage. These cameras are built to withstand various weather conditions, making them suitable for both indoor and outdoor use. The DVR component allows for seamless recording and playback of footage, with user-friendly controls for setting up schedules and alerts.
The system also features motion detection capabilities, which can be configured to send alerts to your mobile device via the companion app. This ensures that you are always informed about any activity on your premises, even when you are not physically present.
QT View On Your Computer
You can access your DVR over the internet on a computer through your browser or, for Windows users, through the QT View desktop application.
Using QT View in a Windows Browser
Use Internet Explorer for the best QT View experience possible, but you can also use the IE Tab Plugin available for Chrome or Firefox.
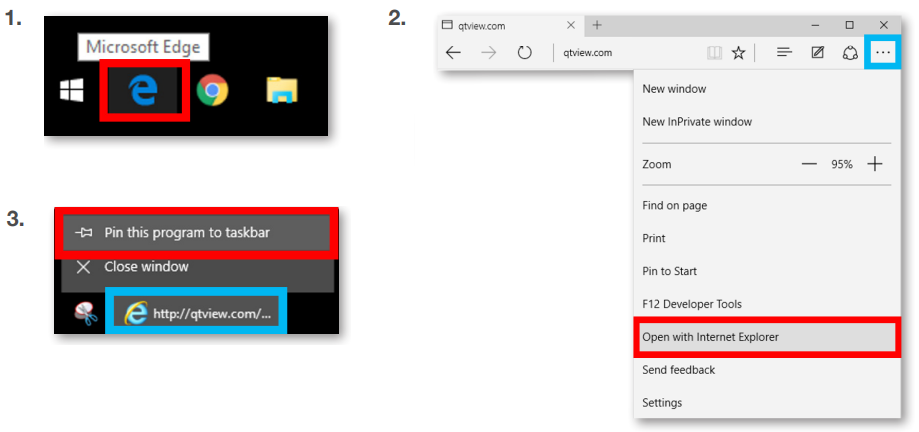
- Open the Microsoft Edge browser.
If you are using Windows 8, 7, Vista, or XP, open Internet Explorer and skip to Step 4. - Go to https://www.QTView.com and click on the ... menu in the upper right corner and select Open with Internet Explorer from the drop down menu.
Right-click Internet Explorer in the taskbar and Click Pin this program to taskbar.
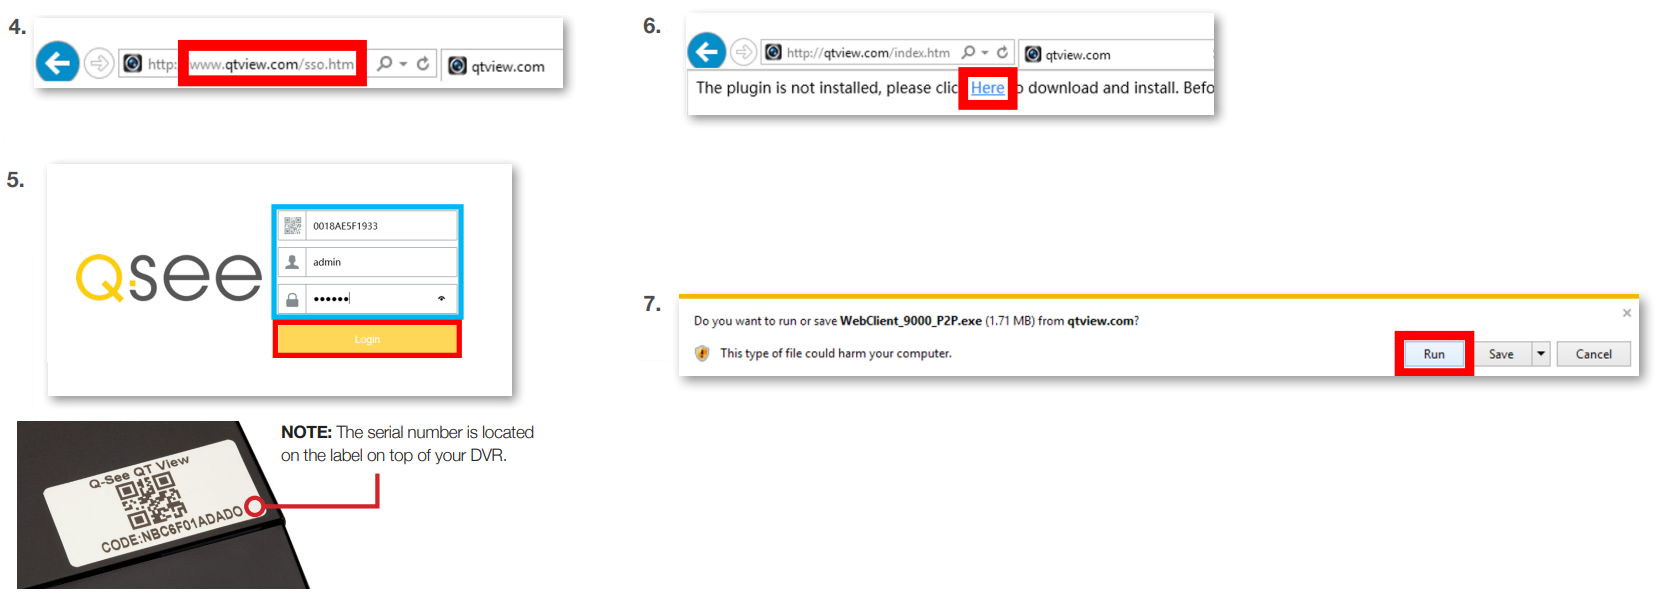
- If https://www.QTView.com does not load properly, or the screen remains blank after loading, enter the address https://www.qtview.com/sso.htm in the address bar.
- Enter the Serial Number, Username, and Password for your system and click Login.
- You will be prompted to install a plugin. Click Here to download the plugin.
The prompt for the download will appear at the bottom of your browser. Click Run.
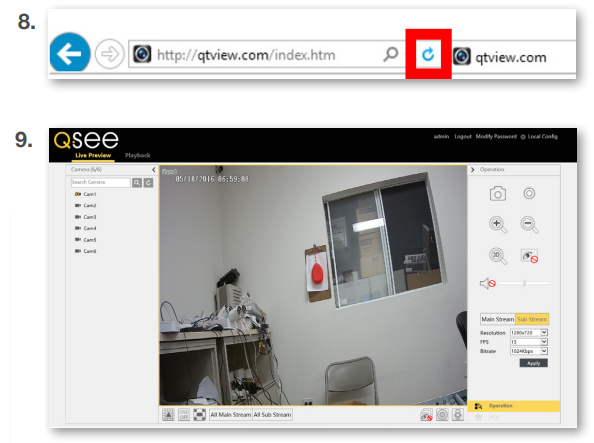
- Once the plugin has been installed, click Refresh or press F5 on your keyboard.
Access to your cameras will automatically appear once the page reloads.
Using QT View on a Mac With Safari
Safari is the only supported browser on OS X.
- Open the Safari browser and go to www.QTView.com
Enter the Serial Number, Username, and Password for your system and click Login.
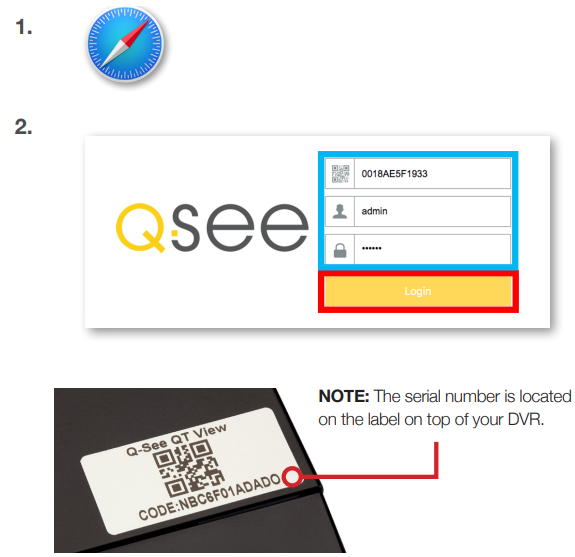
- You will be prompted to install a plugin. Click Here to download the plugin.
- The plugin will appear in the “Downloads” of your browser. Click the Downloads button. Double-click NVMS9000.pkg to begin the installation.
NOTE: If you see a message that the file is from an uniden-tified developer, click OK and refer to answer ID 2634 at https://www.q-see.com/support for info on allowing installations from unidentified developers. - An installation window for NVMS9000 will appear. Click Continue to proceed and then click Install.
You may be prompted to enter the Password to your computer. Once completed, click Install Software.
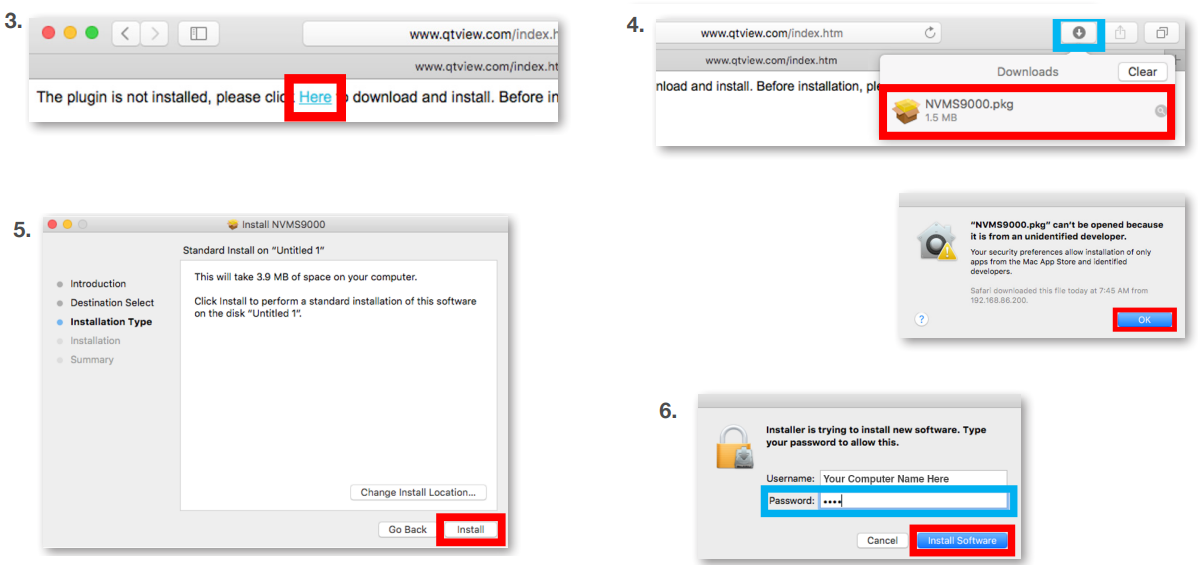
- Once the installation is successful, click Close.
- Safari must be restarted before proceeding. Click Safari in the Menu Bar. Click Quit Safari.
- Open the Safari browser again and go to www.QTView.com
Enter the Serial Number, Username, and Password for your system and click Login.
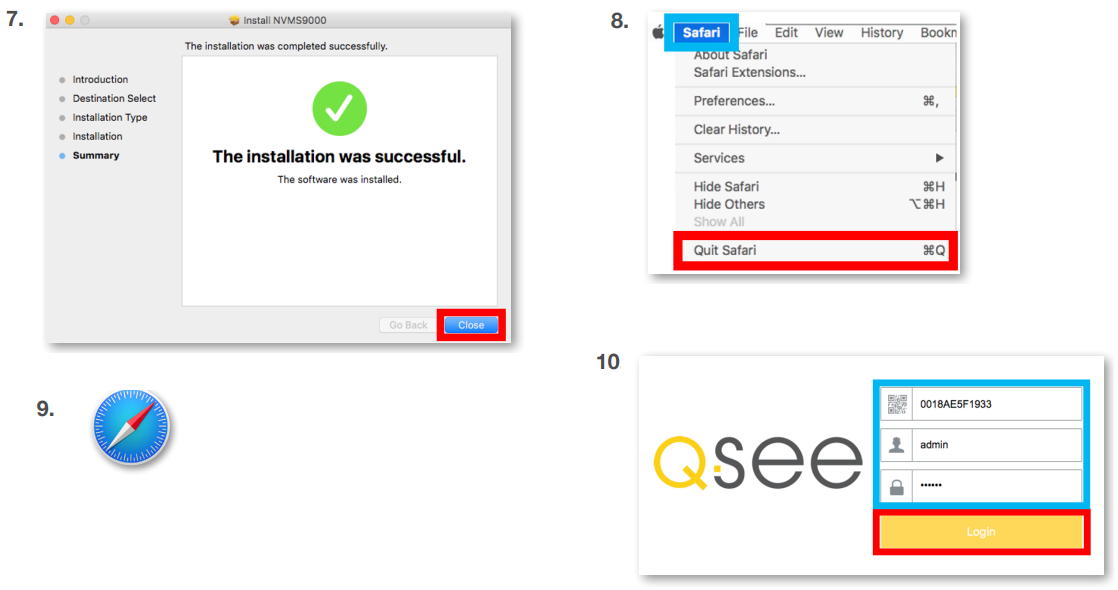
- A prompt to trust NVMS9000 Plug-in will appear. Click Trust.
- Wait a moment for the connection to your recorder to be established and for the camera feed to appear. Click Main Stream to view in High Quality. Viewing your cameras in high quality will require a fast data connection and will result in higher data usage.
Please be patient while the stream refreshes.
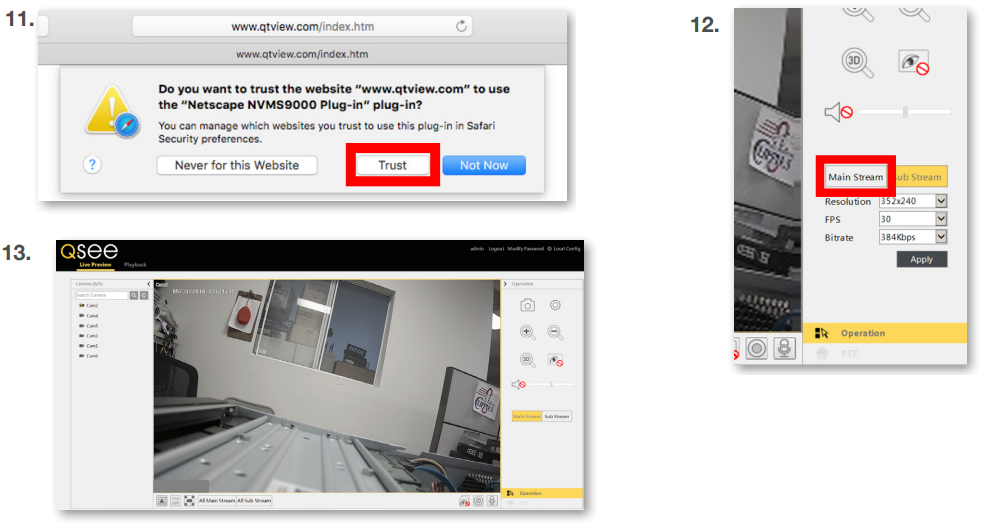
NOTE: High Quality Streaming may cause your network to slow, or cause your browser to become unresponsive if your network speed is insufficient.
Using the QT View Windows Desktop App
- Go to www.QTView.com and click the link below the login screen to download the Windows software.
- Follow the on-screen instructions to install the program after accepting the license terms.
- Launch the program by double clicking the QT View icon on your desktop.
- Create a user name and password for the program. These credentials do not need to be the same as those on the DVR, and are independent.
- Log into QT View using the credentials you created.
- Select the computer hard drive you want to use to save video.
- Click the Control Panel tab in the upper left corner of the screen then click Device.
Click Add Device.
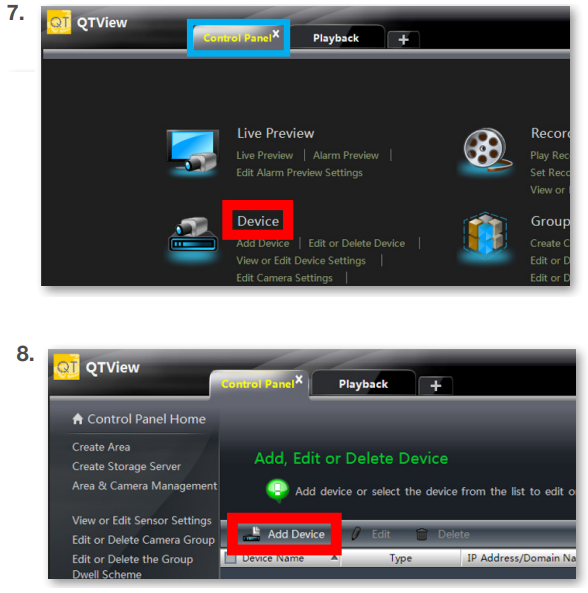
- Click Manually Add in the Add Device window.
- Click in the IP/Domain/Serial Number field for the New Device.
Click on Serial Number from the drop down options.
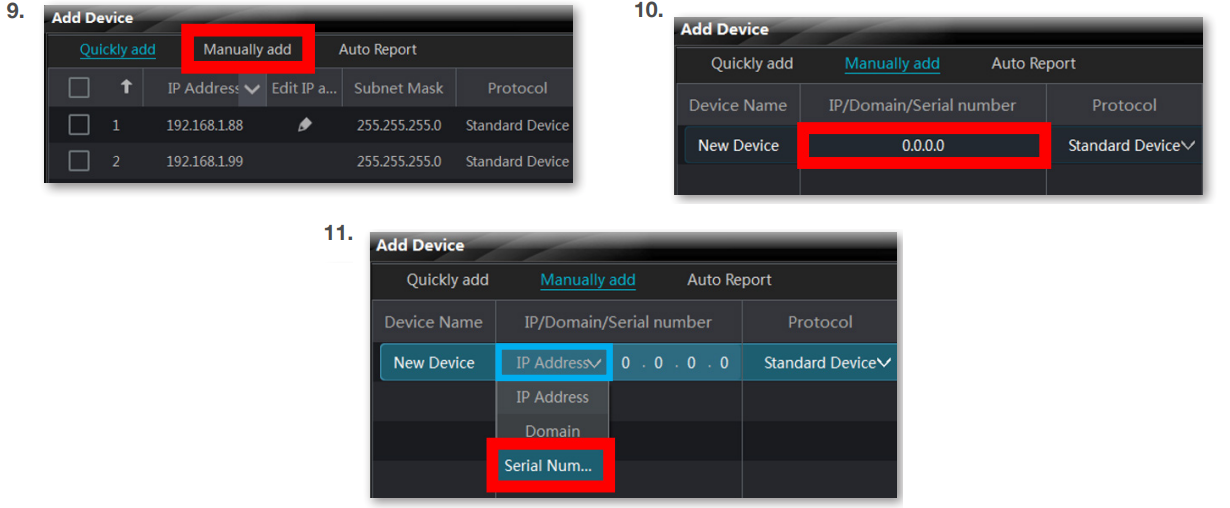
NOTE: QT View can scan your network to automatically search for DVRs. Please note that using this option to connect automat-ically will mean that your computer will need to be connected to the same network as your DVR to view camera feeds. Visit
https://www.q-see.com/support for more information.- Enter the serial number for your system. If the Username and/or Password for the system has been changed, enter them now. Otherwise, enter the default username and password. Default credentials: Username: admin Password: 123456
- Click Add.
Click on Control Panel Home in the top left corner.
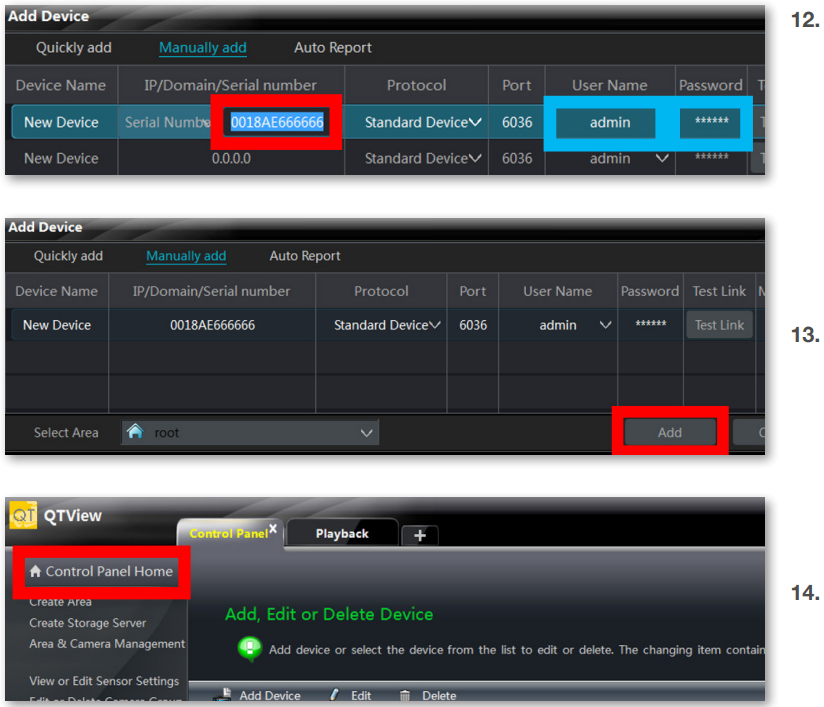
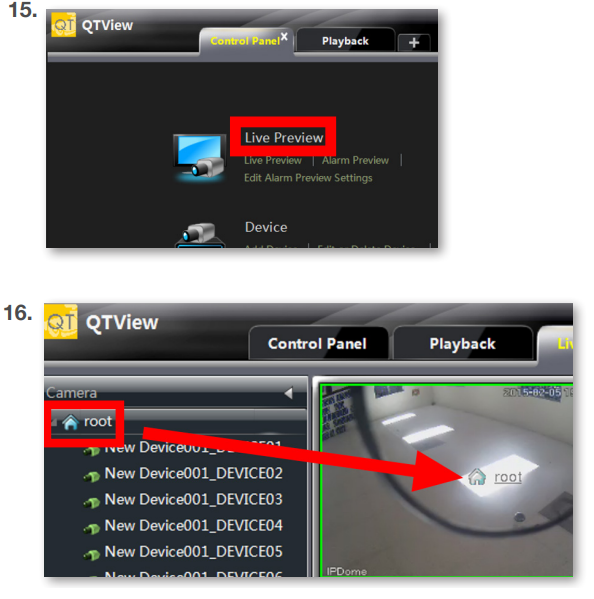
- Click on Live Preview.
Click and drag root into a blank square. The cameras will automatically load.
Video Search, Playback and Backup
Your DVR records video captured by your cameras to its internal hard drive. These records can be accessed by selecting Search and Save in the pull-up menu. You can search for video that was recorded during a certain time, by type of recording,
and by reviewing snapshots of recordings.

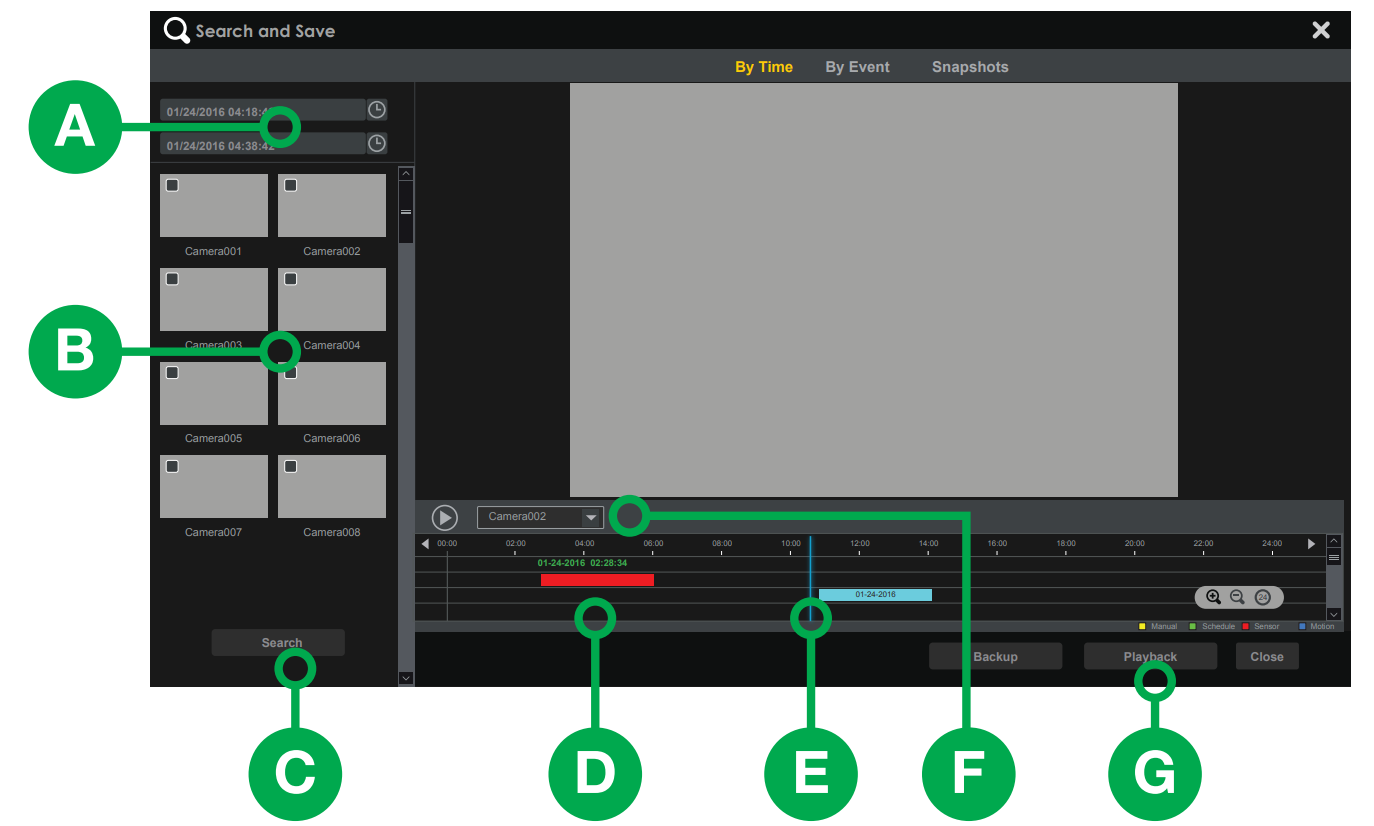
Search by Time: This is the best way to search one or more cameras to identify an incident.
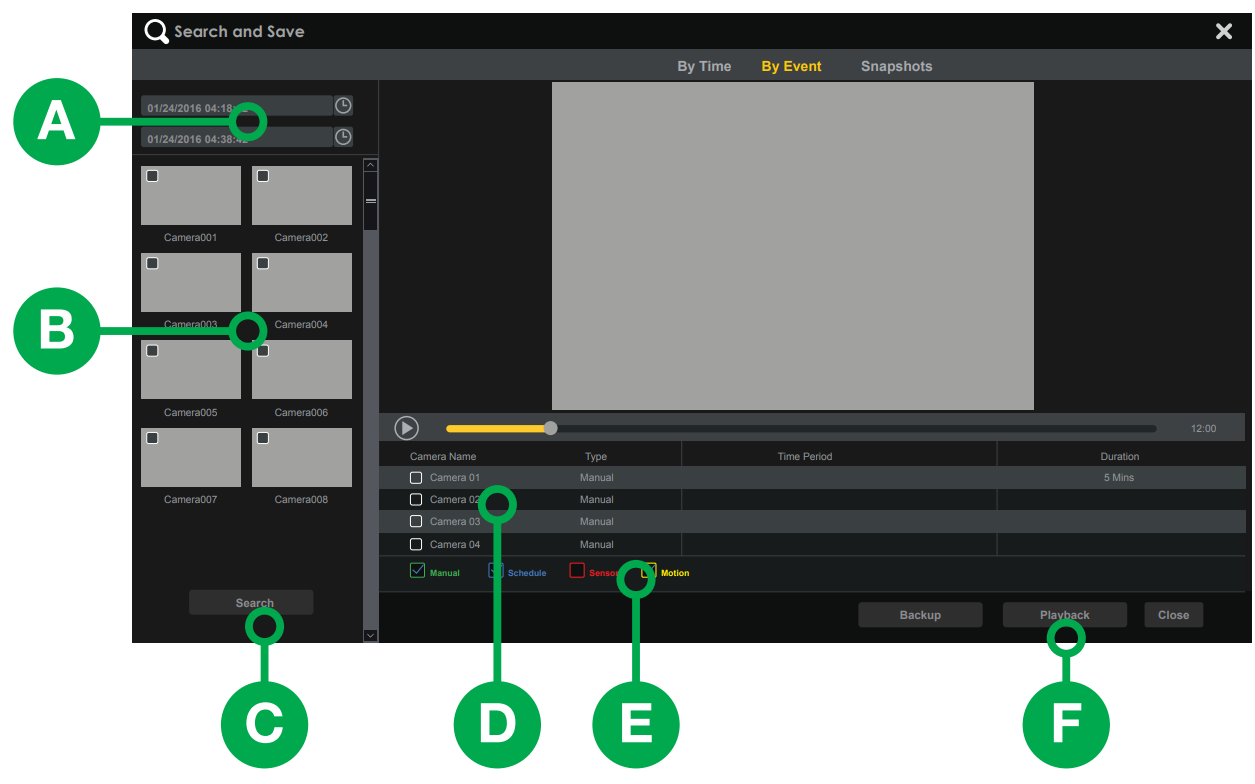
Search by Event: This allows you to search through incidents which the system has flagged, one camera at a time.
More info on these recording functions are included in the next section.
Search by Time
- Set the start and end times of your search.
- Select which camera(s) to search.
- Click Search.
- Video recorded during the search period will appear as color-coded bars, showing the time and duration.
Playback (Single Camera) - Click on the timeline where you want playback to start. The blue time marker will snap to position.
- Select a channel in the pull-down and Press
 .
. NOTE: Pressing Playback (G) will open full screen mode showing video from multiple cameras. Functions operate as described above. Press
 to back up files.
Backup
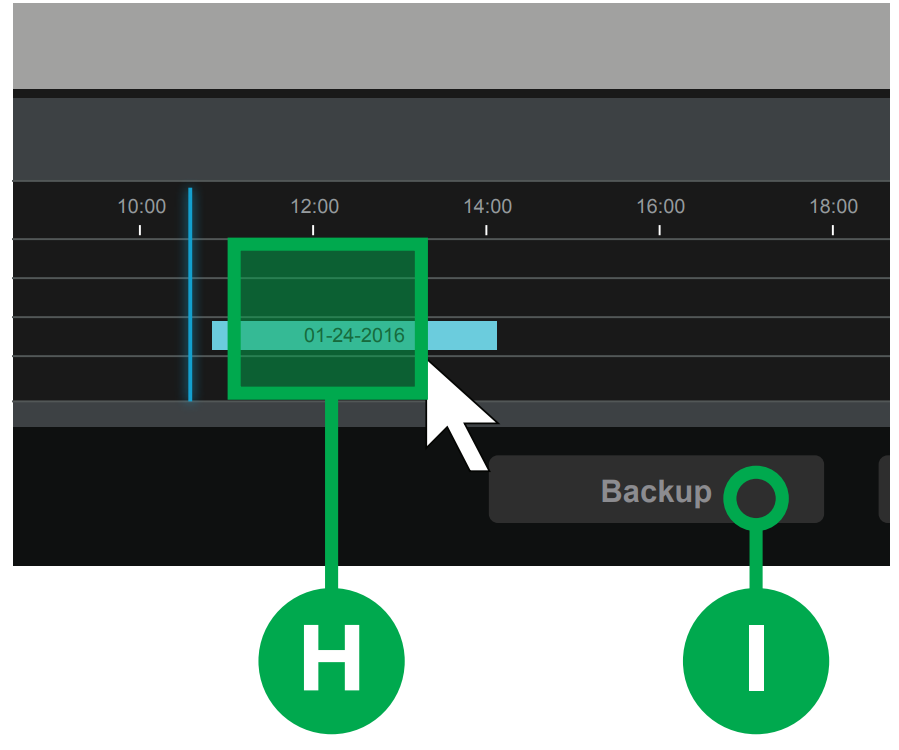
- Click and drag on the timeline to select the video(s) to back up.
Press Backup. Insert a USB flash drive into the port on the front of the DVR and follow the on-screen instructions
Search by Event
- Set the start and end times of your search.
- Select which camera(s) to search.
- Click Search.
- Video recording during the search period will appear in a list.
- Refine your search by selecting the type of event. Playback
- Select a file to view and press Playback.
NOTE: Video events will play back one at a time. Pressing Playback will change to full-screen mode.
Backup - Select the file(s) you want to backup.
Press Backup. Insert a USB flash drive into the port on the front of the DVR and follow the on-screen instructions.
Setup Guide
Setting up the HD Camera & DVR Bundle is relatively straightforward:
- Unpack and Assemble: Carefully unpack all components and assemble the cameras and DVR according to the provided instructions.
- Connect Cameras: Connect the cameras to the DVR using the supplied cables or configure wireless settings if applicable.
- Configure DVR: Set up the DVR by following the on-screen instructions for date/time settings, recording schedules, and motion detection alerts.
- Install Mobile App: Download and install the mobile app to enable remote viewing and alerts.
- Test System: Test all cameras and the DVR to ensure proper functioning before finalizing the setup.
Get the Most Out of Your Q-See Cameras
Follow these tips to maximize the life and performance of your cameras.
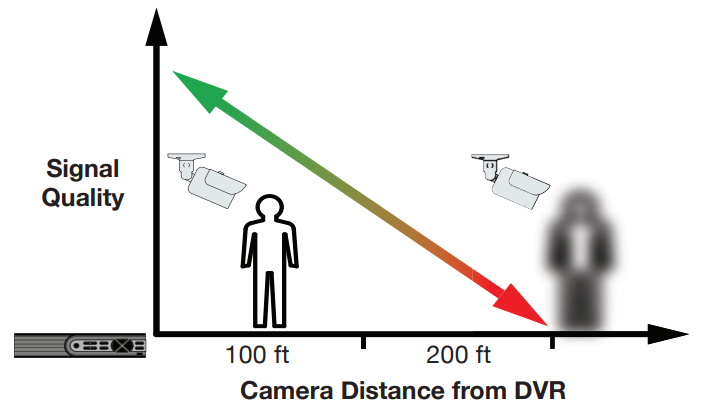
Distance From Viewing/Recording Device
Walls & floors will affect signal strength, especially concrete.
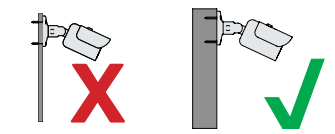
Mounting Surface Thickness
Mount your camera on a wall that is at least 2.5" thick.
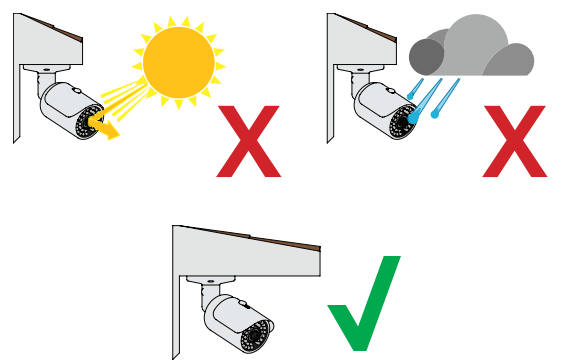
Avoid direct exposure to weather
Mount your camera under an eave or awning if possible.
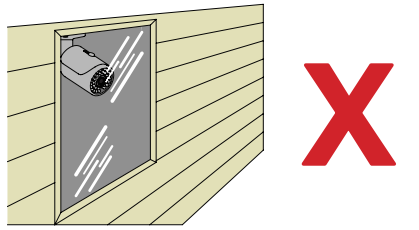
Do not place camera behind a window
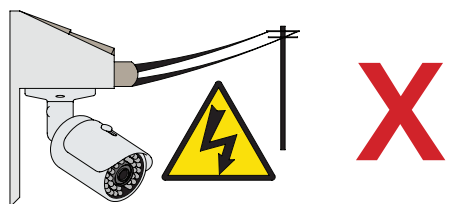
Do not place near high-voltage wires or other sources of electrical interference
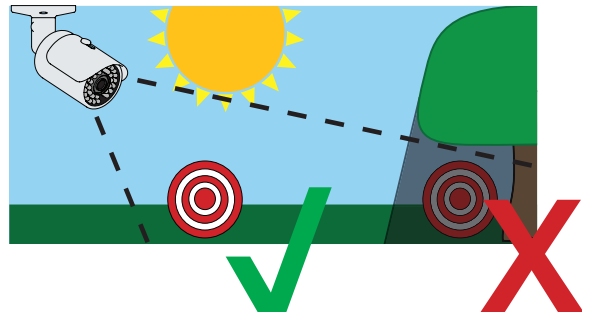
Light levels should be approximately the same between camera and target area
Consistent lighting conditions will provide optimal camera performance.
Legal Considerations
Always check state and local laws before installing cameras. (2011 NEC 820.44)
Troubleshooting
Testing for Power and Night Vision
After you connect your camera to the DVR and power, if you do not see a video image on screen and your DVR does not display a “video loss” message, you should test your camera to ensure it is properly connected.
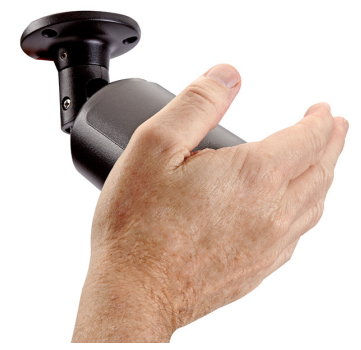
- With your camera(s) still connected to power, cover the lens end of your camera with your hand or an object to completely block it.
- Keep the lens blocked for 10 seconds. You should see a faint red glow from the infrared LEDs. This indicates that your camera has power and is working properly.
If you still do not have a video signal from the camera, ensure that the video cable is properly connected to both the camera and the DVR as shown in Step 2 on page 5.
Other Tests
- Connect the camera to a cable that has a working camera attached. If the camera works, the cable will need to be replaced through the RMA process and you can visit www.q-see.com/support for more info.
- Connect the cable to a different channel on the DVR. If you see video, then the culprit is a bad channel input and the DVR will need to be replaced through RMA.
Advanced troubleshooting and information is all available on our website at: www.q-see.com/support
Glossary
- BNC: Bayonet Neill–Concelman connector is a miniature quick connect/disconnect radio frequency connector used for coaxial cable.
- CVBS/Spot Out Adapter: Converts from CVBS fitting to composite RCA fitting.
- DVR (Digital Video Recorder): Cameras connect directly to the recorder using BNC connections.
- IP (Internet Protocol): IP devices communicate with each other via a local network or over the Internet.
- Language: This is the language the DVR will use.
- Local IP Address: The DVR’s address on your local area network (LAN).
- NTP (Network Time Protocol): This maintains the accuracy of the DVR’s clock. Check the box to turn on.
Warranty
Q-See is always here to answer your questions and take your valued suggestions. Our focus is providing excellent customer support and always working to improve our customers’ experience.
Visit www.q-see.com/support for 24/7 support and access to our online Support Portal.
Qsee HD Camera & DVR Bundle QTH87 Pros & Cons
Pros:
- High-Quality Video: 1080p HD resolution provides clear video footage.
- Durable Cameras: Weather-resistant design suitable for outdoor use.
- Easy Setup: User-friendly setup process with clear instructions.
- Remote Viewing: Mobile app allows for remote access and alerts.
- Affordable: Competitive pricing compared to similar security systems.
Cons:
- Storage Limitations: May require periodic storage cleanup or additional storage devices.
- Internet Dependency: Remote access requires a stable internet connection.
- Complex Configuration Options: Some advanced settings may be confusing for novice users.
Customer Reviews
Customers have generally praised the Qsee HD Camera & DVR Bundle QTH87 for its ease of use and high-quality video. However, some users have noted that the system's storage capacity can fill up quickly if not managed properly. Here are some common complaints:
- Storage Management Issues: Users need to regularly manage recorded footage to avoid running out of space.
- Occasional Connectivity Issues: Some users have reported occasional drops in connectivity between cameras and the DVR.
Faqs
What is the resolution of the cameras in the Qsee HD?
How many cameras come with the Qsee HD Camera & DVR Bundle?
Does the QTH87 bundle support wireless connectivity?
How do I set up motion detection alerts on my Qsee HD Camera & DVR Bundle system?
Can I view live footage remotely using my mobile device?
What type of storage does the DVR use?
Are the cameras in the QTH87 bundle weather-resistant?
How do I update the firmware on my Qsee HD Camera & DVR Bundle QTH87 system?
What should I do if one of my cameras is not detecting motion?
Leave a Comment
