How to Connect: Radio Shack Digital Photo Viewer 63-1078 User Guide
Content
Introduction of Radio Shack Digital Photo Viewer 63-1078
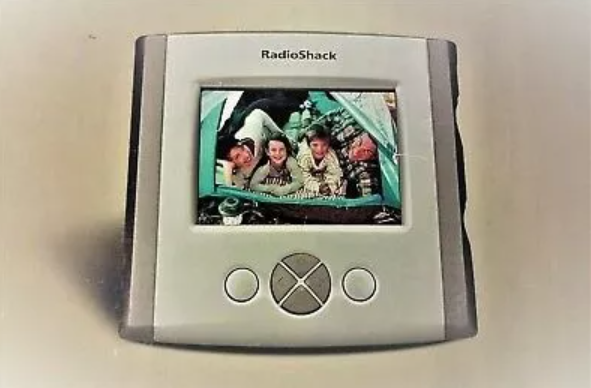
Radio Shack Digital Photo Viewer 63-1078 is a classic device that allows you to view and enjoy your cherished memories in the form of slides. This product is perfect for those who have a collection of 35mm slides and are looking for a convenient way to view them. With an estimated price of around $50-60 and a launch date in the early 2000s, this photo viewer is a must-have for any slide collector.
What's Included
This document
The digital photo viewer
A USB A–B cable
A TV output cable
An AC adapter
A CD driver (Win 98SE only)
Detailed Specifications
Radio Shack Digital Photo Viewer 63-1078 has the following key features:
- Compatible with 35mm slides
- Built-in 14-watt bulb for bright, clear images
- Manual focus control
- 10x zoom capability
- Automatic slide advancement
- Forward and reverse slide selection
- Adjustable speed control
- Takes 100-slide trays (4x4 inches)
Description
The Radio Shack Digital Photo Viewer 63-1078 is a compact and easy-to-use device that provides a convenient way to view your 35mm slides. The built-in 14-watt bulb ensures bright and clear images, while the manual focus control allows you to adjust the focus to your liking. With the 10x zoom capability, you can get up close and personal with your photos, making it perfect for detailed inspections of your slides. The automatic slide advancement feature makes viewing your slides a breeze, while the forward and reverse slide selection allows you to go back and revisit your favorite memories. The adjustable speed control allows you to set the pace of your slide show, giving you complete control over your viewing experience.
Radio Shack Digital Photo Viewer 63-1078 Power
You can power the viewer from any standard AC outlet using the supplied AC adapter.
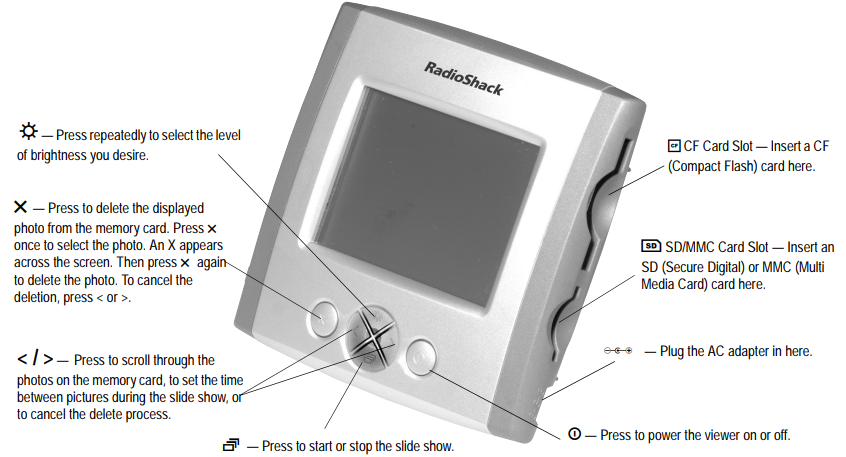
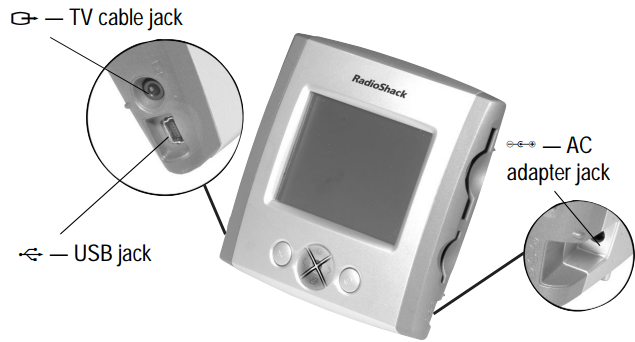
Connect the AC adapter’s barrel plug to the viewer’s jack.
Connect the adapter’s other end to a standard AC outlet. The viewer turns on automatically. Multi-colored image noise may appear briefly when the viewer comes on. This is not a malfunction.
To turn the viewer off, press 1.
CAUTION: You must use an adapter that supplies 12V DC and delivers at least 300mA. Its center tip must be set to positive and its plug must fit this digital photo viewer’s jack. The supplied adapter meets these specifications. Using an adapter that does not meet these specifications could damage the digital photo viewer or this adapter.
Placement
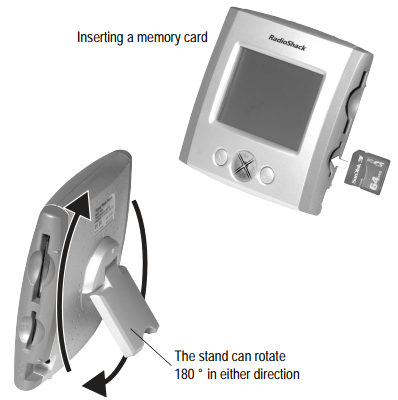
The viewer’s stand rotates 180° in either direction, so that you can place the viewer on virtually any flat surface near an AC outlet. This also allows you to place the viewer either vertically or horizontally.
Installation Memory
Viewing Photos
Repeatedly press < or > until the desired photo displays.
Slide Show
You can program the viewer to display all the photos on the memory card continuously at various intervals (10 seconds, 30 seconds, 1 minute, and 5 minutes).
To start the slide show, press
 . Three arrows (
 ) flash briefly. The photo viewer automatically displays the photos at the 10 second interval.
 To change the slide show interval, repeatedly press < or > to select the desired interval. Four flashing arrows in the display indicate the 30-second interval, five flashing arrows indicate the 1-minute interval, and six flashing arrows indicate the 5-minute interval. To stop the slide show, press
again.  flashes briefly.
Note: If you do not press any key within 12 hours, the digital photo viewer automatically shuts off.
Memory Cards
Remove the memory card from your digital camera. With the memory card’s label facing you, insert a CF card into / or a SD/MMC card into 2. The photo displays immediately. To remove the card from the slot when finished, firmly grip and pull it out of the slot.
CAUTIONS
Do not install more than one type of memory card at one time while the viewer is connected to a computer.
Before removing a memory card while the viewer is connected to the computer, open "My Computer". Right-click the memory card's drive. Select "Eject" from the menu. Then you may safely remove the memory card from the viewer.
The viewer displays only one memory card’s photos at a time. If you install both CF and SD/MMC cards at the same time, the digital photo viewer only displays the CF card’s photos.
File Formats
If the photo’s resolution is larger than 1024 x 768 pixels, the digital photo viewer needs a little longer time to display it.
The image file name must be saved as xxxxaaaa.jpg. xxxx stands for 4 letters or numbers, and aaaa stands for 4 numbers. The image file could be saved as dog00001.jpg, book1234.jpg, or 12345678.jpg. For example, if you took a photo for your dog, you could name the file dog00002.jpg. If your image file name does not match this format, be sure to rename it.
The image files cannot be edited by other image programs or downloaded from the website. If they are, read the images through MS Paint and re-save them in the xxxxaaaa.jpg format. No file name should duplicate the numeric portion of another file. For example, if you name one file dogs0002.jpg and another file rock0002.jpg, one or both JPEGs may not display.
The image file must be a JPEG image captured by the digital camera, and its resolution should be less than 3072 x 2048 (6 mega) pixels.
Viewing Photos from a TV
Connect the supplied TV cable’s black plug to the 5 jack at the left side of the digital photo viewer, and the yellow plug at the cable’s other end to the TV’s video input jack. The digital photo viewer’s display becomes blank.
Set your TV’s input to video.
Press < or > to view a single photo, or 4 to view the slide show.
Connecting to Your PC
Windows ME/2000/XP
Notes
The USB cable fits only one way. If it does not fit, do not force it. Turn it over and try again.
Refer to your computer’s owner’s manual for the location of the USB port.
Start Windows ME, 2000, or XP, and quit all applications.
Insert a CF or SD/MMC memory card into its slot.
Connect the USB cable’s small plug to the digital photo viewer’s jack, and the large plug to the computer’s USB port. The photo viewer’s display becomes blank, and the computer installs automatically.
Windows 98SE
Start Windows 98SE, and quit all applications.
Insert the supplied CD into your CD-ROM drive.
Connect the USB A-B cable’s small plug to the digital photo viewer’s jack, and the large plug to the computer’s USB port. The “Add New Hardware Wizard” screen displays. Click “Next”.
Windows is preset to search for the best driver for your digital photo viewer. Click “Next”.
Check “CD-ROM drive” from the screen, and then click “Next”.
Windows is searching and installing E:\UMSS>INF driver for the digital photo viewer. Click “Next”.
When Windows completes the installation, click “Finish”.
Transferring Files
The digital photo viewer also can work as a card reader/writer to let you transfer any format of files from the memory card to your computer, and vice versa. For example, if you need to free some memory for taking other photos, you can transfer the photo’s files from the memory card to your PC for backup. Any time you need them, move back the photo’s files from PC to the memory card.
Open “Windows Explorer”. Then double-click “My Computer” and “E: Removable Disk” until the “DCIM” folder appears.
Double-click “DCIM”. Its sub-folder like “100MEDIA” or “1xxxxxx” appears. Then double-click that sub-folder. All files stored in your memory card appear.
Note: The sub-folder is named by the camera you use. It usually shows as 100MEDIA, 100xxxx, or 200xxxx,…etc. To transfer files from your PC to the memory card, drag and drop files from your computer to the designated directory :\DCIM\sub-folder. To transfer files from the memory card to your PC, drag and drop files from the designated directory :\DCIM\sub-folder to your PC’s any folder.
Setup Guide
To operate the Radio Shack Digital Photo Viewer 63-1078, follow these steps:
- Insert the 35mm slides into the slide tray (4x4 inches).
- Slide the tray into the photo viewer.
- Turn on the power switch. 4. Use the focus control knob to adjust the focus to your liking.
- Use the zoom control to zoom in or out.
- Use the slide advancement control to move to the next slide.
- Use the forward and reverse slide selection buttons to move back or forward.
- Use the speed control to adjust the pace of your slide show.
Troubleshooting
If you encounter any problems with your Radio Shack Digital Photo Viewer 63-1078, try the following solutions:
- If the slides are not advancing, check to make sure the tray is inserted properly.
- If the image is not in focus, adjust the focus control knob.
- If the bulb is not working, replace it with a new 14-watt bulb.
- If the slide viewer is not turning on, check to make sure the power cord is properly plugged in.
One Year Warranty
This product is warranted by RadioShack against manufacturing defects in material and workmanship under normal use for one (1) year from the date of purchase from RadioShack company-owned stores and authorized RadioShack franchisees and dealers.
Pros & Cons about Radio Shack Digital Photo Viewer 63-1078
Pros
- Easy to use
- Compact and portable
- Provides bright and clear images
- Allows for detailed inspections of slides
- Automatic slide advancement
- Forward and reverse slide selection
- Adjustable speed control
Cons
- Only compatible with 35mm slides
- No digital output option
- 100-slide capacity may be limiting for some users
Faqs
How do I power the Radio Shack Digital Photo Viewer 63-1078 viewer?
What types of memory cards are supported by this Radio Shack Digital Photo Viewer 63-1078?
How do I start a slideshow on the Radio Shack Digital Photo Viewer 63-1078?
What file format and naming convention should I use for my Radio Shack Digital Photo Viewer 63-1078?
What should I do if my photos are not displaying on the Radio Shack Digital Photo Viewer 63-1078?
How do I remove a memory card safely while the Radio Shack Digital Photo Viewer 63-1078 is connected to a computer?
What should I do if the Radio Shack Digital Photo Viewer 63-1078 shows multi-colored image noise when turned on?
How do I transfer photos from the photo Radio Shack Digital Photo Viewer 63-1078 to my computer?
What should I do if the Radio Shack Digital Photo Viewer 63-1078 does not turn on?
How often do I need to replace the bulb in the Radio Shack Digital Photo Viewer 63-1078?
Leave a Comment