
Initial Set-up: Samsung 6 Series Smart LED User Manual
Content
Samsung 6 Series Smart LED
Introduction
The Samsung 6 Series Smart LED offers an immersive viewing experience with its advanced features and stunning picture quality. With its sleek design and smart functionality, it is the perfect addition to any home entertainment setup.
Instructions
- Connect the power cord to the TV and plug it into a power outlet.
- Connect your external devices,, such as a cable/satellite box, gaming console, or Blu-ray player,, to the TV using HDMI cables.
- Turn on the TV and follow the on-screen instructions to complete the initial setup.
- Use the remote control to navigate through the TV's menu and settings.
- Access various smart features, apps, and streaming services by connecting the TV to your home Wi-Fi network.
- Adjust the picture and sound settings according to your preferences for an optimal viewing experience.
- Refer to the user manual for detailed instructions and troubleshooting tips.
TV Installation
Mounting the TV on a wall
Warning: If you mount this TV on a wall, follow the instructions exactly as set out by the manufacturer. Unless it is correctly mounted, the TV may slide or fall and cause serious injury to a child or adult and serious damage to the TV.
You can mount the TV on the wall using a wall mount kit (sold separately).
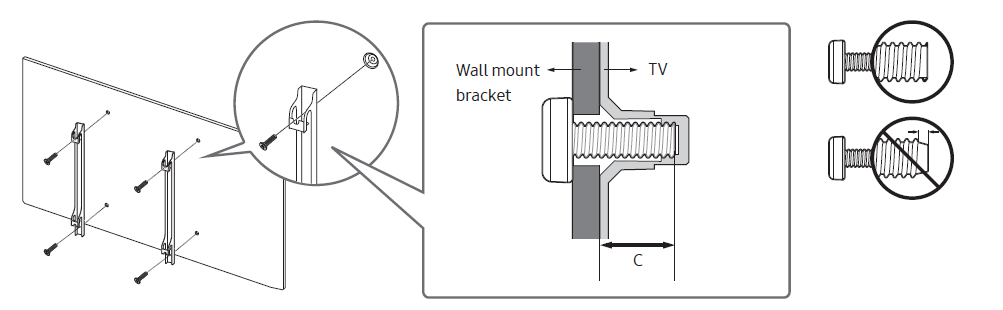
- Samsung Electronics is not responsible for any damage to the product or injury to yourself or others if you choose to install the wall mount on your own.
- To order the wall mount kit, contact Samsung Customer Care at 1-800-SAMSUNG (1-800-726-7864).
- You can install your wall mount on a solid wall perpendicular to the floor. Before attaching the wall mount to surfaces other than plasterboard, contact your nearest dealer for additional information. If you install the TV on a ceiling or slanted wall, it may fall and result in severe personal injury.
- When installing a wall mount kit, we recommend you fasten all four VESA screws.
- If you want to install a wall mount kit that attaches to the wall using only two top screws only, be sure to use a Samsung wall mount kit that supports this type of installation. (You may not be able to purchase this type of wall mount kit, depending on the geographical region.)
- Standard dimensions for wall mount kits are shown in the table below.
If you are installing a third-party wall mount, note that the length of the screws you can use to attach the TV to the wall mount is shown in column C in the table below.
Note: Do not install your wall mount kit while your TV is turned on. This may result in personal injury from electric shock.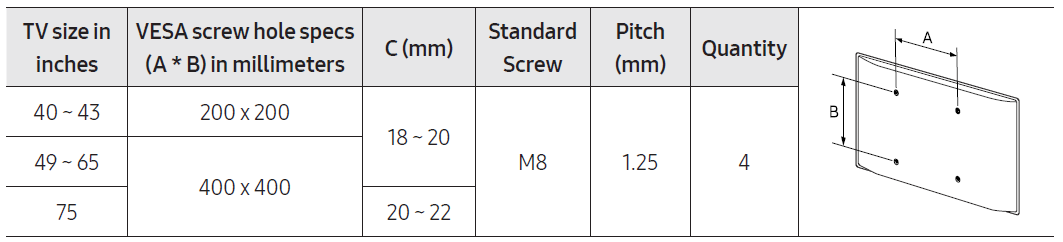
- Do not use screws that are longer than the standard dimension or do not comply with the VESA standard screw specifications. Screws that are too long may cause damage to the inside of the TV set.
- For wall mounts that do not comply with the VESA standard screw specifications, the length of the screws may differ depending on the wall mount specifications.
- Do not fasten the screws too firmly. This may damage the product or cause the product to fall, leading to personal injury. Samsung is not liable for these kinds of accidents.
- Samsung is not liable for product damage or personal injury when a non-VESA or non-specified wall mount is used or when the consumer fails to follow the product installation instructions.
- Do not mount the TV at more than a 15-degree tilt.
- Always have two people mount the TV onto a wall.
Providing proper ventilation for your TV
When you install your TV, maintain a distance of at least 4 inches between the TV and other objects (walls, cabinet sides, etc.) to ensure proper ventilation. Failing to maintain proper ventilation may result in a fire or a problem with the product caused by an increase in its internal temperature. When you install your TV with a stand or a wall mount, we strongly recommend you use parts provided by Samsung Electronics only. Using parts provided by another manufacturer may cause difficulties with the product or result in injury caused by the product falling.
The Samsung Smart Remote
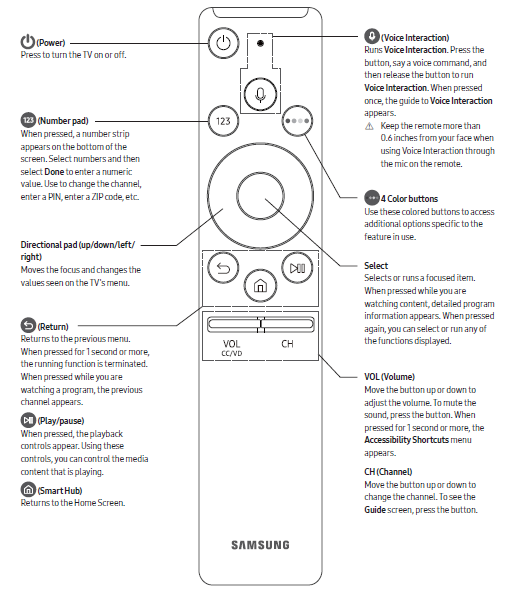
Pairing the TV to the Samsung Smart Remote
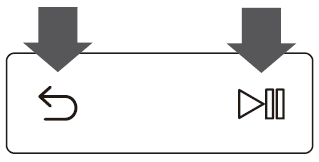
When you turn on the TV for the first time, the Samsung Smart Remote pairs with the TV automatically. If the Samsung Smart Remote does not pair to the TV automatically, point it at the remote control sensor of the TV, and then press and hold the buttons labeled as shown in the figure on the left simultaneously for 3 seconds or more.
Installing batteries into the Samsung Smart Remote
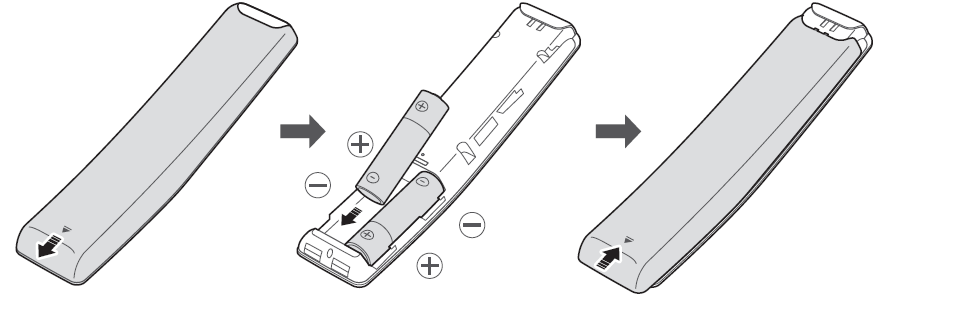
To install the batteries, push the rear cover open in the direction of the arrow, and then insert the batteries as shown in the figure. Make sure that the positive and negative ends are facing in the correct direction. Alkaline batteries are recommended for longer battery life.
Initial Setup
When you turn on your TV for the first time, it immediately starts the Initial Setup. Follow the instructions displayed on the screen and configure the TV's basic settings to suit your viewing environment.
Using the TV Controller
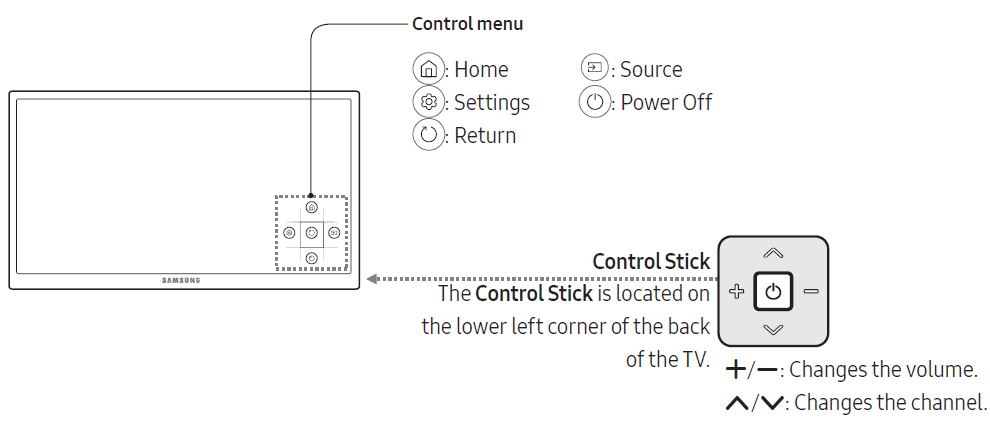
You can use the TV Controller on the back of the TV instead of the remote control to control most of the functions of your TV. While watching TV or cable TV, you can change the channel or adjust the volume by pressing the Control Stick. When using Smart Hub, the TV's menu, or selecting a source, move the Control Stick up, down, left, or right to move the cursor. Press the Control Stick to select or activate the item highlighted by the cursor.
Specifications and Other Information
Specifications
| Model Name | Display Resolution | Screen Size | Sound (Output) | Dimensions (WxHxD) Body | Dimensions (WxHxD) With Stand | Weight Without Stand | Weight With Stand |
|---|---|---|---|---|---|---|---|
| UN40MU6300 | 3840 x 2160 | 40" Class | 20W | 36.1 x 21.1 x 2.5 inches | 36.1 x 23.5 x 11.3 inches | 17.0 lbs | 19.2 lbs |
| UN43MU6300 | 3840 x 2160 | 43" Class | 20W | 38.4 x 22.4 x 2.5 inches | 38.4 x 25.1 x 11.3 inches | 19.0 lbs | 21.2 lbs |
| UN49MU6300 | 3840 x 2160 | 49" Class | 20W | 43.6 x 25.5 x 2.1 inches | 43.6 x 27.9 x 12.2 inches | 27.1 lbs | 30.0 lbs |
| UN50MU6300 | 3840 x 2160 | 50" Class | 20W | 44.4 x 25.8 x 2.5 inches | 44.4 x 28.5 x 12.2 inches | 25.4 lbs | 28.7 lbs |
| UN55MU6300 | 3840 x 2160 | 55" Class | 20W | 48.9 x 28.3 x 2.5 inches | 48.9 x 31.0 x 12.2 inches | 33.7 lbs | 36.4 lbs |
| UN65MU6300 | 3840 x 2160 | 65" Class | 20W | 57.6 x 33.2 x 2.5 inches | 57.6 x 35.7 x 14.5 inches | 51.8 lbs | 56.7 lbs |
| Model Name | Display Resolution | Screen Size | Sound (Output) | Dimensions (WxHxD) Body | Dimensions (WxHxD) With Stand | Weight Without Stand | Weight With Stand |
|---|---|---|---|---|---|---|---|
| UN75MU6300 / UN75MU630D | 3840 x 2160 | 75" Class | 20W | 66.5 x 38.2 x 2.6 inches | 66.5 x 41.4 x 15.2 inches | 77.6 lbs | 85.5 lbs |
Environmental Considerations
| Parameter | Specification |
|---|---|
| Operating Temperature | 50°F to 104°F (10°C to 40°C) |
| Operating Humidity | 10% to 80%, non-condensing |
| Storage Temperature | -4°F to 113°F (-20°C to 45°C) |
| Storage Humidity | 5% to 95%, non-condensing |
Notes
- Design and specifications are subject to change without prior notice.
- This device is a Class B digital apparatus.
- For information about the power supply, and more information about power consumption, refer to the label rating attached to the TV.
- Typical power consumption is measured according to Energy Star Program requirements for televisions.
- Your TV and its accessories may look different than the product images presented in this manual, depending on the model.
- All drawings are not necessarily to scale. Some dimensions are subject to change without prior notice. Refer to the dimensions before installing your TV. Not responsible for typographical or printed errors.
- To connect a LAN cable, use a CAT 7 (*STP type) cable for the connection.
- Shielded Twist Pair
Dimensions
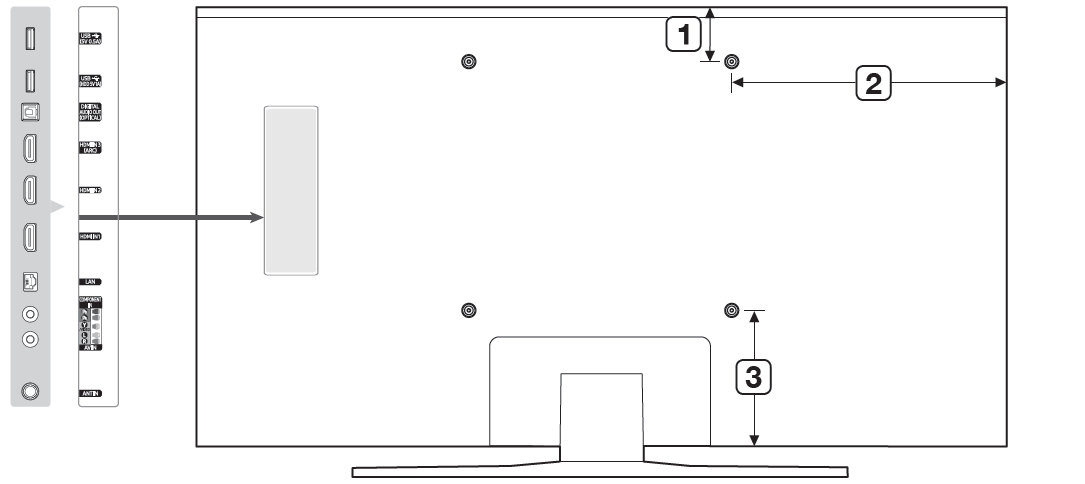
Port panel detail / Rear view
Basic Troubleshooting Guide
TV Won’t Turn On
Possible Causes:
- The power cable is loose or damaged
- Faulty wall socket or surge protector
- Internal power board issue
Fix:
- Unplug the TV for 1 minute, then plug it directly into a wall socket (no extension).
- Check power indicator — if the red light blinks or stays off, test another outlet.
- If still dead, hold the Power button on the remote for 10 seconds to reset.
- If nothing works — likely power supply board issue → needs technician service.
No Picture / Black Screen (Sound Works)
Possible Causes:
- HDMI cable is loose or faulty
- Wrong input source
- Backlight or T-CON board issue
Fix:
- Press Source on remote → select the correct HDMI input.
- Check that all cables are tightly connected.
- Try another device (like a DVD player) to confirm input works.
- Shine a flashlight close to the screen — if you see a faint image → backlight failure (needs service).
No Sound / Audio Issues
Fix:
- Go to Settings → Sound → Sound Output and ensure it’s set to “TV Speaker”.
- Try different sources (HDMI, YouTube app, USB).
- If using a Bluetooth soundbar, re-pair the device.
- Factory reset audio:
Settings → Support → Self Diagnosis → Reset Sound.
Wi-Fi / Internet Not Connecting
Fix:
- Reboot your router & TV.
- Go to Settings → General → Network → Network Status → IP Settings → Set to “Obtain Automatically.”
- If Wi-Fi still fails, connect using an Ethernet cable to test.
- Update firmware (see below).
Remote Not Working
Fix:
- Replace batteries.
- Check the IR sensor — use a phone camera to see if the remote LED blinks when pressing a button.
- Re-pair Smart Remote:
Press Return + Play/Pause together for 5 seconds.
TV Freezing or Apps Not Loading
Fix:
- Reboot TV (hold Power on the remote until the logo appears).
- Clear app cache:
Settings → Apps → Select App → Clear Cache. - Factory reset if persistent:
Settings → Support → Self Diagnosis → Reset → PIN (0000).
Care & Maintenance Tips
Cleaning the Screen
- Turn off and unplug the TV.
- Use a soft microfiber cloth (no paper towels).
- Lightly dampen with distilled water or a 50/50 mix of water + white vinegar.
- Gently wipe in circular motion.
- Avoid pressing the screen or using alcohol/ammonia cleaners.
Ventilation
- Leave at least 4 inches of space behind and around the TV.
- Keep away from direct sunlight, heaters, or moisture.
Power Protection
- Always plug the TV into a surge protector or voltage stabilizer.
- During storms, unplug the TV completely.
Software Updates
- Go to Settings → Support → Software Update → Update Now or download firmware from Samsung’s official support website.
Smart Hub Reset (for app or menu problems)
- Settings → Support → Self Diagnosis → Reset Smart Hub → Enter PIN (0000)
Factory Reset (for major issues)
- Settings → Support → Self Diagnosis → Reset → PIN (0000)
Faqs
Can I connect my smartphone to the Samsung 6 Series Smart LED?
Does the TV support streaming services like Netflix and Amazon Prime Video?
What is HDR and how does it enhance the picture quality?
Can I control the Samsung 6 Series Smart LED TV using voice commands?
How many HDMI ports are available on the Samsung 6 Series Smart LED TV?
Does the Samsung 6 Series Smart LED TV have a built-in web browser?
Can I connect a soundbar or external speakers to the Samsung 6 Series Smart LED TV?
Is the Samsung 6 Series Smart LED TV wall-mountable?
What is the screen size of the Samsung 6 Series Smart LED TV?
Does the Samsung 6 Series Smart LED TV come with a warranty?
More samsung manuals
- Samsung S20 FE G781U User Manual | Features & Settings
- How to Pair: Samsung SM-R322 Gear VR User Manual | Functions
- Setting up: Samsung SM-R323 Gear VR User Manual | Installing and wearing
- Samsung Tab S2 T810 User Manual | Settings & Configurations
- Samsung J3 Orbit S367VL User Manual | Features & Setting
- Settings & Configuration: Samsung S10e and S10+ Mobile User Manual
Leave a Comment