Samsung Galaxy Note9 N960U User Manual | Features

Content
Introduction
The Samsung Galaxy Note9 N960U is a powerful smartphone that combines cutting-edge technology with a sleek design, making it ideal for productivity and entertainment. Featuring a 6.4-inch Super AMOLED display, it delivers vibrant visuals and immersive experiences. Powered by the Qualcomm Snapdragon 845 processor and equipped with up to 512GB of storage, the Note9 offers exceptional performance and versatility. Priced at approximately $474, it stands out as a premium choice for those seeking a high-performance mobile device.
Front and back views
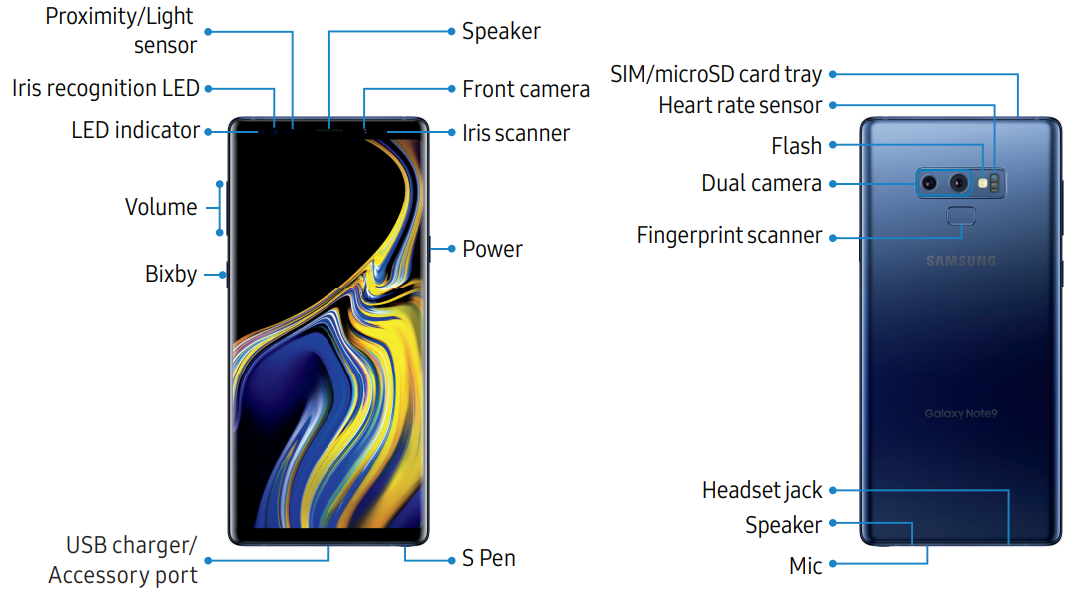
Assemble your device
Learn about your mobile device hardware, assembly procedures, and how to get started using your new device.
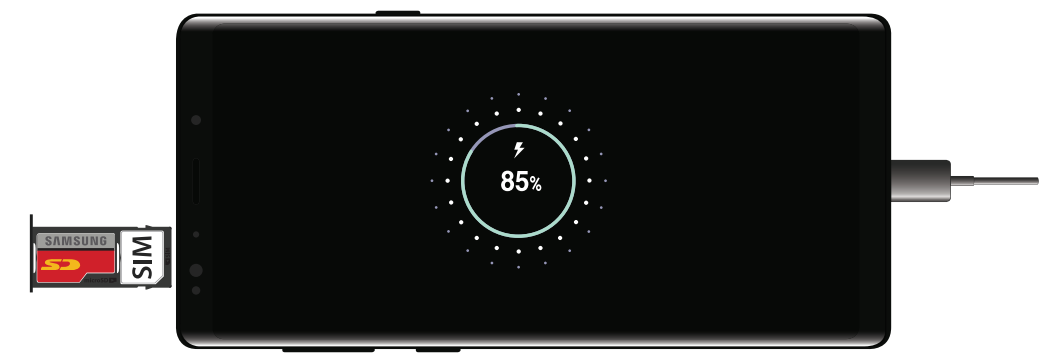
Install a SIM card and memory card
When you subscribe to a cellular network, you are provided with a SIM card. You may be able to use your previous SIM card. Contact your service provider for more details.
Warning: Small components such as SIM cards and memory cards can pose a choking risk. Please be careful when handling these cards to avoid damaging them.
You can install an optional microSD memory card (not included) to add more memory space to your device. A memory card can be installed at any time. It is not necessary to install it prior to using the device.
Charge the battery
Your device is powered by a rechargeable battery. A charger (charging head and USB Type-C cable) is included with the device for charging the battery from any standard outlet.
Note: You should dry the inside of the charging port before inserting a power connector to charge your device. If the charging port is not fully dry, your device may operate abnormally. For example, it may charge more slowly or overheat.
The battery comes partially charged. You can use the device while charging.
Caution: Use only charging devices and batteries (if applicable) that are approved by Samsung. Samsung charging devices and batteries are designed for your device to maximize battery life. Using other charging devices and batteries may void your warranty and may cause damage.
- Insert the USB Type-C cable into the USB charger/Accessory port.
- Connect the USB cable to the charging head, and then plug the charging head into a standard outlet.
- Unplug the charging head from the outlet and remove the USB cable from the device when charging is complete.
Samsung Galaxy Note9 N960U S Pen
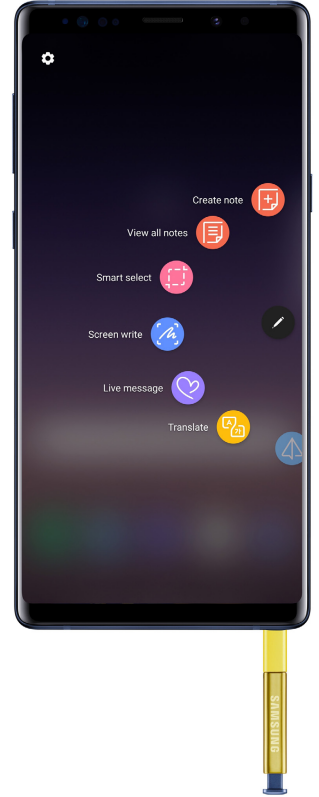
The S Pen is a stylus that assists you in performing various functions.
Note: To maintain the water-resistant and dust-resistant features of your device, make sure that the S Pen slot and opening are both maintained free of dust and water, and the pen is securely inserted prior to any exposure to liquids.
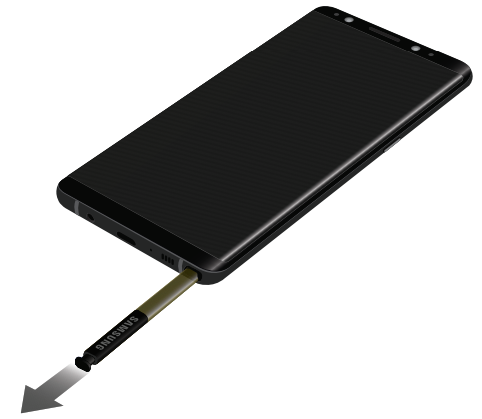
Remove the S Pen
The S Pen stores inside your device for convenient access.
- Push the S Pen inward and release it.
Slide the S Pen out the rest of the way using the notch on the end of the S Pen.
Replace the S Pen tip
You can replace the tip of the S Pen with the included kit.
Use tweezers to pull out the S Pen tip.
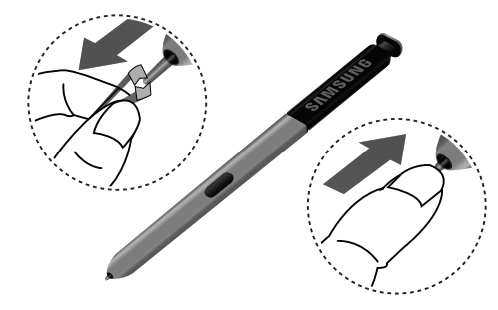
- Insert the new pen tip and press until it clicks in place.
Start using your device
The instructions below explain how to turn your device on or off.
To turn the device on:
- Press and hold the Power key until the device turns on.
To turn the device off:
- Press and hold the Power key.
- Tap Power off, and confirm when prompted.
Use the Setup Wizard
The first time you turn your device on, the Setup Wizard guides you through the basics of setting up your device. Follow the prompts to choose a default language, connect to a Wi-Fi® network, set up accounts, choose location services, learn about your device’s features, and more.
Lock or unlock your device
Use your device’s screen lock features to secure your device. By default, the device locks automatically when the screen times out.
- To lock the device:
Press the Power key. - To unlock the device:
Press the Power key, or double-tap or touch and press Home , and then drag your finger across the screen.
The default Screen lock on your device is Swipe. Choose a secure screen lock.
Add a Google account
Your new device uses your Google™ account to fully utilize its Android™ features.
- From
 Settings, tap Cloud and accounts > Accounts.
 - Tap
 Add account > Google.
Note: When you sign in to a Google account, Factory Reset Protection (FRP) is activated. FRP requires your Google account information when resetting to factory settings.
Add a Samsung account
Create a Samsung account for access to Samsung content and apps on your device.
- From
 Settings, tap Cloud and accounts > Accounts.
 - Tap
 Add account > Samsung account.
Note: To quickly access your Samsung account, tap Settings > Samsung account.
Add an email account
View and manage all of your email accounts.
- From
 Settings, tap Cloud and accounts > Accounts.
 - Tap
 Add account > Email.
Transfer data from your old device
Use Smart Switch to transfer contacts, photos, and other content from your old device. You can also use the included On-the-Go adapter to transfer content quickly and easily from your old device without installing the Smart Switch app.
Note: The USB option must be set to Media device (MTP) on the other device. Transferring content with a USB cable may increase battery consumption.
Make sure your battery is fully charged.
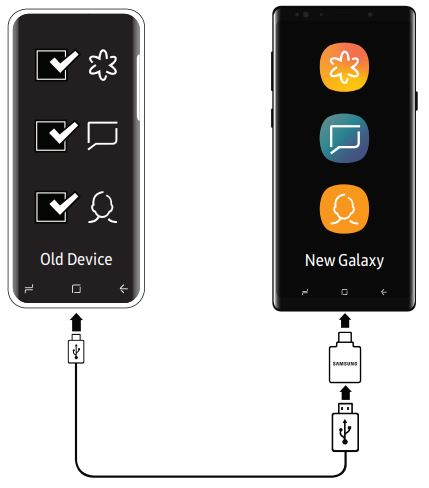
To use Smart Switch:
- From
 Settings, tap Cloud and Accounts> Smart Switch.
 - Follow the prompts and select the content to transfer.
Visit samsung.com/smartswitch for more information and to learn how to use the On-the-Go adapter to transfer content faster.
Set up your voicemail
You can access your voicemail from a Home screen.
- From the Home screen, tap
 Phone.
 - Touch and hold
 Voicemail.
 - Follow the tutorial to create a password, record a greeting, and record your name.
Detailed Specifications
- Display: 6.4-inch Super AMOLED, Quad HD+ (1440x2960 pixels)
- Processor: Qualcomm Snapdragon 845
- RAM: 6GB or 8GB
- Storage: 128GB or 512GB (expandable up to 512GB via microSD)
- Camera: Dual 12MP rear camera, 8MP front camera
- Battery: 4000mAh, fast charging support
- Operating System: Android 8.1 (Oreo), upgradable to Android 10
- Biometric Security: Fingerprint sensor, face recognition, iris scanner
Description
The Samsung Galaxy Note9 N960U is distinguished by its elegant appearance, boasting an IP68 grade for dust and water protection. The device's expansive display is ideal for movie viewing, online surfing, and utilizing the S Pen pen for note-taking and artistic endeavors. The S Pen has been enhanced to incorporate Bluetooth Low Energy (BLE) for remote control capabilities.
The back dual-camera configuration has a wide-angle lens and a telephoto lens, facilitating optical zoom and Live Focus for high-quality photos. The device additionally accommodates sophisticated software functionalities, including DeX (Desktop Experience) mode, enabling users to convert their smartphone into a desktop-like interface when linked to an external display.
Setting
Access Settings
There are a couple of ways to access your device settings.
- From a Home screen, swipe up to access Apps, and then tap
 Settings.
– or – - Drag down from the Status bar to display the Notification panel, and then tap Settings.
Search for Settings
If you are not sure exactly where to find a certain setting, you can use the Search feature.
- From
 Settings, tap
 Search.
 - Enter a word or words in the Search field. As you type, settings that match display on the screen.
- Tap
 an entry to go to that setting.
Connections
Manage connections between your device and a variety of networks and other devices.
Wi-Fi
Connect your device to a Wi-Fi network.
- From
 Settings, tap Connections > Wi-Fi, and then tap On/Off to turn on Wi-Fi.
- When Wi-Fi is turned on, your device automatically scans for available networks and displays them.
- Tap
 the network you want to connect to.
- When you select an open network, you are automatically connected to the network. Otherwise, enter a password to connect.
Manually connect to a Wi-Fi network
Connect your device to a Wi-Fi network that is hidden.
- From
 Settings, tap Connections > Wi-Fi, and then tap On/Off to turn on Wi-Fi.
 - Tap
 Add network at the bottom of the list.
 - Enter information about the Wi-Fi network:
- Network name: Enter the network name.
- Security: Select a security option and enter your password.
- Auto reconnect: Connect to this network automatically.
- Show advanced options: Add advanced options, such as IP settings and Proxy settings.
- Tap Connect.
Wi-Fi preferences
Customize advanced Wi-Fi services.
- From
 Settings, tap Connections > Wi-Fi, and then tap On/Off to turn on Wi-Fi.
 - Tap Advanced. To view all network settings, tap View more.
- Switch to mobile data: Connect automatically to a mobile network connection when the Wi-Fi connection is unstable. When the Wi-Fi signal is strong, it switches back to Wi-Fi.
- Turn on Wi-Fi automatically: Enable Wi-Fi in frequently used locations.
- Wi-Fi power saving mode: Reduce battery usage by analyzing Wi-Fi traffic patterns.
- Secure Wi-Fi: Get extra privacy protection while using unsecured Wi-Fi networks.
- Network notification: Receive notifications when open networks in range are detected.
Manage networks: View your saved Wi-Fi networks.
- Wi-Fi control history: View devices that have turned your Wi-Fi on or off.
- WPS push button: Connect to a Wi-Fi network by pressing the WPS button on a router.
- WPS PIN entry: Connect to a Wi-Fi network by entering your WPS PIN.
- Install network certificates: Install authentication certificates.
- MAC address: View your device’s MAC address, which is required when connecting to some secured networks (not configurable).
- IP address: View your device’s IP address (not configurable).
Wi-Fi Direct
Wi-Fi Direct uses Wi-Fi capability to share data between devices. A Wi-Fi network connection is not required.
- From
 Settings, tap Connections > Wi-Fi, and then tap On/Off to turn on Wi-Fi.
 - Tap Wi-Fi Direct.
- Your device scans for discoverable Wi-Fi Direct devices.
- Tap a device, and then follow the prompts to connect.
Share files with Wi-Fi Direct
Share files with another device using Wi-Fi Direct.
- From an app, tap
 Share.
– or –- Tap
 More options > Share.
- Tap
- Tap Wi-Fi Direct and follow the prompts.
Receive files with Wi-Fi Direct
When another device attempts to send a file to your device using Wi-Fi Direct, your device begins downloading the file.
- To open the file, drag down the Status bar and tap File received.
Disconnect from Wi-Fi Direct
Disconnect your device from a Wi-Fi Direct device.
- From
 Settings, tap Connections > Wi-Fi > Wi-Fi Direct.
 - Tap a device to disconnect it.
Bluetooth
Bluetooth allows you to pair your device to another Bluetooth-enabled device. Once a pairing is created, the devices continue to recognize their partnership and exchange information without having to re-enter a passcode.
- From
 Settings, tap Connections > Bluetooth, and then tap On/Off to turn on Bluetooth.
- Your device scans for discoverable Bluetooth devices. To scan again, tap Scan.
- Tap a device, and follow the prompts to connect.
Rename a paired device
Rename a paired device to make it easier to recognize.
- From
 Settings, tap Connections > Bluetooth, and then tap On/Off to turn on Bluetooth.
 - Tap Settings next to the previously paired device, and then tap Rename.
- Enter a new name, and tap Rename.
Share files with Bluetooth
Use Bluetooth to transfer information to a paired device.
- From an app, tap
 Share.
– or –- Tap
 More options > Share.
- Tap
- Tap Bluetooth and follow the prompts.
Receive files with Bluetooth
When another device attempts to send a file to your device using Bluetooth, you will see a request to accept the file.
- Tap Accept.
- To open the file, drag down the Status bar and tap File received.
Unpair from a Bluetooth device
When you unpair from a Bluetooth device, the two devices no longer recognize each other. To connect again, you have to pair the devices.
- From
 Settings, tap Connections > Bluetooth, and then tap On/Off to turn on Bluetooth.
 - Tap Settings next to the paired device, and then tap Unpair to delete the paired device.
Phone visibility
Allow other devices to find your mobile device and transfer files.
- From
 Settings, tap Connections > Phone visibility, and then tap On/Off.
Data usage
View your current mobile and Wi-Fi data usage.
- From
 Settings, tap Connections > Data usage.
Monitor Wi-Fi data
View your Wi-Fi data usage and set restrictions for Wi-Fi networks.
- From
 Settings, tap Connections > Data usage.
The following options are available: - Wi-Fi data usage: View data usage over Wi-Fi connections.
- Restrict networks: Select networks to prevent apps that are running in the background from using them.
Airplane mode
Airplane mode disconnects your device from all networks and turns off connectivity features.
- From
 Settings, tap Connections > Airplane mode.
 - Tap On/Off to enable this feature.
NFC and payment
NFC (Near Field Communication) allows data exchange when you touch your device with another compatible device.
- From
 Settings, tap Connections > NFC and payment.
 - Tap On/Off to enable this feature.
Android Beam
Share content to another NFC-capable device by touching the backs of the devices.
- From
 Settings, tap Connections > NFC and payment, and then tap On/Off to enable NFC.
 - Tap Android Beam, and then tap On/Off to enable this feature.
Share data with Android Beam
Use Android Beam to transfer information to another NFC-capable device.
- From an app, tap
 Share.
– or –- Tap
 More options > Share.
- Tap
- Tap Android Beam and follow the prompts.
Tap and pay
Use an NFC payment application to make payments by touching your device to a compatible credit card reader.
- From
 Settings, tap Connections > NFC and payment, and then tap On/Off to enable NFC.
 - Tap Tap and pay, and tap an app to set it as the default payment method.
- To specify when to use the default app, tap If open app supports Tap and pay.
Mobile hotspot
Activate Mobile hotspot to allow other devices to use your device’s Internet connection.
- From
 Settings, tap Connections > Mobile hotspot and tethering > Mobile hotspot.
 - Tap On/Off to turn on Mobile hotspot.
- Activate Wi-Fi on the target device.
- Scan for Wi-Fi hotspots and select your device’s Mobile hotspot.
- Enter your device’s Mobile hotspot password on the target device.
Change the mobile hotspot password
Change your Mobile Hotspot password.
- From S
 ettings, tap Connections > Mobile hotspot and tethering > Mobile hotspot.
 - Tap the password and enter a new password.
- Tap Save.
Allowed devices list
Control which devices can connect to your Mobile hotspot.
- From Settings, tap Connections > Mobile hotspot and tethering > Mobile hotspot.
- Tap More options > Allowed devices, and then tap Add to enter the other device’s Device name and MAC address.
- Tap Add to add the device.
- To restrict connections to your Allowed devices list, tap Allowed devices only.
Configure mobile hotspot settings
Manage your security and connecting settings.
- From
 Settings, tap Connections > Mobile hotspot and tethering > Mobile hotspot.
 - Tap More options > Configure mobile hotspot for the following settings:
- Network name: View and change the name of your Mobile hotspot.
- Hide my device: Prevent your Mobile hotspot from being discoverable by other devices.
- Security: Choose the security level for your Mobile hotspot.
- Password: If security is enabled, you can view or change the password.
- Save: Save your changes.
Tethering
Use your device to provide Internet access to another device via USB or Bluetooth.
- From
 Settings, tap Connections > Mobile hotspot and tethering, and then choose a tethering option.
USB tethering
Use your device to provide Internet access to another device via USB.
- Connect your mobile device to a computer using a USB cable.
- From
 Settings, tap Connections > Mobile hotspot and tethering > USB tethering.
 - Tap
 On/Off to enable this feature.
Bluetooth tethering
Use your device to provide Internet access to another device via Bluetooth.
- From
 Settings, tap Connections > Mobile hotspot and tethering, and then tap Bluetooth tethering.
 - Tap
 On/Off to enable this feature.
More connection settings
Access additional settings to help you connect your device to the Internet and other devices.
- From
 Settings, tap Connections > More connection settings.
 - The following options are available:
- VPN: Set up a Virtual Private Network to encrypt your Internet connection.
- Private DNS: Set a DNS provider to enhance security and privacy.
- Mobile networks: Set up and manage your mobile networks.
Share and Connect
Choose how to share and connect to other devices.
- From
 Settings, tap Connections > Share and Connect.
 - The following options are available:
- Nearby devices: Automatically share content with nearby devices.
- Quick share: Quickly share images and videos with other devices.
NFC
Set up NFC features for data transfer.
- From
 Settings, tap Connections > NFC and payment > NFC.
 - Tap
 On/Off to enable this feature.
Data Saver
Manage data usage on your device.
- From
 Settings, tap Connections > Data usage > Data Saver.
 - Tap On/Off to enable this feature.
Internet
Manage your Internet connection.
- From
 Settings, tap Connections > Internet.
 - View and manage your Internet connection settings.
Bluetooth visibility
Control whether your device is visible to other Bluetooth devices.
- From
 Settings, tap Connections > Bluetooth.
 - Tap
 On/Off to allow visibility.
Accessing networks
Connect to and manage different types of networks.
- From
 Settings, tap Connections to access network options.
Smart View
Mirror your device’s screen to a compatible display.
- From
 Settings, tap Connections > Smart View.
 - Select a compatible device to connect.
Other network settings
Manage your device’s connection settings.
- From
 Settings, tap Connections to access other network settings.
Data management
Control your data usage across connections.
- From
 Settings, tap Connections > Data management.
 - Manage your mobile data and Wi-Fi data usage.
Conclusion
Accessing your device settings is simple. From the main menu to advanced options, you can manage your connections, networks, and data usage with ease. For any other queries, feel free to reach out!
Troubleshooting
Common issues with the Galaxy Note9 N960U include:
- Battery Drain: Check for unnecessary background apps and disable them. Update your software to the latest version.
- Camera Issues: Restart the device or clear the camera app's cache and data.
- Storage Full: Delete unnecessary files or expand storage with a microSD card.
- Screen Issues: Ensure the screen protector is not causing any problems; if so, remove it. For severe issues, contact Samsung support.
Always handle the device with care to avoid physical damage, and use original accessories to maintain performance and safety.
Samsung Pros & Cons
Pros
- Powerful Performance: Excellent for multitasking and gaming.
- Large Storage Options: Up to 512GB internal storage plus microSD expansion.
- Advanced Camera System: Dual cameras with features like Live Focus and Super Slow-Mo.
- Long Battery Life: 4000mAh battery with fast charging support.
- S Pen Features: Enhanced stylus with Bluetooth Low Energy (BLE) capabilities.
Cons
- Expensive: High price point at launch.
- No Major Design Changes: Similar design to its predecessor, the Galaxy Note8.
- No 5G Support: Limited to 4G LTE connectivity.
- Large Size: May be cumbersome for some users.
Customer Reviews
Customers have praised the Galaxy Note9 N960U for its performance, camera capabilities, and battery life. However, some have noted that the device's size can be a bit unwieldy for one-handed use. The S Pen has been a highlight for many users, particularly those who value note-taking and creative features.
Common complaints include the high price point at launch and the lack of significant design changes from the previous model. Despite these, the Galaxy Note9 remains a popular choice among power users due to its robust feature set.
Faqs
What is the display size of the Samsung Galaxy?
What processor does the N960U use?
How much storage does the Galaxy Samsung come with?
What are the key features of the S Pen on the Galaxy Note9 N960U?
Is the Galaxy Note9 N960U water-resistant?
Can I use the Galaxy Note9 as a desktop computer?
How do I pair my S Pen with the Galaxy Note9?
What is Live Focus on the Galaxy Note9?
Leave a Comment
