Seal a Meal Food Sealer Storage VS230 Guide
Content
Introduction of Seal a Meal Food Sealer Storage VS230
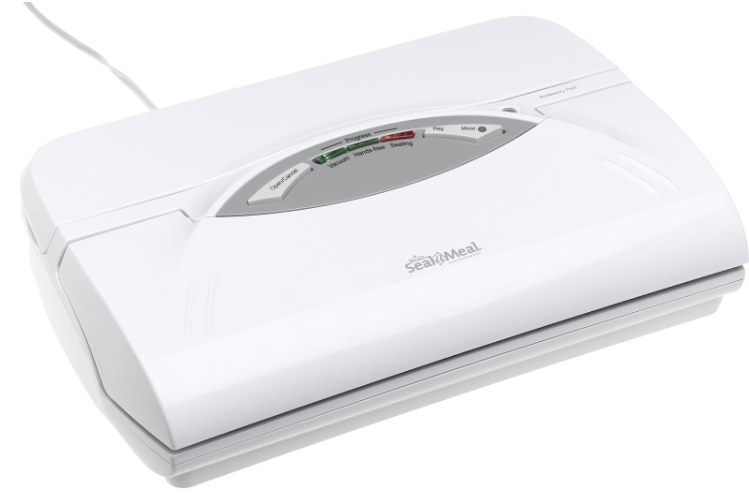
The Seal a Meal Food Sealer Storage VS230 is a must-have kitchen appliance for anyone who wants to keep their food fresh for longer. With its sleek design and powerful vacuum sealing capabilities, this food sealer is a game-changer for meal preppers, home cooks, and even professional chefs. The estimated price of the VS230 is around $70, making it an affordable option for those who want to preserve their food and reduce food waste.
Your unit includes
- Food Sealer
- Starter Bag Kit
- Accessory Hose
By preparing foods and meals in advance and storing with the Seal-a-MealTM Vacuum Storage System, you save time and money.
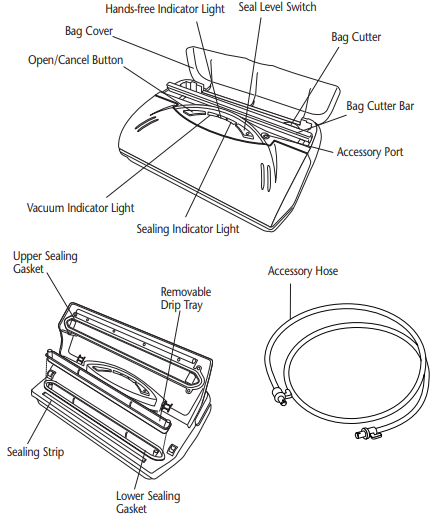
KNOW YOUR STORAGE SYSTEM
Detailed Specifications
The Seal a Meal Food Sealer Storage VS230 has the following key features:
- Automatic vacuum sealing with adjustable settings
- Marinate mode to quickly marinate meats and vegetables
- Moist and dry food settings for optimal sealing
- Indoor/outdoor sealing for use in various environments
- Bag cutter for easy and precise bag sizing
- Roll storage and bag holder for convenience
- Compact design for easy storage
FEATURES AND BENEFITS
- Integrated Bag Storage and Cutter to make custom sized bags.
- Moist Seal setting extends the length of the sealing cycle to provide the securest seal when liquid is present.
- Press/Hold and Release System makes it easy to close the lid and start the vacuum function.
- Vacuums and Seals preserving the taste and nutritional value of stored foods.
- Dishwasher Safe Drip Tray System can be removed from your vacuum sealer and cleaned in the top rack of your dishwasher.
- Accessory Port allows vacuum packaging with accessories.
- Hands-free Indicator Light illuminates when it is safe to remove hands from the lid.
- Sealing Indicator Light illuminates when the appliance is sealing the bag.
- Open/Cancel Button cancels the vacuum and seal process or releases the lid once the vacuum and sealing process are complete.
Description
The Seal a Meal Food Sealer Storage VS230 is a powerful and easy-to-use kitchen appliance that can help you keep your food fresh for up to five times longer than traditional storage methods. With its automatic vacuum sealing feature, you can quickly and easily seal a variety of foods, from meats and vegetables to cheese and snacks. The VS230 also has a marinate mode, which can quickly marinate meats and vegetables in just minutes. Additionally, the moist and dry food settings ensure that your food is sealed optimally, preventing freezer burn and preserving the flavor and texture of your food.
Seal a Meal Food Sealer Storage VS230 How to Use
Carefully unpack your Seal-a-Meal Vacuum Sealer and place it on a level surface. Be sure to remove all packing materials from the inside of the machine. Clean all parts according to the CARE AND CLEANING section in this manual before first use.
HOW TO MAKE CUSTOM SIZED BAGS WITH THE INTEGRATED BAG ROLL
- Open Lid and place bag roll into roll storage compartment.
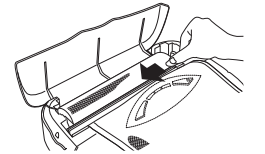
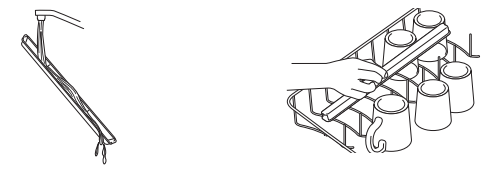
- Lift up Bag Cutter Bar.
Pull enough bag material from roll to hold item to be vacuum packaged, plus 3 inches. Lower the Bag Cutter Bar.
Cut desired bag length from Bag Roll. Make sure to cut a straight line. Plug in Power Cord.
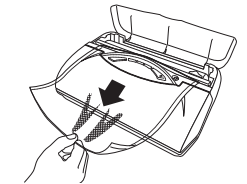
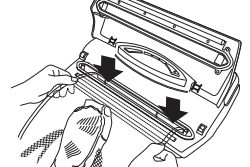
Open the Lid. Place one end of the cut bag between the Sealing Strip and the Lower Sealing Gasket. DO NOT place open end of bag in the Drip Tray.
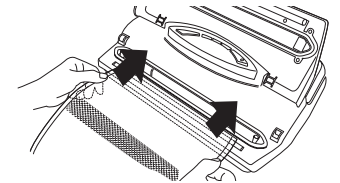
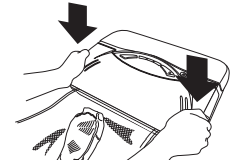
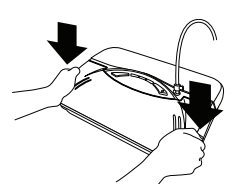
Close Lid. Position hands on both sides of the Lid. Press firmly on both sides of the Lid and hold until the motor starts.
NOTE: Sealer will not operate if Lid is not properly closed.
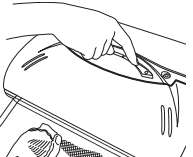
Continue to hold the Lid. When the Hands-free Indicator Light illuminates, it is safe to remove your hands from the Lid. The Sealing Indicator Light illuminates when the unit starts sealing the bag.

- When the motor stops and the Progress Indicator Lights shut off, sealing is complete.
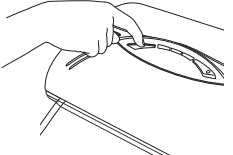
Press the Open/Cancel button.
- The custom sized bag is ready for vacuum sealing.
NOTE: The Open/Cancel button can be used to cancel the process mid-cycle and open the Lid. The bag will not be sealed when doing this.
CAUTION: This sealer is not for commercial use. If sealing more than 30 bags or canisters in a row wait at least 25 minutes before continuing to use your vacuum food sealer.
CAUTION: The unit has a cool down period between cycles. Wait 20 seconds before using again.
HOW TO VACUUM SEAL WITH SEAL-A-MEALTM BAGS
- Place the items to be sealed into a pre-cut or custom sized bag. Leave at least 3 inches between the contents and the top of the bag to allow for bag contraction.
Open the Lid and place the open end of the bag into the Drip Tray.
- Close Lid.
Change Press to Select the appropriate Seal Level – Choose Moist for foods with high liquid content or Regular for dry foods.
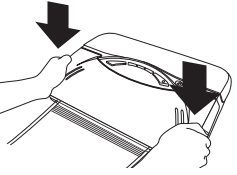
- To begin the vacuum process, press down firmly on Lid with both hands and hold until the motor starts. Continue to hold the Lid. When the Hands-free Indicator Light illuminates, it is safe to remove hands from the Lid. The unit continues to vacuum and seal the bag.
- When the motor stops and the Progress Indicator Lights shut off, sealing is complete.
Press the Open/Cancel button.
Lift the Lid and remove the bag.
NOTE: The Open/Cancel button can be used to cancel the process mid-cycle and open the lid. The bag will not be sealed when doing this.
CAUTION: This sealer is not for commercial use. If sealing more than 30 bags or canisters in a row wait at least 25 minutes before continuing to use your vacuum food sealer.
CAUTION: The unit has a cool down period between cycles. Wait 20 seconds before using again.
HOW TO VACUUM SEAL WITH SEAL-A-MEALTM ACCESSORIES
Attach one end of the Accessory Hose into the Accessory Port.
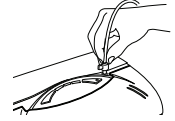
Attach the other end of the Accessory Hose to the Accessory.
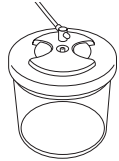
To begin the vacuum process, press down firmly on Lid with both hands and hold until the motor starts. Continue to hold the Lid. When the Hands-free Indicator Light illuminates, it is safe to remove hands from the Lid. The unit continues to vacuum. Once all of the air is removed, the motor and indicator lights will automatically turn off.
NOTE: Sealer will not operate if Lid is not properly closed.
NOTE: The Open/Cancel button can also be used to cancel the process mid-cycle and open the Lid.
Seal a Meal Food Sealer Storage VS230 Setup Guide
Setting up the Seal a Meal Food Sealer Storage VS230 is easy. First, plug in the appliance and turn it on. Next, insert the vacuum bag into the sealer, making sure to align the open end of the bag with the sealer's track. Close the lid and select the desired sealing mode. The VS230 will automatically vacuum out the air and seal the bag. Once the bag is sealed, remove it from the sealer and store your food in the refrigerator, freezer, or pantry.
CARE AND CLEANING
- Always unplug the unit before cleaning.
- Do not immerse in water.
- Do not use abrasives to clean the unit.
- Wipe the outer surfaces with a soft, damp cloth and soap.
- To clean the inside of the unit, wipe away any food or liquid with a paper towel.
- Dry all parts thoroughly before you plug in and operate the unit again.
Cleaning the Removable Drip Tray
The Seal-a-MealTM Vacuum Food Sealer is equipped with a Removable Drip Tray to trap any liquid that may be drawn from the bag. The Drip Tray contains antimicrobial protection, which inhibits the growth of stain and odor causing bacteria and keeps the unit cleaner between uses. Normal cleaning practices should be maintained.
- Lift the lid and carefully remove the Drip Tray as to not spill any contents.
- Wash the Drip Tray in warm, soapy water or on the top rack of the dishwasher.
Allow to dry completely.
Replace Drip Tray Cleaning the Bags
- Wash bags in warm, soapy water.
- Bags can be washed in the dishwasher if desired. Turn bags inside out and spread them over the top rack only.
- Allow bags to dry completely before using.
NOTE: DO NOT reuse bags if they have been used to store raw meats, fish, oily foods or have been boiled or microwaved.
HINTS AND TIPS
- Save Money: Buy in bulk, separate food into meal size portions, vacuum seal, and freeze. Just remove the sealed bag, thaw in the refrigerator, and prepare your meal.
- Save Time: Prepare meals in advance, vacuum seal, store in the refrigerator or freezer, and reheat for a quick, no-hassle meal.
- Save Food: Vacuum seal leftovers to eliminate waste.
- Save Flavor: Wash, vacuum, seal, and freeze seasonal fruits and vegetables to enjoy any time of the year.
- Save clothing, valuable documents, photographs, craft supplies, and much more.
- Portion Control: Separate food into individual portions, write nutritional information on the bag, vacuum seal, and store.
Keep Food Fresh Longer.
Food Item Storage Time with Conventional Bags & Wraps Storage Time with Seal-a-Meal™ Vacuum Food Storage System Beef (Steaks, Roasts) 6–12 months 2–3 years Beef (Ground, Stew Meat) 3-4 months 1 year Lean Fish (Cod, Haddock) 4-6 months 2 years Fatty Fish (Salmon, Sea Trout) 2-3 months 1 year Pork Chops 4–6 months 2–3 years Poultry 6–12 months 2–3 years Soups and Sauces 2-4 months 1–2 years Vegetables (Freezer) 6–9 months 2–3 years Cheese (Refrigerator) 2-4 weeks 4–8 months Deli Meats 3–4 days 7–10 days Fruits (Berries) 1–5 days 7-14 days Vegetables (Refrigerator) 2–7 days 7–14 days Cereal (Pantry) 2-3 months 6–12 months Coffee (Ground) 2 weeks 1–2 years Cookies (Homemade) 1-2 weeks 3–6 weeks Flour 6-8 months 1–2 years Nuts 6-8 months 1-2 years
Seal-a-Meal Vacuum Food Storage System Outperforms Conventional Bags & Wraps
Seal-a-Meal storage time estimates may vary depending upon preparation, quality of food, and storage conditions.
IMPORTANT SAFEGUARDS
When using electrical appliances, basic safety precautions should always be followed, including the following
- Read the instructions carefully.
- Do not use the Vacuum Food Sealer on wet or hot surfaces, or near a heat source.
- Always use the Vacuum Food Sealer on a level flat surface.
- Do not immerse any part of the Vacuum Food Sealer, power cord or plug into water or other liquid.
- To disconnect, unplug the power cord from the electrical outlet. Do not disconnect by pulling on the cord. Always unplug the Vacuum Food Sealer before cleaning or when not in use.
- Do not operate the Vacuum Food Sealer with a damaged power cord or plug.
- Do not operate the Vacuum Food Sealer if it malfunctions or is damaged in any way. If the cord or the machine is damaged, it must be returned to an authorized service center. See warranty for more information.
- Use the Vacuum Food Sealer only for its intended use.
- Close supervision is required when this product is used near children.
- This appliance should not be operated by children.
- Do not allow the Vacuum Food Sealer to be used as a toy.
- The Vacuum Food Sealer is not for commercial use. If sealing more than 30 bags or canister in a row, wait at least 25 minutes before continuing to use your vacuum food sealer.
SAVE THESE INSTRUCTIONS
This appliance is for HOUSEHOLD USE ONLY. No user-serviceable parts inside. Do not attempt to service this product. A short power supply cord is provided to reduce the hazards resulting from entanglement or tripping over a long cord. An extension cord may be used with care. However, the marked electrical rating should be at least as great as the electrical rating of the skillet. The extension cord should not be allowed to drape over the counter or tabletop where it can be pulled on by children or tripped over unintentionally.
POLARIZED PLUG
This appliance has a polarized plug (one blade is wider than the other). To reduce the risk of electric shock, this plug will fit into a polarized outlet only one way. If the plug does not fit fully into the outlet, reverse the plug. If it still does not fit, contact a qualified electrician. Do not attempt to modify the plug in any way. If the plug fits loosely into the AC outlet or if the AC outlet feels warm do not use that outlet.
TROUBLESHOOTING
Nothing happens when I press down on the lid
Make sure the power cord is correctly plugged into the electrical outlet.
Make sure the power cord is not damaged in any way.
Make sure the electrical outlet is operative by plugging in another appliance. If it is not, please check the circuit breakers or fuses in your home.
Make sure the bag is positioned correctly in the vacuum channel. (See Figures on previous pages)
Press down firmly on both sides of the lid.
Wait 20 minutes to allow appliance to cool off, and then try using again.
Air is not vacuumed from the bag
Check that there are not gaps, folds, wrinkles or holes in the pre-sealed bags.
Verify that the Drip Tray is inserted properly into the unit.
Make sure the Accessory Hose is not inserted into the Accessory Port.
Check for loose, worn or cracked Upper and Lower Sealing Gaskets.
Foods with high liquid contents may prevent the bag from sealing properly. Cut bag open and wipe top inside of bag and reseal.
Check to see if bag is properly inserted into the Drip Tray.
Make sure you've placed the bag in the proper place. When making a bag from a roll, make sure end of cut piece is on Sealing Strip, NOT over Lower Sealing Gasket or in Drip Tray.
Air has seeped back into the vacuumed bag
Check the seal of the bag. There may be a hole or wrinkle that is allowing air to re-enter the bag. Carefully cut the bag open and re-seal it, or use an entirely new bag.
Make sure there is no moisture or liquid from the food present within the bag. You may need to cut open the bag and re-seal it in moist setting, or use an entirely new bag. Partially freeze foods with excess liquids, prior to vacuum sealing.
Make sure there were no food items with sharp edges that may have punctured the bag. If you find a puncture hole, seal the item in an entirely new bag.
Make sure no liquids were drawn to the sealing strip area.
Check for loose, worn or cracked Upper and Lower Sealing Gaskets.
Moisture of foods with high liquid content will prevent the bag from sealing properly. Cut bag open and wipe top inside of bag and reseal.
Bag melts
The sealing strip may have been too hot during the sealing process. Allow the unit to cool for 20 seconds between uses. If the bag continues to melt, allow the unit to cool with the lid in the upright position for 25 minutes before using.
Bag will not seal
Check that there aren’t any gaps, folds, wrinkles or holes in pre-sealed edges.
Moisture of foods with high liquid content will prevent the bag from sealing properly. Cut bag open and wipe top inside of bag and reseal.
Make sure you've placed the bag in the proper place. When making a bag from a roll, make sure end of cut piece is on Sealing Strip, NOT over Lower Sealing Gasket or in Drip Tray.
Make sure you give the appliance time to cool down. Wait at least 20 seconds between seals.
1 YEAR WARRANTY
Sunbeam Products, Inc. doing business as Jarden Consumer Solutions or if in Canada, Sunbeam Corporation (Canada) Limited doing business as Jarden Consumer Solutions, (collectively “JCS”) warrants that for a period of one year from the date of purchase, this product will be free from defects in material and workmanship.
Pros & Cons
Pros
- Powerful vacuum sealing capabilities
- Easy to use with automatic sealing
- Marinate mode for quick marinating
- Compact design for easy storage
- Affordable price point
Cons
- May not work well with large or oddly-shaped items
- Can be loud during the sealing process
- Requires vacuum bags for operation
- May not seal bags tightly enough for some users
Customer Reviews about Seal a Meal Food Sealer Storage VS230
Customers love the Seal a Meal Food Sealer Storage VS230 for its powerful vacuum sealing capabilities and easy-to-use design. Many customers have reported that the VS230 has helped them reduce food waste and save money by preserving their food for longer. However, some customers have noted that the VS230 can be loud during the sealing process and may not work well with large or oddly-shaped items. Overall, the Seal a Meal Food Sealer Storage VS230 is a highly-rated and popular kitchen appliance.
Faqs
What type of vacuum bags does the Seal a Meal Food Sealer Storage VS230 use?
Can the Seal a Meal Food Sealer Storage VS230 be used with zip-top bags?
How long does the Seal a Meal Food Sealer Storage VS230 take to seal a bag?
Can the Seal a Meal Food Sealer Storage VS230 be used for canning?
What is the warranty on the Seal a Meal Food Sealer Storage VS230?
Can the Seal a Meal Food Sealer Storage VS230 be used to seal wet or moist foods?
How should I clean the Seal a Meal Food Sealer Storage VS230?
What is the maximum bag size that the Seal a Meal Food Sealer Storage VS230 can accommodate?
Can the Seal a Meal Food Sealer Storage VS230 be used for sous vide cooking?
How should I store the vacuum bags for the Seal a Meal Food Sealer Storage VS230?
Leave a Comment