Shot Scope GPS Golf V2 Watch User Guide
Content
Introduction
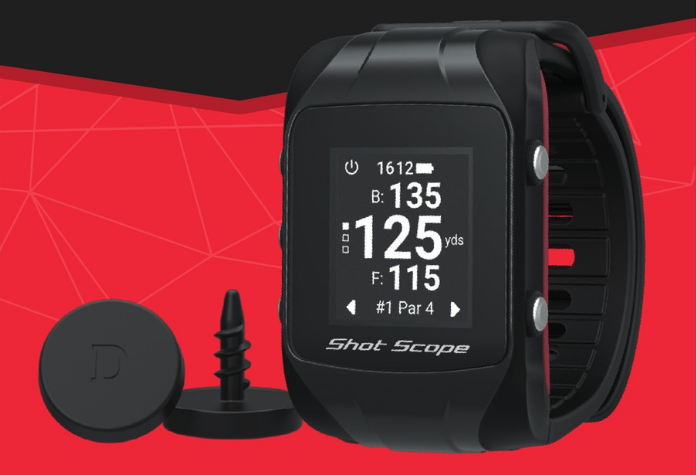
The Shot Scope GPS Golf V2 Watch is a cutting-edge golf performance monitor made for serious players looking to get better. This watch offers precise distances to greens and hazards together with extensive shot tracking and GPS features, along with comprehensive insights into your performance on the course. Golfers may examine their game and make informed judgments with the V2 Watch's user-friendly UI and automatic shot detection. The Shot Scope GPS Golf V2 Watch is a necessary tool for any golfer trying to improve their game and cut their scores. It is fashionable and long-lasting.
Inside Your Box
- 1 x Shot Scope V2 watch
- 20 x Lightweight tags
- 1 x Carry pouch for tags
- 1 x USB cable
1 x User guide
Shot Scope GPS Golf V2 Watch Specifications
- The Shot Scope GPS Golf V2 Watch boasts several impressive features, including:
- High-resolution touchscreen display
- Automatic course recognition and hole advancement
- Shot tracking and performance analysis
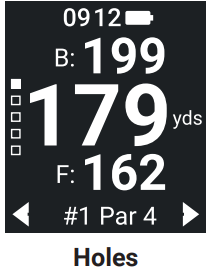
- Distance to front, middle, and back of the green
- Layup and carry distance measurements to hazards and targets
- Long battery life of up to 10 hours in GPS mode
- Water-resistant up to 30 meters
- Compatible with both Android and iOS devices
GET STARTED
Powering on the watch
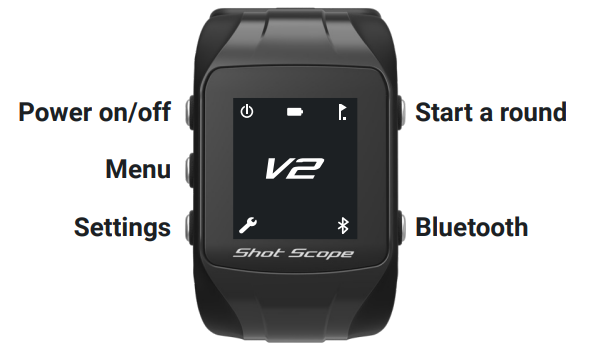
To power on your Shot Scope V2, press the top left button. The home screen will be displayed.
Home screen
Measurement settings; yards and meters
Shot Scope is automatically set up to display distance in yards. To change the unit of measurement to meters, navigate to the settings screen.
- To scroll down, press the bottom right button.
- To scroll up, press the top right button.
- To select an option, press the top left button.
Once an option has been selected, the watch will display “Setting Updated” and you will be automatically returned to the home screen.
Note: This will only update the unit of measurement for your yardages and not your statistics. This can be updated within the Shot Scope apps.
Time and date
The first time you switch on the device, the V2 logo will be displayed instead of the time and date. The time and date will automatically update and display on your Shot Scope the first time you play golf.
SETTING UP YOUR SHOT SCOPE V2
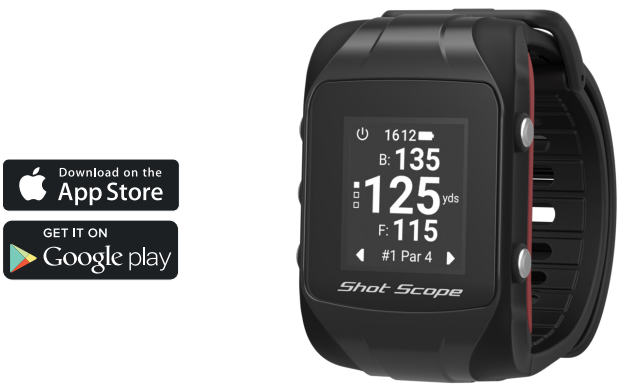
Step 1: Download and install the apps
Shot Scope provides three apps: desktop, iOS, and Android. We recommend using both the desktop app and one of the mobile apps. The desktop app provides an easy link to the performance dashboard where you can access your full performance data.
- To download the Shot Scope desktop app, go to www.shotscope.com/getstarted
- To download or install the Shot Scope app on a mobile device, simply search for Shot Scope on either the App Store or the Google Play store.
Open the app
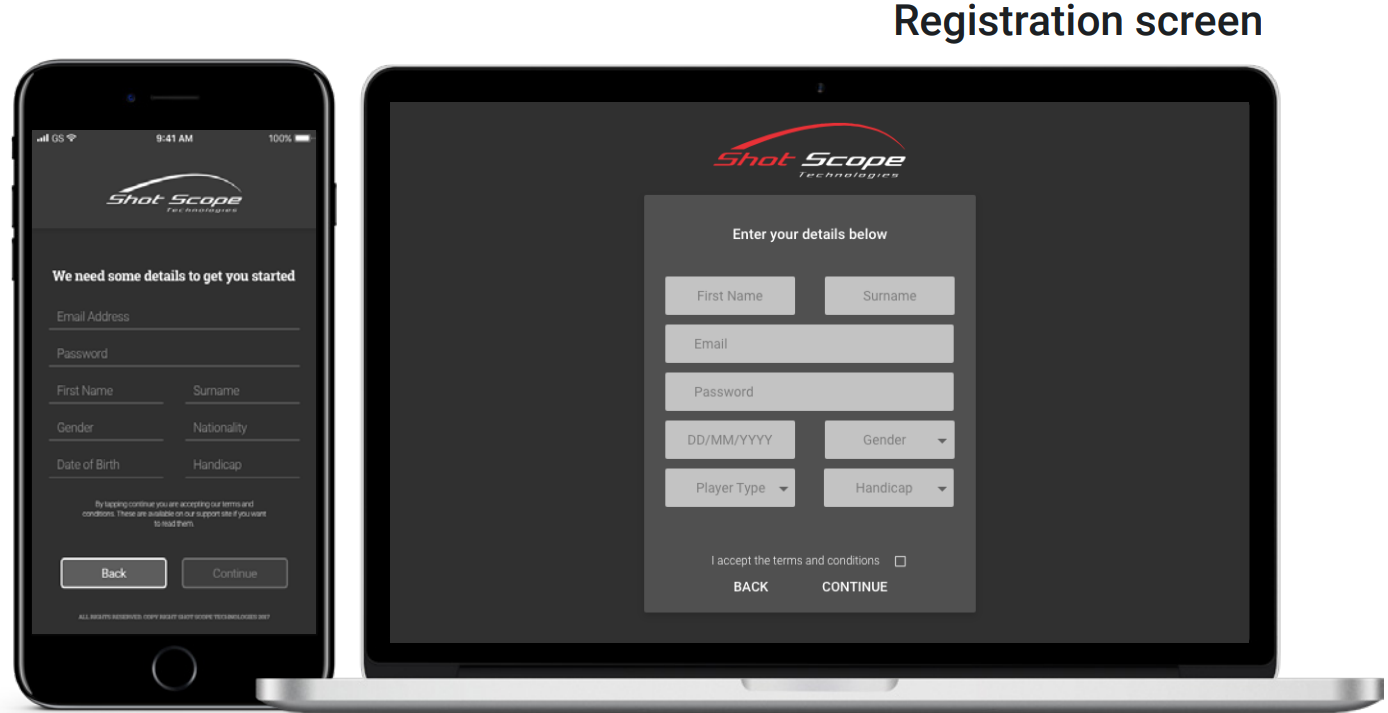
Register
To register an account, press the “Register” button on the app. This will open the registration page. Shot Scope Top Tip: It takes less than 20 seconds to download a course to the watch using the desktop app. The mobile app takes around 70 seconds.
Step 2: Downloading courses to your Shot Scope V2
Course maps must be downloaded and synced to your Shot Scope before playing. We recommend downloading courses or checking for course updates at least 48 hours before you play.
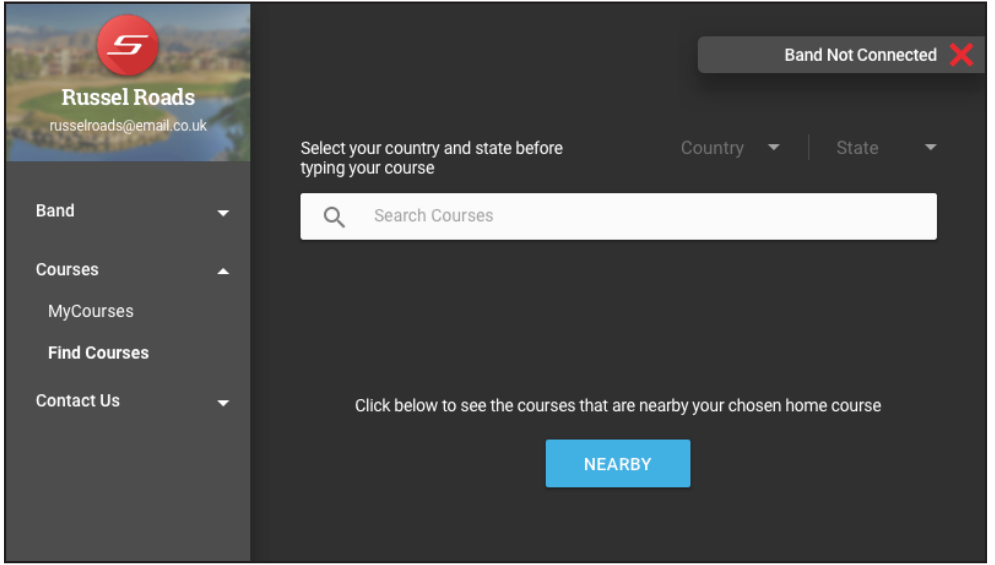
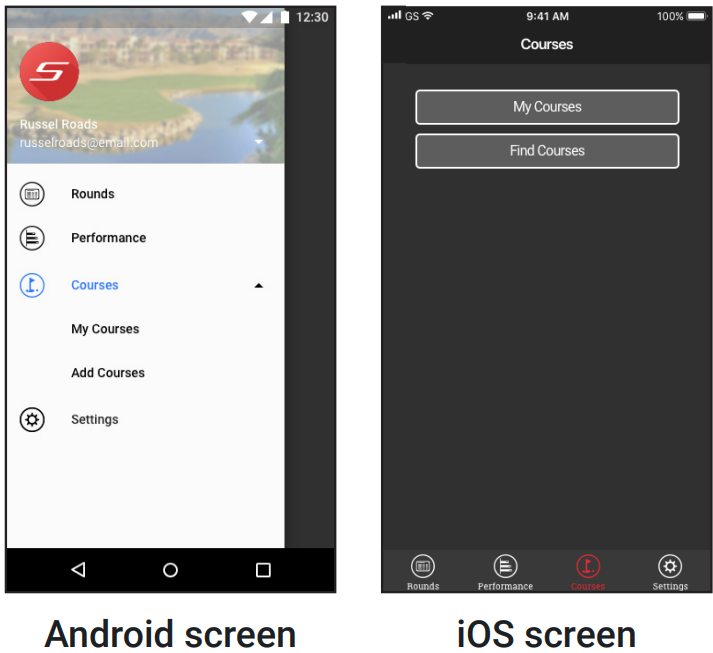
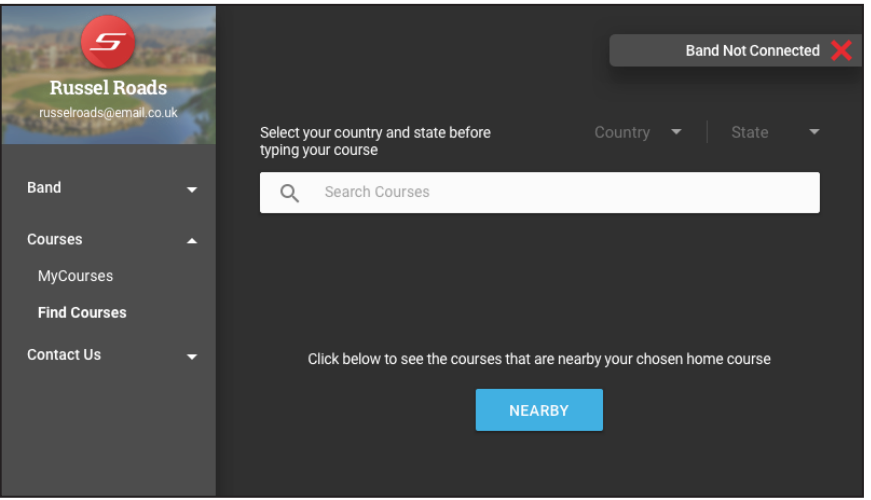
To download courses from the desktop app, navigate to “Courses” on the main menu and select “Find Courses”.
To download courses from the mobile app, navigate to “Courses” on the main menu and select “Find Courses”.
Step 3: Find and select a course
You can search our course database by entering the name of the course or using your current location to find nearby courses.
Enter the name of the course in the search tab.
Use your current location by selecting the “nearby” tab. Location services must be turned on for this functionality.
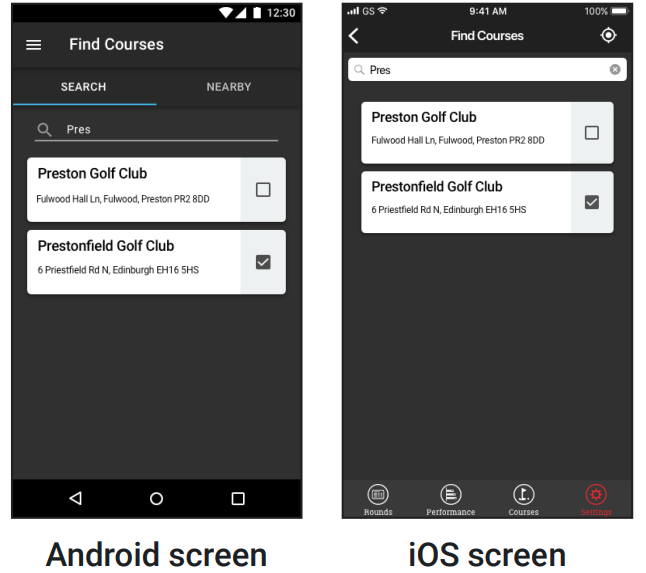
Select a course by clicking the tick box.

- When a course has been added, a pop-up will appear. Press continue to keep adding courses or press “My Courses” to view and sync your courses.
Course Added
Press “My Courses” below to view and sync your downloaded courses or select “Continue” to continue selecting courses.- MY COURSES
- CONTINUE
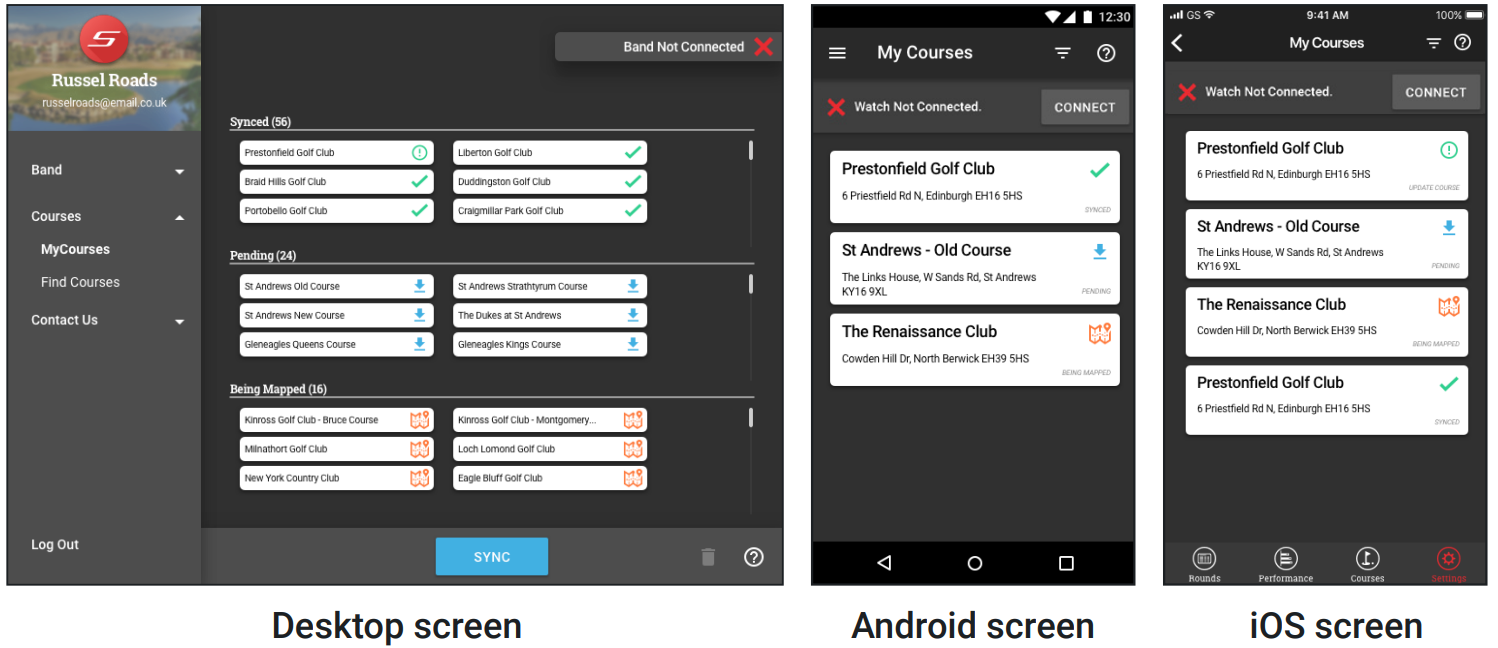
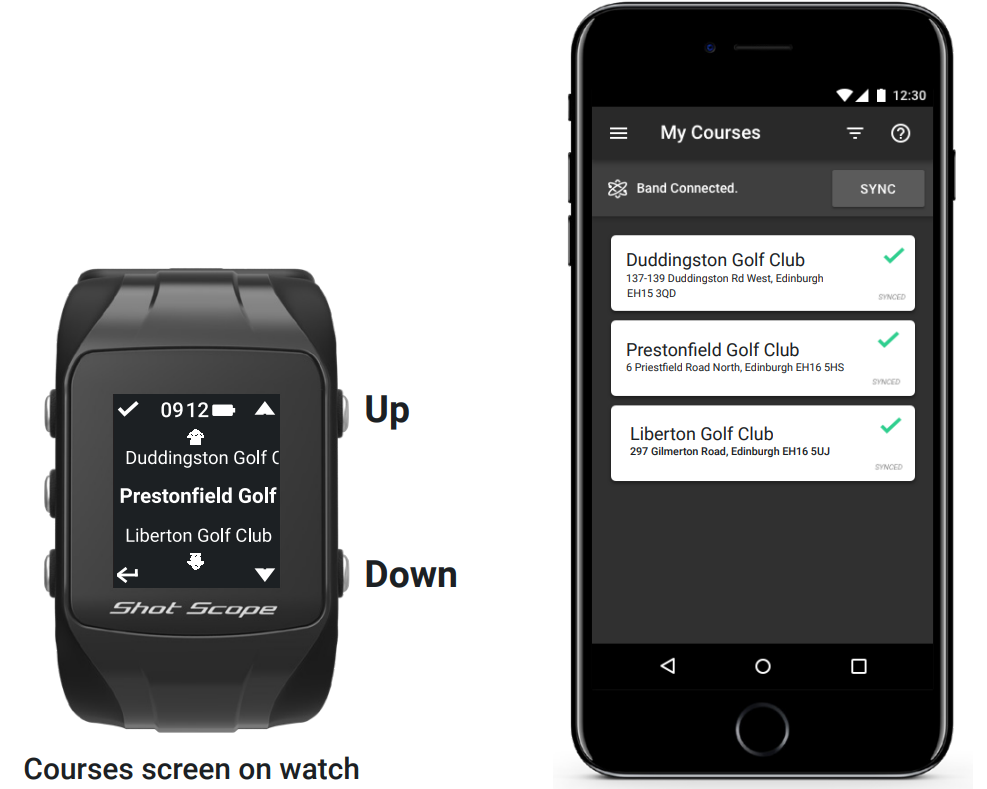
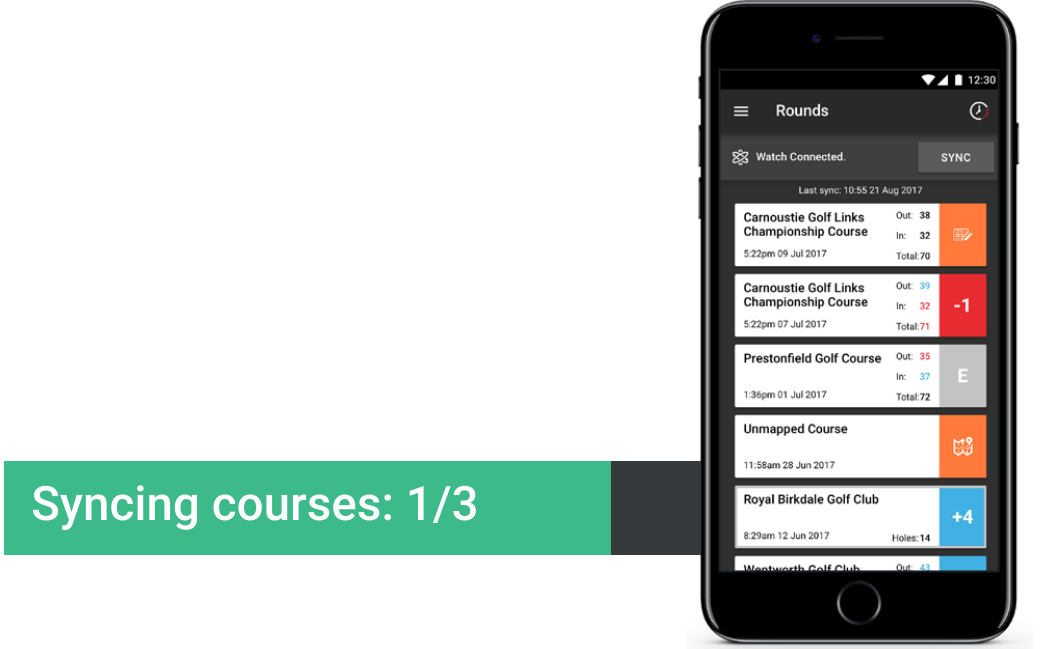
Now you have added courses to your account it’s time to sync these courses to your Shot Scope. Navigate to the “My Courses” page. A list of all your courses and the status of the course will be displayed.
Step 4: Connecting to Shot Scope
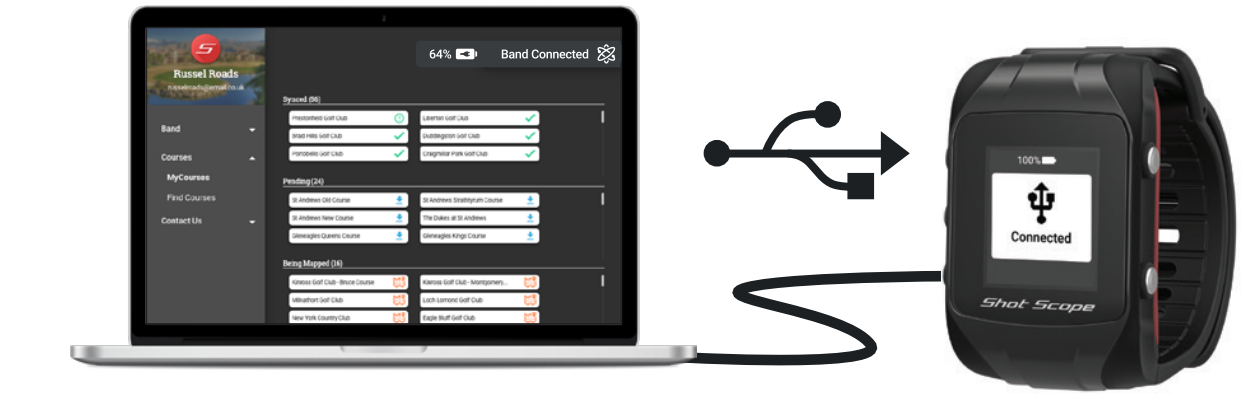
You now need to connect your watch to your desktop or mobile device.
To connect your Shot Scope watch to your computer, use the micro-USB cable provided. The desktop app will show the watch is successfully connected in the top right corner.
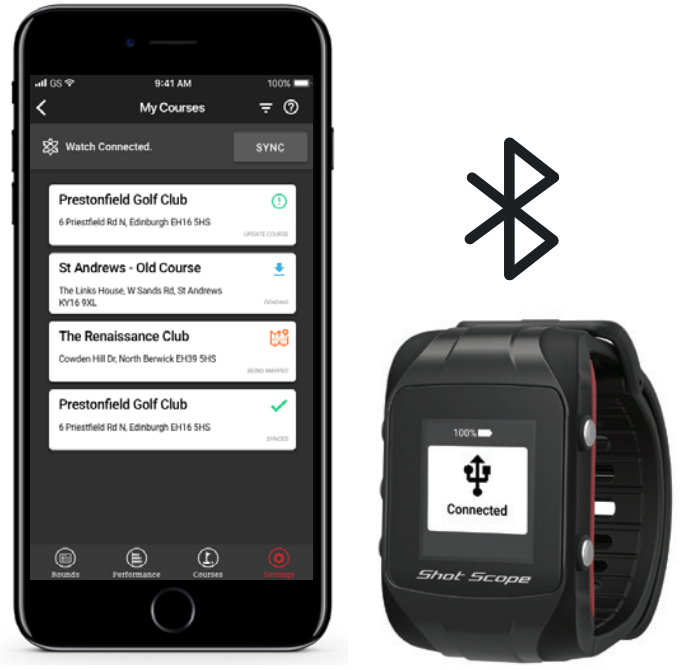
To connect your Shot Scope wristband to your mobile device, navigate to the My Courses page. At the top of the page, there will be a message saying “Band not connected. Tap here to connect.” Follow the on-screen instructions to connect your mobile device to your watch. Remember, Bluetooth and location services (Android) must be enabled on your mobile device.
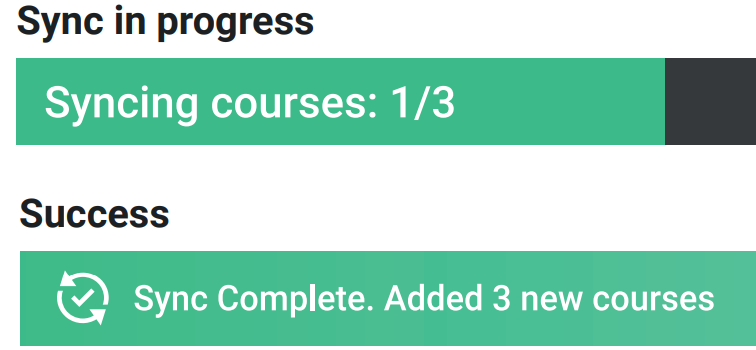
Step 5: Sync
To sync your courses to the watch, press the sync button on mobile or desktop.
Course status
The diagram below explains the status of each course:
- Green Tick – Synced: The course has been fully synced to your watch and is ready to play.
- Green Exclamation – Update: The course map data has been updated and needs to be resynced. (You can still play a round in this status).
- Blue Download – Pending: The course is ready to be added to your Shot Scope device. Tap “sync” to start this process.
- Orange Map – Being Mapped: The course is currently being mapped by our in-house team. We aim to have this course ready within 3 days.
If the band is not connected, the status of the course will be unknown and no icon will be shown.
Step 6: Final Stage Before you head out to play
Check the course has successfully uploaded to the watch.
- Step one: Press the settings button on the home screen (bottom left).
- Step two: Select “Courses” by pressing the tick (top right button).
Step three: Scroll through the course list to check your course has been uploaded.
If your course is not present on the watch, please retry step 4 or contact Shot Scope support.
Description
With its user-friendly design and array of high-tech capabilities, the Shot Scope GPS Golf V2 Watch is the perfect golfing companion. You may wear it on or off the course with confidence because to its modern style and high-definition touchscreen display. Put your mind at ease and concentrate on your game with our automatic hole advancement and course recognition systems. In addition to helping you choose the right clubs for the job, the watch's shot tracking and performance analysis capabilities let you assess your game and find places to improve.
BEFORE YOU PLAY FOR THE FIRST TIME
Step 1: Charging your Shot Scope V2
How to charge
Your Shot Scope V2 can be charged from any USB port or USB compliant wall charger. Please use the micro-USB cable provided. The charging port can be found on the back of the watch. The watch screen will show that the device is charging and the percentage of battery it currently holds - changing to “100%” upon completion. When you first receive your Shot Scope, we recommend charging it fully before your first round. Please allow up to five hours for the watch to fully charge. We do recommend fully charging your Shot Scope between uses to ensure optimum performance.
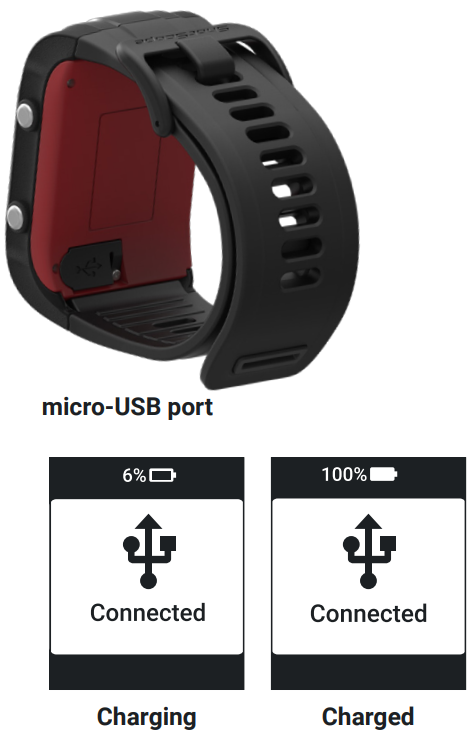
Top Tip: To preserve battery life, we recommend you power down the watch when not in use. To power down the device, press the top-left button and then press yes (bottom left button).
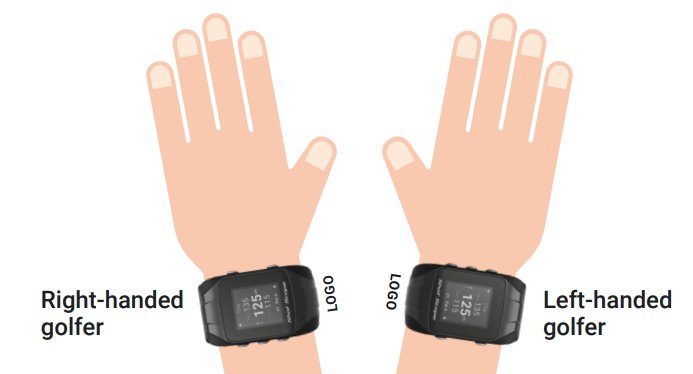
Step 2: Left or right handed
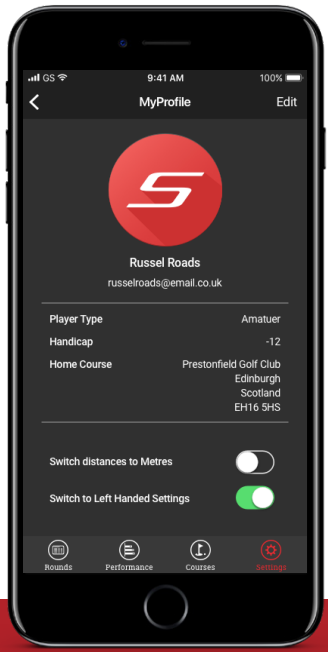
The hand on which you wear the watch depends on whether you are a left or right-handed golfer. If you play as a right-handed golfer, it must be worn on your left hand, and if you play left-handed, it must be worn on your right hand. The watch must be within 10 cm of the tag when swinging the club, therefore it is essential that you do not wear the watch high on your wrist. By default, the watch is configured for right-handed players. This can be changed in ‘Settings’ on either the desktop or mobile apps. Your watch must be connected via USB or Bluetooth to change this setting.
Note: Wearing ION bands or other devices can affect Shot Scope’s performance.
TO CHANGE SETTINGS
- Connect your watch using the USB cable provided. Once connected, navigate to settings where you can update this using the toggle.
Connect your watch to your smartphone. To do this, open your Shot Scope app and tap connect at the top of the rounds page. Once connected, navigate to the settings page and select profile. Within ‘profile’ you can update this using the toggle.
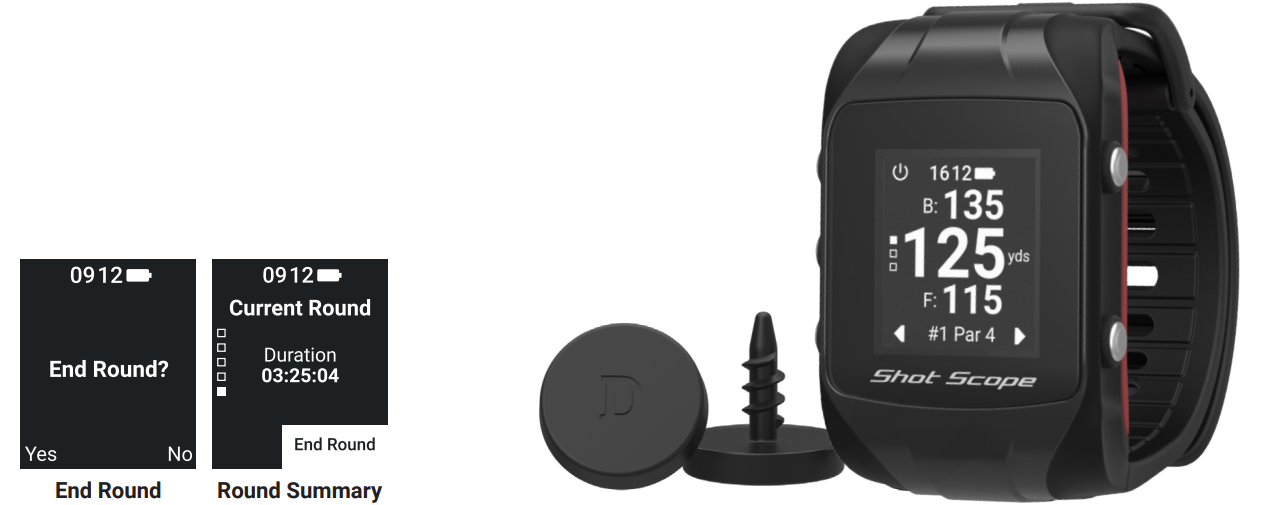
Step 3: Installing tags
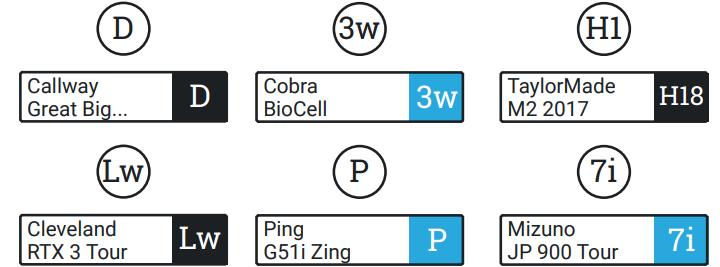
Your Shot Scope comes with 20 tags, each labeled with an initial to identify the club. It is best practice to match the appropriate tags with the corresponding club.
For example, the D tag would screw into your driver. Tags must be inserted securely into the grip of the club you wish to track. Do this by rotating the tag clockwise while applying a slight downward force. There are 4 ‘spare’ tags marked X1, X2, X3, and X4, these should be used for clubs such as a 7 wood or an extra driver. Only the P tag can be used with a putter.

Step 4: Setting up My Bag
My Bag can be found in the dashboard by clicking your name (top right) which will display a dropdown. Once you have screwed your tags into their respective clubs, you should then enter the make and model of each of your clubs using the ‘My Bag’ feature. My Bag allows you to collect data for all of your clubs and compare each individual club accurately, gaining performance insights for as many clubs as you wish. To find out more, please go to: www.support.shotscope.com/mybag This feature will soon be added to the mobile apps.
AT THE COURSE
Step 1: Getting ready to play
To start your round, turn on your watch and press the ‘Pin’ icon located on the top right. You can then select which mode you would like to use. Your watch will then search for a GPS fix which should take around 30 seconds. (The first time you search for a GPS fix it may take around 2-5 minutes). We suggest that you turn your watch on at the start of your round on the 1st tee. This stops the watch from recording any swings or shots from your warm-up routine.
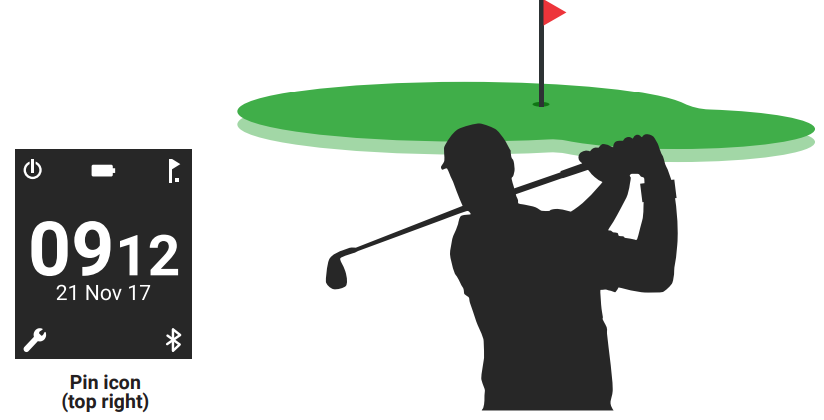
Note: You need to be within 400/500m of a golf course to get a GPS signal.
Step 2: Modes
The modes are interchangeable and allow you to get the most out of your V2 by offering flexibility between events. Before you start your round, select which mode you would like to use. Choose between: GPS, PRO, or GPS+Track.

- GPS: Provides F/M/B yardages on the screen of your V2 throughout your round. This mode does not gather any performance tracking information.
- PRO: Automatically gathers performance tracking data for retrospective game analysis. This mode does not provide any on-course information and no GPS distances will be displayed on your watch while you play.
- GPS+Track: Combines the two modes above, providing both GPS distances and collecting performance tracking data to analyze your game post-round.
Step 3: During Play
PinCollect
PinCollect is a simple feature that allows you to get the most out of your statistics by collecting the position of the pin. When you reach a green, your watch will automatically change to the PinCollect screen. This screen shows the numbers 1-4, which represent the number of putts taken on the hole. Once you have holed out, simply press the number which correlates the number of putts taken, over the hole, and the pin location will be saved.
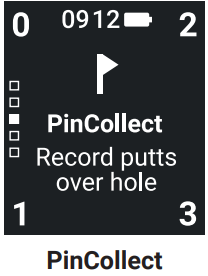
Top Tip: PinCollect is the only way that we can determine where the pin is on any given day. So if you don’t use PinCollect, we have no way of knowing whether your approach/chip was 30ft or 10ft away.
What if I forget to PinCollect?
Don’t worry if you forget to PinCollect occasionally. Although the watch will remind you to do so on every green, forgetting is still easily done! If you do forget, you can add the pin position in editing and move your putts as required.
Scrolling between holes
When you go to a new hole, the watch should automatically move on to the next hole. You can scroll between holes by using the bottom left and right buttons.
Lost GPS signal
If the watch loses GPS signal during the round, you will be notified on the screen. The watch will automatically start to search for GPS and, if this happens, you can simply wait and the screen will return to yardages. If you want to end the round at this point, press the bottom right button. This will return the watch to the home screen.

Ending a Round
To complete your round, press the menu button three times. You will be asked to confirm that you wish to end your round. Do this by pressing the bottom-left button which will then advance you to a summary of your round. If you have pressed this in error and do not wish to end your round, press the menu button to return to the yardages.
The end of your round confirmation displays your round summary with playing time. Press the bottom-left button to return to the home screen, or the bottom right button to proceed to the sync screen.
POST-ROUND
Step 1: Uploading your data
- Once you have played a round you must then upload it in order to view your performance data.
- To upload your data on desktop, connect your Shot Scope watch to your computer using the USB cable provided. You will then get a message asking if you wish to “Sync” your watch. Click “Sync” and all rounds stored in the watch will be downloaded and then made available to view on your Shot Scope dashboard.
- To upload your data on mobile, navigate to Rounds. At the top of the page, there will be a message saying “Band not connected. Tap here to connect.” Press this button and instructions on how to connect your Shot Scope will appear. Follow these instructions to connect your mobile device with your watch. Remember Bluetooth and location services (Android) must be enabled on your mobile device.
- Once the watch has connected, the message at the top of the Rounds page will change to “Band Connected. Tap here to sync”. Simply tap this message and your round data will begin to sync. If there is no data on the watch the tab will only say “Band connected”.
- Once your round has successfully synced, it will appear on your Rounds page.
Step 2: Editing data
Editing is one of the most useful features on your performance dashboard and should be part of every user's Shot Scope routine.
To find out more about editing please go to: www.support.shotscope.com
Setup Guide
To set up the Shot Scope GPS Golf V2 Watch, follow these simple steps:
- Charge the watch fully before use.
- Download and open the Shot Scope app on your mobile device.
- Create a new account or log in to an existing one.
- Turn on the watch and select "Bluetooth" in the settings menu.
- Follow the on-screen instructions to pair the watch with your mobile device.
- Use the mobile app to search for and download courses in your area.
- Once on the course, the watch will automatically recognize the course and hole you're on.
GET THE MOST OUT OF YOUR SHOT SCOPE
Practice strokes for optimum data
To maximize data collection, it is vital that practice strokes are taken beside the ball. This allows for the refinement of the algorithm which detects shots. We recommend taking multiple practice strokes beside the ball for each shot to give the system maximum data to pull from. If you find that your V2 is not picking up shots, we recommend increasing your practice strokes and playing again. Practice strokes are vital when putting and will ensure that your shots are recorded accurately, please take practice strokes beside the ball only.
Metal and GPS
As with any GPS device, there is the potential for interference caused by metal. If the golfer has any metal in their body, such as pins or plates, this can disrupt the signal. Metal worn on the wrists can also cause data distortion, including copper bracelets. We recommend that nothing else is worn on the wrists whilst using Shot Scope. This includes another watch, smartwatch or negative ION bracelets.
Where to wear
In order to provide automatic shot detection, Shot Scope uses both the watch and the tags. The two must be within a 10cm range of each other at all times when a shot is being played. If you grip down or wear the watch high on your wrist and the watch becomes more than 10cm away from your tag, then the shot will not be recorded.
Troubleshooting
If you experience any issues with your Shot Scope GPS Golf V2 Watch, try these troubleshooting steps:
- Check that the watch is charged and paired with your mobile device.
- Ensure that the correct course and hole are selected in the mobile app.
- Restart the watch by holding down the power button for 10 seconds.
- If the watch still doesn't work, contact Shot Scope customer support for further assistance.
WARRANTY INFORMATION
FOR CONSUMERS PROTECTED BY CONSUMER PROTECTION LAWS OR REGULATIONS IN THEIR COUNTRY OF PURCHASE. THE BENEFITS CONFERRED BY THIS LIMITED WARRANTY ARE IN ADDITION TO ALL RIGHTS AND REMEDIES CONVEYED BY SUCH CONSUMER PROTECTION LAWS AND REGULATIONS.
Shot Scope Technologies Ltd products are warranted to be free from defects in materials, components, and workmanship through normal use. The Warranty Period begins on the date of purchase from Shot Scope Technologies Ltd and lasts for a period of (12) months for a new product and (90) days for a refurbished product.
Shot Scope Pros & Cons
Pros
- Real-time distances to greens, hazards, and targets
- Shot tracking and performance analysis
- Sleek design and high-resolution touchscreen display
- Automatic course recognition and hole advancement
- Compatible with both Android and iOS devices
Cons
- Some users may find the watch's price point to be high.
- The watch may not be compatible with some older mobile devices.
Customer Reviews
Customers have praised the Shot Scope GPS Golf V2 Watch for its accuracy, ease of use, and stylish design. The watch's long battery life and automatic course recognition have also been popular features among users. However, some users have criticized the watch's price point as being too high, while others have reported issues with compatibility with older mobile devices.
Faqs
To begin, what sets the Shot Scope GPS Golf V2 Watch apart from its competitors?
How can I configure the Shot Scope GPS Golf V2 Watch wristwatch?
How do I get the Shot Scope GPS Golf V2 Watch to charge?
In what ways does the Shot Scope GPS Golf V2 Watch GPS work accurately?
Does the Shot Scope GPS Golf V2 Watch understand how I hit the ball?
Does the Shot Scope work with both iOS and Android phones and tablets?
How long does the Shot Scope GPS Golf V2 Watch's battery last?
How can I make my Shot Scope V2's software more up to date?
How can I see the Shot Scope V2's success stats?
Does the Shot Scope GPS Golf V2 Watch show how far away dangers are?
Leave a Comment