Spiegel Computerized Sewing Machine 60609 User Guide
Content
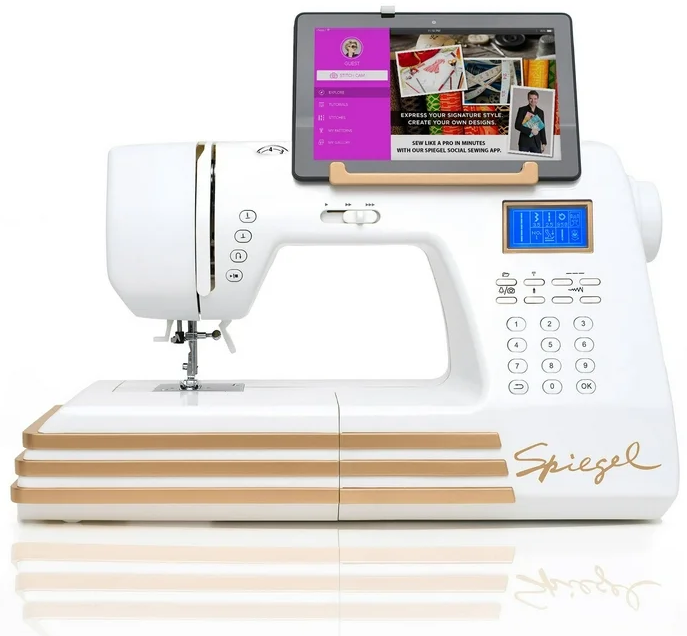
Introduction Spiegel Computerized Sewing Machine 60609
The Spiegel Computerized Sewing Machine 60609 is an innovative and versatile tool designed for both beginners and experienced sewers. With over 350 built-in stitches and the ability to download additional patterns, it offers extensive creative possibilities. Features like automatic start/stop technology, a one-step buttonhole function, and a built-in Wi-Fi station for connecting to a StitchCam enhance usability. This sewing machine is priced at approximately $299, making it a valuable addition to any sewing enthusiast's collection.
GETTING TO KNOW YOUR SEWING MACHINE
SPIEGEL 60609 OVERVIEW
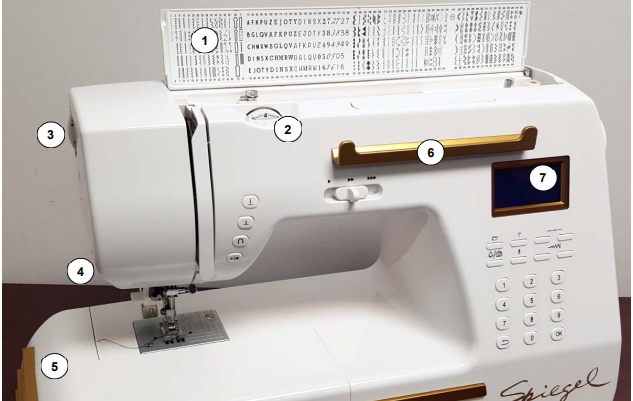
- Top Cap
- Thread Tension Dial
- Presser Foot Pressure Dial
- Thread Cutter
- Accessories Box
- Smart Device Holder
- LCD Display
- Bobbin Winder Thread Dial
- Thread Guide
- Main Spool Pin
- Minor Spool Pin
- Bobbin Winder Spindle
- Bobbin Stop
Handy Hook
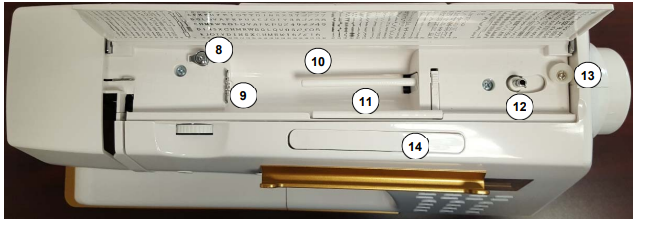
- Hand Wheel
- Carrying Handle
- USB Charging Station
- Main Power Switch
- Foot Control Socket
- Main Power Socket
- Presser Foot Lever
- Feed Dogs
- Automatic Threader Lever
- Fast-Change Foot Lever
- Buttonhole Lever Arm
- Needle Plate
- Power Cord
- Foot Controller
Camera and Light (not visible)
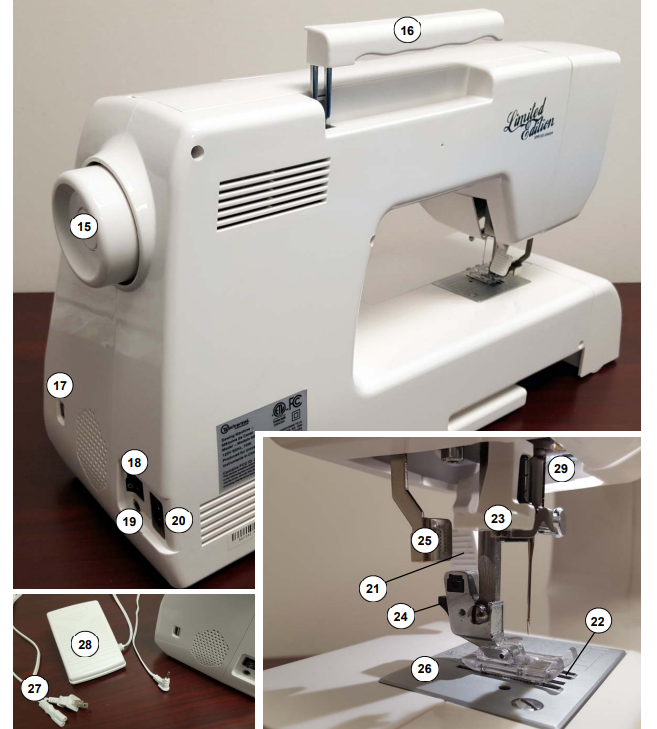
Machine Power and Sockets
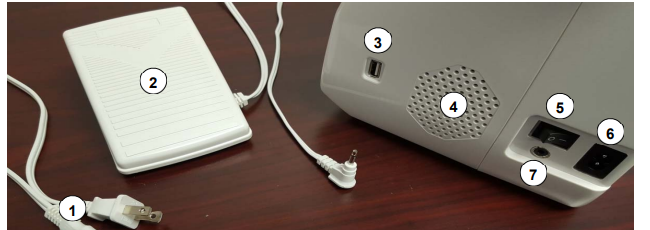
- Power Cord — Connects to main power socket.
- Foot Controller — This controls the sewing speed (up to the speed selected by the slider).
- USB Charging Station — The USB charging station is available to charge your mobile devices.
- Air Vent — Make sure the air vent is never obstructed in any way.
- Main Power Switch — This switch toggles the main power on and off.
- Main Power Socket — Connect the power cord to the power socket, then to the wall outlet.
- Foot Controller Socket — Connect the foot controller to this port.
NOTE: If a power outage occurs while sewing, immediately switch off the machine power and unplug the power cord. When power is restored, restart the sewing machine normally.
WARNING: Your sewing machine has a polarized electrical plug (one blade is wider than the other). Always plug the blades in correctly to an approved, listed wall outlet to reduce your risk for electrical shock. Never force the plug. If the plug does not fit, make sure you have aligned the polarized blades correctly. If the plug still does not fit, contact a qualified electrical technician. Never modify the electrical plug in any way.

This sewing machine is intended for indoor household use only. Never use this sewing machine outside or expose it to the elements. Using this machine outdoors or exposing it to the elements could result in electric shock or damage to the machine. This machine is not intended for industrial use. Never expose the machine to extreme heat. Proper ventilation is required for normal operation. Poor ventilation or extreme heat could lead to machine failure, electrical fire, and increased risk of electric shock.
Accessories
Your sewing machine ships with all the accessories you need to begin sewing right away. These include the following items:
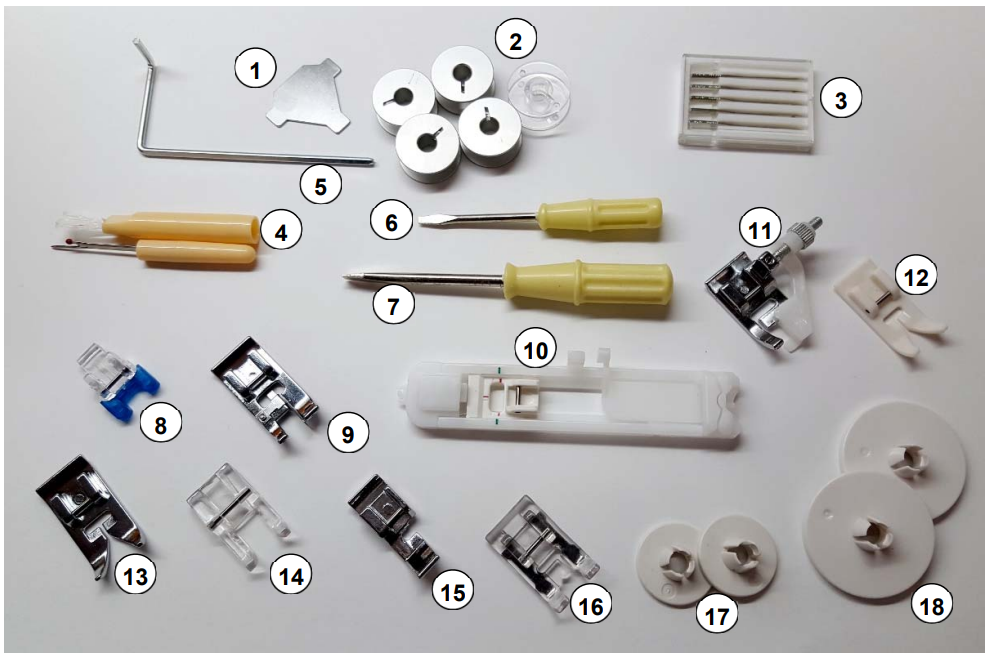
- T-Shaped Screwdriver
- Bobbins (6 total included; 1 is installed)
- Needle Pack
- Seam Ripper/Brush
- Edge/Quilting Guide
- Screwdriver (Small)
- Screwdriver (Large)
- Button Fitting Foot
- Overcasting Foot
- Buttonhole Foot
- Blind Hem Foot
- Zigzag Foot
- Non-stick Foot
- Open Toe Foot
- Zipper Foot
- Monogramming Foot (installed)
- Spool Cap (Small) (2 included)
- Spool Cap (Large) (2 included)
Controls Overview
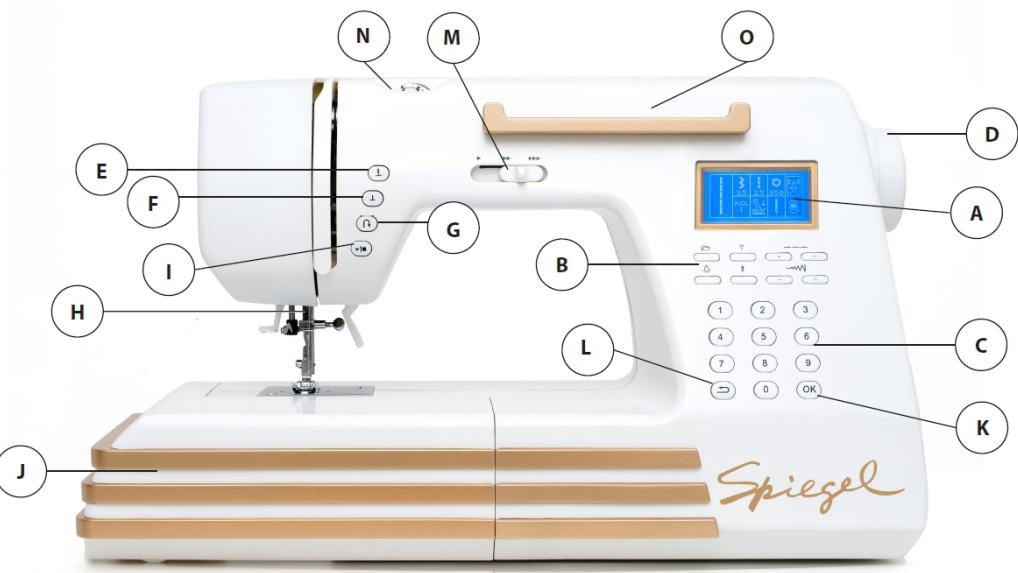
- LCD Display — This backlit panel provides feedback on operation selections.
- Menu Function Keys — These keys allow the user to enter menu selections.
- Numeric Selection Keys — These keys allow the user to enter stitch selections.
- Handwheel — This allows the user to raise and lower the needle manually.
- Needle Up Key — This automatically raises the needle, allowing the user to move and trim fabric.
- Needle Down Key— This automatically lowers the needle, preventing slippage.
- Reverse Stitch Key — When this key is pressed, the sewing machine automatically sews in reverse.
- Needle and Presser Foot — Refer to the details on pages 6 and 10 for more information.
- Start/Stop Key — This key allows the user to start and stop the sewing machine.
- Accessories Box — This detachable tray holds accessories for your sewing machine. (While not a “control,” it is a very useful organizational tool.)
- OK Key — This key allows the user to confirm entries.
- Cancel/Clear Key — Press this key to cancel the previous entry.
- Speed Control Slider — The user may slide this lever left or right to control the speed of the machine.
- Thread Tension Dial — This dial is used to adjust the upper thread tension. Tension is adjusted automatically to the setting selected.
- Smart Device Holder — This tray can be used to hold your smartphone, tablet, or other wireless device for use with the Stitch CamTM feature.
Needle and Presser Foot
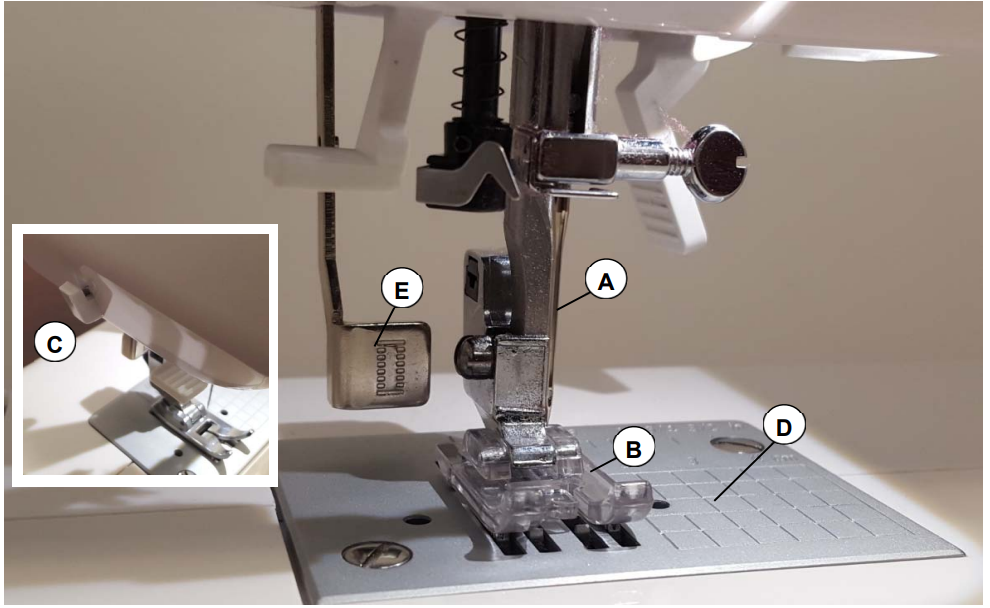
- Needle — The needle of your sewing machine can be changed by turning the screw on the shaft above the needle. The flat side of the needle must be flush to the shaft (if the needle is installed backwards, it will fall out). Your sewing machine also incorporates an automatic threading mechanism that threads the needle when you pull the lever connected to the mechanism.
- Presser Foot — The presser foot maintains pressure on the fabric during stitching, keeping fabric smooth and in position. Open areas within the shape of the presser foot accommodate different stitches. There are different presser feet for zigzag stitches, for buttonhole stitches, and for zipper stitches. Your sewing machine ships from the factory with a basic presser foot already installed. This is sufficient for sewing basic stitches.
- Thread Cutter — Your sewing machine is equipped with a thread cutter. Simply draw the thread through the opening in the cutter and pull down gently over the blade set in the plastic hook, using enough pressure to separate the thread. You may then remove the fabric.
- Needle Plate — The needle plate incorporates moving grooves beneath the presser foot (“feed dogs”), which pull the fabric through the machine as you sew. The feed dogs can be dropped (lowered) for quilting projects.
- Buttonhole Lever Arm — This arm is used with the one-step buttonhole foot when sewing buttons. Refer to page 35, “Buttonhole Foot Sewing,” for more information. Always remove pins prior to sewing. Always keep feed dogs free of debris, pins, and scraps of fabric or thread, to prevent clogging and jamming of the bobbin.
Detailed Specifications
- Computerized Interface: Easy-to-use LCD display with touch controls.
- Stitch Options: 60 built-in stitches, including decorative, utility, and quilting stitches.
- Automatic Threader: Simplifies the threading process, saving time and effort.
- Free Arm: Allows for easy sewing of cuffs, sleeves, and other hard-to-reach areas.
- LED Light: Provides ample illumination for your work area.
- High-Speed Sewing: Capable of up to 850 stitches per minute.
Operation Buttons
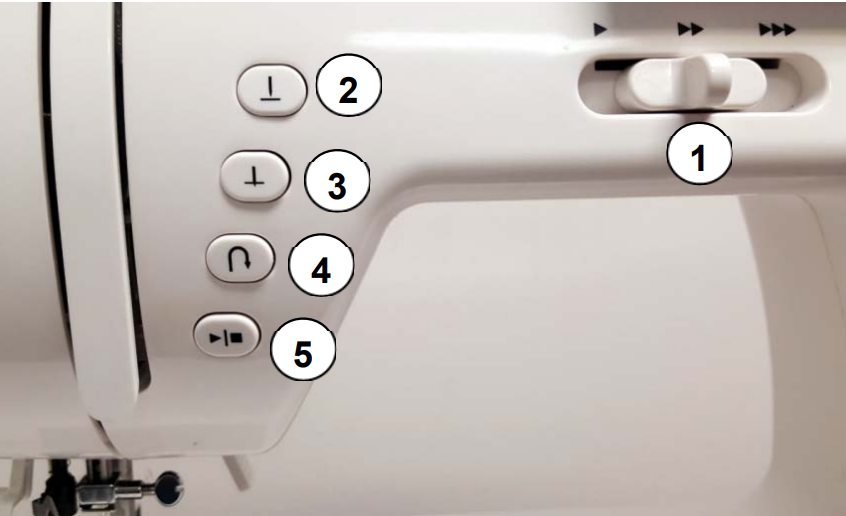
- Sewing Speed Control Slider — Moving the slider from left (slow) to right (faster) changes the speed (for those stitches where faster speeds are available).
NOTE: The highest speed of 950 stitches per minute is available only in straightstitch sewing. Certain stitches have different maximum speeds, which are set in the sewing machine software. These maximum speeds cannot be exceeded. Changing the speed controller will not increase the speed of the stitch past this point. - Needle Up Key — Press the Needle Up key to stop the needle in the upper position. This is used when operating the automatic needle threader and when removing fabric from the machine.
- Needle Down Key — Press the Needle Down key to stop the needle in the lower position. This is used to more easily trim and maneuver fabric.
- Reverse Stitch Key — Press the Reverse Stitch key to sew reverse stitches.
NOTE: The key must be held down for reverse stitching. Release the key to stop sewing. Only straight stitches can be reversed evenly. - Start/Stop Key — Press the Start/Stop key to start or stop sewing.
NOTE: The Start/Stop key functions ONLY when the foot controller is NOT plugged in. Once the Start/Stop key has been pressed to start the machine, the machine WILL NOT STOP until the key is pressed again. - LCD (Liquid Crystal Display) — This provides visual indication of settings for the selected stitch and also displays status and error messages.
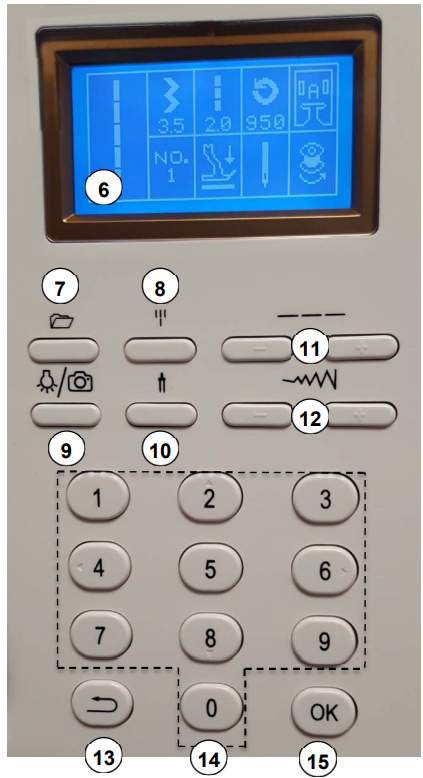
- Folder Setting Key — Press this key to enter the numeric designation for a specific stitch (which is confirmed with the OK key).
- Stretch Stitch Key — Press this key to reverse 3-5 stitches, which reinforces the stitching. This feature works with straight stitches only.
- LED Light/Camera Key — Press this key to turn on/off the LED light and camera. Switching off the light and camera also switches off WiFi connectivity.
- Needle Type Key (Single/Twin) — Press this key to toggle between single needle sewing and twin needle sewing. Stitch width automatically adjusts to 4mm when twin needle sewing is toggled on.
- Stitch Length Keys — Press " - " or "+" to adjust the stitch length.
- Stitch Width Keys — Press " - " or "+" to adjust the stitch width. Stitch width cannot be changed on certain preprogrammed stitches.
- Cancel/Clear Key — Press this key to cancel the entry.
- Numeric Selection Keys (0-9) — These keys are used to enter the numeric designations for specific stitches.
OK Key — Press this key to confirm entries when entering stitch code numbers.
Numeric Selection Keypad Arrows
Arrows on the 2, 4, 6, and 8 keys of the Numeric Selection Keypad can be used when selecting stitches (refer to Selecting Stitches for more information). Normally, to select a specific stitch, you would press the Folder Setting key, then the number of the stitch you want. If you do not first press the Folder Setting key, the 2, 4, 6, and 8 keys function as directional inputs.
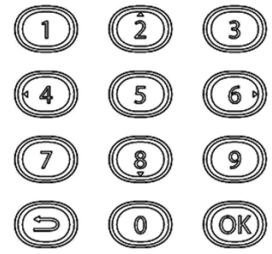
- Left Arrow (4 Key): This lets you scroll backwards through previously used stitches. For example, if you used stitch #1, stitch #5, and stitch #10, you could left-arrow back to stitch #5 from stitch #10.
NOTE: Stitches only become available in this “scroll back” list after you have sewn with them. Simply entering the stitch and confirming with the OK key does not add the stitch. - Right Arrow (6 Key): This lets you scroll forward through previously used stitches if you have already scrolled backward. For example, if you used stitch #1, stitch #5, and stitch #10, you could left-arrow back to stitch #5 from stitch #10, then right-arrow forward to stitch #10 again.
- Up Arrow (2 Key): This lets you scroll up through the stitch catalog stitch by stitch.
- Down Arrow (8 Key): This lets you scroll down through the stitch catalog stitch by stitch.
LCD (Liquid Crystal Display)
The LCD displays status and error codes for your sewing machine. These are displayed in the form of icons. The icons are arranged as follows:
_spiegel_computerized_sewing_machine_60609.png)
- Selected Stitch
- Numeric designation for the selected stitch
- Presser foot status (raised or lowered)
- Twin/single needle sewing status
- Winding status (highlighted while winding bobbins)
- Presser foot type that is installed (refer to the Presser Foot Icons section)
- Maximum sewing speed (which ranges from 90 to 950 stitches per minute)
- Stitch length (0mm to 5mm)
- Stitch width (0mm to 7mm)
CONTROLLING YOUR SEWING MACHINE
Your computerized sewing machine uses electrical power. Follow all relevant safety guidelines to avoid the risk of shock, fire, and injury.
WARNING
Outdoor use is not recommended. Use the sewing machine only as designed and intended. Do not use the machine with accessories not provided for sale by Spiegel. Use of unapproved accessories could result in injury and/or damage to the machine, and will void your limited Spiegel product warranty.
- This machine should not be operated near oxygen tanks or where oxygen is being administered. Do not operate the machine in proximity to any aerosol chemical.
- Your sewing machine has a polarized electrical plug (one blade is wider than the other). Always plug the blades in correctly to an approved, listed wall outlet to reduce your risk for electrical shock. Never force the plug. If the plug does not fit, make sure you have aligned the polarized blades correctly. If the plug still does not fit, contact a qualified electrical technician. Never modify the electrical plug in any way.
- NEVER operate the sewing machine if the power cord is damaged or exposed wires are visible. The sewing machine should not be operated after it has been exposed to water, after it has been subjected to impact damage, or if it has otherwise been damaged. Always have your sewing machine examined and repaired by an authorized Spiegel dealer if it has been damaged.
- Do not leave the sewing machine plugged in while it is unattended. Always unplug the sewing machine from the electrical outlet when it is not in use. Never clean or maintain your sewing machine while it is plugged in. Do not unplug the machine while power is switched on. Always switch the power off before unplugging the machine, and never pull the power cord by the cord itself. Always hold the power cord by the plug.
- Always switch off the sewing machine whenever you are changing the needle or whenever you are otherwise adjusting the sewing machine.
- Do not block the ventilation slots of the sewing machine. Proper air flow is required for operation of the machine. Do not allow fabric, dust, or debris to block the air vents. Never insert objects into any openings or seams on the machine.
Using The Foot Controller
The speed control slider sets the maximum speed at which you sew, but the foot controller allows you to control the actual speed at which you sew, from zero up to the maximum speed selected by the slider.
Connect the foot controller to the socket on the sewing machine. Then simply press lightly on the foot controller with your heel resting at the base.
The more pressure you exert, the faster the sewing machine operates. When you release pressure on the foot control, the sewing machine will stop.
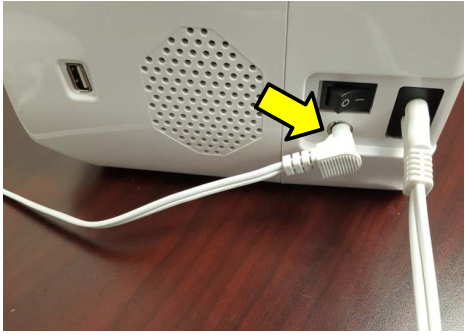
NOTE: Before using the foot controller, connect it to the foot controller socket on the sewing machine.
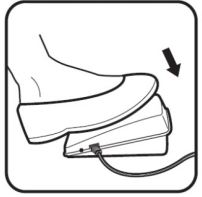
WARNING — Always watch the needle or the Stitch CamTM when sewing. Keep fingers away from the needle area. You may feel the natural urge to look down at the foot pedal the first few times you use it, but resist this urge to reduce the risk of personal injury. Operate the foot pedal through feel and watch the needle or the Stitch CamTM as you sew.
Always switch off the sewing machine before connecting the foot controller. This prevents the machine from running accidentally when the controller is connected.
NOTE: The Start/Stop key cannot be used to start and stop the sewing machine when the foot controller is connected to the sewing machine.
Speed Control Slider
Slide the speed control to the left (1) for slower speed and to the right (3) for the highest speed. You can adjust the speed only to the maximum for the selected stitch, which varies from stitch to stitch. The setting selected by the slider becomes the foot controller’s maximum speed. The speeds are as follows:
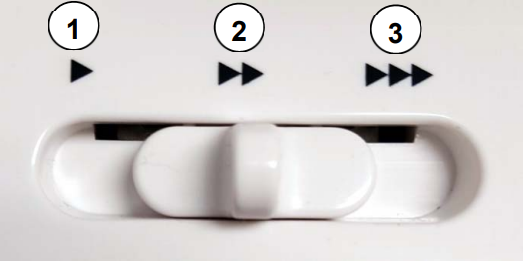
- Low — 90-300 stitches per minute
- Medium — 300-500 stitches per minute
- High — 500-950 stitches per minute
CONNECTING TO YOUR STITCH CAM
~ Spiegel 60609 WIFI STATION & CAMERA ~
Overview
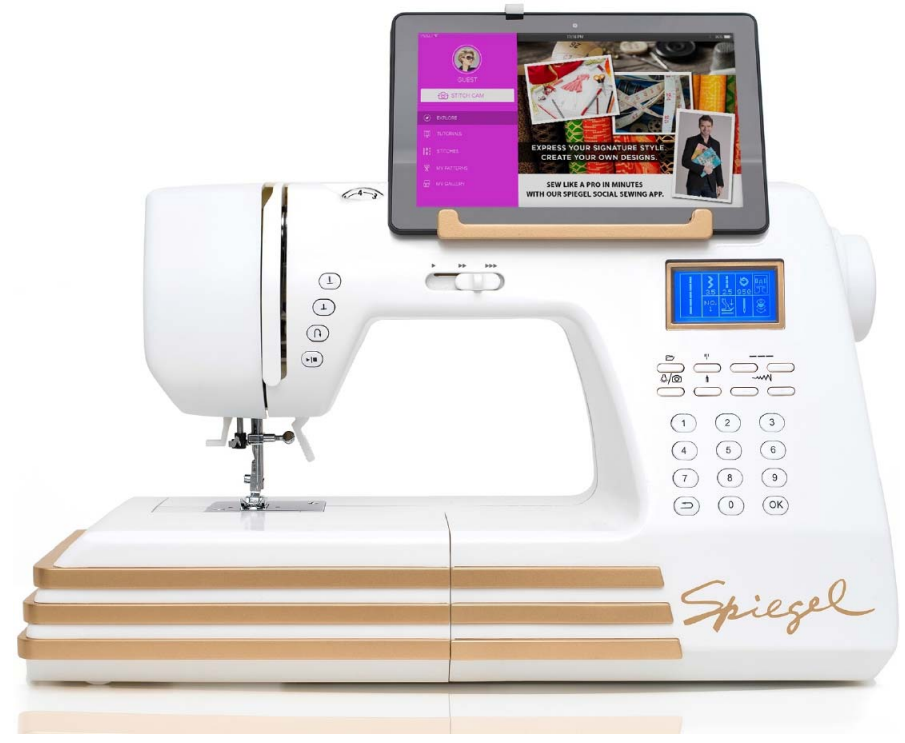
Your Spiegel WiFi capable sewing machine comes equipped with a camera that overlooks the sewing work area. A smartphone, tablet, or other wireless device running the Spiegel sewing app must be connected to your sewing machine’s local WiFi network to facilitate viewing the sewing area in a real-time close-up view. The tablet/smartphone Handy HookTM on top of the sewing machine allows you to safely mount your wireless device on the machine while the viewing application is in use. A USB charging station is also located on the sewing machine for your convenience.
Using the Handy Hook
The Handy Hook can be used to hold your smartphone, tablet, or other device securely on the sewing machine so that you can take full advantage of the machine’s advanced features. For large devices, use the Handy HookTM with the rotating hook positioned at the top of the shaft for maximum possible reach. For smaller devices, remove the hook and reverse it within the shaft as shown so that the hook can be positioned close enough to hold the device.

Setting Up Your Sewing Machine
To connect to the Stitch CamTM, you will need to download the Spiegel sewing app. Once installed, the app will guide you through the necessary steps to get your Stitch CamTM working.
NOTE: The default password is Style150. Your Spiegel 60609 is compatible with 2.4ghz routers ONLY.
- Download and install the Spiegel sewing app from Google Play, the iTunes Store, or Amazon App Store, depending on your device and operating system.
- Turn on your sewing machine.
- From your smartphone, tablet, or other wireless device, run the Spiegel sewing app and follow the instructions to connect with your sewing machine.
Download the Spiegel Sewing App right now from Google Play, the iTunes Store, or the Amazon App Store! Not only will the app guide you through the process of controlling your Stitch Cam, but our website https://www.SpiegelSewing.com contains many video tutorials that will help you get the most out of your Model 60609 sewing machine. You can access SpiegelSewing.com through the QR code shown here.
NOTE: Depending on your device, it may be necessary to exit the Spiegel sewing app in order to connect or reconnect to the appropriate wireless network. This may also be necessary when updating firmware for your sewing machine, or when updating the app itself.
Using the USB Charging Station
Your sewing machine is equipped with a state-of-the-art USB charging station located at the bottom front area of the sewing machine’s right side.
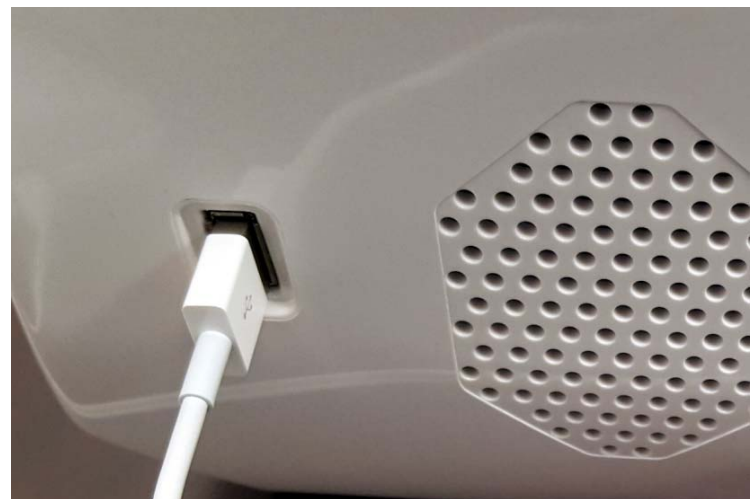
Any supported device can be plugged into this port and charged while it is used in conjunction with the Stitch Cam.
WARNING — Plug in your device to charge only when necessary. Make sure USB cables do not become snagged or pulled into the sewing machine. If any cord or USB plug appears damaged, discontinue use immediately to avoid risk of electric shock or machine power failure. DO NOT insert foreign objects into the USB charging station. Make sure the USB charging station does not become blocked with pins, needles, thread, fabric, or other debris.
NOTE: USB connectors can be inserted in the charging station in only one direction. Do not force connectors. Check the orientation of the plug before attempting to reinsert it.
If your device does not charge when connected to the USB charging station, it may be incompatible with the charging station, or the charging station may not generate sufficient power for your device to register the charge. If this occurs, use an alternate charging method.
Description
The Spiegel 60609 is built with durability and convenience in mind. Its sturdy metal frame ensures long-lasting performance, while the ergonomic design makes it comfortable to use for extended periods. The machine comes with a variety of accessories, including presser feet, bobbins, and a user manual. The built-in carrying handle makes it easy to transport, making this machine perfect for classes, workshops, or home use.
The machine's computerized features allow for precise control over stitch length and width, and the automatic threader simplifies the setup process. The large sewing field provides ample space for larger projects, and the adjustable presser foot lift helps in managing thick fabrics with ease.
HOW TO THREAD AND USE YOUR MACHINE
Upper Threading and Auto Threader
WARNING — Always switch off the machine power before performing upper threading.
- Raise the presser foot lever.
- Rotate the handwheel counter-clockwise to raise the needle to its highest position.
- Open the top cover of the machine.
Upper Threading - Insert the spool of thread and secure it with one of the supplied spool caps.
Pull the thread through the thread guide as shown.
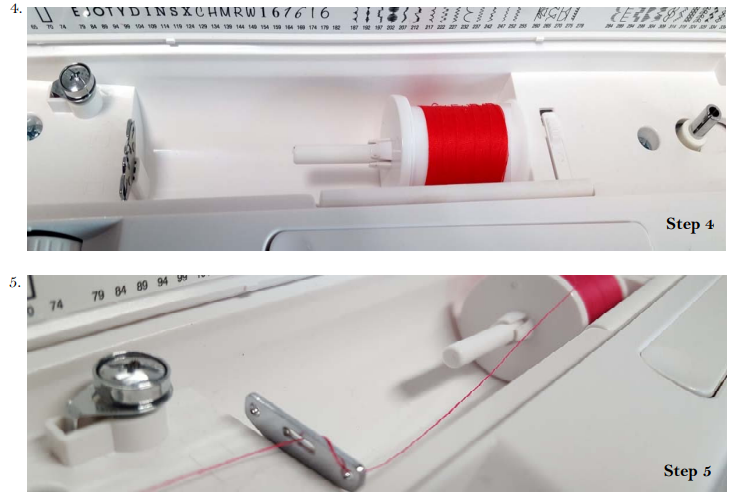
- Pull the thread through wire guide as shown.
Guide the thread down, around, and up into the long U-shaped channel until it is captured by the mechanism, then bring the thread down to the needle area. The cutaway view shows what is happening inside the machine when you bring the thread down and around the U-shaped tension plate: the thread is captured by the internal mechanism so it can be brought down to the needle.
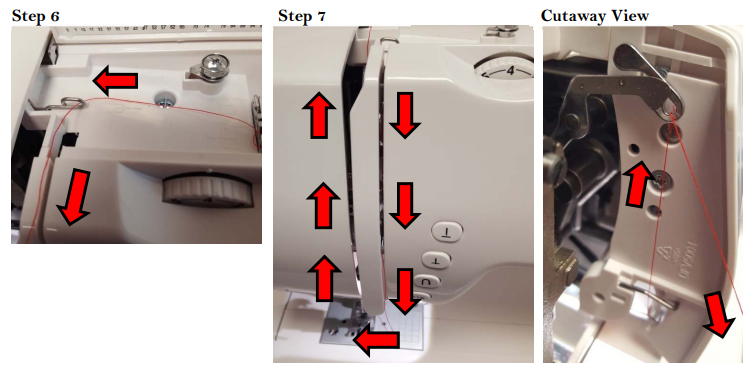
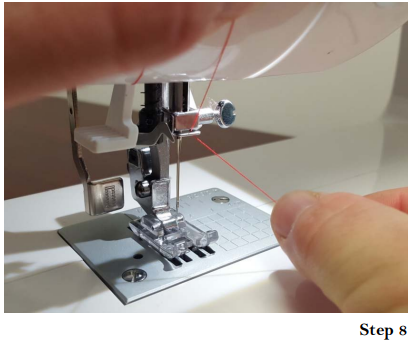
Bring the thread down to the needle and guide it as indicated. It is now possible to thread the needle. Refer to the next page for instructions on using the auto-threader.

Auto-threader
- Loop the thread around the hook of the auto-threader as shown here.
- Press the auto-threader lever to bring the hooked thread down toward the needle.
The thread should be guided into position by the auto-threader relative to the needle as shown here. When the auto-threader lever is released, the thread will be pulled through the eye of the needle.
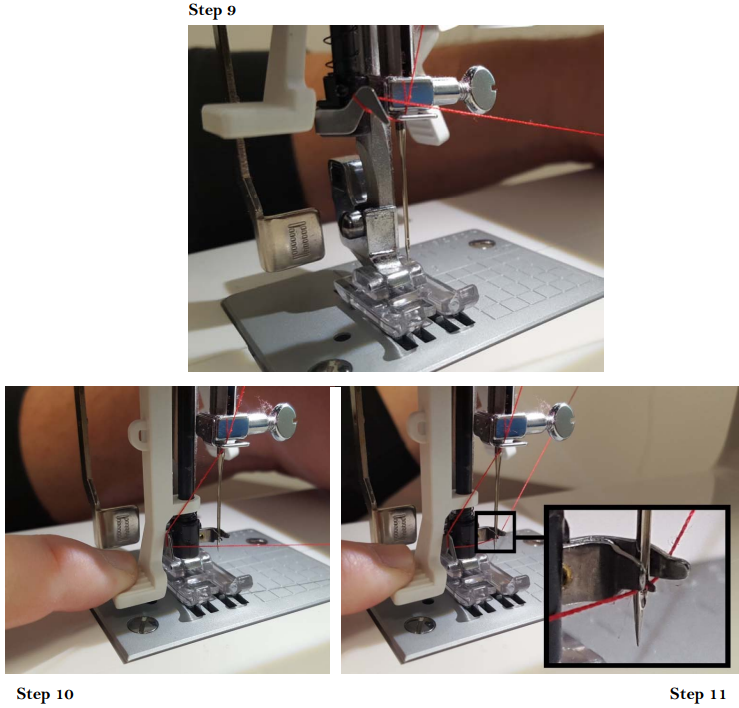
NOTE: If this is your first time using the automatic threader tool, it may take a few attempts to catch the thread as shown in Step 11. The hook that passes through the needle must be able to catch the thread. Press down firmly to make sure the hook passes through the needle fully. Release simultaneously, opening your hand and letting go of the hook at the same time.
- Slowly release the auto-threader lever, drawing the thread through the eye of the needle.
- If auto-threading is successful, the thread will appear as shown.
Position the thread to prepare for lower threading.
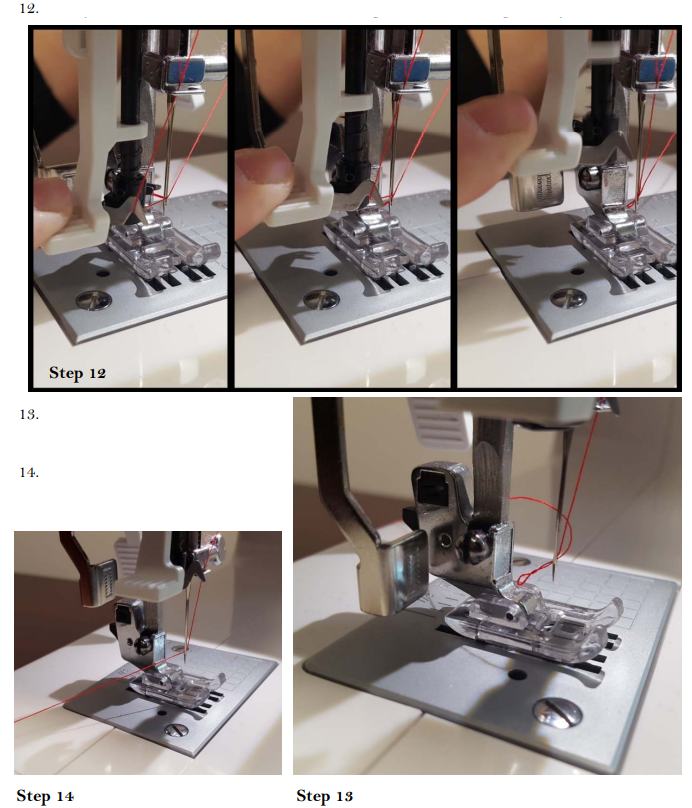
Make sure these three conditions are met in order to have consistent success with the automatic threader:
- The needle must be in the up position.
- The auto-threader lever must be fully depressed to ensure the hook within the needle cage has fully rotated through the needle eyelet.
- When drawing the thread across the needle cage, make sure the thread is pulled back against the needle and up against the bottom side of the hook. This will help the hook to catch the thread successfully when retracting.
Winding the Bobbin in Preparation for Lower Threading
CAUTION: Always stop sewing before winding the bobbin. The 60609 sewing machine uses a BO-103(Z) style bobbin. Use of any unapproved bobbin could damage the machine or result in poor performance. Additional bobbins are available at Spiegelsewing.com.
To wind the bobbin in preparation for lower threading, stop sewing, open the top cover, and perform the following steps:
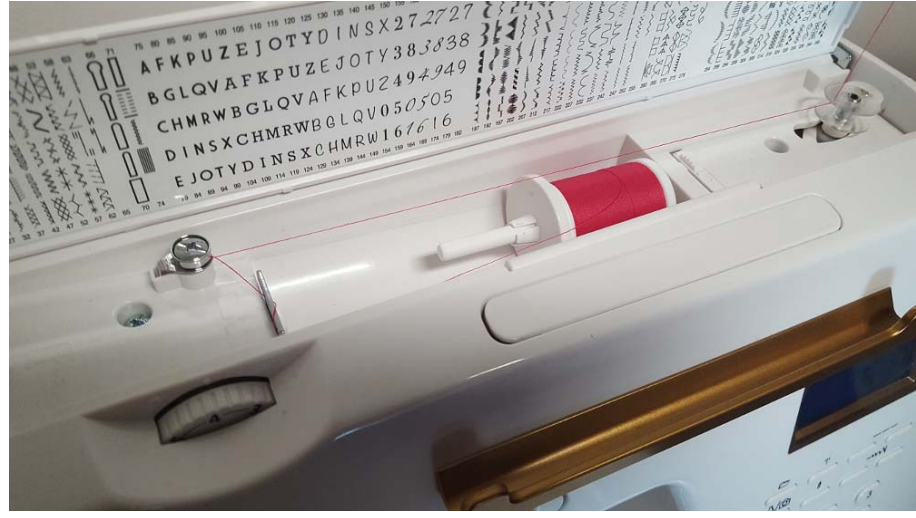
- Place a spool of thread onto the spool pin and secure it with one of the provided spool caps.
- Pull the thread through the thread guide and counter-clockwise around the bobbin winder thread guide.
- Guide the thread back toward the bobbin as shown.
- Pick up the bobbin, pass the end of the thread through the hole in the bobbin, and reposition the bobbin on the bobbin winder shaft. The bobin is now prepared for winding.
Insert the bobbin on the bobbin winder spindle and push the spindle into the winding position. The bobbin winding icon will be highlighted on the sewing machine’s LCD display.

Bobbin Prepared for Winding
Using the Start/Stop button or the foot controller, run the sewing machine to wind the bobbin.
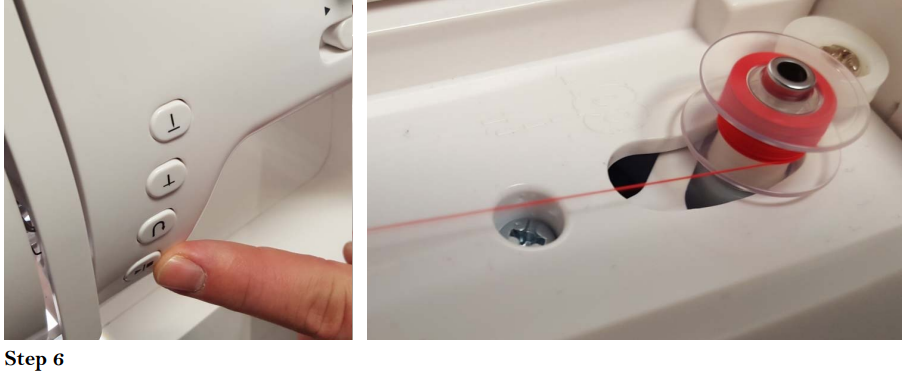
NOTE: For best resuls, use at least medium speed for bobbin winding.
- Release the foot controller or press the Start/Stop key and cut the end of the thread when the bobbin is full. The bobbin will automatically stop winding when it is full, but the machine will
When bobbin winding is completed, push the bobbin winder back to the left position to return to sewing. Remove the bobbin from the shaft.
NOTE: When the bobbin winder spindle is in the “bobbin winding” position, the machine will not sew and the hand wheel will not turn. To start sewing, push the bobbin winder spindle to the left (“sewing position”).
Lower (Bobbin) Threading
WARNING — Always switch off the machine power before performing lower threading.
CAUTION — The 60609 sewing machine uses a BO-103(Z) style bobbin. Use of any unapproved bobbin may damage the machine or result in poor performance. Always stop sewing before winding the bobbin.
NOTE: The needle must be raised to its upper position before inserting or removing the bobbin.
Perform the following steps to insert the bobbin:
- Remove the accessories box and open the hinged cover below the needle area. The bobbin case has a metal latch in its face. Pull this latch to release the bobbin case from the sewing machine. Remove the bobbin case.
Hold the bobbin case so the thread unwinds in the direction shown and put the bobbin in the bobbin case, pulling the thread into the notch.
_threading_spiegel_computerized_sewing_machine_60609.png)
Draw the thread under the tension spring, out from the slot on the end of the spring, and pass it through the bobbin case thread guard. Allow about 4 inches of thread to hang freely from the bobbin.
_threading_of_spiegel_computerized_sewing_machine_60609.png)
- Insert the bobbin case fully into the machine as shown and release the latch. Make sure the metal finger fits into the notch at the top of the race cover. You should hear a loud “click” when the bobbin seats properly.
NOTE: Do not operate the sewing machine with the bobbin installed unless you hear the bobbin locking mechanism click, indicating it is seated properly.
Spiegel 60609 Setup Guide
- Unboxing and Assembly:
Carefully unpack the machine and its accessories. Assemble the machine according to the user manual. - Threading:
Use the automatic threader to thread your machine. Follow the on-screen instructions for threading guidelines. - Selecting Stitches:
Choose your desired stitch from the LCD display. Adjust stitch length and width as needed. - Pairing Accessories:
Attach the appropriate presser foot for your project type. - Starting to Sew:
Place your fabric under the presser foot and begin sewing. Adjust speed and tension as necessary.
Important Safety Instructions
AVOID THE RISK OF ELECTRIC SHOCK, FIRE, BURNS, OR PERSONAL INJURY
WARNING
Outdoor use is not recommended. Use the sewing machine only as designed and intended. Do not use the machine with accessories not provided for sale by Spiegel. Use of unapproved accessories could result in injury and/or damage to the machine, and will void your limited Spiegel product warranty.
- This machine should not be operated near oxygen tanks or where oxygen is being administered. Do not operate the machine in proximity to any aerosol chemical.
- Your sewing machine has a polarized electrical plug (one blade is wider than the other). Always plug the blades in correctly to an approved, listed wall outlet to reduce your risk for electrical shock. Never force the plug. If the plug does not fit, make sure you have aligned the polarized blades correctly. If the plug still does not fit, contact a qualified electrical technician. Never modify the electrical plug in any way.
- NEVER operate the sewing machine if the power cord is damaged or exposed wires are visible. The sewing machine should not be operated after it has been exposed to water, after it has been subjected to impact damage, or if it has otherwise been damaged. Always have your sewing machine examined and repaired by an authorized Spiegel dealer if it has been damaged.
- Do not leave the sewing machine plugged in while it is unattended. Always unplug the sewing machine from the electrical outlet when it is not in use. Never clean or maintain your sewing machine while it is plugged in. Do not unplug the machine while power is switched on. Always switch the power off before unplugging the machine, and never pull the power cord by the cord itself. Always hold the power cord by the plug.
- Always switch off the sewing machine whenever you are changing the needle or whenever you are otherwise adjusting the sewing machine.
- Do not block the ventilation slots of the sewing machine. Proper air flow is required for operation of the machine. Do not allow fabric, dust, or debris to block the air vents. Never insert objects into any openings or seams on the machine.
TO AVOID THE RISK OF PERSONAL INJURY OR DAMAGE TO THE SEWING MACHINE
WARNING
Be extremely careful when placing your hands close to the needle and presser foot, components that always have the potential to cause injury to the hand. Never push or pull fabric into and through the needle and presser foot area, which can cause a feed dog failure, clog the bobbin, break the needle, or make the needle jump.
- Never permit children to operate the machine unsupervised or to play on or around it. Your Spiegel computerized sewing machine is not a toy. Adult supervision is required for younger users.
- Never use a damaged needle in the sewing machine. Bent or broken needles should be discarded immediately.
- Unplug the machine when storing it and when it is not in use, even for short periods of time. This is especially important when children are present in the household.
- Repair and service of your Spiegel computerized sewing machine must be conducted through and by an authorized dealer. Contact Spiegel customer service for more information. Complete contact information may be found at www.SpiegelSewing.com.
Troubleshooting
- Thread Breakage:
Check for tangles or knots in the thread. Ensure proper threading. - Machine Jam:
Turn off the machine, remove any fabric, and carefully clear the bobbin area. - Stitch Quality:
Adjust stitch length and width. Ensure correct tension settings. - Instruction Warnings:
Always refer to the user manual for specific instructions. Avoid overloading the machine with too many layers of fabric.
Pros & Cons
Pros
- User-Friendly Interface: Easy to navigate and operate.
- Versatile Stitch Options: Suitable for various sewing tasks.
- Durable Construction: Built to last with a metal frame.
- Convenient Accessories: Includes multiple presser feet and other useful tools.
Cons
- Price Point: May be out of budget for some users.
- Complexity for Beginners: May require some time to get accustomed to all features.
- Heavy: Due to its metal construction, it can be heavy to transport.
Customer Reviews
Customers have praised the Spiegel 60609 for its ease of use and wide range of features. Many have found it to be a significant upgrade from their previous sewing machines. However, some users have noted that the machine can be somewhat heavy and may require some time to learn all its functions.
Common complaints include occasional thread breakage and the need for occasional cleaning to maintain performance. Despite these minor issues, the overall feedback is positive, with users appreciating the machine's durability and versatility.
Faqs
How do I thread the Spiegel Computerized Sewing Machine 60609?
What types of stitches does the Spiegel offer?
How do I clean the Spiegel Computerized Sewing Machine?
Can I use the Spiegel for heavy-duty sewing?
What accessories come with the Spiegel Computerized?
How do I troubleshoot common issues with the Sewing Machine?
Does the Spiegel come with a warranty?
Can I use my own presser feet with the Spiegel?
How do I update the firmware of my Spiegel Computerized Sewing Machine?
Leave a Comment
