Installation Instructions: Steadyrack Classic Bike Rack Guide
Content
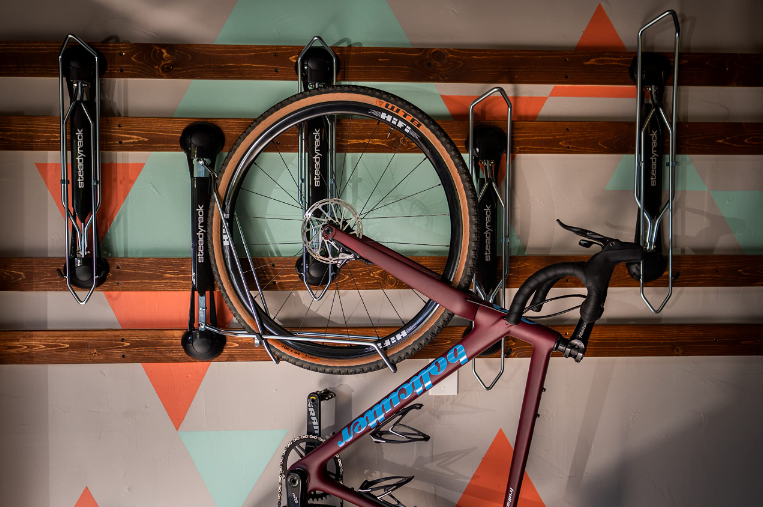
Introducing the Steadyrack Classic Bike Rack
The Steadyrack Classic Bike Rack is a high-quality bike storage solution designed for ease of use and durability. With a sleek and compact design, this bike rack is perfect for any garage or home. The estimated price of the Steadyrack Classic Bike Rack is around $169.99, and it is currently available for purchase.
PARTS INCLUDED
- 1 x Steadyrack Bike Rack
- 1 x Rear Tyre Rest
- 2 x End Caps
MOUNTING KIT
- 4 x Bolts - ½” or 13mm x M8 x 40mm
- 4 x Wall Plugs (masonry use only)
REAR TYRE REST
- 2 x 1¼” screws - 2 Point Phillips Head x M6
- 2 x Wall Plugs (masonry use only)
DRILL BIT SIZES
- Large Bolts - M8
- Smaller Screws - M6
Detailed Specifications
The Steadyrack Classic Bike Rack has several key features that make it stand out from other bike racks on the market. These features include:
- Weight capacity of 77 lbs (35 kg)
- Adjustable rubber bumpers to fit a variety of tire widths
- Folds away when not in use for easy storage
- Durable powder-coated finish
- Easy-to-use design with a simple pull and swivel motion
Description
The Steadyrack Classic Bike Rack is a wall-mounted bike rack that makes storing and retrieving your bike a breeze. With its unique swivel design, you can easily move your bike out of the way when not in use, and then pull it forward when you're ready to ride. The adjustable rubber bumpers ensure a secure fit for tires up to 2.4 inches wide, while the powder-coated finish protects against scratches and rust. Whether you're a serious cyclist or just looking for a convenient way to store your bike, the Steadyrack Classic Bike Rack is an excellent choice.
Installation Instructions
- First you will need the following tools; a tape measure, power drill, the correct sized drill bits (10mm (3/8”) for the rack and 8mm (5/16”) for the rear tyre rest), a Phillips screw driver/bit, and a 13mm (1/2”) socket to tighten the bolts.
- Packaging includes a mounting kit for masonry or timber. If you are installing your rack to a steel frame or any other material, check with your local hardware supplier to ensure you have the correct fixings.
- Installing Steadyrack on drywall is not recommended unless anchored to a stud.
NB: Fixing to drywall only is not recommended and voids our warranty. Racks must be fixed to framing or masonry.
LET’S GET STARTED
Mark the locations of the mounting bolts.
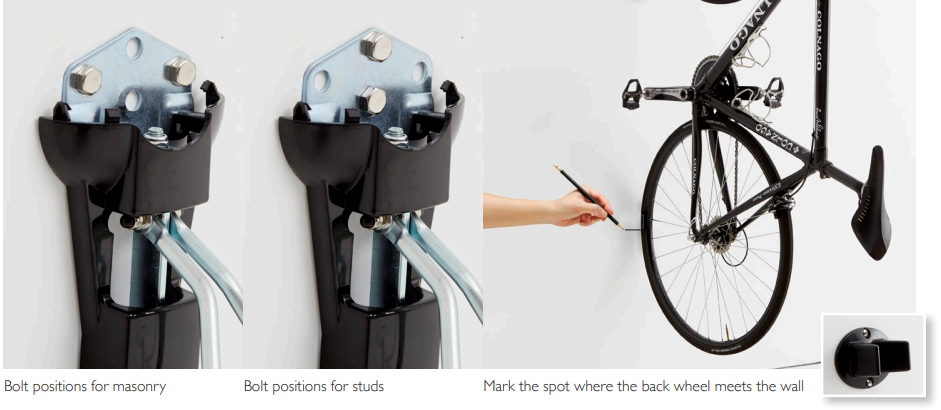
- Take the rack out of the box, remove end caps, Stand your bike in its normal upright riding position and place it at right angles to the wall you are going to attach your Steadyrack bike rack to.
- Make sure the back wheel is hard up against the wall. Next take your Steadyrack bike rack and place it under the front tyre simulating it hanging in the rack.
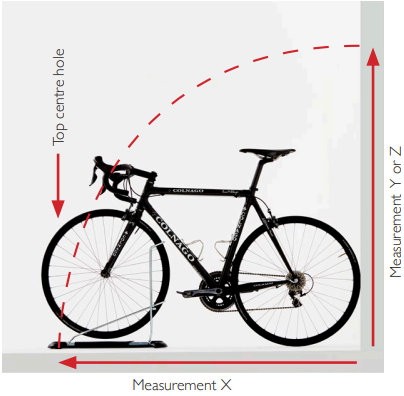
- Mark the position of the centre hole at the top of the rack on the floor with a pencil.
- Now place the bike and the rack to one side and use your tape measure to measure the exact distance from the wall to the pencil mark on the floor. Measurement X.
- Allow between 1” (25mm) and 3” (75mm) clearance from the floor for optimum easy loading and unloading.
Mounting Height
- If your bikes are not exactly the same length you can mount your racks at the same height. Just make sure mounting height you choose fits longest bike and they will all hang nicely in the racks.
- Now transfer measurement X to your wall or frame, (Measurement Y).You have now located the exact position of your first hole.
- Drill your first hole and bolt the Steadyrack to the wall so it hangs loosely. Take a spirit level and place it on the side of the rack.
- Make sure the rack is plumb and vertical and mark all the remaining holes (make sure the rack doesn’t move while you mark the holes).
- Remove the rack from the wall and drill the remaining holes.
- For installation into timber simply pre-drill your holes and fix bolts supplied directly into the timber.
- For masonry, pre-drill your holes and then insert the plastic wall plugs supplied or your own wall plugs.
- You’re now ready to fasten your Steadyrack to the wall.
- Insert the bolts provided through the holes in the Steadyrack and fasten with a socket (1/2” /13mm) or adjustable wrench. Make sure the bolts are firm but be careful not to overtighten them.
- Replace the end caps - you’re almost finished.
- Installing your rear tyre rest bracket (the rest)
- Load your bike into the Steadyrack. Place the rear tyre rest between the wall and the rear wheel. The rear tyre should hold the rest in position against the wall so you can mark the holes. The center of the rear tyre rest should be in line with the rear axle of your bike (see diagram 3 - you can use a spirit level for this). Use a pencil and mark the hole positions on the wall.
- Place the bracket to one side and drill your 2 holes. Insert the wall plugs (for masonry only) and the screws. You are now ready to use your new Steadyrack.
Setup Guide of Steadyrack Classic Bike Rack
Setting up the Steadyrack Classic Bike Rack is easy. Simply follow these steps:
- Choose a suitable wall location, ensuring there is enough space to swivel the bike in and out.
- Install the wall bracket using the included screws and wall anchors.
- Attach the Steadyrack Classic Bike Rack to the wall bracket.
- Adjust the rubber bumpers to fit your bike's tire width.
- Hang your bike on the rack, making sure it is securely in place.
Care & Maintenance
MAINTAINING YOUR STEADYRACK
To ensure your Steadyrack bike rack operates perfectly we recommend you perform the following basic maintenance and checks:
- Check and adjust tension on the nuts on Central Pivot Bar. The nuts that attach the central pivot bar to the top and bottom mounting brackets are pre-tensioned in the factory to a torque setting of 5nm. This is to ensure there is enough resistance when you push your bike into the rack to stop the arms swinging out of the way.
- Remove the two clip-in end caps which cover the mounting brackets using a 13mm socket wrench or a suitable spanner.
- Adjust the nuts connecting the central spine to the top and bottom mounting brackets to the desired tension.
- Be sure to not overtighten or the rack won’t pivot. Replace your end caps and you are good to go.
- Check the nuts attaching the top and bottom arms to the Central Pivot Bar. The 2 arms are connected to the central pivot bar by bolts with dome nuts and black tips either side. These can work loose over time. Check them periodically and tighten.
- Check your mounting bolts from time to time to make sure they haven’t worked loose and tighten if necessary.
Cleaning
Ensure the rack remains free from dirt and debris and clean by dusting or using a dry cloth from time to time.
Materials
- Mild Steel Zinc Coated
- UPVC Plastics
Warranty
Steadyrack warrants that the Steadyrack Bike Rack is free from defects in workmanship and materials for a period of ONE YEAR from the date of retail purchase.
Troubleshooting
Here are some common problems and solutions when using the Steadyrack Classic Bike Rack:
- Problem: The bike won't stay on the rack.
Solution: Make sure the rubber bumpers are adjusted to fit your bike's tire width. Also, double-check that the bike is securely in place before letting go. - Problem: The rack is difficult to swivel.
Solution: Make sure the wall bracket is installed on a flat and level surface. If the surface is uneven, it may be difficult to swivel the rack. - Problem: The finish on the rack is scratched or damaged.
Solution: The Steadyrack Classic Bike Rack is designed to be durable and withstand regular use. However, if the finish is damaged, you can touch it up with a matching paint color.
Pros & Cons
Pros
- Easy to use with a simple pull and swivel motion
- Adjustable rubber bumpers fit a variety of tire widths
- Folds away when not in use for easy storage
- Durable powder-coated finish protects against scratches and rust
- Can hold up to 77 lbs (35 kg)
Cons
- May not be suitable for very heavy bikes
- Requires wall mounting, which may not be ideal for all users
Steadyrack Classic Bike Rack Customer Reviews
Customers love the Steadyrack Classic Bike Rack for its ease of use and durability. Many reviewers note that the rack is easy to install and can hold even heavy bikes securely. Some of the most common complaints are that the rack is more expensive than other bike racks on the market, and that it requires wall mounting, which may not be ideal for all users.
Faqs
What maintenance does the Steadyrack Classic Bike Rack require?
Is installation of the Steadyrack Classic Bike Rack Classic difficult?
Do I need special tools to install the Steadyrack Classic Bike Rack?
Can the Steadyrack Classic Bike Rack be used with kids' bikes?
How do I adjust the rubber bumpers on the Steadyrack Classic Bike Rack?
Can the Steadyrack Classic Bike Rack be used with mountain bikes?
How do I install the wall bracket for the Steadyrack Classic Bike Rack?
How do I swivel the Steadyrack Classic Bike Rack?
Can the Steadyrack Classic Bike Rack be used with carbon fiber frames?
How do I store the Steadyrack Classic Bike Rack when not in use?
Leave a Comment