
Startup: Support Pro Bike Conversion Kit EBK-K261-FT User Manual
Content
Support Pro Bike Conversion Kit EBK-K261-FT
Introduction
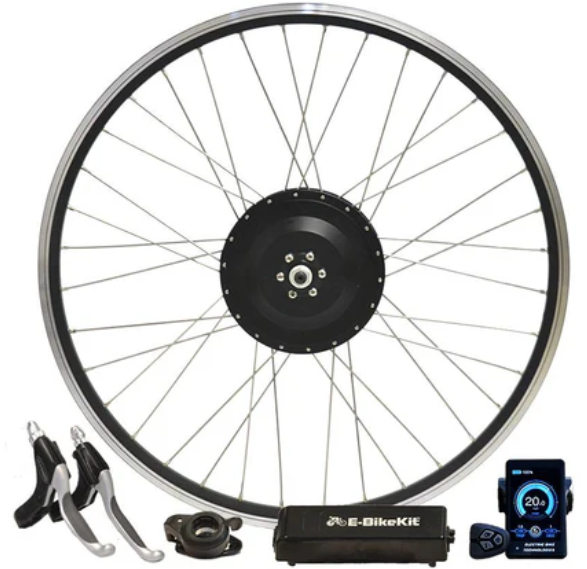
The Support Pro Bike Conversion Kit EBK-K261-FT is a comprehensive solution designed to transform your traditional bicycle into an electric bike. This kit is perfect for cyclists who want to enhance their riding experience with the assistance of electric power. The kit includes a high-efficiency motor, a long-lasting battery, and all the necessary components for a seamless conversion.
The Support Pro Bike Conversion Kit is intended for users who seek to upgrade their biking experience without the need for a new electric bike. With an estimated price range of $500-$700, this kit offers an affordable alternative to purchasing a fully integrated electric bicycle. The kit is expected to launch in the spring of 2024, making it a highly anticipated product among cycling enthusiasts.
The kit is designed to be compatible with a wide range of bicycle models, ensuring that most users can benefit from its features. Whether you are commuting to work, enjoying leisure rides, or tackling challenging trails, the Support Pro Bike Conversion Kit is an excellent choice.
Safety Information
- Install and operate this equipment ONLY in accordance with these instructions. Read them completely before installation and use. Contact customer service if any point is unclear.
- ALWAYS obey all applicable local and national laws and regulations while riding. Do not ride your modified bicycle in any area prohibited for electric bicycles. Always wear your helmet and other required protective gear. Always maintain your reflectors and other required safety equipment.
- ONLY use this equipment with bicycles with fully functioning brakes. Even after the lever is cut to the motorized wheel, the inertia of the bike will often require active braking power.
- ALWAYS ensure all fasteners and components are intact and securely tightened before and after every use.
- DO NOT ride your bicycle if any part of this equipment is damaged or malfunctions. Repair or replace worn and broken parts before further use.
- Pay attention to the remaining power before setting out and during use. Recharge your battery as needed to ensure it never runs out of power at a moment when you are taken by surprise.
- DO NOT allow children or persons unfamiliar with these instructions to operate your modified bicycle without strict supervision.
- DO NOT wear loose footwear or clothing that may become caught in the motorized wheel.
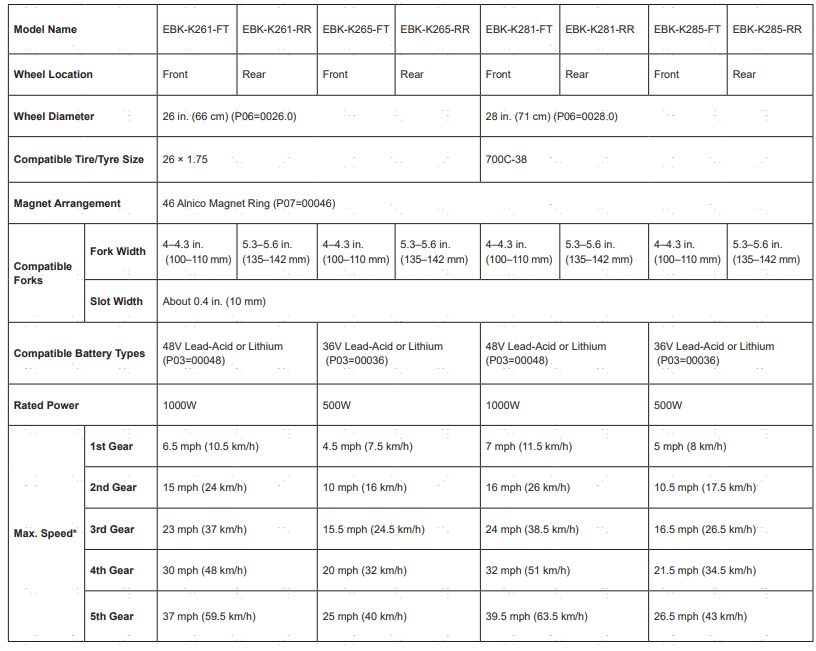
- It is recommended that you not ride your bike faster than about 15 mph (25 km/h) when getting started. This can be ensured by connecting wires J & K on the control hardware and setting the bike's maximum speed to this level until you are fully familiar with your new motorized bike and its controls.
- ALWAYS be alert for people, animals, or any obstacles that may appear in front of you while riding your bicycle. Be aware that pedestrians and drivers may not expect the speed or responsiveness of your motorized bike. Adjust your behavior accordingly. It is advisable to install warning devices to draw their attention, but always be ready to turn safely out of their way if needed. Do not focus on the LLCD for extended periods of time while riding.
- NEVER ride at a speed where your stopping distance exceeds your visibility. We do not recommend that you ride your bicycle at night or in an environment with poor visibility. If you have an emergency that makes it necessary to do so, keep your light on and limit your speed appropriately.
- NEVER use the motorized wheel, cruise control, pedal assist system (PAS), or timed shutoff in any situation, road condition, or terrain where doing so might impair your control of your bicycle.
- NEVER adjust P03, P06, or P07 while using the provided motorized wheel system. Adjustment of these parameters should only be made when using the display and control hardware with other compatible wheels of differing voltage, diameter, or magnet arrangements. In any other case, any adjustment of these parameters should be undone immediately, and the original settings restored before any further use of your bicycle.
- Disconnect the battery from the motorized wheel before any cleaning, servicing, or storage.
Specifications
Package List
Assembly
Installing the Motorized Wheel
Make sure your bicycle is fully functioning and has a front or rear fork compatible with the model of your kit.
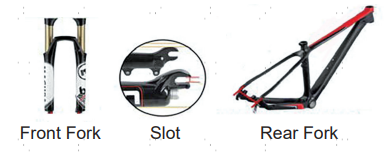
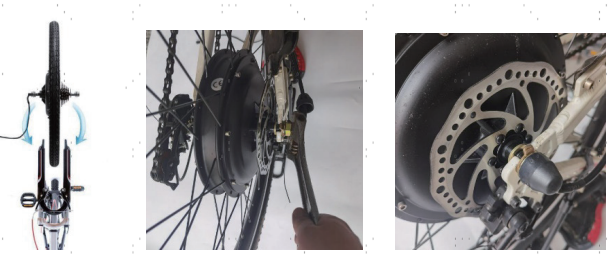
- Turn the main frame of your bicycle upside down and separate the wheel to be replaced from the frame. Note that front and rear motorized wheels are not interchangeable. DO NOT replace your bicycle’s front wheel with a motorized rear wheel or replace your bicycle’s rear wheel with a motorized front wheel.
In the case of disc brakes, disconnect them from the removed wheel and attach them to the new motorized wheel. Make similar adjustments for other styles of brakes. Test the brakes carefully before use and NEVER use your motorized bicycle if its brakes fail to catch or perform badly during testing.
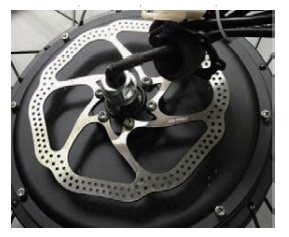
- Loosen the caps, nuts, and washers on the motorized wheel hub.
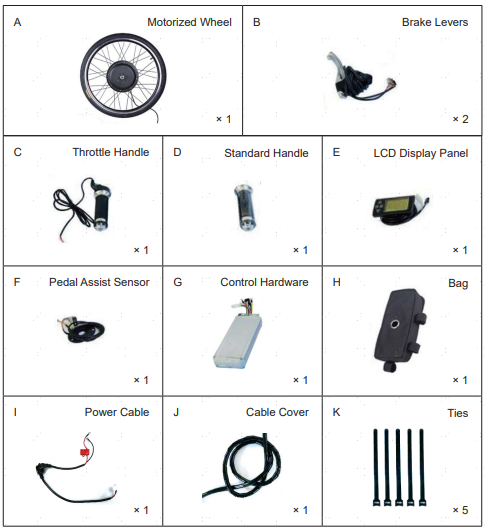
Fit the motorized wheel (A) onto the appropriate fork of the frame, securing it using its washers, nuts, and caps. Use an adjustable wrench/spanner (not included) as needed to fully retighten all fasteners. When installing rear wheels, attach your chain to the included cassette.
Installing the Pedal Assist Sensor
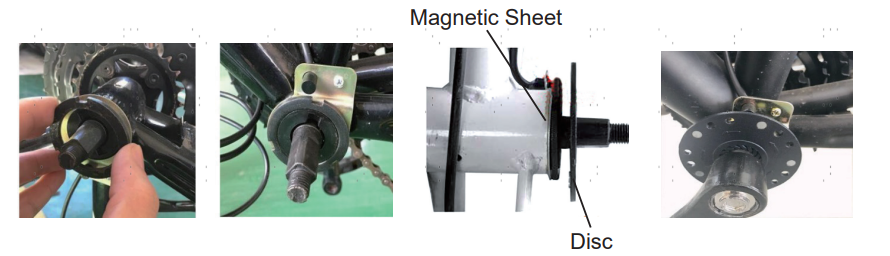
- Remove either crank arm from the pedal axle of your bicycle’s main frame.
- Attach the magnetic sheet of the pedal assist sensor (F) to the axle, sliding it completely forward.
- Secure the magnetic sheet by mounting the removed washers back into place.
- Fit the sensor disc onto the axle, keeping it 0.05–0.1 inches (1–2 mm) away from the magnetic sheet.
- Replace the crank arm onto the pedal axle and secure it with its previously removed fasteners.
Installing the Brake Levers
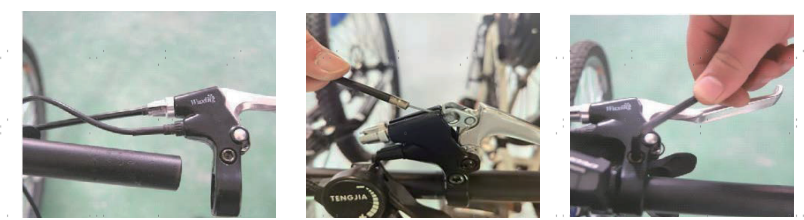
- Disconnect the original brake levers from your bicycle. Separate them from their brake cables.
- Open the clamp of one brake lever (B) by removing its nut and bolt with your adjustable wrench and M5 hex wrench (not included).
- Attach the brake lever to the appropriate handlebar for your jurisdiction. For instance, in the United States, the left handlebar should control the front brake, but in the UK , the right handlebar should control the rear brake. Close the clamp, replacing and retightening its previously removed bolt and nut.
- Fit the brake cable onto the brake lever by passing its round metal head through this lever.
- Install the other brake lever on the other handlebar and connect it to the other brake cable in the same fashion.
Installing the Handles
- Remove the handle corresponding to the brake for the motorized wheel.
- Release the clamp inside the throttle handle (C) by loosening the attached bolt with an M3 hex wrench (not included).
- Attach the throttle handle to the handlebar and tighten the bolt until the handle is securely attached.
- Remove the other original handle and attach the standard handle (D) in its place. To secure the new handle, turn it back and forth while pressing in until it is securely attached. This step can be skipped if your bicycle is incompatible with the inner diameter of the new handle (about 0.9 inches or 22.2 mm). In that case, reattach the brake cable to the original handle and leave it in place.
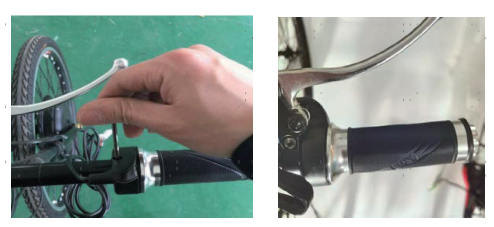
Installing the LCD Display Panel
- Open the clamp under the display panel (E) by removing its bolt with your M3 hex wrench.
- Mount the display on the frame of your bike opposite from the throttle handle.
While holding the display in place, close its clamp and secure it by replacing and retightening its previously removed bolt.
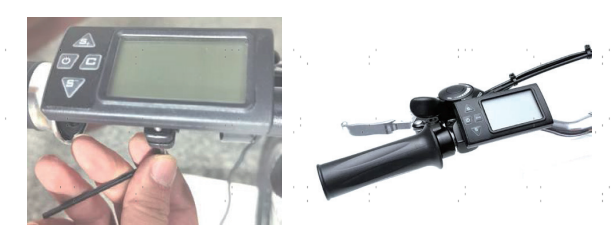
- The display panel can be used to control your bike’s light(s) if desired. Simply disconnect your light from its current power source and connect it to the display’s 2-pin terminal, matching the positive (brown) and negative (white) wires to those from your light.
Installing the Control Hardware
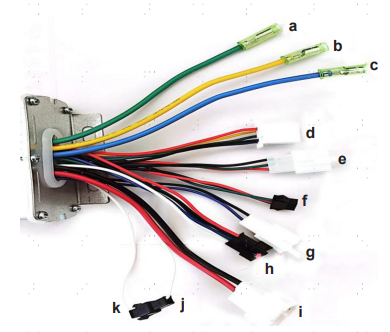
- Fit the control hardware (G) into the provided bag (H), running wires a–k from the hole of this bag.
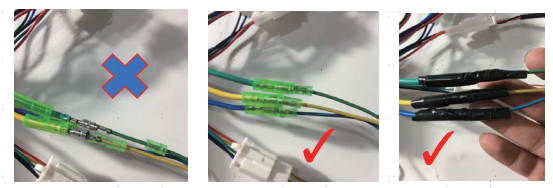
Connect these wires as shown:
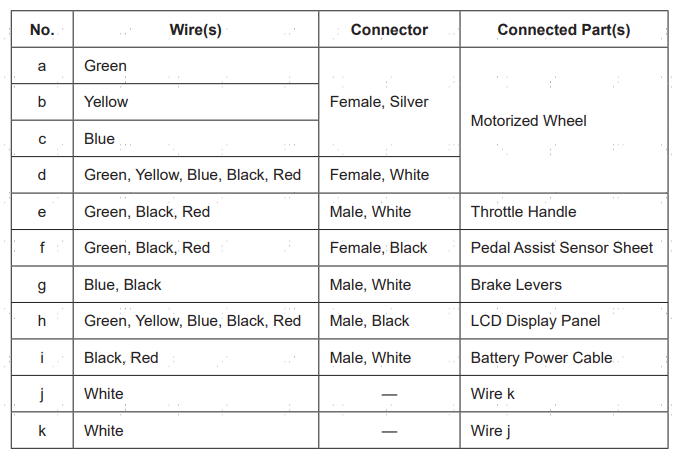
- When connecting wires and terminals, be sure all colors/colours match exactly.
For exposed connectors (a–c), cover them securely with the provided sheaths and with electrical tape or other durable insulation. It is recommended that the cable cover (J) be used to join all the motorized wheel wiring after they are fully connected and wrapped.
- When wires j & k are connected, the motorized wheel will never upshift to 4th or 5th gear. To access these gears, keep these wires disconnected. When you have decided, tuck these wires back into the bag.
- Hang the bag from the main frame of your bicycle using its velcro straps.
Installing Your Battery
- Ensure that your bicycle battery is compatible with your model of motorized wheel.
- Fully charge it according to its separate instructions.
- Install your battery at a convenient position on your bicycle.
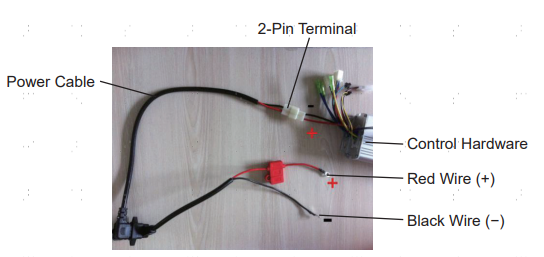
- Connect the power cable (I) to your battery’s terminals, ensuring its red (+) and black (−) ends are securely attached to its anode and cathode, respectively.
- Fully insulate these connections.
Binding the Wires and the Brake Cables
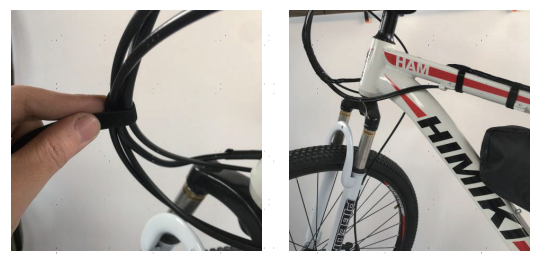
For best results, bind all loose wires and cables using the provided cover (J) and ties (K) with other fasteners.
Troubleshooting
Pros & Cons
Pros:
- Affordable alternative to buying a new electric bike
- High-efficiency motor for smooth and powerful rides
- Long-lasting battery with extended ride times
- User-friendly LED display and thumb throttle
- Compatible with various wheel sizes
Cons:
- Installation can be complex for beginners
- Additional weight from the motor and battery
- May require professional assistance for setup
Customer Reviews
Customers have praised the Support Pro Bike Conversion Kit for its ease of use and significant performance enhancement. Many have noted that the kit has made their daily commutes much easier and enjoyable. However, some users have reported challenges during the installation process, recommending that less experienced cyclists seek professional help.
Faqs
What is the maximum speed of the Support Pro Bike Conversion Kit EBK-K261-FT?
How long does the battery last on a single charge?
Is the kit compatible with all types of bicycles?
Can I use the kit in wet conditions?
How difficult is the installation process?
What kind of maintenance does the kit require?
Can I upgrade the battery or motor in the future?
Does the kit come with a warranty?
How much weight does the kit add to my bicycle?
Can I use this kit for off-road cycling?
Tags
Leave a Comment