
Setup: Tc Electronic Ditto X2 Looper User Manual
Content
TC Electronic Ditto X2 Looper
Introduction
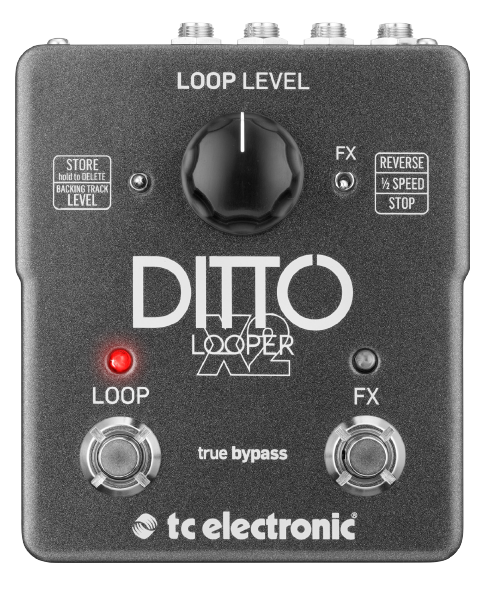
The TC Electronic Ditto X2 Looper is a powerful and intuitive music tool designed for musicians looking to enhance their live performances and practice sessions. This pedal builds upon the simplicity of its predecessor, the Ditto Looper, by offering more features while maintaining ease of use. It features 24-bit signal processing, stereo inputs and outputs, and unlimited overdubs, making it ideal for guitarists and bassists seeking to create complex, layered music pieces. The Ditto X2 also includes reverse and half-speed effects allowing for creative experimentation with loops. With a maximum loop time of five minutes and the ability to import and export loops via USB, this pedal is versatile and user-friendly.
The TC Electronic Ditto X2 Looper is targeted at musicians who value simplicity and high-quality sound. It is particularly useful for solo artists and bands looking to add depth to their performances. The estimated price range for the Ditto X2 Looper is between $140 and $180, making it an affordable option for musicians of all levels. It is widely available from music retailers like Sweetwater and Thomann Music.
Setup
Ready…
The Ditto X2 Looper box should contain the fol-lowing items:
- 1 Ditto X2 Looper pedal
- 2 rubber feet for “non-velcro” pedalboard mounting
- 1 USB cable (for transferring loops from and to a computer and for updating the pedal firmware)
- 1 “Quick Start Guide” sheet
- 1 TC Electronic sticker
- 1 leaflet about TC’s guitar FX product range
- Inspect all items for signs of transit damage. In the unlikely event of transit damage, inform the carrier and supplier.
If damage has occurred, keep all packaging as it can be used as evidence of excessive handling force.
Set…
- Connect a 9V power supply delivering a mini-mum of 100 mA with the following symbol to the DC input socket of Ditto X2 Looper.
- Please note that Ditto X2 Looper does not come with a power supply.
- Plug the power supply into a power outlet.
- Alternatively, you can operate Ditto X2 Looper using one or two 9V batteries.
- Ditto X2 Looper has two battery slots. You can operate the pedal using only one battery, but using two batteries will prolong operation time.
- Connect your instrument to the MONO input jack on the rear of the pedal using a ¼“ jack cable. You can also feed the pedal with a ste-reo signal by using both INPUT jacks.
- Connect the MONO output jack on the rear of the pedal to your amplifier using a ¼“ jack cable. You can also send a stereo signal from the pedal to the next device in the signal chain by using both OUTPUT jacks.
- For more complex setups, see “Setup exam-ples” on page 5.
Let’s get loopin’!
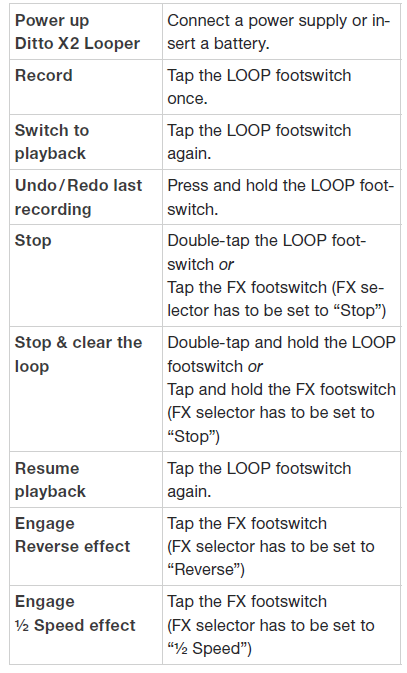
If you are in a hurry, chances are you’ll find what you’re looking for in this overview.
Operation
Setup examples
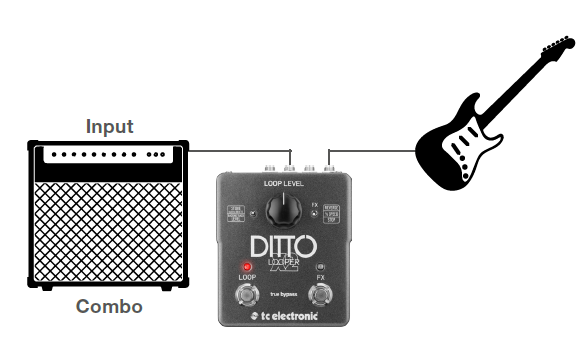
Setup example 1:
Basic looping – no effects
This is the most basic mono setup: your instru-ment, Ditto X2 Looper and your amp.
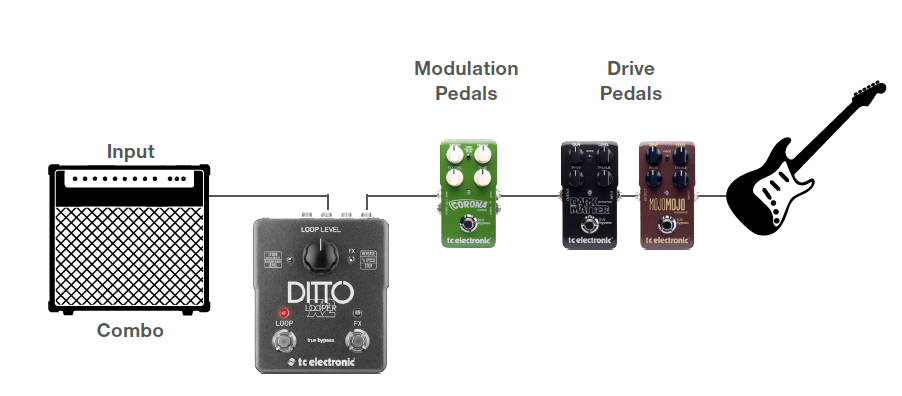
Setup example 2:
Ditto X2 Looper and effects
Place your effects before Ditto X2 Looper. This will allow you to create and record different sounds within the same looping session simply by switching your effects on and off.
Setup example 3:
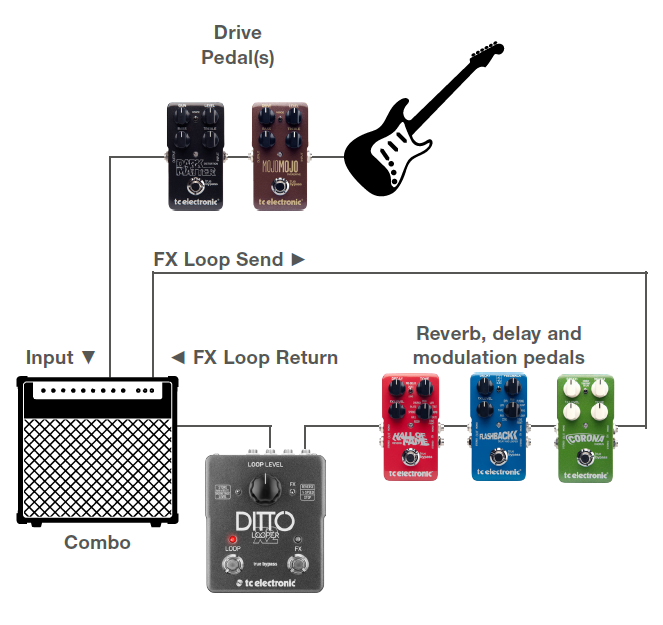
Ditto X2 Looper in an FX loop
If you are using an amp equipped with an FX loop, place your modulation effects and Ditto X2 Looper in that FX loop. Again: To get the most out of your setup, place Ditto X2 Looper at the end of the FX loop. This gives you the flexibility to add parts with or without signal processing by simply switching effects on and off as required.
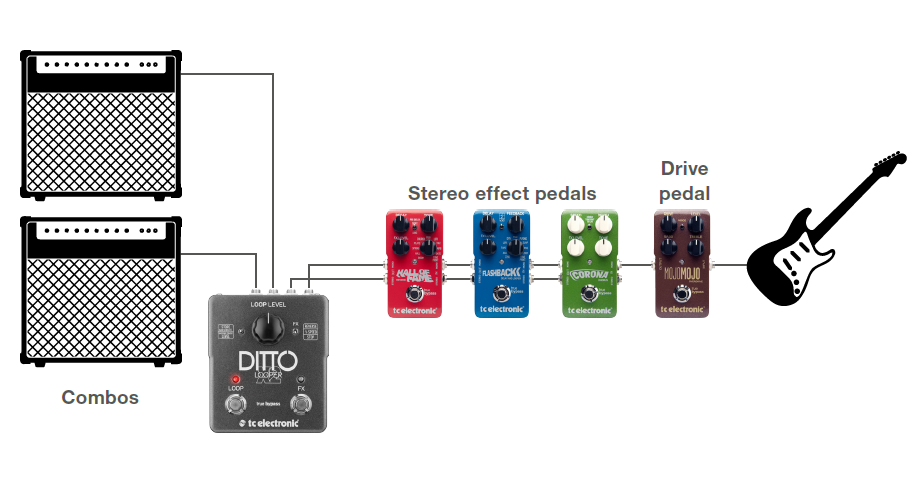
Setup example 4:
Dual amp setup
- Got two amps? Feed’em!
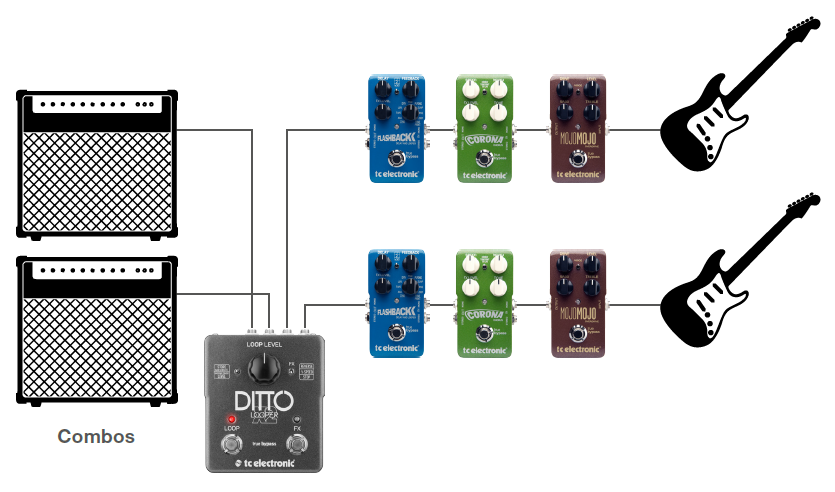
Setup example 5:
- Dual mono with two instruments
- As they say: Two can play!
- Share the love (i.e., your Ditto) with another guitar (or bass) player. You’ll just have to agree on who gets to hit the LOOP footswitch…
Technical specifications
- Maximum loop length: 5 minutes
- Maximum no. of overdubs: Unlimited
- Bypass mode: True Bypass
- Latency: None (analog dry-through)
- Dimensions (Width x depth x height): 113 mm x 135 mm x 54 mm / 4.44” x 5.31” x 2.13
- Weight: 512 g / 1.13 lbs.
- Input connectors: Stereo – 2 standard TS ¼” jacks
- Output connector type: Stereo – 2 standard TS ¼” jacks
- Power input: Standard 9 V DC, centre negative (not supplied)
- USB connector type: Mini-B USB Controls:
- Loop level knob
- Loop footswitch– FX footswitch
- FX selector switch
- Store / Backing track level switch
Troubleshooting the TC Electronic Ditto X2 Looper
Here are some common issues and solutions for the TC Electronic Ditto X2 Looper:
- No Sound Output: Ensure that the pedal is properly powered and that the inputs are connected correctly. Check that the bypass switch is in the correct position.
- Looping Issues: If loops are not recording correctly, check that the loop level is set appropriately and that overdubs are enabled.
- USB Connection Problems: Verify that the USB cable is securely connected and that the software is compatible with your device.
For further assistance, contact TC Electronic's support team. The Ditto X2 Looper typically comes with a warranty that covers defects in materials and workmanship. Regular updates and troubleshooting guides can be found on the official TC Electronic website.
Pros and Cons of the TC Electronic Ditto X2 Looper
Pros:
- Easy to Use: The pedal features a simple two-button interface that is intuitive for beginners and experienced musicians alike.
- High-Quality Sound: The Ditto X2 offers uncompressed 24-bit sound quality, ensuring that loops are clear and undistorted.
- Feature-Rich: Includes reverse and half-speed effects, USB loop import/export, and unlimited overdubs.
Cons:
- Size and Weight: Larger than the original Ditto, which may be a drawback for those seeking the most compact option.
- Price: While affordable, it may be out of budget for some entry-level musicians compared to single-button loopers.
The TC Electronic Ditto X2 Looper offers excellent value for money, especially considering its features and sound quality. It is a solid choice for musicians looking to expand their creative possibilities without breaking the bank.
Customer Reviews of the TC Electronic Ditto X2 Looper
Users generally praise the Ditto X2 Looper for its simplicity, sound quality, and versatility. Common praises include its robust build, intuitive interface, and the ability to create complex musical layers easily. Some users have noted that the larger size compared to the original Ditto might be a drawback for those seeking ultra-compact solutions.
The Ditto X2 Looper typically receives high ratings, often averaging 4.5 out of 5 stars. Testimonials highlight its ease of use and the value it adds to live performances. For those considering purchasing, it is recommended to watch demo videos and compare it with other loopers like the Boss RC-1 to ensure it meets your specific needs.
Faqs
How do I set up the tc electronic Ditto X2 Looper for the first time?
What should I do if the tc electronic Ditto X2 Looper USB connection is not recognized?
What are the main difference features of the tc electronic Ditto X2 Looper compared to the original Ditto Looper?
How can I change the operating mode on the tc electronic Ditto X2 Looper?
Why is my tc electronic Ditto X2 Looper loop playback volume too low, and how do I adjust it?
How do I maintain and care for the tc electronic Ditto X2 Looper to ensure longevity?
Can I use the tc electronic Ditto X2 Looper with stereo setups and backing tracks?
What are common troubleshooting steps if the tc electronic Ditto X2 Looper is not recording or overdubbing correctly?
Tags
Leave a Comment