Teraflex JK 2 And 4 Door 2.5" Lift Kit User Manual | Installation Instruction
Content
Introduction
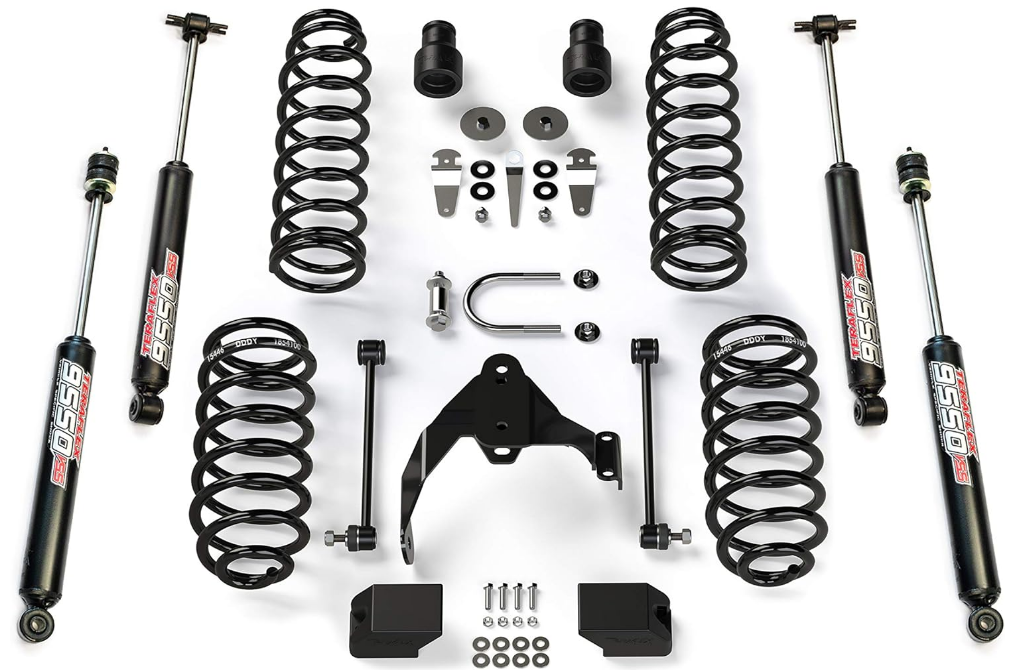
The Teraflex JK 2 and 4 Door 2.5" Lift Kit is engineered to enhance the off-road capabilities of Jeep Wrangler models from 2007 to 2018. This lift kit provides a 2.5-inch increase in height, allowing for larger tires and improved ground clearance without compromising on-road handling. It includes essential components such as lift coil springs and bump stop extensions, ensuring that factory stability controls remain functional. The cost of the Teraflex lift kit is approximately $967.98.
Teraflex JK 2 And 4 Door 2.5" Lift Kit Specifications
The Teraflex JK 2 And 4 Door 2.5" Lift Kit comes with several key features that make it stand out:
- 2.5-inch lift height for increased ground clearance and larger tire capability.
- Heavy-duty coil springs designed for optimal off-road performance.
- Steel track bar brackets for improved durability and alignment.
- Sway bar links to maintain proper suspension geometry.
- Bump stops to prevent overextension and damage.
Important Notes
Prior to beginning this or any installation read these instructions to familiarize yourself with the required steps and evaluate if you are experienced and capable to personally perform these modifica-tions. A factory service manual should be used in conjunction with these installation instructions. Refer to the parts list to ensure that all necessary components and hardware has been included. If any parts are missing please contact your local TeraFlex dealer for assistance. A wheel spacer on the factory wheels, or an after market wheel with a back spacing of 4.5” or greater, will need to be used in order to clear the rear sway bar with the new links installed.

Tools needed:
- This installation guide
- Basic Mechanic Tool Set
JK 2.5” Lift Springs Kit

JK 2 Door Springs | |||
Item Number | Part Number | Description | Quantity |
| 1 | 1853050 | JK 2 Door2.5" Front Springs | 2 |
| 2 | 1854050 | JK 2 Door 2.5" Rear Springs | 2 |
JK 4 Door Springs | |||
Item Number | Part Number | Description | Quantity |
| 1 | 1853100 | JK 4 Door2.5" Front Springs | 2 |
| 2 | 1854100 | JK 4 Door2.5" Rear Springs | 2 |
JK Brake Line Extension Bracket Kit

Brake Line Extension Brackets Parts List-Kit #4304400 | |||
Item Number | Part Number | Description | Quantity |
1 | 600276 | JK Rear BrakeLine Extension Bracket | 2 |
2 | 77 | Bolt 1/4"-28 x 3/4" Hex Head | 2 |
3 | 76 | Nut 1/4"-28 NylockZinc | 2 |
4 | 458 | Washer 1/4" Flat Zinc | 4 |
JK Rear Springs Retainer Kit

Parts List- Kit #1744014 | |||
Item Number | Part Number | Description | Quantity |
1 | 98 | Bolt 3/8"-16 x 1"Hex Head Zinc | 2 |
2 | 85 | Nut 3/8"-16 Flanged Serrated | 2 |
3 | 123 | Washer 3/8" Lock Washer | 2 |
4 | 600271 | Spring Retainer Wrench Tool | 1 |
5 | 600270 | Lower Coil Retainer | 2 |
JK 3”-4” Rear Swivel Stud Swaybar Link Kit

Parts List | |||
Item # | Part # | Description | Quantity |
1 | 37 | Washer 1/2" Flat Zinc Plated | 4 |
2 | 754500 | Swaybar Link Rear12.25" w/ SwivelStud and Nylock Nut | 2 |
JK Bumpstop Extensions Kit
#1953800 Front Upper 2.75” Tall

Front Bumpstops Parts Kit# 1953800 | ||
Part Number | Description | Quantity |
953800 | JK Front Upper Bumpstop Extension 2.75" | 2 |
Rear Bumpstops Parts List- Kit #1954700 | |||
Item Number | Part Number | Description | Quantity |
| 1 | 954700 | JK Rear Lower Bumpstop 2.75" Tall | 2 |
| 2 | 153 | Bolt 5/16-18x1.25" HexHead | 4 |
| 3 | 38 | Washer 5/16" Flat | 8 |
| 4 | 632 | Nut 5/16"-18 StoverLocknut | 4 |
#1954700 Lower 2.75” Tall

JK 2.5" Rear Track Bar Axle Bracket Kit
Kit #1954776 for 2.5”lift

Track Bar Bracket PartsList | |||
Item Number | Part Number | Description | Quantity |
1 | 954776 | JK RearTrack Bar Bracket2.5" | 1 |
2 | 97732 | U-Bolt, Bracket | 1 |
3 | 600513 | Spacer Sleeve1" OD x .5" ID x 1.62" Wide | 1 |
4 | 214 | Nut 1/2"-13 StoverLocknut | 1 |
5 | 215 | Nut 1/2"-20 Stover Locknut | 2 |
6 | 242 | Bolt 1/2"-13x3.5" Hex Head | 1 |
7 | 37 | Washer 1/2" Flat | 4 |
Kit #1954776 for 2.5”lift
JK Rear Track Bar Bracket
#1954202

TeraFlex Track Bar Bracket Template

Cut this template out and tape it to the outside of the factory bracket. The tape will ensure that the template does not move while you center punch the top hole for the new TeraFlex track bar drop bracket.
JK Front and Rear Shock Extension Kit
#1553800

#1554800

Description
This lift kit is engineered with precision to ensure that your Jeep Wrangler JK maintains its legendary off-road capabilities while offering a smooth ride on paved roads. The high-strength coil springs are tuned to provide the perfect balance between lift height and ride quality. Additionally, the kit includes track bar brackets that help maintain proper axle alignment, ensuring that your Jeep tracks straight even with the increased lift.
The sway bar links are designed to maintain the factory sway bar's functionality, ensuring stability during cornering and braking. Bump stops are also included to prevent over-compression of the springs and shocks, protecting your suspension components from damage.
FRONT REMOVAL
- Refer to the factory service manual for lift locations. Raise and support the vehicle at the frame. Remove the tires and wheels and support the axle with a jack or jack stands.
- Loosen all front control arm bolts with a 21mm.
DO NOT REMOVE ARMS OR BOLTS.
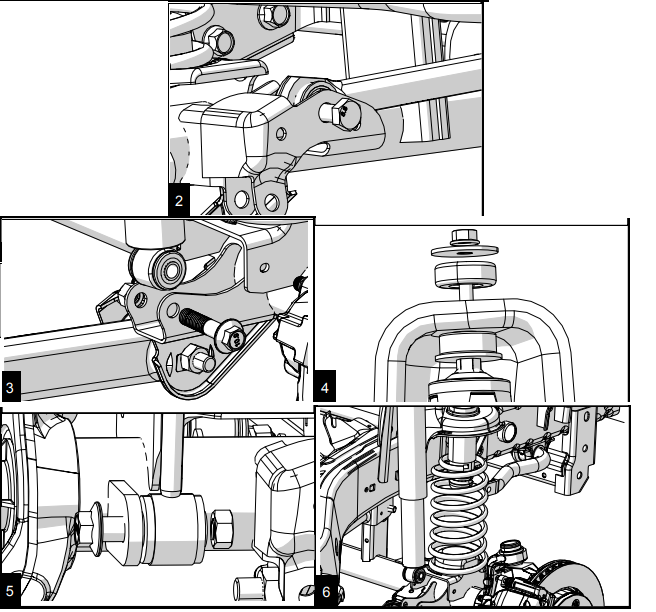
Remove the shocks at the axle with an 18mm wrench and socket.
Remove the track bar at the axle with a 21mm. The nut is a flag nut. - If NOT Installing New Shocks or Extensions SKIP this Step With 16mm wrenches remove the upper nut, retainer and grommet from the top of the shock. On 2012+ Wranglers, the battery box interferes with access to the upper shock. Simply break away a section of the thin plastic to gain access.
- Remove the sway bar links with an 18mm wrench and socket at the axle. If replacing the links, see Instructions 999027 JK Front sway bar quick disconnects.
Lower the jack until the spring is free. Remove the coil spring. Be sure to watch the ABS, brake lines and breathers that they are not over stretched..
- FRONT BUMP STOP EXTENSION INSTALL
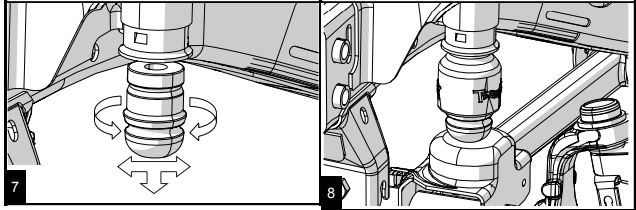
Remove the factory bumpstop from the jounce tube by working it back and forth while twisting and pulling down. Reinstall the bumpstop by aligning the bumpstop, extension, and jounce tube. Use the hydraulic jack and raise the axle until they are seated together. A grease coating will help.
FRONT INSTALLATION
Install both coil springs, drivers side first followed by the pas-senger side. Rotate the spring until they are fully seated in the lower spring brackets groove.
- If replacing the shocks do so now, see instructions 999160 JK Shock Installation.
Raise the jack high enough to install the shock bolts. Torque to 56 ft-lbs (76 Nm). - For kits with Shock Extension Brackets. Remove upper bushings from shock. Apply thread locker to stem and thread on extension. Insert supplied washer and one of the shock bushing onto extension. Install stem through the shock mount bracket. Put another shock bushing on stem, oriented as shown, followed by another washer then the nut. Torque to 20 ft-lbs or until the bushings compress about 1/8”.
Reinstall the sway bar links or install new links if supplied. Torque top and bottom to 75 ft-lbs.

- Reinstall wheels and tires. Torque lug nuts to 95-115 ftlbs.
Once the vehicle is on the ground, torque the upper control arm bolts to 75 ft-lbs and the lower control arm bolts to 125 ft-lbs Reinstall the front track bar and torque the Track Bar bolt to 125 ft-lbs.
REAR REMOVAL
Remove the rear track bar at the axle with a 21mm. If your lift kit did not come with frame side track bar boost skip to step 4
- With a 21mm loosen all rear control arm bolts. DO NOT REMOVE ARMS OR BOLTS.
For frame side track bar boost remove the frame side track bar bolt with an 18mm and remove the track bar.
Remove the shocks at the axle with an 18mm wrench and socket. If replacing the shocks, see instructions 999160 JK Shock Removal and Installation. - Remove the clips that secures the ABS wiring harness to the upper control arm mount. Remove the parking brake cable bracket from the underside of the body with a 10mm deep socket and discard bracket.
- Remove the brake line mount from the frame with a 10mm.
Carefully lower the axle enough to remove the spring. Be sure to watch the ABS, brake lines and breather tubes for overextension. Remove the old spring.
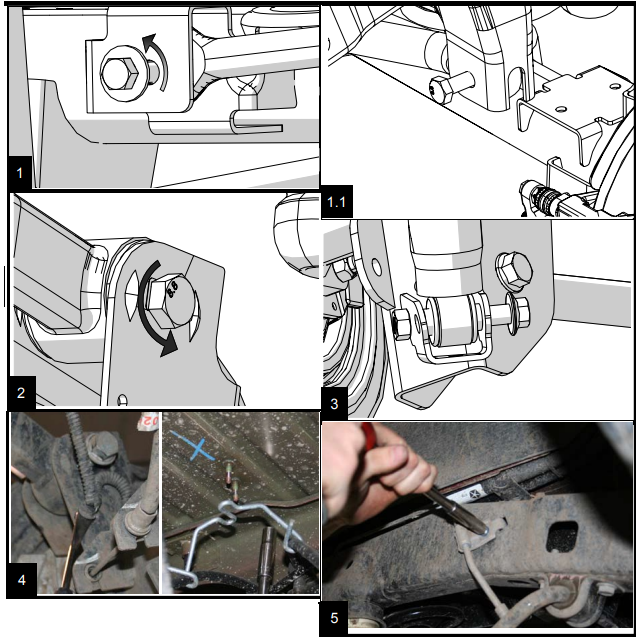
Skip to step 2 if your lift kit did not come with Extension Bracket. For the rear shock extensions finish removing the rear shocks. Apply penetrating oil. These are captured nuts and a broken bolt here is a real inconvenience. Remove the two upper bolts with a 16mm.
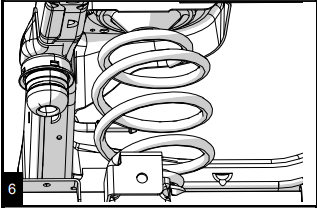
REAR INSTALLATION
Install the new springs. Make sure to reuse the factory spring isolator.
- Install the left rear shock extension. Using the supplied 5/16” bolt and nut, hold the extension bracket into place. Start one of the M10 x 90 mm long bolts and washer.
Position open end of shock bar pin onto bracket and M10 bolt that was started, then install the other M10 bolt and washer. Torque M10 bolts to 37 ft-lbs.
Tighten the 5/16” bolt.
Raise the axle high enough to reinstall the lower shock bolts. Torque to 56 ft-lbs. Torque to 16 ft-lbs.
If your kit came with Shock Extensions see step 4 and - Place the retainer on the lower spring pad.
Torque the bolts to 30 ft-lbs (41 Nm)
If your kit did not come with a frame side tack bar boost skip to page 15
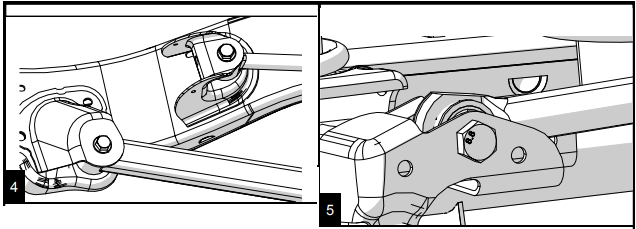
Install the 3/8” bolt and lock washer through the spring retainer and spring pad. Place a nut into the provided tool. Slide the tool underneath the spring pad from the front of the axle and thread the bolt into the nut.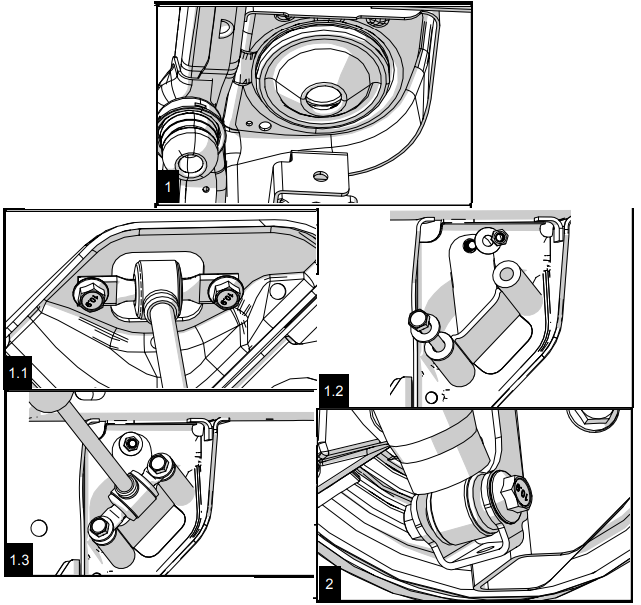
- Frame side track bar boosts install: Cut out the provided template and wrap it around the track bar bracket. Index the factory holes with the template holes then mark and drill the indicated 3/8” hole.
- Install the bracket with the provided hardware as shown. Be sure to place the sleeve in the factory bracket to avoid crushing.
Torque the 9/16” bolt to 125 ft-lbs and the 3/8” bolt to 45 ft-lbs.
Position the TeraFlex bracket so it installs over the factory bracket and lines up with the lower control arm bolt. Reinstall the control arm bolt finger tight.
Use the provided sleeve as a spacer and install the
1/2”x3.5” bracket bolt with washers on either side and a locknut. Torque to 75 ft-lbs.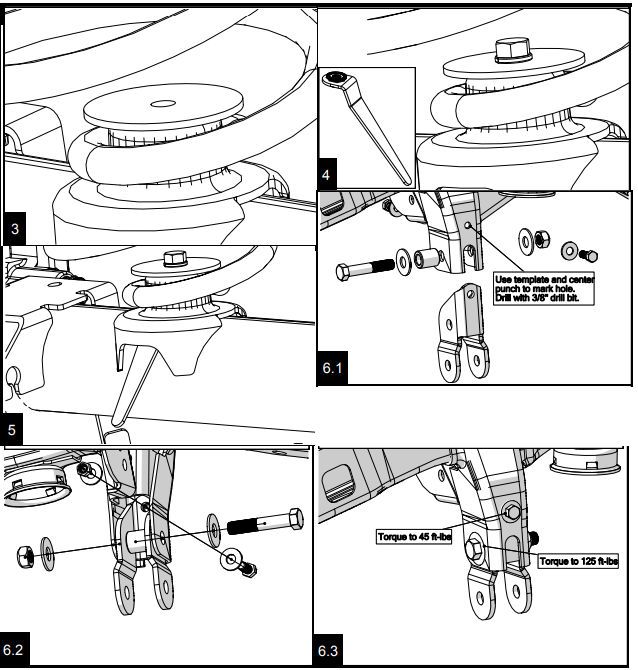
- Install the U-bolt around the axle and into the bracket. Torque the nuts to 45 ft-lbs.
- Reinstall lower control arm bolts but do not tighten. Reinstallation of the track bar will be done once the Jeep is back on the ground.
- Using the 18mm socket and wrench, remove the bolt holding the factory sway bar link to the axle bracket.
- Using a 19mm wrench to hold the stud from turning and an 18mm to remove the nut, remove the link form the sway bar. Repeat steps 2 and 3 on other side.
With both factory links removed, install the swivel end of the link into the sway bar from the outside. Install the new lock nut using the 19mm end wrench and a 6mm allen wrench. Torque to 66 ft-lbs
Reinstall the factory hardware as well as two provided washers on the lower end of the link. Place the washers on either side of the bushing. Torque to 75 ft-lbs.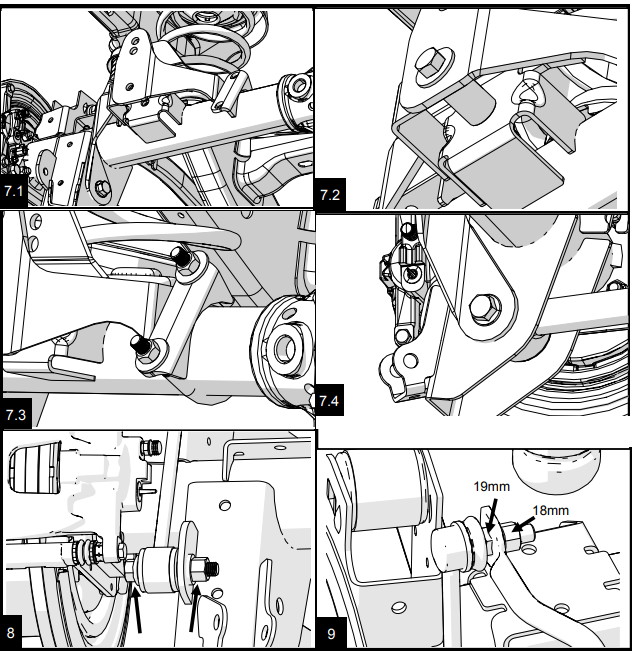
- Install the bracket to the frame using the factory bolt. Note orientation with the bend inwards.
Torque to 48 in-lbs (5.4 Nm) - Using a 7/16” wrench and the supplied hardware, bolt the brake line to the bracket with a washer on both sides. Torque bolt to 120 in-lbs. (13 Nm). Press the hard brake line against the frame to avoid contact with the sway bar links as the suspension cycles.
Straighten the factory hard brake line, a touch, to allow for less tension with suspension droops.
REAR BUMP STOPS
- Align the extension on the factory pad with the “shelf” towards the front of the vehicle. Install the provided bolts with washers into the two holes. Torque to 25 ft-lbs.
- Reinstall wheels and tires, torque to 95-115 ft-lbs. Lower to the ground. Torque all upper control arm bolts to 75 ft-lbs and all lower control arms to 125 ft-lbs.
For Axle Side Track Bar Boost: Reinstall the rear track bar using the upper hole and factory hardware. Have someone push on the body to help align the bolt holes.
Torque to 125 ft-lbs.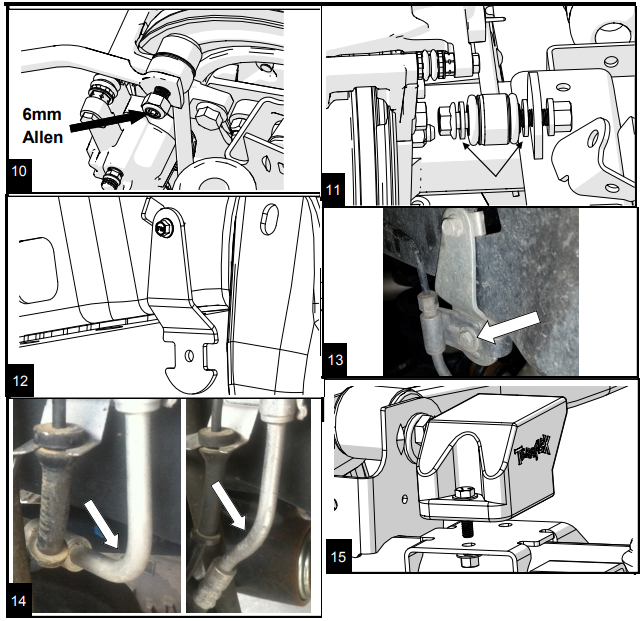
- Reinstall the rear track bar at the axle. Have someone push on the body to help align the bolt holes. Torque to 125 ft-lbs.
Check torque for all bolts and nuts.
Re-torque all bolts and nuts after the first 100 miles
To straighten the steering wheel, loosen the adjuster sleeve on the drag link with a 15mm. Make a mark across the sleeve and threads to indicate the original position. Looking from the drivers side, rotate the adjuster sleeve counter clockwise 3/4 of a turn. This should be pretty close. Every vehicle is different, test drive yours and adjust as needed. Torque the pinch clamp bolts to 45 ft-lbs.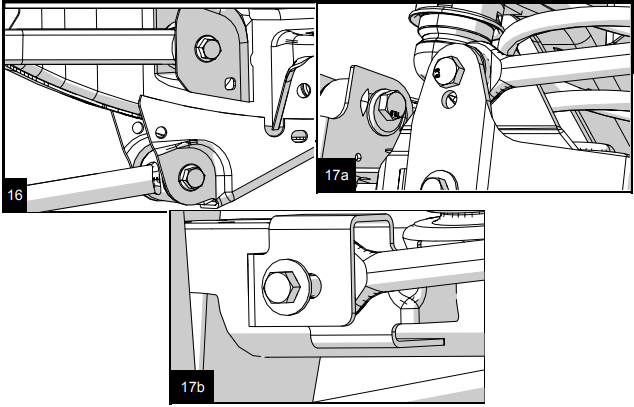
Setup Guide
- Installing the Teraflex JK 2 And 4 Door 2.5" Lift Kit requires some mechanical aptitude but can be done at home with the right tools. Here’s a brief overview of the process:
- Begin by raising your Jeep on jack stands and removing the wheels.
- Disconnect the sway bar links and track bars to allow for coil spring removal.
- Install the new coil springs, ensuring they are properly seated.
- Reconnect the track bar brackets and sway bar links according to the manufacturer’s instructions.
- Lower the vehicle and adjust the track bar as necessary for proper alignment.
MAINTENANCE INFORMATION
It is the buyer’s responsibility to have all suspension, drivetrain, steering, and other components checked for proper tightness and torque after the first 100 miles and every 3000 miles after that.
NOTICE TO INSTALLER
The enclosed “Warning to Driver” sticker must be installed in the vehicle in driver’s view. This sticker is to act as a constant safety reminder when operating the vehicle. It is your responsibility as the equipment installer to install the provided sticker and to forward the product instructions to the vehicle’s owner for review. If a “Warning to Driver” sticker or product installation guide were not included in the kit, FREE replacement stickers and instructions are available by request. It is the installer’s duty to ensure a safe and controllable vehicle after the modifications have been performed.
WARNING: Neither the seller nor the manufacturer will be liable for any loss, damage, or injury directly or indirectly arising from the use of or inability to determine the use of these products. Before using, the user shall determine the suitability of the products for its intended use, and the user shall assume all responsibility and risk in connection there with.
WARNING TO DRIVER
This vehicle has been modified to enhance off road performance and has unique handling characteristics. Use in harsh environments can cause extreme stress on the components. Vehicle should be inspected after being off-road to make sure that all the components are in working order and safe to travel on the highway. All fasteners should be checked so that they are at the correct torque specifications as the vibration and stresses from off-roading may cause critical fasteners to work loose. Extra care should be taken to inspect the critical components, steering, and brake systems.
Troubleshooting
Common issues encountered during or after installation include misaligned axles or uneven ride heights. Here are some solutions:
- Check if all bolts are tightened securely according to torque specifications.
- Ensure proper alignment by measuring from center hub to center hub on both axles.
- If ride height is uneven, recheck coil spring installation or consider adding shims.
Always follow safety guidelines when working under the vehicle, and consider consulting a professional if you are unsure about any part of the process.
Warranty
All TeraLow products are covered by the TeraFlex two (2) year warranty to be free of defects in material and workmanship for two years from date purchased. TeraFlex axles are covered by a 12-month warranty to be free of defects in materials and workmanship
Pros & Cons
Pros
- Enhanced off-road capability with increased ground clearance.
- High-quality components ensure durability and reliability.
- Smooth on-road ride despite increased lift height.
- Easy to install with clear instructions provided by Teraflex.
Cons
- Higher cost compared to some other lift kits on the market.
- May require additional adjustments or components for optimal performance.
- Some users report minor vibrations at high speeds due to altered suspension geometry.
Customer Reviews
Customers generally praise the Teraflex JK 2 And 4 Door 2.5" Lift Kit for its robust construction and noticeable improvement in off-road performance. However, a few users have noted that it may take some trial and error to achieve perfect alignment post-installation.
"The Teraflex lift kit has transformed my JK's capabilities The installation was straightforward, but I did need to tweak the alignment afterward," said one satisfied customer.
Faqs
What is the primary purpose of the Teraflex JK 2 And 4 Door 2.5" Lift Kit?
What are the key components included in this lift kit?
Is this lift kit suitable for both 2-door and 4-door Jeep Wranglers?
How difficult is the installation process?
What common issues might I encounter during or after installation?
Are there any specific safety precautions I should take during installation?
Can I use larger tires with this lift kit?
What kind of warranty does Teraflex offer for this product?
Are there any customer reviews or feedback available for this product?
Leave a Comment