Timex Audio Dual Alarm Clock USB Charging T129 User Guide
Content
Introducing the Timex Audio Dual Alarm T129
The Timex Audio Dual Alarm Clock USB Charging T129 is a multifunctional alarm clock designed to enhance your sleep routine and keep your devices charged. Featuring dual alarms, it allows you to set different wake-up times for weekdays and weekends, while the programmable snooze and nap timers offer added convenience. With two USB charging ports, you can easily power your smartphone and tablet simultaneously. The clock is priced at approximately $34.99, making it an affordable addition to any bedroom.
What’s in the Box
This product ships with the following items. Make sure all are present.
- T129 Alarm Clock
- AC adaptor
Instruction book

Controls Overview
Top Panel

Rear Panel

Front Panel

Bottom Panel

Timex Audio Specifications
- Dual alarm settings for two separate wake-up times
- USB charging port for charging smartphones, tablets, and other devices
- Clear LCD display with backlight for easy reading in low light
- Snooze function for temporary alarm silencing
- Battery backup to maintain time and alarm settings during power outages
- Compact and sleek design to fit any room decor
- User-friendly interface for easy setup and operation
Product Care
- Place the unit on a level surface away from sources of direct sunlight or excessive heat.
- Protect your furniture when placing your unit on a natural wood and lacquered finish. A cloth or other protective material should be placed between it and the furniture.
- Clean your unit with a soft cloth moistened only with mild soap and water. Stronger cleaning agents, such as Benzene, thinner or similar materials can damage the surface of the unit.
Clock USB Charging T129 Display

Description
The Timex Audio Dual Alarm Clock USB Charging T129 boasts a modern design that combines functionality with aesthetics. The clear LCD display ensures that the time is always visible, even in dimly lit rooms, thanks to its backlight feature. The dual alarm function allows for flexibility in setting wake-up times, making it ideal for shared use or for those who need multiple reminders throughout the day.
The built-in USB charging port is a significant convenience, eliminating the need for additional charging adapters and keeping your bedside table clutter-free. The device also features a snooze function, allowing you to temporarily silence the alarm without turning it off completely. With its battery backup, you can rest assured that your time and alarm settings will be preserved even during power outages.
Timex Audio Set-Up
Connecting to Power Source
Connect the AC adaptor to the DC jack located on back of the unit. Connect plug into a working wall outlet that is not controlled by a wall switch. The unit does not operate on batteries (the battery back up system maintains clock settings during power failures).

Redi-SET
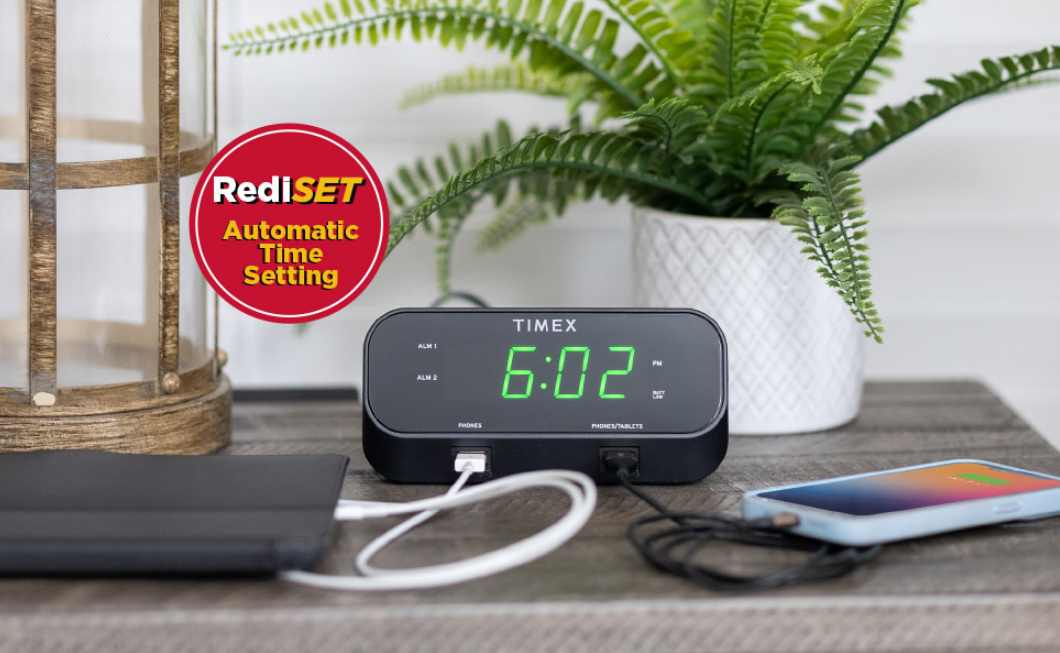
This unit has a Redi-SETclock feature. When connected to power, the display will show the current time. By default, the unit is set to Eastern time. If the time displayed is not correct, you may need to adjust the Time Zone and/or the clock.
Adjusting the Time Zone
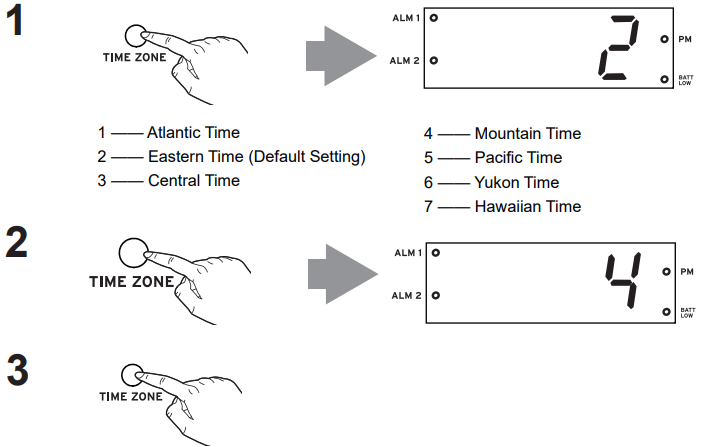
- If you are NOT in the Eastern time zone, press the Time Zone Button located on back of the unit. “2” will appear in the display.
NOTE: The PM indicator will light when the hour is set for PM. There is no AM indicator. - Find the number that matches your time zone above.
Keep pressing the Time Zone Button until the desired zone is reached, then release the button. Once you select a time zone, the number will appear on the display for 5 seconds before the display reverts back to the current time at your location.
Setting the Alarm Clock
- This unit features Redi-SET and should display the correct time when first connected to power. If the time is not correct, follow these steps to set the clock manually.
- For quick adjustment for Daylight Saving Time, slide the DST Switch on the back of the unit to +1 to add an hour. For Standard Time slide switch to -1 to subtract an hour.
- Press and hold the Time Set Button until the time flashes on the display.
Press and release the Minus or Plus Button as needed to adjust the clock to the correct time (hold for faster setting).
NOTE: The PM indicator will light when the time is set for PM. There is no AM indicator.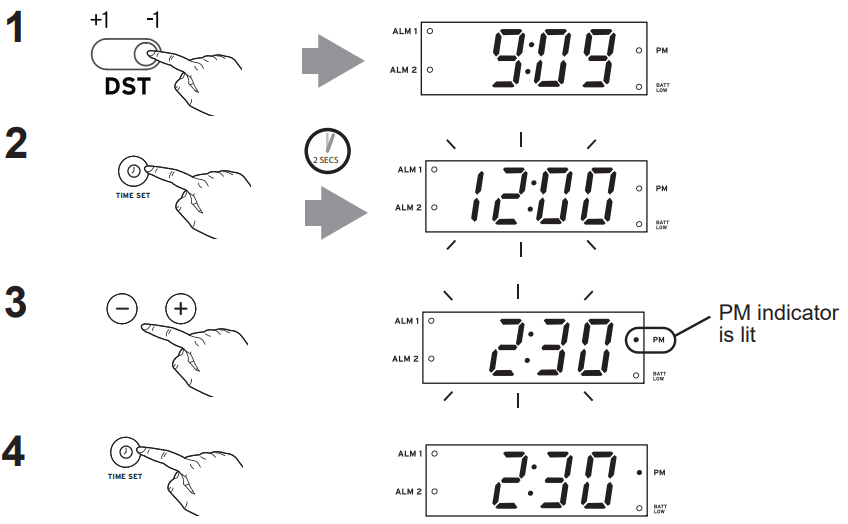
Setting and Using Alarms
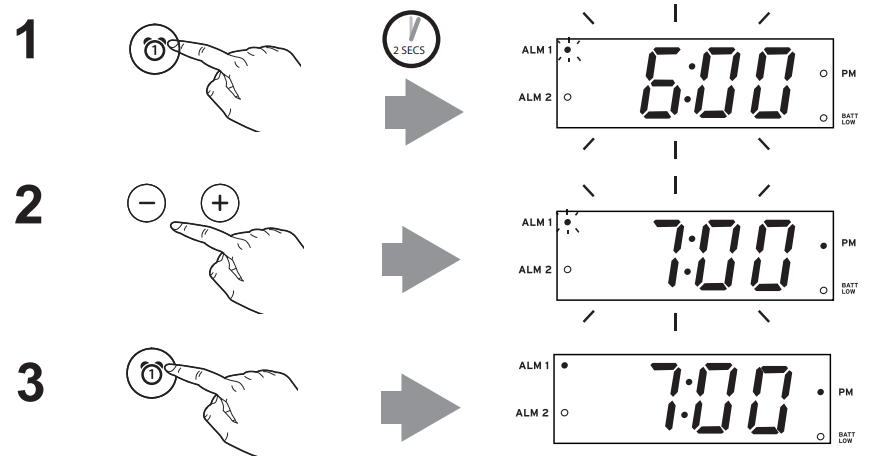
This unit has two independent alarms, Alarm 1 and Alarm 2. Each is set and operates in the same way. Instructions below show Alarm 1. Follow the same method to set Alarm 2.
- Press and hold the Alarm 1 Button until current alarm time flashes on the display.
- Press and release the Minus or Plus Button to adjust the desired alarm time.
NOTE: The PM indicator will light when the hour is set for PM. There is no AM indicator. Press and release the Alarm 1 Button to confirm alarm setting.
SETTING THE ALARM VOLUME
Move the Alarm Volume Switch on the back of the unit to Loud for sound sleepers or to Soft for lighter sleepers.

RESETTING AN ALARM TO COME ON THE NEXT DAY
To silence any sounding alarm and reset it come on the next day at the same time, press and release the Nap/Alarm Reset Button. Note: If you press either Alarm 1 Button or Alarm 2 Button, you will disable current alarm setting and alarm will not sound the next day.

SNOOZE
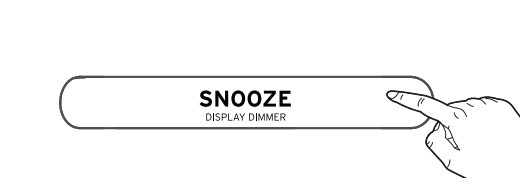
Press and release the Snooze/Dimmer Button when the alarm sounds to silence it for 9 minutes. Snooze can be used several times during alarm.
ADJUSTING SNOOZE TIME
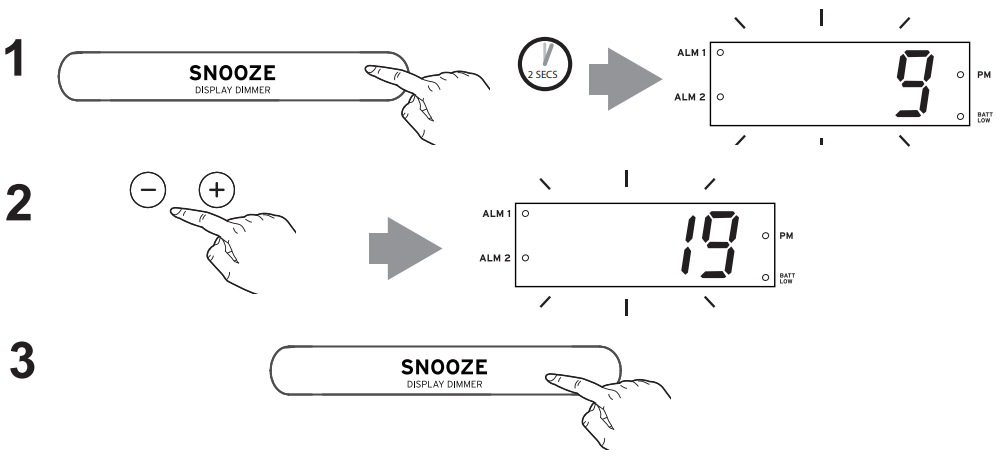
- Press and hold the Snooze/Dimmer Button during normal operation (no alarm is sounding). Current snooze duration will flash on the display.
- Press and release the Minus or Plus Button to adjust the desired snooze duration time from 1 to 29 minutes.
Press and release the Snooze/Dimmer Button to confirm snooze duration setting.
Nap Mode
Nap mode allows you to set the alarm to sound after a selected time interval.

Press and release the Nap/Alarm Reset Button to select the desired nap interval: 5, 10, 15, 30, 45, 60, 90 minutes or OFF.
(Note: OFF cancels nap alarm.) When nap alarm sounds, press the Nap/Alarm Reset Button to turn it off.
Dimmer
Press the Snooze/Dimmer Button during normal operation (alarm is not sounding) to toggle display brightness between high, medium and low settings. Dimmer cannot be adjusted when alarm is sounding.

Charging Devices Using the USB Ports

Connect a USB cable (not included) to the 1 Amp Phone USB Charging Port on the left front of the unit and connect the other end to the phone you wish to charge. For faster charging or to charge tablets, connect cable to the 2.1 Amp Phone/Tablet USB Charging Port on the right front. Unit must be connected to AC to charge devices via USB: it will not charge when operating on backup batteries.
Battery Cautions and Tips
- Only use the recommended/supplied batteries or equivalent.
- Use alkaline batteries for longer life.
- Do not mix old and new batteries, and do not mix alkaline, carbon-zinc or rechargeable nickel-cadmium batteries.
- Insert batteries with proper polarity (+/–) as indicated.
- Remove exhausted batteries from product.
- Recharge rechargeable batteries under adult supervision.
- Do not attempt to recharge non-rechargeable batteries.
- Do not open batteries or heat them beyond normal ambient temperatures.
- To prevent battery leakage or damage remove batteries from a product if it will not be used for a month or longer.
- Use extreme caution handling leaking batteries (avoid direct contact with eyes and skin). If battery leakage comes in contact with eyes, IMMEDIATELY flush the eye with lukewarm and gently flowing water for at least 30 minutes. If skin contact occurs, wash skin with clear water for at least 15 minutes. Seek medical attention if any symptoms occur.
- Store in cool, dry, ventilated area away from hazardous or combustible material.
- Do not dispose of batteries in the household trash or fire.
- Follow applicable laws and local regulations for the disposal and transportation of batteries.
Installing and Replacing Backup Batteries
Your new Timex Clock Radio includes 2 AA batteries (installed). This battery backup system will maintain the time and alarm settings during a temporary power interruption. When the Battery Low Indicator on the bottom right of the display is lit, it’s time to replace the batteries.

- Keep unit connected to AC power when changing batteries to avoid losing your settings.
- Insert the end of a paperclip or similar into the Door Release port next to the battery door.
- Slide the battery door to open and remove the battery door.
- Install 2 fresh “AA”batteries. Check and match the correct polarity (+/ - ) markings in the battery compartment.
- Replace the battery door.
NOTE: With batteries installed, the display will turn off during a power failure but the clock will continue to run and maintain your alarm settings and the alarm will sound.
IMPORTANT SAFETY INSTRUCTIONS
When used in the directed manner, this unit has been designed and manufactured to ensure your personal safety. However, improper use can result in potential electrical shock or fire hazards. Please read all safety and operating instructions carefully before installation and use, and keep these instructions handy for future reference. Take special note of all warnings listed in these instructions and on the unit.
- Water and Moisture – The unit should not be used near water. For example: near a bathtub, washbowl, kitchen sink, laundry tub, swimming pool or in a wet basement.
- Ventilation – The unit should be situated so that its location or position does not interfere with its proper ventilation. For example, it should not be situated on a bed, sofa, rug or similar surface that may block ventilation openings. Also, it should not be placed in a built-in installation, such as a bookcase or cabinet, which may impede the flow of air through the ventilation openings.
- Heat – The unit should be situated away from heat sources such as radiators, heat registers, stoves or other appliances (including amplifiers) that produce heat.
- Power Sources – The unit should be connected to a power supply only of the type described in the operating instructions or as marked on the appliance.
- Power-Cable Protection – Power supply cables should be routed so that they are not likely to be walked on or pinched by items placed upon or against them. It is always best to have a clear area from where the cable exits the unit to where it is plugged into an AC socket.
- Cleaning – The unit should be cleaned only as recommended. See the Maintenance section of this manual for cleaning instructions.
- Objects and Liquid Entry – Care should be taken so that objects do not fall and liquids are not spilled into any openings or vents located on the product.
- Attachments – Do not use attachments not recommended by the product manufacturer.
- Lightning and Power Surge Protection – Unplug the unit from the wall socket and disconnect the antenna or cable system during a lightning storm or when it is left unattended and unused for long periods of time. This will prevent damage to the product due to lightning and power-line surges.
- Overloading – Do not overload wall sockets, extension cords, or integral convenience receptacles as this can result in a risk of fire or electric shock.
- Damage Requiring Service – The unit should be serviced by qualified service personnel when:
- the power supply cable or plug has been damaged.
- objects have fallen into or liquid has been spilled into the enclosure.
- the unit has been exposed to rain.
- the unit has been dropped or the enclosure damaged.
- the unit exhibits a marked change in performance or does not operate normally.
- Antenna – Do not connect an external antenna to the unit (other than that provided).
- Periods of Nonuse – If the unit is to be left unused for an extended period of time, such as a month or longer, the power cable should be unplugged from the unit to prevent damage or corrosion.
- Servicing – The user should not attempt to service the unit beyond those methods described in the user’s operating instructions. Service methods not covered in the operating instructions should be referred to qualified service personnel.
Alarm Clock Charging Troubleshooting
- The unit does not power ON.
The unit is not connected to AC outlet, the AC outlet has no power, or is controlled by a wall switch that is “OFF”. Check AC outlet and wall switch. - Alarm does not come on?
The alarm time AM or PM incorrectly set, Alarm was OFF, etc. Check alarm settings. - Low battery indicator is on.
Batteries have not been installed correctly in the battery compartment or the batteries may be weak or exhausted. Try replacing batteries. - USB port not charging devices.
Unit is operating on backup batteries or not properly connected to AC. Make sure unit is powered by working AC. Device requires higher than 1 Amp USB charge. Check device’s charging requirements and/or connect to Phone/Tablet 2.1 Amp USB port on unit. - Unit shuts “Off” unexpectedly.
The unit was turned ON by an alarm and the alarm time ended, AC outlet unit is connected to is controlled by a wall switch that is turned OFF. Check mode on unit. Check wall switch. Turn unit on with Power Button. - Unit doesn’t respond (locked up or frozen).
The unit may need to be reset. To do so, insert a paperclip or similar into the Reset port located on the bottom of the unit. You will need to reset the clock, radio and any other settings.
90 Days Warranty Information
Timex Audio Products, a division of SDI Technologies Inc. (hereafter referred to as SDI), warrants this product to be free from defects in workmanship and materials, under normal use and conditions, for a period of ninety (90) days from the date of original purchase.
Pros & Cons
Pros:
- Dual alarm feature for flexibility in setting wake-up times
- Convenient USB charging port for devices
- Clear LCD display with backlight for easy reading
- Snooze function for temporary alarm silencing
- Battery backup to maintain settings during power outages
- Compact and sleek design fitting any room decor
- User-friendly interface for easy setup and operation
Cons:
- No radio or music playback features
- No smart home integration capabilities
- Some users may find the display too bright in dark rooms
- Limited customization options for alarm tones and volumes
Customer Reviews
Customers have generally praised the Timex Audio Dual Alarm Clock USB Charging T129 for its reliability, ease of use, and practical features. Many users appreciate the dual alarm function and the convenient USB charging port. However, some have noted that the display can be too bright in dark rooms and that there are limited customization options for alarm tones and volumes.
Faqs
What is the primary benefit of the dual alarm feature on the Timex Audio Dual Alarm Clock USB Charging T129?
How do I set the time on the Timex Audio T129?
Can I charge multiple devices simultaneously using the USB port?
What happens to my alarm settings during a power outage?
Is the display adjustable for brightness?
Can I customize the alarm tones and volumes on the Timex Audio Dual Alarm?
How do I use the snooze function?
Leave a Comment
